Capture meter readings on the phone, followed by recognition
Introduction
It so happened that I live in a cottage village where there is no central heating, which means that everyone heats his apartment on his own. Most often for these purposes gas boilers are used, the method is quite cheap, there is nothing to complain about, but there is one subtlety. For the gas boiler to work correctly (suddenly) it is necessary to have gas in the pipe.
Probably, not all boilers behave this way, but ours turns off even in case of a brief interruption in the gas supply and does not turn on again if the supply is restored. If someone is at home, then this is not a problem, I pressed the button and the boiler heats further, but if it so happened that we decided to go on vacation with the whole family, and it was winter outside, good to -20 ° C, then the consequences can be deplorable.
The solution is simple - leave the keys to relatives / friends / neighbors so that they can come and turn on the boiler, if some trouble happens. Well, if there is a neighbor who will come every day and check whether everything is in order. And if not? Or will he also decide to go somewhere for the weekend?
')
So, I decided to adjust the reading of the meter somewhere on the Internet, so that I could periodically check whether gas is being spent somewhere on a long trip, and if I suddenly stop wasting, then I urgently call relatives / friends / neighbors (or whoever I’m left the keys) to come and press the button.
Of course, after simply putting testimony on the Internet, I decided not to stop there and fouled up the recognition of indications and graphical representation, read about it in Part 2 of this topic.
Part 1. Taking readings from the meter and putting them on the Internet
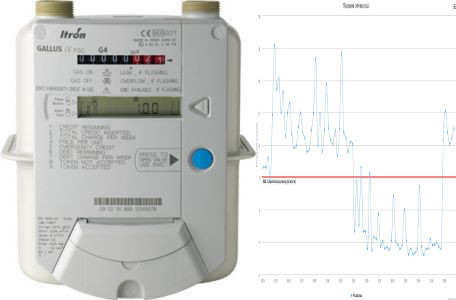
Here it is necessary to make a reservation that the counters are completely different in nature, some of them have special buses and interfaces for automated reading. If you have one, then you probably can not read further. But I have the most common without such interfaces (at least, I did not find, maybe I looked badly), the GALLUS iV PSC model. Therefore, there remains one option - a visual removal of evidence. The network offers ready-made solutions, but they cost a lot of money, and most importantly, it is not at all sporty, so we will do everything ourselves.
What do we need?
To take readings from the meter and then send these readings to the Internet, we need any unnecessary android smartphone. For example, I used the Samsung Galaxy S III (SCH-I535) for this purpose. Yes, probably, not every reader has a third Galaxy lying around, but you need to understand that the requirements for a smartphone are not so great:
- it should load
- the camera should work
- WiFi should work
That's all, the presence of a working screen, touch screen, microphone, speaker, etc. absolutely not required. This fact significantly reduces the cost.
Having a hobby of buying various broken phones on ebay and collecting working ones, I easily found in my storeroom a sgs3 motherboard with a dead microphone (~ $ 10), as well as a used camera (~ $ 10) and a Chinese battery (~ 300r) Also for the convenience of attaching the battery to the board used a frame with a broken display.

At first I thought to do only the motherboard and the camera, but it turned out that even when connected to charging, the board does not turn on without a battery, so I had to add a frame and a battery. But even in this case, the budget turned out to be about $ 30; if you use sgs3 devices simpler, then you can keep within a smaller amount.
True, such a solution has its drawbacks, a smartphone without a display and a touchscreen is not so convenient to configure, so I’ll tell you a little about how this problem had to be solved.
Setup of the device
We will proceed from the worst case scenario. Suppose that there is no display or touchscreen, there is no root on the smartphone, adb debugging is disabled, and the firmware is unknown.
Resuscitation
Attention! Further instructions are suitable for the device Samsung Galaxy S III (SCH-I535), if you have another smartphone, then the actions may differ.
It is assumed that you are familiar with such concepts as adb, firmware, etc.
To bring the smartphone into a more or less known state, for starters, we will flash the stock firmware VRBMB1 from here using Odin . I will not describe in detail how this is done, the Internet is full of instructions on how to use Odin. Odin in our case is good because it is easy to work with it without using the smartphone screen, you only need to turn on the smartphone in boot mode (Vol Down + Home + Power - hold for a few seconds, then Vol Up, connect usb to Windows and that's all. Odin-a).
After Odin flush the drain, the phone will boot the system, disconnect it from the usb and remove the battery so that it turns off. This operation must be done every time after completing the Odin firmware, in order to start the next operation from the off state.
Next, we sew CWM recovery and root according to the instructions . In short, as follows:
- Through Odin, we flash the custom VR bootbain VRALEC.bootchain.tar.md5
- Through Odin we flash CWM recovery
- Through CWM recovery, we flash SuperSU_Bootloader_FIXED.zip . The manual says that zip should be thrown onto an sd card, but due to the lack of a screen, it is easier to do this through sideload:
Turn on the body holding Vol Up + Home + Power - hold for a few seconds, then another 5 seconds loading, we get into the CWM-recovery mode.
We check this by typingadb devicesin the console in ubuntu (the body itself must be connected via usb and adb must be installed -sudo apt-get install android-tools-adb):malefic@lepeshka:~$ adb devices List of devices attached 64cb5c59 recovery
If we see the last line, it means everything is in order, click on the Vol Down, Vol Down, Power device - go to adb sideload mode (at least in the CWM version of the instructions, this is the second line from the top), you just have to type in ubuntu console:malefic@lepeshka:~$ adb sideload SuperSU_Bootloader_FIXED.zip sending: 'sideload' 100%
and root flies to the device, after which we do not forget to turn off the device by pulling out the battery from it. - Through Odin, we are flashing the stock bootchain, corresponding to the stock firmware VRBMB1_Bootchain.tar.md5 supplied before that
Next, we need to enable usb debugging on the smartphone, for this we launch the smartphone in the CWM-recovery mode, check:
malefic@lepeshka:~$ adb devices List of devices attached 64cb5c59 recovery Mount the system:
malefic@lepeshka:~$ adb shell mount -o rw -t ext4 /dev/block/platform/msm_sdcc.1/by-name/system /system Add a line to /system/build.prop:
malefic@lepeshka:~$ adb shell "echo \"persist.service.adb.enable=1\" >> /system/build.prop" Reboot:
malefic@lepeshka:~$ adb reboot We are waiting for the download, check the adb status in the terminal:
malefic@lepeshka:~$ adb devices List of devices attached 64cb5c59 device Bingo! Debugging is enabled, let's see what we have going on there on our smartphone, to do this, we launch AndroidScreenCast using Java Web Start and see:

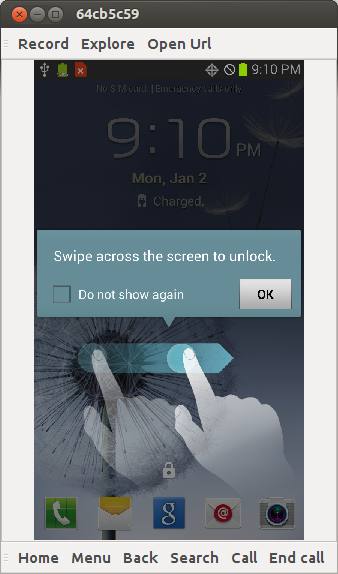
This is the Verizon SIM card activation screen, I don’t have such a SIM, so I just skip the activation, following the instructions:
on the language selection screen, we consistently touch the lower left corner (above the emergency call button), lower right corner, lower left, lower right and volume + on the screen.
Namely:
malefic@lepeshka:~$ adb shell input tap 10 1150 malefic@lepeshka:~$ adb shell input tap 710 1150 malefic@lepeshka:~$ adb shell input tap 10 1150 malefic@lepeshka:~$ adb shell input tap 710 1150 then I press the Vol Up button on the smartphone, now we see:
Put a tick and click OK:
malefic@lepeshka:~$ adb shell input tap 50 600 malefic@lepeshka:~$ adb shell input tap 650 600 
Swipe to unlock the screen:
malefic@lepeshka:~$ adb shell input swipe 100 100 500 100 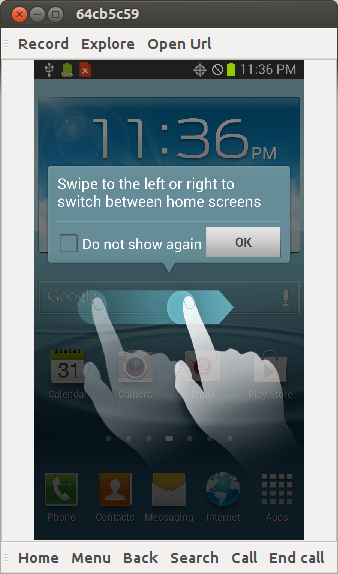
Now you need to put some vnc server for Android, for example, Android VNC Server . Install it on your smartphone:
malefic@lepeshka:~$ adb install droid+VNC+server+v1.1RC0.apk 4055 KB/s (2084419 bytes in 0.501s) pkg: /data/local/tmp/droid+VNC+server+v1.1RC0.apk Success We will wake up the smartphone, as it most likely fell asleep while we were installing the vnc server, and swipe to unlock the screen:
malefic@lepeshka:~$ adb shell input keyevent 26 malefic@lepeshka:~$ adb shell input swipe 100 100 500 100 We start the vnc server:
malefic@lepeshka:~$ adb shell am start -a android.intent.action.Main -n org.onaips.vnc/.MainActivity 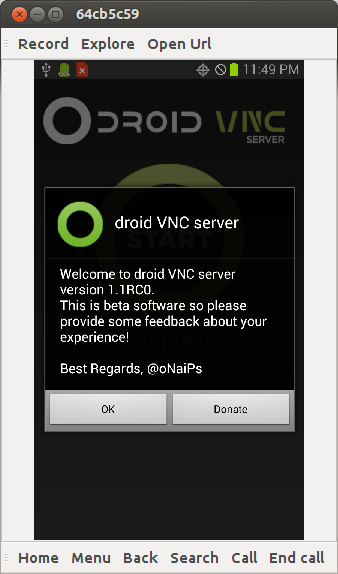
Click OK:
malefic@lepeshka:~$ adb shell input tap 50 900 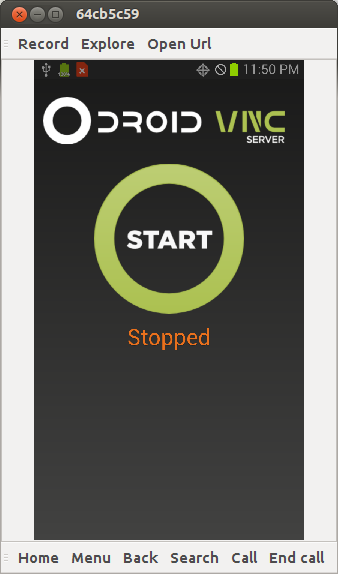
Click Start:
malefic@lepeshka:~$ adb shell input tap 350 300 
Click to provide access:
malefic@lepeshka:~$ adb shell input tap 600 1000 
Ok, now we forward ports through adb:
malefic@lepeshka:~$ adb forward tcp:5801 tcp:5801 malefic@lepeshka:~$ adb forward tcp:5901 tcp:5901 and go to the smartphone through a browser or a favorite vnc client.
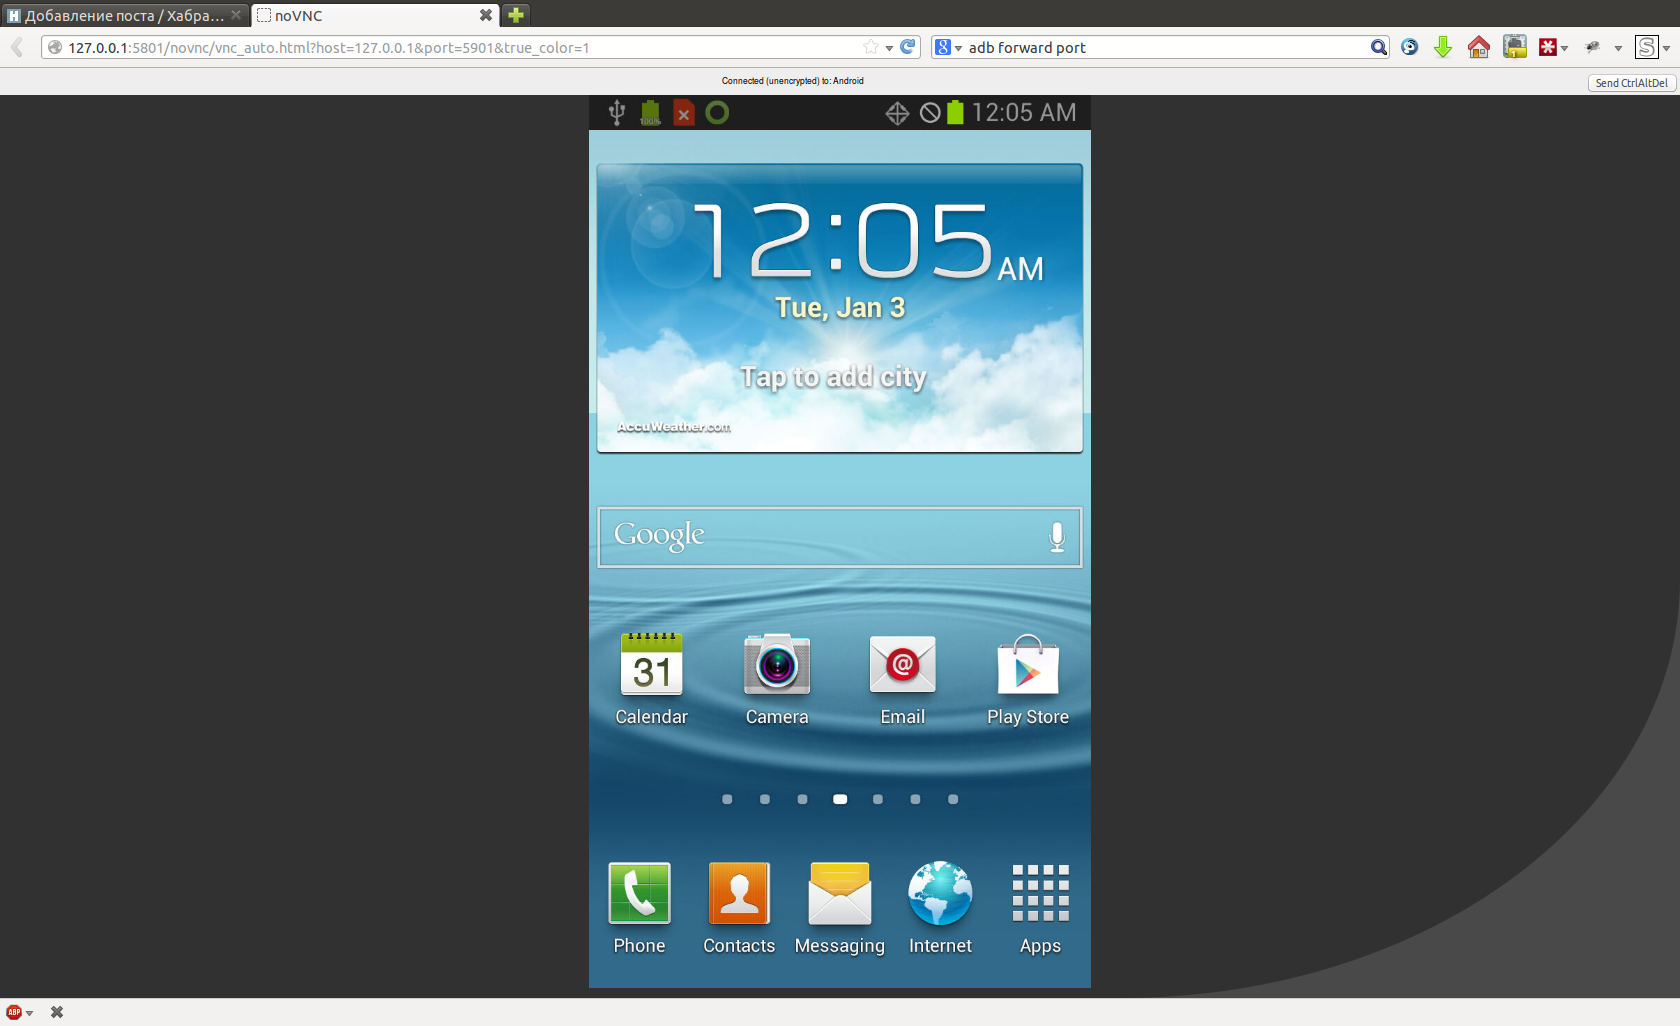
Then we work as with an ordinary Android phone, only through a computer, it is convenient to immediately set up a WiFi connection, then you can go over vnc via WiFi, and not keep the phone connected all the time to the computer (after all, the gas meter is not always located in the immediate vicinity of the computer).
Now that the interaction with the device is fully established, you can proceed to setting up photographing and publishing data on the Internet.
Periodic photography
Install the Tasker application, create a temporary profile in it from 00:00 to 23:59 every 30 minutes, perform an action - take a photo. Shooting options select the most suitable for the location of the phone and counter. I have a macro shot with a mandatory flash.
So, actually, I placed my phone (top view):

A cardboard box tied to the counter with a string, a smartphone lives in it, an egg package is there to fix the smartphone in an upright position. Then I also modified the design using scotch tape and cardboard so that the flash would not hit the dial directly, this gives serious glare that interferes with the recognition. I covered everything from above with a cover so that it was dark inside, otherwise autofocus does not always work correctly in bright ambient light.
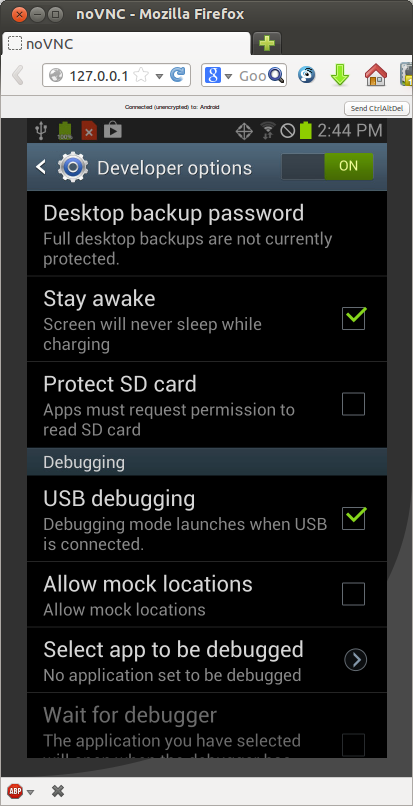
In the settings of the smartphone in the developer’s tools, it is necessary to tick the smartphone so that the smartphone doesn’t fall asleep while charging is connected, otherwise at some point it stops taking pictures and continues only if it is disturbed.
We spread on the Internet
To move the captured images of the counter to the Internet, I used the first available application - FolderSync Lite . It can synchronize a folder on a smartphone with a folder, for example, on a Google drive.
Thus, I can now, from anywhere in the world where there is Internet, go to my Google Drive and check that the gas boiler is operating normally.
Part 2. Recognition of evidence
So, after sending the meter readings to the Internet, I was interested in the possibility of automatic recognition of readings. This will allow:
- perform a statistical analysis of gas consumption
- automatically track gas interruptions (with the possibility of a warning by e-mail or sms)
Python was chosen as the development language, the OpenCV library was used for working with images.
Here is the code of the main program, which runs on the crown once an hour:
import sys import os from models import getImage, sess from gdrive import getImagesFromGDrive, createImageFromGDriveObject if __name__ == '__main__': # images, http = getImagesFromGDrive() # for img_info in images: # img = createImageFromGDriveObject (img_info, http) file_name = img_info['title'] # try: dbimage = getImage(os.path.basename(file_name)) dbimage.img = img dbimage.download_url = img_info["downloadUrl"] dbimage.img_link = img_info['webContentLink'].replace('&export=download','') except ValueError as e: print e continue # dbimage.identifyDigits() # sess.commit() Here functions are used, the code of which I post below:
getImagesFromGDrive- a function that returns a list of unrecognized images from Google DrivecreateImageFromGDriveObject- a function that downloads the image itself and converts it into the OpenCV formatgetImage- the function searches for an image record in the database, if there is none, it creates itidentifyDigitsis a method that recognizes readings on a given imagehttp- an authorized client to access Google Drive, read in detail about access to the Disk API heresess- database connection object, using SQL Alchemy library
Work with Google Drive
The first thing we do is get a list of images from Google Drive:
import os from datetime import tzinfo, timedelta, date from dateutil.relativedelta import relativedelta from apiclient.discovery import build from models import getLastRecognizedImage def getImagesFromGDrive(): # id Google , FOLDER_ID = '0B5mI3ROgk0mJcHJKTm95Ri1mbVU' # http = getAuthorizedHttp() # drive_service = build('drive', 'v2', http=http) # , month_ago = date.today() + relativedelta( months = -1 ) q = "'%s' in parents and mimeType = 'image/jpeg' and trashed = false and modifiedDate<'%s'" % (FOLDER_ID, month_ago.isoformat()) files = drive_service.files().list(q = q, maxResults=1000).execute() for image in files.get('items'): drive_service.files().trash(fileId=image['id']).execute() # , last_image = getLastRecognizedImage() # , page_size = 1000 result = [] pt = None # API 1000 , # 1000 while True: q = "'%s' in parents and trashed = false and mimeType = 'image/jpeg' and modifiedDate>'%s'" % (FOLDER_ID, last_image.check_time.replace(tzinfo=TZ()).isoformat('T')) files = drive_service.files().list(q = q, maxResults=page_size, pageToken=pt).execute() result.extend(files.get('items')) pt = files.get('nextPageToken') if not pt: break # , result.reverse() return result, http An authorized Disk client is created as follows:
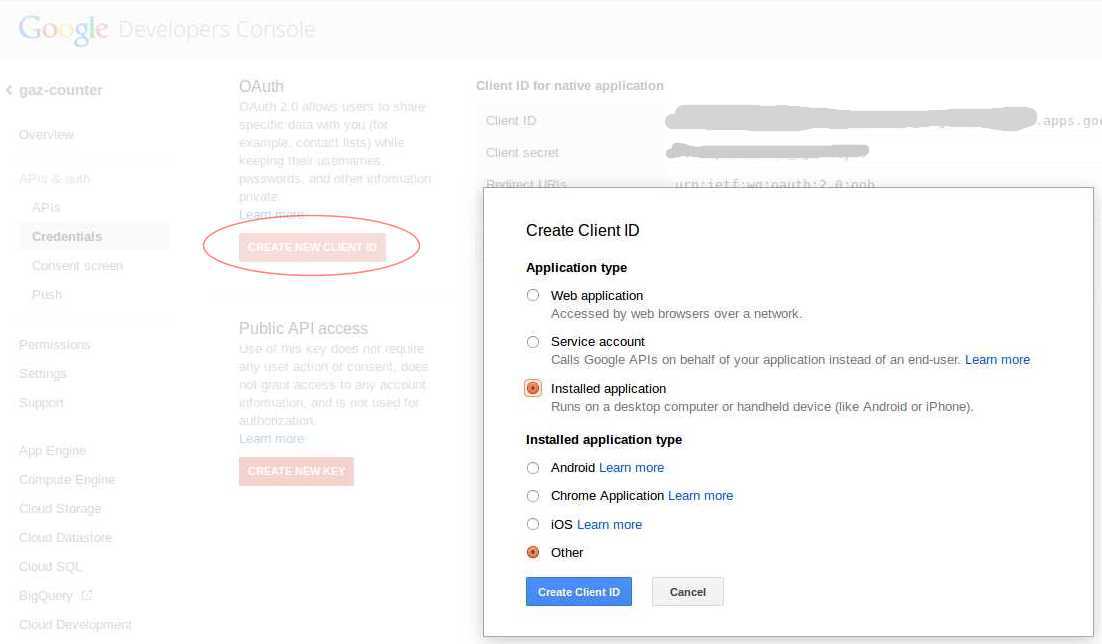
import httplib2 import ConfigParser from oauth2client.client import OAuth2WebServerFlow from oauth2client.file import Storage def getAuthorizedHttp(): # config.ini CLIENT_ID CLIENT_SECRET config = ConfigParser.ConfigParser() config.read([os.path.dirname(__file__)+'/config.ini']) CLIENT_ID = config.get('gdrive','CLIENT_ID') CLIENT_SECRET = config.get('gdrive','CLIENT_SECRET') # OAuth 2.0 scope that will be authorized. # Check https://developers.google.com/drive/scopes for all available scopes. OAUTH_SCOPE = 'https://www.googleapis.com/auth/drive' # Redirect URI for installed apps REDIRECT_URI = 'urn:ietf:wg:oauth:2.0:oob' # client_secrets.json storage = Storage(os.path.dirname(__file__) + '/client_secrets.json') credentials = storage.get() # , if not credentials: # Perform OAuth2.0 authorization flow. flow = OAuth2WebServerFlow(CLIENT_ID, CLIENT_SECRET, OAUTH_SCOPE, REDIRECT_URI) authorize_url = flow.step1_get_authorize_url() # , print 'Go to the following link in your browser: ' + authorize_url # code = raw_input('Enter verification code: ').strip() credentials = flow.step2_exchange(code) # storage.put(credentials) # http http = httplib2.Http() credentials.authorize(http) return http To get the CLIENT_ID and CLIENT_SECRET in the Google Developers Console, you need to create a project and for this project in the APIs & auth - Credentials - OAuth section, click CREATE NEW CLIENT ID , then select Installed application - Other :
When you first start the script, write the url on which you need to go to the console in order to get the token, paste it into the address bar of the browser, allow the application to access Google Drive, copy the verification code issued by Google from the browser and give it to the script. After that, the script will save everything you need to the
client_secrets.json file and will not ask anything on subsequent launches.The image download function is extremely simple:
import cv2 import numpy as np def downloadImageFromGDrive (downloadUrl, http=None): if http==None: http = getAuthorizedHttp() # resp, content = http.request(downloadUrl) # OpenCV img_array = np.asarray(bytearray(content), dtype=np.uint8) return cv2.imdecode(img_array, cv2.IMREAD_COLOR) def createImageFromGDriveObject (img_info, http=None): return downloadImageFromGDrive(img_info['downloadUrl'], http) Search for evidence on the photo
The first thing that needs to be done after we get a photo is to find numbers on it that we will recognize. This is the
extractDigitsFromImage method: def extractDigitsFromImage (self): img = self.img Initially, the photo looks like this:

Therefore, we first turn it so that it acquires the desired orientation.
# 90 h, w, k = img.shape M = cv2.getRotationMatrix2D((w/2,h/2),270,1) img = cv2.warpAffine(img,M,(w,h)) 
# , img = img[0:h, (wh)/2:h+(wh)/2] h, w, k = img.shape Now consider a piece of the image, circled in red. It is quite unique within the entire photo, you can use it to search for the dial. I put it in the
sample.jpg file and wrote the following code to find its coordinates: # sample = cv2.imread(os.path.dirname(__file__)+"/sample.jpg") sample_h, sample_w, sample_k = sample.shape # res = cv2.matchTemplate(img,sample,cv2.TM_CCORR_NORMED) min_val, max_val, min_loc, max_loc = cv2.minMaxLoc(res) # x_center = max_loc[0] + sample_w/2 y_center = max_loc[1] + sample_h/2 # , , # if x_center>w*0.6: img = img[0:h, 0.2*w:w] h, w, k = img.shape x_center = x_center-0.2*w 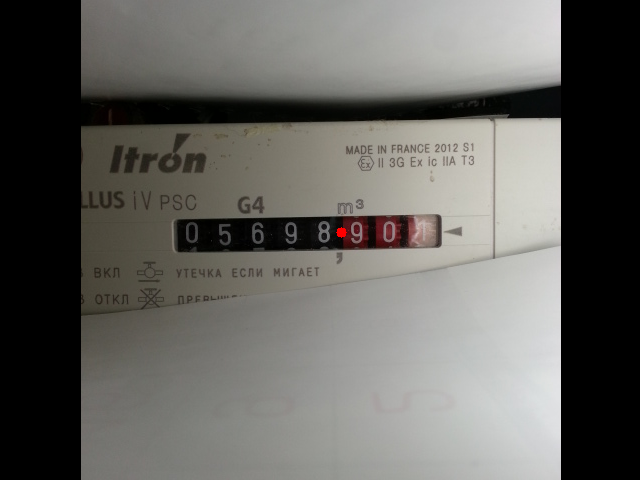
The point on the figure indicates the coordinates found, what we wanted. Next, we launch the algorithm for searching for boundaries, having previously translated the image into gray tones. 100 and 200 are empirically matched threshold values.
# gray = cv2.cvtColor(img,cv2.COLOR_BGR2GRAY) # Canny edges = cv2.Canny(gray, 100, 200) 
Now we run the algorithm for searching lines on the resulting image with borders. In addition to the image itself, the
HoughLines method also takes as parameters the magnitudes of the search steps for the distance and angle of rotation and the threshold value responsible for the minimum number of points that should form a line. The smaller this threshold, the more lines the algorithm will find. # lines = cv2.HoughLines(edges, 1, np.pi/180, threshold=100) 
Of all the lines found, we consider only more or less horizontal lines and find the two closest to the previously discovered center (one from the top, the other from the bottom).
# rho_below = rho_above = np.sqrt(h*h+w*w) line_above = None line_below = None for line in lines: rho,theta = line[0] sin = np.sin(theta) cos = np.cos(theta) # if (sin<0.7): continue # , "" rho_center = x_center*cos + y_center*sin # if rho_center>rho and rho_center-rho<rho_above: rho_above = rho_center-rho line_above = {"rho":rho, "theta":theta, "sin":sin, "cos":cos} # if rho_center<rho and rho-rho_center<rho_below: rho_below = rho-rho_center line_below = {"rho":rho, "theta":theta, "sin":sin, "cos":cos} # , if line_below==None or line_above==None: mylogger.warn("No lines found") return False # , if rho_below/rho_above>1.7 or rho_below/rho_above<0.6: mylogger.warn("Wrong lines found: %f" % (rho_below/rho_above)) return False 
Rotate the image so that the found lines become completely horizontal:
# M = cv2.getRotationMatrix2D((0,(line_below["rho"]-line_above["rho"])/2+line_above["rho"]),line_above["theta"]/np.pi*180-90,1) img = cv2.warpAffine(img,M,(w,h)) 
Now let's cut off everything that is behind the found lines:
# img = img[line_above["rho"]:line_below["rho"], 0:w] h, w, k = img.shape 
Next, we need to find the left and right edges of the dial, translate the image in black and white:
# gray = cv2.cvtColor(img,cv2.COLOR_BGR2GRAY) thres = cv2.adaptiveThreshold(gray,255,cv2.ADAPTIVE_THRESH_GAUSSIAN_C, cv2.THRESH_BINARY, 31, 2) 
We are looking for the right edge using the same technology as the “central” point, the template is circled in red:
sample_right = cv2.imread(os.path.dirname(__file__)+"/sample_right.jpg",cv2.IMREAD_GRAYSCALE) # res = cv2.matchTemplate(thres,sample_right,cv2.TM_CCORR_NORMED) min_val, max_val, min_loc, max_loc = cv2.minMaxLoc(res) # x_right = max_loc[0]-6 To search for the left border, apply the closure transformation to remove noise:
# kernel = np.ones((7,7),np.uint8) thres = cv2.morphologyEx(thres, cv2.MORPH_CLOSE, kernel) 
Next, we will go through all the pixels starting from the left, until we meet black, this will be the left edge:
# x_left=0 while x_left<w : if thres[h/2,x_left]==0: break x_left+=1 
Cut the image on the left and right edge:
# img = img[:, x_left:x_right] h, w, k = img.shape 
Let's make a small check that the image found by the aspect ratio corresponds to the dial:
# if float(w)/float(h)<6.5 or float(w)/float(h)>9.5: mylogger.warn("Image has bad ratio: %f" % (float(w)/float(h))) return False self.digits_img = img return True Digitization
The
splitDigits method is used to splitDigits dial-out function selected by the previous function into separate digits: def splitDigits (self): # , , if None == self.digits_img: if not self.extractDigitsFromImage(): return False img = self.digits_img h, w, k = img.shape To begin with, simply cut our dial into 8 equal parts:

We will process only the first 7 parts, since the 8th digit is constantly spinning, it is useless to recognize it.
Each part is translated into b / w color using the
adaptiveThreshold method, the parameters are chosen empirically: # 8 for i in range(1,8): digit = img[0:h, (i-1)*w/8:i*w/8] dh, dw, dk = digit.shape # / digit_gray = cv2.cvtColor(digit,cv2.COLOR_BGR2GRAY) digit_bin = cv2.adaptiveThreshold(digit_gray,255,cv2.ADAPTIVE_THRESH_GAUSSIAN_C, cv2.THRESH_BINARY, 9, 0) 
Slightly remove the noise using the opening transform (using a 2x2 core). It could have been done without this, but sometimes it helps to cut off large white pieces from the figure connected by thin jumpers:
# kernel = np.ones((2,2),np.uint8) digit_bin = cv2.morphologyEx(digit_bin, cv2.MORPH_OPEN, kernel) 
Run the contour search algorithm
# other, contours, hierarhy = cv2.findContours(digit_bin.copy(),cv2.RETR_TREE,cv2.CHAIN_APPROX_SIMPLE) 
Next, we will throw out all too small contours and contours along the edges of the image, then we will find the largest contour of the remaining:
# biggest_contour = None biggest_contour_area = 0 for cnt in contours: M = cv2.moments(cnt) # if cv2.contourArea(cnt)<30: continue # if cv2.arcLength(cnt,True)<30: continue # cx = M['m10']/M['m00'] cy = M['m01']/M['m00'] # , - if cx/dw<0.3 or cx/dw>0.7: continue # if cv2.contourArea(cnt)>biggest_contour_area: biggest_contour = cnt biggest_contour_area = cv2.contourArea(cnt) biggest_contour_cx = cx biggest_contour_cy = cy # , if biggest_contour==None: digit = self.dbDigit(i, digit_bin) digit.markDigitForManualRecognize (use_for_training=False) mylogger.warn("Digit %d: no biggest contour found" % i) continue 
The largest contour is our figure, we will throw away everything that lies outside of it by applying a mask:
# , mask = np.zeros(digit_bin.shape,np.uint8) cv2.drawContours(mask,[biggest_contour],0,255,-1) digit_bin = cv2.bitwise_and(digit_bin,digit_bin,mask = mask) 
Now we describe a rectangle of standard size around each digit with the center in the center of mass of the contour:
# rw = dw/2.0 rh = dh/1.4 # , if biggest_contour_cy-rh/2 < 0: biggest_contour_cy = rh/2 if biggest_contour_cx-rw/2 < 0: biggest_contour_cx = rw/2 
We cut the image in a rectangle and scale it to the specified size, for me it is
digit_base_h = 2 4, digit_base_w = 16 . The result is saved in the database. # digit_bin = digit_bin[int(biggest_contour_cy-rh/2):int(biggest_contour_cy+rh/2), int(biggest_contour_cx-rw/2):int(biggest_contour_cx+rw/2)] # digit_bin = cv2.resize(digit_bin,(digit_base_w, digit_base_h)) digit_bin = cv2.threshold(digit_bin, 128, 255, cv2.THRESH_BINARY)[1] # digit = self.dbDigit(i, digit_bin) return True 
Number Recognition
Here is the
identifyDigits method, which is called from the main program for each image: def identifyDigits(self): # , if self.result!='': return True # if len(self.digits)==0: # , if self.img == None: return False # if not self.splitDigits(): return False # , sess.commit() # for digit in self.digits: digit.identifyDigit() # str_digits = map(str,self.digits) # , if '?' in str_digits: return False # self.result = ''.join(str_digits) return True Everything is trivial, except for the
identifyDigit method: def identifyDigit (self): # , if self.result!='?': return True if not KNN.recognize(self): # , self.markDigitForManualRecognize() # 7- , "0", , , if self.i==7: self.result = 0 return True return False else: self.use_for_training = True return True The
identifyDigit method is also trivial, the recognition occurs in the KNN.recognize method, the algorithm for finding the nearest neighbors from OpenCV is used: @staticmethod def recognize(dbdigit): # , if not KNN._trained: KNN.train() # , , h,w = dbdigit.body.shape if h!=digit_base_h or w!=digit_base_w: dbdigit.markDigitForManualRecognize(use_for_training=False) mylogger.warn("Digit %d has bad resolution: %dx %d" % (dbdigit.i,h,w)) return False # sample = dbdigit.body.reshape(digit_base_h*digit_base_w).astype(np.float32) test_data = np.array([sample]) # , - - 5 knn = KNN.getKNN() ret,result,neighbours,dist = knn.find_nearest(test_data,k=5) # if result[0,0]!=neighbours[0,0]: # dbdigit.markDigitForManualRecognize() return False if neighbours[0,1]!=neighbours[0,0] or neighbours[0,2]!=neighbours[0,0]: # dbdigit.markDigitForManualRecognize() return False if dist[0,0]>3000000 or dist[0,1]>3500000 or dist[0,2]>4000000: # dbdigit.markDigitForManualRecognize() return False # , dbdigit.result = str(int(ret)) return True Training is described in the method
KNN.train: @staticmethod def getKNN(): # cv2.KNearest if KNN._knn==None: KNN._knn = cv2.KNearest() return KNN._knn @staticmethod def train(): knn = KNN.getKNN() # train_digits = sess.query(Digit).filter(Digit.result!='?').filter_by(use_for_training=True).all() train_data = [] responses = [] for dbdigit in train_digits: h,w = dbdigit.body.shape # if h*w != digit_base_h*digit_base_w: continue # sample = dbdigit.body.reshape(digit_base_h*digit_base_w).astype(np.float32) train_data.append(sample) responses.append(int(dbdigit.result)) # KNN knn.train(np.array(train_data), np.array(responses)) KNN._trained = True I cite an excerpt from the file
models.py, if the reader has questions about the work of some used, but not described functions.Missing descriptions of functions and methods in the article
import datetime from sqlalchemy import Column, Integer, String, Text, Boolean, ForeignKey, DateTime, PickleType from sqlalchemy.orm import relationship from sqlalchemy.ext.declarative import declarative_base from sqlalchemy import create_engine from sqlalchemy.orm import sessionmaker import base64 import cv2 import numpy as np import os import logging import sys dbengine = create_engine('sqlite:///' + os.path.dirname(__file__) + '/../db/images.db', echo=False) Session = sessionmaker(bind=dbengine) sess = Session() Base = declarative_base() # image class class Image(Base): __tablename__ = 'images' id = Column(Integer, primary_key=True) file_name = Column(String) img_link = Column(Text) download_url = Column(Text) check_time = Column(DateTime) result = Column(String(8)) digits = relationship("Digit", backref="image") img = None # source image digits_img = None # cropped source image def __init__(self, file_name): self.file_name = file_name self.check_time = datetime.datetime.strptime(file_name, "gaz.%Y-%m-%d.%H.%M.%S.jpg") self.result = "" def __repr__(self): return "<Image ('%s','%s','%s')>" % (self.id, self.file_name, self.result) def dbDigit(self, i, digit_img): digit = sess.query(Digit).filter_by(image_id=self.id).filter_by(i=i).first() if not digit: digit = Digit(self, i, digit_img) sess.add(digit) else: digit.body = digit_img return digit ## # digit class class Digit(Base): __tablename__ = 'digits' id = Column(Integer, primary_key=True) image_id = Column(Integer, ForeignKey("images.id")) i = Column(Integer) body = Column(PickleType) result = Column(String(1)) use_for_training = Column(Boolean) def __init__(self, image, i, digit_img): self.image_id = image.id self.i = i self.body = digit_img self.markDigitForManualRecognize() def __repr__(self): return "%s" % self.result def markDigitForManualRecognize (self, use_for_training=False): self.result = '?' self.use_for_training = use_for_training def getEncodedBody (self): enc = cv2.imencode('.png',self.body)[1] b64 = base64.b64encode(enc) return b64 ## Base.metadata.create_all(bind=dbengine) # function to get Image object by file_name and img def getImage(file_name): image = sess.query(Image).filter_by(file_name=file_name).first() if not image: image = Image(file_name) sess.add(image) # store image object to base sess.commit() image.digits_img = None return image def getLastRecognizedImage(): return sess.query(Image).filter(Image.result!='').order_by(Image.check_time.desc()).first() def dgDigitById(digit_id): digit = sess.query(Digit).get(digit_id) return digit For the analysis of indications and manual recognition, I also wrote a small web-interface on the Flask framework . I will not give the code here, who is interested, he can look at it, as well as the rest of the code on Github .
The interface has only two pages, one for viewing indications as a graph, for example, for a day or for a week:


The second page for manual recognition of numbers. After I hammered the first 20-30 readings with my hands, the robot began to quite properly recognize the readings by itself. Occasionally, exceptions are still encountered and it is impossible to recognize the number, it is most often associated with the rotation of the dial:


Then you have to enter the missing numbers with your hands:

Or you can simply ignore such readings, they will be skipped on the chart, and nothing bad will happen.
There are plans to further refine the script to send an e-mail if the last few readings match.
That's all, what I wanted to tell you, thank you, if you have read to the end.
Source: https://habr.com/ru/post/220869/
All Articles