WiFi Led Controller Device Study
Today, for inspection, a device designed to make our life easier is presented.
This device is designed to control the lighting. When you connect RGB diodes, you can control the color and brightness, and when you connect monochrome diode lamps only brightness. In the latter case, 3 color channels can be used separately. In addition, the device has several modes that set either constant lighting or flashing. Power supply from 5 to 24 volts. The same voltage device outputs to the channels. Specifications are as follows:
Max load: 288 W
Remote control: 50M
Model: WIFI100 wifi controller

However, with the inclusion of my life did not become easier. On the contrary, complicated. The reason for this was the application MagicColor v1.0, included in the package. Despite the fact that this program worked on HTC and LG phones, it did not work on my Samsung Galaxy Note 10.1 and Galaxy Nexus devices, which made her prepare a little bit, and with it the wonderful device itself. The first thing that was established, which was not mentioned in the instructions, was that the device had a WEB interface with login: admin and password of 1234, which of course made me happy.
')
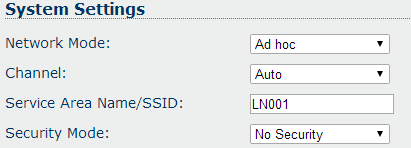
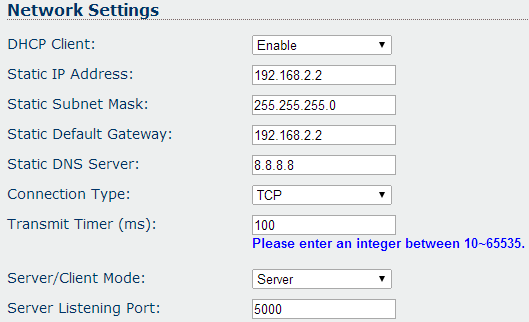
As you can see from the default screenshots, the device works in Ad hoc mode with unprotected access to the network. The default protocol is TCP and port 5000.
I must say that this situation did not suit me at all. First of all, this is security, it is simply not there. Anyone can access this device. Secondly, I would like to see this device in my home network, which already has its own DHCP server, and protection from external attacks. Unfortunately, MagicColor does not have the ability to change the device’s IP address. In addition, as it turned out later, there is an ssid network name check in the program.
Now let's deal with the program. To unpack the MagicColor.apk file, I used APK Manager v.4.9. To do this, simply copy the .apk to the “place-apk-here-for-modding” folder and run the Script.bat script. After these manipulations, the folder “projects” appears in the root folder of the program, and in it the folder with the same name as the .apk file. Now you need to get the .jar file from the classes.dex file, for which the dex2jar script was used. Just drag and drop the .dex file onto dex2jar.bat and we get what we want.
The next step is to decompile the received classes_dex2jar.jar file. First, I tried the JD-gui decompiler. But, he did not live up to expectations, having given out a wrong code. But the next decompiler AndroChef completely coped with the task.
We will understand with the source code. For disassembly, I used the Eclipse Standart version of Kepler, with the ADT Plugin plug-in installed on it. You can install it from the Eclipse shell by calling the “Help” - “Install New Software ...” menu. then click the “Add” button and in the “Name” field enter the ADT Plugin ”, and in the“ Location: ” field dl-ssl.google.com/android/eclipse . Select all components and click “Finish”.
First, I created an empty Android Application Project project. Where installed the Application Name: Color, Project Name: MagicColor2, Package Name: com.android.color. Then I removed the checkmarks from the items “Create custom launcher icon” and “Create activity”.
In the src folder I placed the “cn” and “com” folders obtained during decompilation. From “com / android / color” the R.java file is transferred with replacement into the folder “gen / com / android / color”.
Do not forget to transfer all the files from the “res” folder to the project folder of the same name. And AndroidManifest.xml. Which I received using the apktool script with java -jar apktool.jar d MagicColor.apk out. After the script is created, an “out” folder is created in which the “res” folder and AndroidManifest.xml are present
You can begin to analyze the program code. The Eclipse program finds several errors that need to be fixed. How I did it can be viewed in the source code that I attached to the article below.
In StaticClass.java, we see the default program settings. Some of these parameters will come in handy later. In the Protocol.java file, an algorithm for forming a command for the device is described, the basis of which is the getAll () function, in which the command is formed.
Based on this data, we see that the first two bytes are always the same, and equal to -86 and 85, which in binary form 10101010 and 1010101 form a sequence of bits that allow to determine the authenticity and correctness of the command. Also to determine the correctness of the command included a checksum, which is located at the very end, 9 byte commands. It is calculated by getCurCheckValue (int paramInt1, int paramInt2, int paramInt3, int paramInt4, int paramInt5) using the following original method: Key_Num + (blue + (green + (red + (bar_No + 255))) + mode)% 255
Where: paramint1 - StaticClass.bar_No, paramint2 - StaticClass.red, paramint3 - StaticClass.green, paramint4 - StaticClass.blue, paramint5 - StaticClass.Key_Num
As you have already guessed, the red, green and blue fields are from 1 to 255 for the 1.2.3 channel, respectively. When RGB lighting is connected, the color changes, and when conventional diode lamps are connected, the brightness changes. The Key_Num field defines the device operation mode. The modes are as follows: 1 - turning off the lights, 2 - turning on the lights, 3 sequential switching of the built-in modes of the device, from frequent blinking to constant light. Having at my disposal only one channel with a lamp, I could not get acquainted with the whole variety of modes. Field mode = 1, the bar_No field is always 50.
Before sending, the command is changed by the exchangeBytes and exchangeInt functions apparently in order to slightly encrypt the transfer protocol. The idea of these functions is that parts of the center bytes that are extreme symmetrical with respect to the center are interchanged, for example, if we have the initial AB CD message, then after the conversion we get AC BD, and if 12 34 56 78 we get 17 35 46 28. That's so tricky !! !
Now about the problem that did not allow to use the program for my Samsung devices. As it turned out when debugging an application, the network's SSID is enclosed in quotes and its length increases by 2 characters, which the program does not expect, and checking the length of the SSID expects to receive 5 instead of 7. The verification functions that are in the ColorActivity.java file are discussed below. There are two of them: private void getWifiInfo () and protected void isWifiInfo (). In both functions, the code is present:
In bold I singled out those samwe checks. Why check the length of the SSID and the first two characters of the name SSID, but they are always the same, I do not know. In the SSID, only the last 3 characters differ, and they depend on the position of the SSID switch on the device. Position 0 on the switch corresponds to the SSID “LN001”. In order for the program to work on my phone, it was enough to remove these checks.
Then I managed to add an additional field to the program settings page in which you can enter the IP address of the device. Now it became possible to switch the device from “ad hoc” to “infrastructure” mode, configure security and connect it from your home network, leaving the ability to control the lighting from your mobile device.
The finished project and the work program in the “bin” folder with the device’s IP address field added to the settings can be found here: Magic Color 2 project.
This device is designed to control the lighting. When you connect RGB diodes, you can control the color and brightness, and when you connect monochrome diode lamps only brightness. In the latter case, 3 color channels can be used separately. In addition, the device has several modes that set either constant lighting or flashing. Power supply from 5 to 24 volts. The same voltage device outputs to the channels. Specifications are as follows:
Max load: 288 W
Remote control: 50M
Model: WIFI100 wifi controller
However, with the inclusion of my life did not become easier. On the contrary, complicated. The reason for this was the application MagicColor v1.0, included in the package. Despite the fact that this program worked on HTC and LG phones, it did not work on my Samsung Galaxy Note 10.1 and Galaxy Nexus devices, which made her prepare a little bit, and with it the wonderful device itself. The first thing that was established, which was not mentioned in the instructions, was that the device had a WEB interface with login: admin and password of 1234, which of course made me happy.
')
As you can see from the default screenshots, the device works in Ad hoc mode with unprotected access to the network. The default protocol is TCP and port 5000.
I must say that this situation did not suit me at all. First of all, this is security, it is simply not there. Anyone can access this device. Secondly, I would like to see this device in my home network, which already has its own DHCP server, and protection from external attacks. Unfortunately, MagicColor does not have the ability to change the device’s IP address. In addition, as it turned out later, there is an ssid network name check in the program.
Now let's deal with the program. To unpack the MagicColor.apk file, I used APK Manager v.4.9. To do this, simply copy the .apk to the “place-apk-here-for-modding” folder and run the Script.bat script. After these manipulations, the folder “projects” appears in the root folder of the program, and in it the folder with the same name as the .apk file. Now you need to get the .jar file from the classes.dex file, for which the dex2jar script was used. Just drag and drop the .dex file onto dex2jar.bat and we get what we want.
The next step is to decompile the received classes_dex2jar.jar file. First, I tried the JD-gui decompiler. But, he did not live up to expectations, having given out a wrong code. But the next decompiler AndroChef completely coped with the task.
We will understand with the source code. For disassembly, I used the Eclipse Standart version of Kepler, with the ADT Plugin plug-in installed on it. You can install it from the Eclipse shell by calling the “Help” - “Install New Software ...” menu. then click the “Add” button and in the “Name” field enter the ADT Plugin ”, and in the“ Location: ” field dl-ssl.google.com/android/eclipse . Select all components and click “Finish”.
First, I created an empty Android Application Project project. Where installed the Application Name: Color, Project Name: MagicColor2, Package Name: com.android.color. Then I removed the checkmarks from the items “Create custom launcher icon” and “Create activity”.
In the src folder I placed the “cn” and “com” folders obtained during decompilation. From “com / android / color” the R.java file is transferred with replacement into the folder “gen / com / android / color”.
Do not forget to transfer all the files from the “res” folder to the project folder of the same name. And AndroidManifest.xml. Which I received using the apktool script with java -jar apktool.jar d MagicColor.apk out. After the script is created, an “out” folder is created in which the “res” folder and AndroidManifest.xml are present
You can begin to analyze the program code. The Eclipse program finds several errors that need to be fixed. How I did it can be viewed in the source code that I attached to the article below.
In StaticClass.java, we see the default program settings. Some of these parameters will come in handy later. In the Protocol.java file, an algorithm for forming a command for the device is described, the basis of which is the getAll () function, in which the command is formed.
public byte[] getAll() { this.all[0] = this.frameHead[0]; this.all[1] = this.frameHead[1]; this.all[2] = 0; this.all[3] = this.mode; this.all[4] = this.keyNumber; this.all[5] = this.keyValue; this.all[6] = this.colorRGB[0]; this.all[7] = this.colorRGB[1]; this.all[8] = this.colorRGB[2]; this.all[9] = this.checkValue; return this.all; } Based on this data, we see that the first two bytes are always the same, and equal to -86 and 85, which in binary form 10101010 and 1010101 form a sequence of bits that allow to determine the authenticity and correctness of the command. Also to determine the correctness of the command included a checksum, which is located at the very end, 9 byte commands. It is calculated by getCurCheckValue (int paramInt1, int paramInt2, int paramInt3, int paramInt4, int paramInt5) using the following original method: Key_Num + (blue + (green + (red + (bar_No + 255))) + mode)% 255
Where: paramint1 - StaticClass.bar_No, paramint2 - StaticClass.red, paramint3 - StaticClass.green, paramint4 - StaticClass.blue, paramint5 - StaticClass.Key_Num
As you have already guessed, the red, green and blue fields are from 1 to 255 for the 1.2.3 channel, respectively. When RGB lighting is connected, the color changes, and when conventional diode lamps are connected, the brightness changes. The Key_Num field defines the device operation mode. The modes are as follows: 1 - turning off the lights, 2 - turning on the lights, 3 sequential switching of the built-in modes of the device, from frequent blinking to constant light. Having at my disposal only one channel with a lamp, I could not get acquainted with the whole variety of modes. Field mode = 1, the bar_No field is always 50.
Before sending, the command is changed by the exchangeBytes and exchangeInt functions apparently in order to slightly encrypt the transfer protocol. The idea of these functions is that parts of the center bytes that are extreme symmetrical with respect to the center are interchanged, for example, if we have the initial AB CD message, then after the conversion we get AC BD, and if 12 34 56 78 we get 17 35 46 28. That's so tricky !! !
Now about the problem that did not allow to use the program for my Samsung devices. As it turned out when debugging an application, the network's SSID is enclosed in quotes and its length increases by 2 characters, which the program does not expect, and checking the length of the SSID expects to receive 5 instead of 7. The verification functions that are in the ColorActivity.java file are discussed below. There are two of them: private void getWifiInfo () and protected void isWifiInfo (). In both functions, the code is present:
if(this.ssid != null) { if(this.ssid.length() != 5) { StaticClass.wifi_correct = false; return; } if(!this.ssid.substring(0, 2).equals("LN")) { StaticClass.wifi_correct = false; return; } In bold I singled out those samwe checks. Why check the length of the SSID and the first two characters of the name SSID, but they are always the same, I do not know. In the SSID, only the last 3 characters differ, and they depend on the position of the SSID switch on the device. Position 0 on the switch corresponds to the SSID “LN001”. In order for the program to work on my phone, it was enough to remove these checks.
Then I managed to add an additional field to the program settings page in which you can enter the IP address of the device. Now it became possible to switch the device from “ad hoc” to “infrastructure” mode, configure security and connect it from your home network, leaving the ability to control the lighting from your mobile device.
The finished project and the work program in the “bin” folder with the device’s IP address field added to the settings can be found here: Magic Color 2 project.
Source: https://habr.com/ru/post/220531/
All Articles