Installing and configuring the LAMP web server for PHP development
Many novice web developers are switching to Linux-based distributions just to create their own stable web server for testing and debugging their projects. And projects most often, of course, in PHP. In this article, I offer you my own way of deploying a LAMP web server (Linux + Apache + MySQL + PHP) in a very accessible form.
This method has been using for several years on .deb-based distributions. Previously, the web server was installed and worked fine on Debian, Mint, Ubuntu, LMDE (with some amendments) and now runs on elementaryOS.
So, let's begin.
')
In advance, we assume that our site should be accessible at mysite.zz , and the folder with the site files is located along the path /home/user/server/mysite.zz. The web server will be installed on ElementaryOS. Therefore, the standard text editor scratch-text-editor will be used in the setup process. You can use any text editor by replacing the “scratch-text-editor” with the name of your editor.
We enter in the terminal
When installing packages, we will need to pre-configure them. in pseudographic terminal mode.
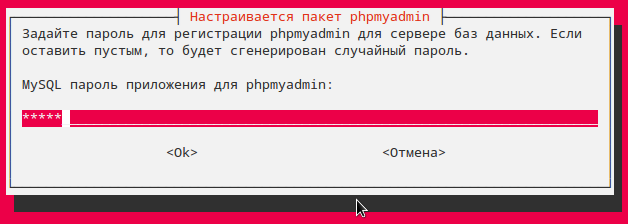
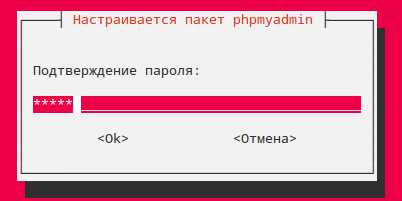
In the first window, we are prompted to enter the password for the MySQL user “root”. Enter the password and confirm it:
Next comes phpmyadmin setup.
Here we will be asked which web server to use to run phpmyadmin. Mark apache2 with the space bar and press enter:
On the next screen we read some information and click enter.
Next, we confirm the configuration of the database using dbconfig-common:
Enter the password entered above in
Go to any browser at localhost . If the server is normally installed, then we should see the server test page:
To access phpmyadmin follow the link localhost / phpmyadmin . Enter the login "root" and the password entered earlier:
There you can also change the phpmyadmin interface language.
If everything is done correctly, then we will proceed to the management of our databases:
Create a link to phpmyadmin in / var / www
Open the server configuration file:
and add a line to the end of the file:
Open the hosts file to add our site:
and add a line to the file
Create in any folder a site configuration file called “mysite.zz” with content
and copy it with superuser rights in / etc / apache2 / sites-available
We activate our site:
Activate the mod-rewrite module (necessary for the implementation of the CNC):
And restart the server:
Create an index.php file in our site folder (/home/user/server/mysite.zz), for example, with the following content:
Next, in any browser, go to mysite.zz
If we see our page, then everything is done correctly.
To correct this error, you must reconfigure phpmyadmin
The following problems were observed by me only in LMDE. But it is possible that they may occur in other distributions.
To fix this problem, the extension .conf must be added to the name of the configuration file of our site in / etc / apache2 / sites-available
file content should be edited as follows
And site activation must be done by config name
To correct this error, we will make some changes to the phpmyadmin configuration file.
Open it
and add the following lines
after the lines
Now phpmyadmin should recognize our login and password.
This article did not consider connecting the project to the database. There are a lot of connection options in both procedural PHP and object-oriented. The only thing I can say about this is that, in any implementation of connecting to a specific database, you will need to use the user “root” and the password that we specified when setting up the packages during their installation.
Also, the installation of postal north was not considered, since this is already the topic of a separate article. There are many mail servers in the repositories of any distributions, and each with its own nuances.
In conclusion, I note that the PHP configuration file php.ini configuration is located in the / etc / php5 / apache2 / directory.
Good luck to you projects and clean code!
This method has been using for several years on .deb-based distributions. Previously, the web server was installed and worked fine on Debian, Mint, Ubuntu, LMDE (with some amendments) and now runs on elementaryOS.
So, let's begin.
')
In advance, we assume that our site should be accessible at mysite.zz , and the folder with the site files is located along the path /home/user/server/mysite.zz. The web server will be installed on ElementaryOS. Therefore, the standard text editor scratch-text-editor will be used in the setup process. You can use any text editor by replacing the “scratch-text-editor” with the name of your editor.
1. Install the necessary packages
We enter in the terminal
sudo apt-get install apache2 mysql-server php5 phpmyadmin When installing packages, we will need to pre-configure them. in pseudographic terminal mode.
In the first window, we are prompted to enter the password for the MySQL user “root”. Enter the password and confirm it:
enter root password for mysql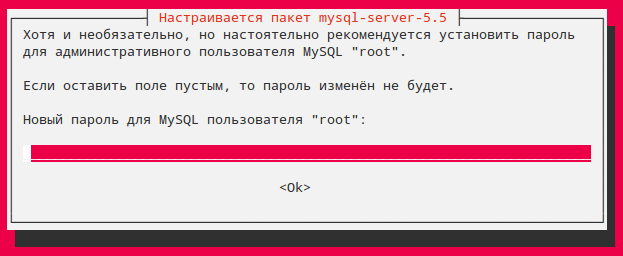
password confirmation for root mysql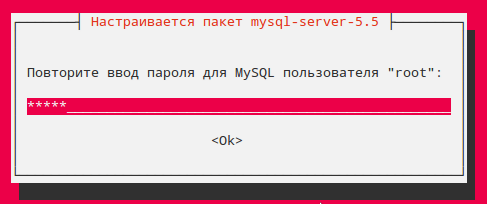
Next comes phpmyadmin setup.
Here we will be asked which web server to use to run phpmyadmin. Mark apache2 with the space bar and press enter:
choosing a web server to run phpmyadmin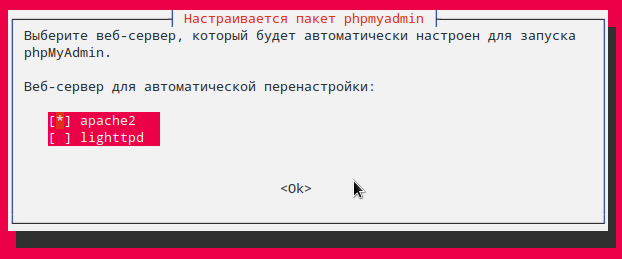
On the next screen we read some information and click enter.
some information
Next, we confirm the configuration of the database using dbconfig-common:
Confirm Configuration with dbconfig-common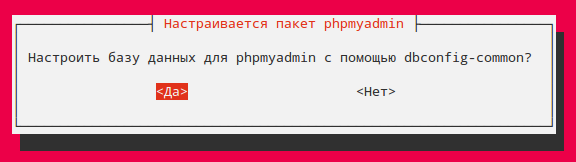
Enter the password entered above in
the following three screens
2. Check server and phpmyadmin
Go to any browser at localhost . If the server is normally installed, then we should see the server test page:
server test page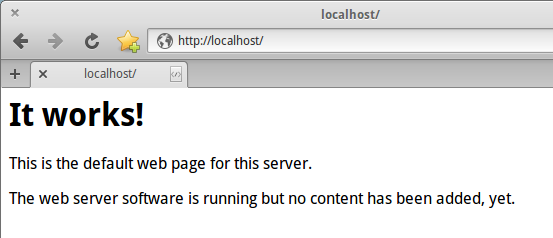
To access phpmyadmin follow the link localhost / phpmyadmin . Enter the login "root" and the password entered earlier:
phpmyadmin login page
There you can also change the phpmyadmin interface language.
If everything is done correctly, then we will proceed to the management of our databases:
phpmyadmin home page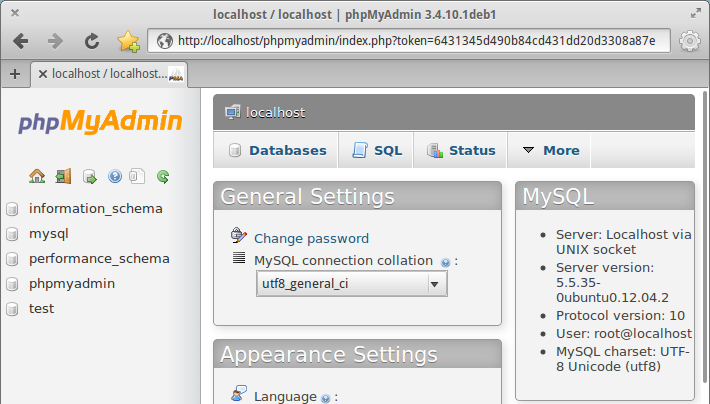
3. Server setup
Create a link to phpmyadmin in / var / www
sudo ln -s /etc/phpmyadmin /var/www Open the server configuration file:
sudo scratch-text-editor /etc/apache2/apache2.conf and add a line to the end of the file:
ServerName localhost:80 /etc/apache2/apache2.conf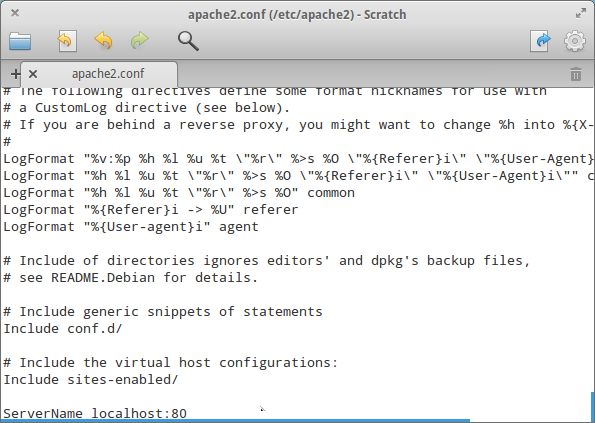
4. Adding our site
Open the hosts file to add our site:
sudo scratch-text-editor /etc/hosts and add a line to the file
127.0.1.1 mysite.zz / etc / hosts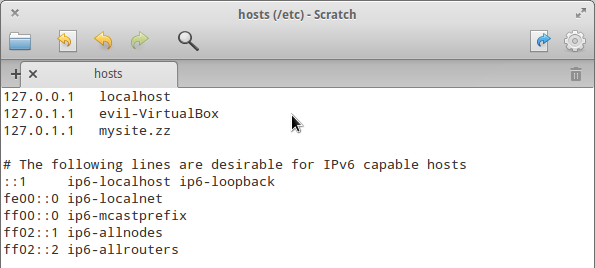
Create in any folder a site configuration file called “mysite.zz” with content
<VirtualHost *:80> ServerAlias mysite.zz www.mysite.zz DocumentRoot /home/user/server/mysite.zz <Directory home/user/server/mysite.zz/> AllowOverride All </Directory> </VirtualHost> and copy it with superuser rights in / etc / apache2 / sites-available
sudo cp ___ /etc/apache2/sites-available/ We activate our site:
sudo a2ensite mysite.zz Activate the mod-rewrite module (necessary for the implementation of the CNC):
sudo a2enmod rewrite And restart the server:
sudo /etc/init.d/apache2 restart 5. Checking the operation of our site
Create an index.php file in our site folder (/home/user/server/mysite.zz), for example, with the following content:
<? echo 'hello!))'; ?> Next, in any browser, go to mysite.zz
test page of our site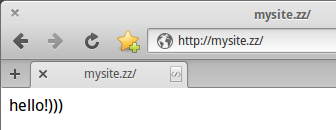
If we see our page, then everything is done correctly.
6. Possible problems
Phpmyadmin is not available at localhost / phpmyadmin
To correct this error, you must reconfigure phpmyadmin
sudo dpkg-reconfigure phpmyadmin The following problems were observed by me only in LMDE. But it is possible that they may occur in other distributions.
Access to our site may be denied by the server.
To fix this problem, the extension .conf must be added to the name of the configuration file of our site in / etc / apache2 / sites-available
mysite.zz.conf file content should be edited as follows
<VirtualHost *:80> ServerAlias mysite.zz www.mysite.zz DocumentRoot /home/user/server/mysite.zz <Directory home/user/server/mysite.zz/> AllowOverride All Require all granted </Directory> </VirtualHost> And site activation must be done by config name
sudo a2ensite mysite.zz.conf Login and password are not defined when entering phpmyadmin
To correct this error, we will make some changes to the phpmyadmin configuration file.
Open it
sudo scratch-text-editor /etc/phpmyadmin/config.inc.php and add the following lines
$dbuser = 'root'; $dbpass = 'kenny'; after the lines
$cfg['Servers'][$i]['controluser'] = $dbuser; $cfg['Servers'][$i]['controlpass'] = $dbpass; Now phpmyadmin should recognize our login and password.
Addition
This article did not consider connecting the project to the database. There are a lot of connection options in both procedural PHP and object-oriented. The only thing I can say about this is that, in any implementation of connecting to a specific database, you will need to use the user “root” and the password that we specified when setting up the packages during their installation.
Also, the installation of postal north was not considered, since this is already the topic of a separate article. There are many mail servers in the repositories of any distributions, and each with its own nuances.
In conclusion, I note that the PHP configuration file php.ini configuration is located in the / etc / php5 / apache2 / directory.
Good luck to you projects and clean code!
Source: https://habr.com/ru/post/220181/
All Articles