Algorithms for video processing processor TI DM368, continued ...
In the first part of the article, we looked at the hardware blocks that make up the TI DM368 video processor, and now we are going to review our algorithms and code.
')
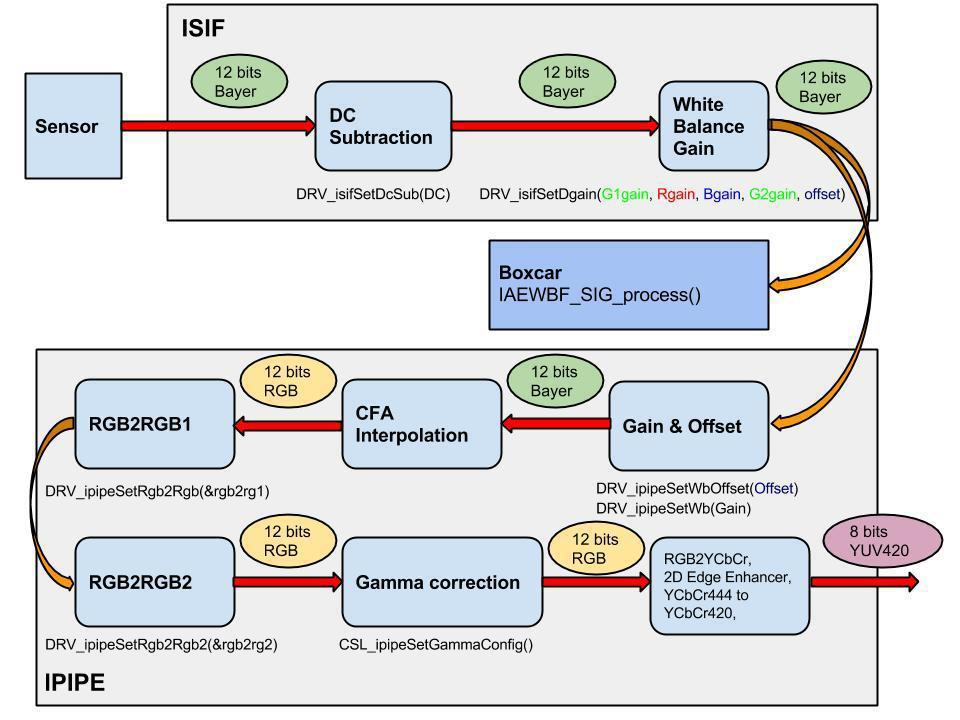
The entire hardware conveyor of the camera operates in streaming mode, that is, immediately after the pixel is processed by one of the blocks, it is transferred to the next one. When turned on, the video processor software sets parameters and initializes all conveyors, then enters a continuous processing cycle of each frame. If the frame rate of the sensor is 30 fps, then all necessary functions will be called 30 times per second.
Now about the principles of the algorithms. The essence of the algorithm AE (auto expouse - auto exposure) is to set the exposure values, multiplication factor (gain) and shift (offset) so that the output to get a picture with a minimum number of overexposed and dark areas.

The exposure or electronic shutter is responsible for the amount of light falling on the sensor. In modern sensors, it can vary from 1,000,000 to 1 microsecond, so there is no need to use a diaphragm to limit the luminous intensity. Gain and offset are used to convert from 12 bits to 8, and are chosen so as to maximize the use of a scant 8 bit dynamic range.
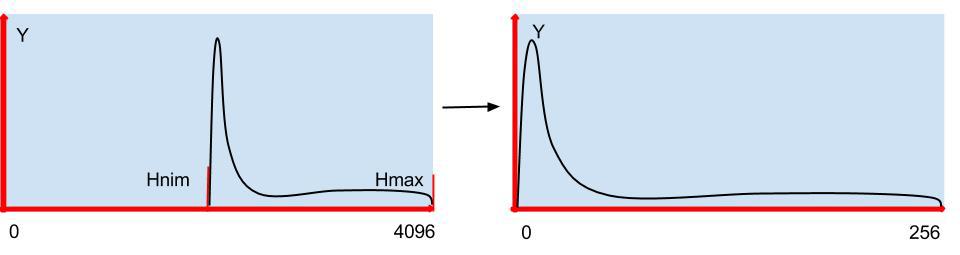
How to determine the value of the exposure? We tried several options: and limited from above, that is, changed the exposure so that the maximum value of the histogram was below a certain threshold, and lowered the lower limit of the histogram to a certain value.
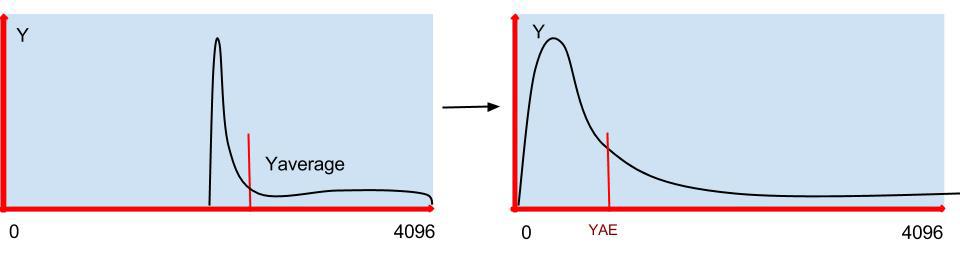
Both the one and the other method maximally use the entire dynamic range, but they have one drawback - on a bright sunny day, objects in the shade are almost invisible. Thus, in order to consider blackouts, it is sometimes better to re-flash some parts of the scene. Therefore, we let the maximum of the histogram float freely and select the exposure so that the average value of Y coincides with the value we selected.
It's time to go to the algorithms, let's start with the auto exposure:
1. The algorithm begins with the acquisition of statistics from Boxcar.
2. Then, using this data, a histogram is constructed and the average value of Y is calculated.
3. Find the minimum value of the histogram.
4. Change the exposure value. If the value of the average value of Y is two times greater or less than our threshold YAE, then the step of change increases, and if the change of Y is less than 20%, then the exposure does not change.
5. To smoothly change the video streaming image, we do averaging the last few values of the values used in the AE algorithm:
6. And finally, the final stage AE is the gain and shift setting. At the output, we are guided by the fact that the average value of Y falls approximately in the middle of the output range HmaxTh. Taking into account gamma correction and experiment, this value is hn-> HmaxTh / 4.
Now for the white balance (WB).
There are many algorithms for setting it up; we use 2 of them in our camera.
In day mode, we minimize local color deviations throughout the entire image. Since white, black and gray have R = G = B, and white is also the brightest in the scene, its minimization makes the greatest contribution to the total energy.
At night, with an open infrared filter, we use the gray world algorithm, that is, simply align the color averages.
In the main cycle when filling the histograms, we look for the values of the total deviations of the red GR [j] and blue GB [j] from the green and find the direction of movement to the minimum:
Different sensors have completely different color deviations, but the algorithm always works correctly during the day, an example for a SONY IMX136 sensor before and after white balance:

Let us dwell on the gamma correction , it is necessary in order to even out the sensitivity of the camera and the human eye. As a rule, the transformation function has a power dependence, but we use another, according to our subjective sensations, it reflects reality better:
gam [i] = out * ((log (i + in * a) - log (in * a)) / (log (in + in * a) - log (in * a)));
where in is the maximum of the input range,
out - maximum output range
a - curvature coefficient (in our case, 0.05 is best suited for different scenes)

During system initialization, we load this curve into the LUT table and each frame passes through it. An example of how the gamma correction image changes:

I would also like to mention the capabilities of our cameras, which are not very often found. First, switching to a lower frame rate while reducing the illumination, and secondly, in the night mode, when the infrared filter is removed, the camera can remain in color.
The source code for the firmware of our cameras is available via the Git version control system at: git: //sigrand.ru/sigticam.git. To download the source code you can use the following command: git clone git: //sigrand.ru/sigticam.git.
The above algorithms are in the directory sigticam / sigticam / platform / ti_dm368 / appro2 / av_capture / framework / alg / src / aewbf_sig
Live broadcast from our, and not only ours, cameras can be viewed here .
In the next article we will look at how autofocus is implemented in our cameras.
and what is the wide dynamic range of HDR or WDR.
.
')
The entire hardware conveyor of the camera operates in streaming mode, that is, immediately after the pixel is processed by one of the blocks, it is transferred to the next one. When turned on, the video processor software sets parameters and initializes all conveyors, then enters a continuous processing cycle of each frame. If the frame rate of the sensor is 30 fps, then all necessary functions will be called 30 times per second.
Now about the principles of the algorithms. The essence of the algorithm AE (auto expouse - auto exposure) is to set the exposure values, multiplication factor (gain) and shift (offset) so that the output to get a picture with a minimum number of overexposed and dark areas.
The exposure or electronic shutter is responsible for the amount of light falling on the sensor. In modern sensors, it can vary from 1,000,000 to 1 microsecond, so there is no need to use a diaphragm to limit the luminous intensity. Gain and offset are used to convert from 12 bits to 8, and are chosen so as to maximize the use of a scant 8 bit dynamic range.
How to determine the value of the exposure? We tried several options: and limited from above, that is, changed the exposure so that the maximum value of the histogram was below a certain threshold, and lowered the lower limit of the histogram to a certain value.
Both the one and the other method maximally use the entire dynamic range, but they have one drawback - on a bright sunny day, objects in the shade are almost invisible. Thus, in order to consider blackouts, it is sometimes better to re-flash some parts of the scene. Therefore, we let the maximum of the histogram float freely and select the exposure so that the average value of Y coincides with the value we selected.
It's time to go to the algorithms, let's start with the auto exposure:
1. The algorithm begins with the acquisition of statistics from Boxcar.
Uint32 w, h; Uint16 *box; status = DRV_ipipeGetBoxcarBuf(&bufId, 0); if(status!= OSA_SOK) { OSA_ERROR("ERROR: DRV_ipipeGetBoxcarBuf()\n"); return status; } pBufInfo = DRV_ipipeGetBoxcarBufInfo(bufId); DRV_ipipePutBoxcarBuf(bufId); box = pBufInfo->virtAddr; w = gDRV_ipipeObj.boxcarInfo.width; //Boxcar width h = gDRV_ipipeObj.boxcarInfo.height; // Boxcar height 2. Then, using this data, a histogram is constructed and the average value of Y is calculated.
Uint32 sz = w*h, sz4 = sz*4, hsz = 512; Uint32 hist[hsz]; int GN[3] = { -16, 0, 16}; memset(hist, 0, sizeof(Uint32)*hsz); //AE and WB for(i=0; i < sz4; i+=4) { r = box[i+2]>>2; g = box[i+1]>>2; b = box[i ]>>2; RR += r; GG += g; BB += b; Y += ((117*b + 601*g + 306*r)>>10); hist[r>>3]++; hist[g>>3]++; hist[b>>3]++; for(j=0; j < ns; j++) { GB[j] += abs(g - (b*(512 + GN[j])>>9)); GR[j] += abs(g - (r*(512 + GN[j])>>9)); } } Y = Y/sz; hn->Y.New = Y; RR = RR/sz; GG = GG/sz; BB = BB/sz; 3. Find the minimum value of the histogram.
//Find histogram min sum = 0; for(i=0; sum < hn->SatTh; i++) sum += hist[i]; hn->Hmin.New = i; //Find histogram max sum = 0; for(i=hsz-1; sum < hn->SatTh; i--) sum += hist[i]; hn->Hmax.New = i; 4. Change the exposure value. If the value of the average value of Y is two times greater or less than our threshold YAE, then the step of change increases, and if the change of Y is less than 20%, then the exposure does not change.
if(hn->Y.New) tmp = (hn->Y.New > hn->YAE) ? hn->Y.New*100/hn->YAE : hn->YAE*100/hn->Y.New; if(tmp > 200){ if(hn->Y.New) hn->Exp.New = hn->Exp.Old*(hn->Y.New*2 + hn->YAE)/(hn->Y.New*3); } else if(tmp > 20){ if(hn->Y.New > hn->YAE) hn->Exp.New = hn->Exp.Old*99/100; else hn->Exp.New = hn->Exp.Old*100/99; } if(hn->Exp.New > hn->Exp.Range.max) hn->Exp.New = hn->Exp.Range.max; 5. To smoothly change the video streaming image, we do averaging the last few values of the values used in the AE algorithm:
#define HISTORY 30 int history = 0; typedef struct IAEWBF_Param{ XDAS_Int32 Old; //Old value XDAS_Int32 New; //New value XDAS_Int32 Step; //The step of changing XDAS_Int32 Avrg; //Sum of all history value XDAS_Int32 Change; //Need for smooth change XDAS_Int32 Hist[HISTORY]; //History array XDAS_Int32 HistC; //History count XDAS_Int32 NewA; //Avarage of value IAEWBF_Range Range; //The range of value changes }IAEWBF_Param; int add_history(IAEWBF_Param *p) { int diff = 0; p->Avrg += p->New; p->Avrg -= p->Hist[p->HistC]; if(p->New) diff = abs(p->Hist[p->HistC] - p->New)*100/p->New; p->Hist[p->HistC] = p->New; p->HistC = (p->HistC == (HISTORY - 1)) ? 0 : p->HistC + 1; p->NewA = (history < HISTORY) ? p->Avrg/history : p->Avrg/HISTORY; return diff; } history++; add_history(&hn->Hmax); add_history(&hn->Hmin); add_history(&hn->Y); 6. And finally, the final stage AE is the gain and shift setting. At the output, we are guided by the fact that the average value of Y falls approximately in the middle of the output range HmaxTh. Taking into account gamma correction and experiment, this value is hn-> HmaxTh / 4.
//Change the offset and gain hn->Offset.New = hn->Hmin.NewA; if(hn->Y.NewA - hn->Offset.New) hn->GIFIF.New = ((hn->HmaxTh/4)*512)/(hn->Y.NewA - hn->Offset.New); up = hn->Hmax.NewA*hn->GIFIF.New>>9; if((up < hn->HmaxTh) && (hn->Y.NewA - hn->Offset.New)) if(hn->Y.NewA - hn->Offset.New) hn->GIFIF.New = (((hn->HmaxTh*2 - up)/4)*512)/(hn->Y.NewA - hn->Offset.New); //Check gain range hn->GIFIF.New = hn->GIFIF.New > hn->GIFIF.Range.max ? hn->GIFIF.Range.max : hn->GIFIF.New; hn->GIFIF.New = hn->GIFIF.New < hn->GIFIF.Range.min ? hn->GIFIF.Range.min : hn->GIFIF.New; Now for the white balance (WB).
There are many algorithms for setting it up; we use 2 of them in our camera.
In day mode, we minimize local color deviations throughout the entire image. Since white, black and gray have R = G = B, and white is also the brightest in the scene, its minimization makes the greatest contribution to the total energy.
At night, with an open infrared filter, we use the gray world algorithm, that is, simply align the color averages.
In the main cycle when filling the histograms, we look for the values of the total deviations of the red GR [j] and blue GB [j] from the green and find the direction of movement to the minimum:
if(IRcutClose){ min = GR[0]; minr = 0; for(j=1; j < ns; j++){ if(GR[j] < min) { min = GR[j]; minr = j; } } min = GB[0]; minb = 0; for(j=1; j < ns; j++){ if(GB[j] < min) { min = GB[j]; minb = j; } } if(minr != 1) hn->Rgain.New = hn->Rgain.Old + (GN[minr]*hn->Rgain.Old/512); if(minb != 1) hn->Bgain.New = hn->Bgain.Old + (GN[minb]*hn->Bgain.Old/512); } else { //Night AW mode if(RR) hn->Rgain.New = GG*hn->Rgain.Old/RR; if(BB) hn->Bgain.New = GG*hn->Bgain.Old/BB; } Different sensors have completely different color deviations, but the algorithm always works correctly during the day, an example for a SONY IMX136 sensor before and after white balance:
Let us dwell on the gamma correction , it is necessary in order to even out the sensitivity of the camera and the human eye. As a rule, the transformation function has a power dependence, but we use another, according to our subjective sensations, it reflects reality better:
gam [i] = out * ((log (i + in * a) - log (in * a)) / (log (in + in * a) - log (in * a)));
where in is the maximum of the input range,
out - maximum output range
a - curvature coefficient (in our case, 0.05 is best suited for different scenes)
During system initialization, we load this curve into the LUT table and each frame passes through it. An example of how the gamma correction image changes:
I would also like to mention the capabilities of our cameras, which are not very often found. First, switching to a lower frame rate while reducing the illumination, and secondly, in the night mode, when the infrared filter is removed, the camera can remain in color.
The source code for the firmware of our cameras is available via the Git version control system at: git: //sigrand.ru/sigticam.git. To download the source code you can use the following command: git clone git: //sigrand.ru/sigticam.git.
The above algorithms are in the directory sigticam / sigticam / platform / ti_dm368 / appro2 / av_capture / framework / alg / src / aewbf_sig
Live broadcast from our, and not only ours, cameras can be viewed here .
In the next article we will look at how autofocus is implemented in our cameras.
and what is the wide dynamic range of HDR or WDR.
.
Source: https://habr.com/ru/post/220141/
All Articles