Automate the deployment of applications in 1 click on the platform InfoboxCloud Jelastic with JPS
The goal of the Jelastic platform is to make the use of complex technologies simple and straightforward. Our goal is to reduce the time developers usually spend on routine tasks to improve work efficiency. However, there is always something that can be done better.
In this article we will consider a solution that allows you to automate the installation of an application in one click - Jelastic Packaging Standard (JPS) . We will describe how to pack the application as a ready-to-use product.

')
JPS is a standard that can be used to create application templates that are ready to be installed in Jelastic in 1 click. Currently, the system supports applications in Java, PHP and Ruby. In the future, we plan to add support for other programming languages.
JPS simplifies installation and application configuration for the end user, manages the application deployment process, determines the set of its properties and the cluster configuration in which the application will run. JPS also indicates the amount of resources needed and the scaling limits for each container in the environment.
Using JPS, you can offer users a widget for quick installation of applications. This contributes to the spread of the application and sales growth. Attracting users becomes easier because of the ease of installation and configuration. In addition, reduced support costs and other issues related to the distribution of the application.
Each installation widget contains an application manifest (or a link to it) describing the topology of the environment required for proper operation, as well as installation and configuration instructions. JPS manifest based on JSON .

To start installing the prepared application, the user must click on the widget and enter a valid e-mail. An e-mail will be sent to the specified address, using the link from which you need to go to initialize the installation. The user will be redirected to the Jelastic control panel, where he will be able to confirm the action.
After that, Jelastic will take several minutes to complete the installation process. It is worth noting that the actual duration depends on the selected application, its properties and characteristics. Jelastic relies on the manifest and creates the necessary nodes: application servers, databases, load balancers, and so on. As a result, the user gets a fully functional application without any manual operations.

Below we take a closer look at the technical side of preparing a manifest and creating a widget. And of course we will show how the installation looks in one click from the end user.
Before packing the application, we recommend to deploy it in the Jelastic cloud manually and check if everything works as it should. This is worth doing to know exactly what configuration you need to specify in the manifest.
You can use the JSON Formatter & Validator or http://pro.jsonlint.com to create a manifest that fully fits JSON requirements. Your code must contain a set of lines necessary for successful installation of the application.
The mandatory part of the manifest contains several lines:
This part contains information about the JPS version and the type of installation of the application (for example, “install” starts the process of creating a new environment that is suitable for deployment).
The above code must be expanded in accordance with the settings of the application that you are going to pack using the JPS standard. Configuration information is included in the “application” parameter: {}
First of all, you need to describe some general information about the application. For example, the name, version, programming language, and more.
Sample code for OpenCMS that contains basic information about the application:
Detailed information about the available options can be found in the JPS documentation .
Here you need to specify the information about the environment that the application requires for optimal performance. The settings specified in this part of the code will be used to create and configure the environment required for installation of the package.
Use the “env” parameter : {} to describe all the required values. Thus it is necessary to consider the possible options that are listed in the documentation .
From the parameters you can use:
“Topology”: {} contains data about the programming language of the environment, data about the necessary nodes and allows you to use additional functions such as High Availability and SSL.
“Deployments”: [] is responsible for the deployment process of the application in the finished environment.
“Upload”: [] - the block can be added, if the application requires third-party files, they will be downloaded and installed.
“Configs”: [] - this block allows you to change any file on any of the nodes to configure application settings (for example, a description of the process of establishing a connection between an application server and a database).
An example of code that describes the parameters of the environment to perform Hello World:
Detailed information on the initial settings is available here .
JPS maintains a list of templates (placeholders) that can be used in any part of the JPS file (unless the block is strictly limited to the content). The JPS controller will try to convert all the templates at the package installation stage. If this does not happen, the template will not be implemented and will be displayed in the text as $ {placeholder}
To check the correctness of the created manifest, use the link below. The link initiates the installation process:
app.jelasticloud.com?manifest= {manifest_code}
Note that in this link, instead of the manifest code, we recommend using a URL with a JSON manifest file.
In case of problems with the manifest, you can click Send report and the details of the error in details appear:
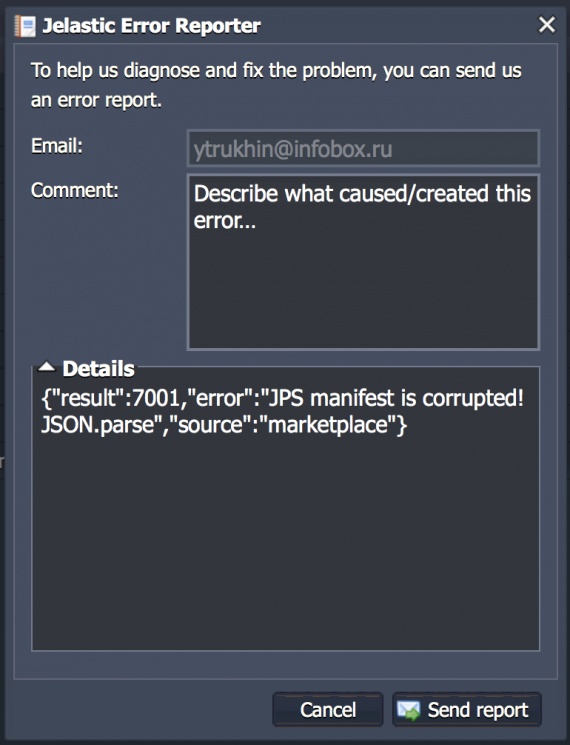
JSON code can be checked for example in the validator http://pro.jsonlint.com and correct the error.
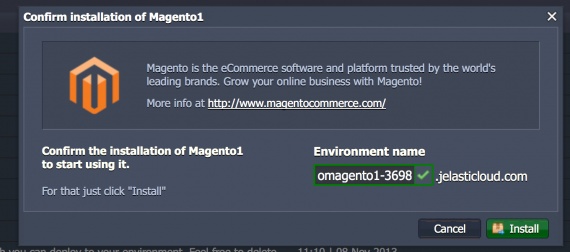
If successful, you will see the proposal to deploy the application:
This is an example of the Magento manifest. You can use this code as a basis for preparing application packages. Other examples can be found here .
Additional useful information:
Let's look at the other side of using JPS. When the application manifest is ready, you can share the option to install the application in 1 click with users using the installation widget:

As an example, we analyze the Magento package widget.
1) Place the following javascript on your page. Best of all, if the code is immediately after the opening tag.
2) Place this code in any place where you would like to see the widget.
The above attributes are responsible for:
data-manifest - defines a link to a JSON file.
data-width - the width of the widget.
data-theme - the color of the widget. Available: flat-blue, flat-purple, flat-orange, flat-green;
data-text - the initial label of the widget. Default text: Get it hosted now!
data-tx-empty - when you hover the mouse over the widget, the user will see the text described by this attribute. Default: Type your email and click the button
data-tx-invalid-email - the text described by the attribute is given if the e-mail is incorrect. Default: Invalid email, please check the spelling
data-tx-error - if any error occurs the user sees the message: An error has occurred, please try again later
data-tx-success - the text will be shown, if everything is OK, the installation process has been started and a confirmation email has been sent: Check your email.
class - the attribute always contains the value of je-app.
data-key is an optional parameter that specifies the hosting provider. If the parameter is not defined, then GeoIP will work. A geographically close provider will be selected.
Widget you can use on any site and customize it as you like. The only condition that must be met, the widget must request a link of the following form:
reg.app.jelasticloud.com/installapp?email= {user_email} & id = {app_id}
When the widget is already placed on the site, any user can start the installation process by clicking the button Get it hosted now! and performing a series of actions:
1) Enter the email address and click on the pointer.

2) An email with a link to confirm will be sent to the specified e-mail. The link is valid once and redirects to the Jelastic control panel.

If the e-mail is already registered in Jelastic, then the user will automatically login to the control panel. Otherwise, the user will receive login credentials to the e-mail.
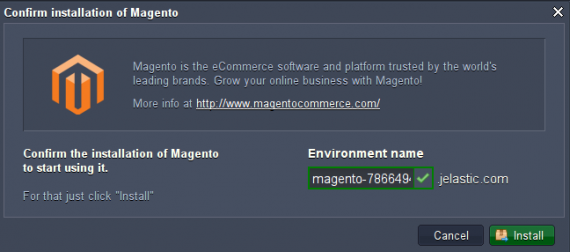
3) In the control panel, the Confirm installation of application window with brief information about the application will open.
You must enter the name of the environment that will be created for the deployment of the application and click Install.
4) The creation process has begun. You must wait a couple of minutes, the creation of the environment, its configuration and deployment of the application will be completed.
Url applications and data to access it will be displayed at the end of the installation process (of course, if it is specified for the application).
5) Click the Open in browser button and the application will load at the same time.
As you can see, the application is working and ready to use. There is nothing difficult!
In this article, we looked at how easy it is to package an application and give the end user the ability to easily deploy it.
Create packages of your applications and share them on sites using widgets. One click - and you're done!
The more widgets, the more users.
Start now and experience the benefits of using the JPS format and the InfoboxCloud Jelastic platform .
In this article we will consider a solution that allows you to automate the installation of an application in one click - Jelastic Packaging Standard (JPS) . We will describe how to pack the application as a ready-to-use product.
')
general information
JPS is a standard that can be used to create application templates that are ready to be installed in Jelastic in 1 click. Currently, the system supports applications in Java, PHP and Ruby. In the future, we plan to add support for other programming languages.
JPS simplifies installation and application configuration for the end user, manages the application deployment process, determines the set of its properties and the cluster configuration in which the application will run. JPS also indicates the amount of resources needed and the scaling limits for each container in the environment.
Using JPS, you can offer users a widget for quick installation of applications. This contributes to the spread of the application and sales growth. Attracting users becomes easier because of the ease of installation and configuration. In addition, reduced support costs and other issues related to the distribution of the application.
Installation Process with JPS
Each installation widget contains an application manifest (or a link to it) describing the topology of the environment required for proper operation, as well as installation and configuration instructions. JPS manifest based on JSON .
To start installing the prepared application, the user must click on the widget and enter a valid e-mail. An e-mail will be sent to the specified address, using the link from which you need to go to initialize the installation. The user will be redirected to the Jelastic control panel, where he will be able to confirm the action.
After that, Jelastic will take several minutes to complete the installation process. It is worth noting that the actual duration depends on the selected application, its properties and characteristics. Jelastic relies on the manifest and creates the necessary nodes: application servers, databases, load balancers, and so on. As a result, the user gets a fully functional application without any manual operations.
Below we take a closer look at the technical side of preparing a manifest and creating a widget. And of course we will show how the installation looks in one click from the end user.
Application manifest
Before packing the application, we recommend to deploy it in the Jelastic cloud manually and check if everything works as it should. This is worth doing to know exactly what configuration you need to specify in the manifest.
You can use the JSON Formatter & Validator or http://pro.jsonlint.com to create a manifest that fully fits JSON requirements. Your code must contain a set of lines necessary for successful installation of the application.
Manifest Content
The mandatory part of the manifest contains several lines:
{ "jpsVersion":"0.2" "jpsType": "install", "application": { } } This part contains information about the JPS version and the type of installation of the application (for example, “install” starts the process of creating a new environment that is suitable for deployment).
Application settings
The above code must be expanded in accordance with the settings of the application that you are going to pack using the JPS standard. Configuration information is included in the “application” parameter: {}
First of all, you need to describe some general information about the application. For example, the name, version, programming language, and more.
Sample code for OpenCMS that contains basic information about the application:
{ application: { "id":"opencms", "name":"OpenCMS", "version":"8.5", "logo":"", "type":"java", "homepage": "", "description": { "en": "OpenCMS from Alkacon Software is a professional, easy to use website content management system. OpenCms helps content managers worldwide to create and maintain beautiful websites fast and efficiently.", "ru": "Russian description" }, "startPage" : "/install.jsp", "success": { "text": "Dashboard success text", "email": "Email success text" } }} Detailed information about the available options can be found in the JPS documentation .
Environment settings
Here you need to specify the information about the environment that the application requires for optimal performance. The settings specified in this part of the code will be used to create and configure the environment required for installation of the package.
Use the “env” parameter : {} to describe all the required values. Thus it is necessary to consider the possible options that are listed in the documentation .
From the parameters you can use:
“Topology”: {} contains data about the programming language of the environment, data about the necessary nodes and allows you to use additional functions such as High Availability and SSL.
"topology":{ "ha":"value", "engine":"value", "ssl":"value", "nodes":[ ] }, “Deployments”: [] is responsible for the deployment process of the application in the finished environment.
"deployments":[ { "archive":"value", "name":"value", "context":"value" } ] “Upload”: [] - the block can be added, if the application requires third-party files, they will be downloaded and installed.
"upload":[ { "nodeType":"value", "sourcePath":"value", "destPath":"value" } ], “Configs”: [] - this block allows you to change any file on any of the nodes to configure application settings (for example, a description of the process of establishing a connection between an application server and a database).
"configs":[ { "nodeType":"value", "restart":"value", "replacements":[] "path":"value", "database":{}, } ] An example of code that describes the parameters of the environment to perform Hello World:
"env": { "topology": { "engine": "php5.3", "nodes": [{ "extip": false, "count": 1, "cloudlets": 16, "nodeType": "apache2" } ], "ssl": false, "ha": false }, "deployments": [{ "archive": "http://app.jelastic.com/xssu/cross/download/RDYYHFNuUQYJBFpPZQ08F0UWCRlUHxdBD0ZlTS4gcQJFFBJUDwIBQmNTTEBI", "name": "Hello World", "context": "ROOT" } ], "configs": [] }, Detailed information on the initial settings is available here .
JPS maintains a list of templates (placeholders) that can be used in any part of the JPS file (unless the block is strictly limited to the content). The JPS controller will try to convert all the templates at the package installation stage. If this does not happen, the template will not be implemented and will be displayed in the text as $ {placeholder}
Check result
To check the correctness of the created manifest, use the link below. The link initiates the installation process:
app.jelasticloud.com?manifest= {manifest_code}
Note that in this link, instead of the manifest code, we recommend using a URL with a JSON manifest file.
In case of problems with the manifest, you can click Send report and the details of the error in details appear:
JSON code can be checked for example in the validator http://pro.jsonlint.com and correct the error.
If successful, you will see the proposal to deploy the application:
Sample Manifest for Magento
This is an example of the Magento manifest. You can use this code as a basis for preparing application packages. Other examples can be found here .
{ "jpsVersion": "0.2", "jpsType": "install", "application": { "id": "omagento1", "logo": "https://app.jelastic.com/xssu/cross/download/RDYYHFNvBFQOA1RKYgFoRhdDWhRTS00RDxZtG34gIlYWHhdXDwIBQmNTTEBI/view", "description": { "en": "Magento is the eCommerce software and platform trusted by the world's leading brands. Grow your online business with Magento!" }, "name": "Magento1", "env": { "topology": { "engine": "php5.3", "nodes": [{ "extip": false, "cloudlets": 16, "count": 1, "nodeType": "apache2" }, { "extip": false, "cloudlets": 16, "count": 1, "nodeType": "mysql5" } ], "ssl": false, "ha": false }, "deployments": [{ "name": "magento-1.7.0.2.zip", "context": "ROOT", "archive": "https://app.jelastic.com/xssu/cross/download/RDYYHA9jBlRaAVRLZldjQUdFDhhUG0dACkY4TnpzJlFFEhZVDwIBQmNTTEBI" } ], "configs": [{ "nodeType": "mysql5", "database": { "dump": "https://app.jelastic.com/xssu/cross/download/RDYYHFM0UFEJU1VNNwVqRRBAXhhXGBEQChNrG31xdFQRFkBYDwIBQmNTTEBI", "patch": "UPDATE magento.admin_user SET password=CONCAT(MD5('qX${user.appPassword}'), ':qX'), email='${user.email}' WHERE username='admin';", "name": "magento", "user": "magento" } }, { "replacements": [{ "replacement": "<![CDATA[${env.appid}]]>", "pattern": "{{key}}" }, { "replacement": "<![CDATA[${nodes.mysql5.address}]]>", "pattern": "{{db_host}}" }, { "replacement": "<![CDATA[${nodes.mysql5.database.user}]]>", "pattern": "{{db_user}}" }, { "replacement": "<![CDATA[${nodes.mysql5.database.password}]]>", "pattern": "{{db_pass}}" }, { "replacement": "<![CDATA[${nodes.mysql5.database.name}]]>", "pattern": "{{db_name}}" }, { "replacement": "</config>", "pattern": "{{db_name}}" } ], "path": "/var/www/webroot/ROOT/app/etc/local.xml", "nodeType": "apache2" }, { "restart": true, "replacements": [{ "replacement": "extension=gd.so", "pattern": "; Dynamic Extensions ;" } ], "path": "/etc/php.ini", "nodeType": "apache2" } ] }, "success": { "text": "Admin panel URL: <a href='${env.url}index.php/admin/' target='_blank'>${env.url}index.php/admin/</a> Username: admin Password: ${user.appPassword}", "email" : "Admin panel URL: <a href='${env.url}index.php/admin/' target='_blank'>${env.url}index.php/admin/</a> Username: admin Password: ${user.appPassword}" }, "type": "php", "homepage": "http://www.magentocommerce.com/", "version": "1.7.0.2" } } Additional useful information:
- Links in the manifest to the logo should be https.
- The ha attribute is available only for Java applications at the moment.
- for the correct display, the description must be in all languages that are included in the Jelastic control panels (currently it is Russian and English).
Installation widget
Let's look at the other side of using JPS. When the application manifest is ready, you can share the option to install the application in 1 click with users using the installation widget:
As an example, we analyze the Magento package widget.
1) Place the following javascript on your page. Best of all, if the code is immediately after the opening tag.
<html> <body> <script> (function(d, s, id) { var js, fjs = d.getElementsByTagName(s)[0]; if (d.getElementById(id)) return; js = d.createElement(s); js.id = id; js.async = true; js.src = "//go.jelastic.com/widgets.js"; fjs.parentNode.insertBefore(js, fjs); }(document, 'script', 'jelastic-jssdk')); </script> </body> </html> 2) Place this code in any place where you would like to see the widget.
<div class="je-app" data-manifest="link_to_json_file" data-width="280" data-theme="flat-blue" data-text="Get it hosted now!" data-tx-empty="Type your email and click the button" data-tx-invalid-email="Invalid email, please check the spelling" data-tx-error="An error has occurred, please try again later" data-tx-success="Check your email" data-key="app.jelasticloud.com"> </div> The above attributes are responsible for:
data-manifest - defines a link to a JSON file.
data-width - the width of the widget.
data-theme - the color of the widget. Available: flat-blue, flat-purple, flat-orange, flat-green;
data-text - the initial label of the widget. Default text: Get it hosted now!
data-tx-empty - when you hover the mouse over the widget, the user will see the text described by this attribute. Default: Type your email and click the button
data-tx-invalid-email - the text described by the attribute is given if the e-mail is incorrect. Default: Invalid email, please check the spelling
data-tx-error - if any error occurs the user sees the message: An error has occurred, please try again later
data-tx-success - the text will be shown, if everything is OK, the installation process has been started and a confirmation email has been sent: Check your email.
class - the attribute always contains the value of je-app.
data-key is an optional parameter that specifies the hosting provider. If the parameter is not defined, then GeoIP will work. A geographically close provider will be selected.
Widget you can use on any site and customize it as you like. The only condition that must be met, the widget must request a link of the following form:
reg.app.jelasticloud.com/installapp?email= {user_email} & id = {app_id}
By the user
When the widget is already placed on the site, any user can start the installation process by clicking the button Get it hosted now! and performing a series of actions:
1) Enter the email address and click on the pointer.
2) An email with a link to confirm will be sent to the specified e-mail. The link is valid once and redirects to the Jelastic control panel.
If the e-mail is already registered in Jelastic, then the user will automatically login to the control panel. Otherwise, the user will receive login credentials to the e-mail.
3) In the control panel, the Confirm installation of application window with brief information about the application will open.
You must enter the name of the environment that will be created for the deployment of the application and click Install.
4) The creation process has begun. You must wait a couple of minutes, the creation of the environment, its configuration and deployment of the application will be completed.
Url applications and data to access it will be displayed at the end of the installation process (of course, if it is specified for the application).
5) Click the Open in browser button and the application will load at the same time.
As you can see, the application is working and ready to use. There is nothing difficult!
Results
In this article, we looked at how easy it is to package an application and give the end user the ability to easily deploy it.
Create packages of your applications and share them on sites using widgets. One click - and you're done!
The more widgets, the more users.
Start now and experience the benefits of using the JPS format and the InfoboxCloud Jelastic platform .
Source: https://habr.com/ru/post/220137/
All Articles