Automate acceptance testing for Android applications using Calabash
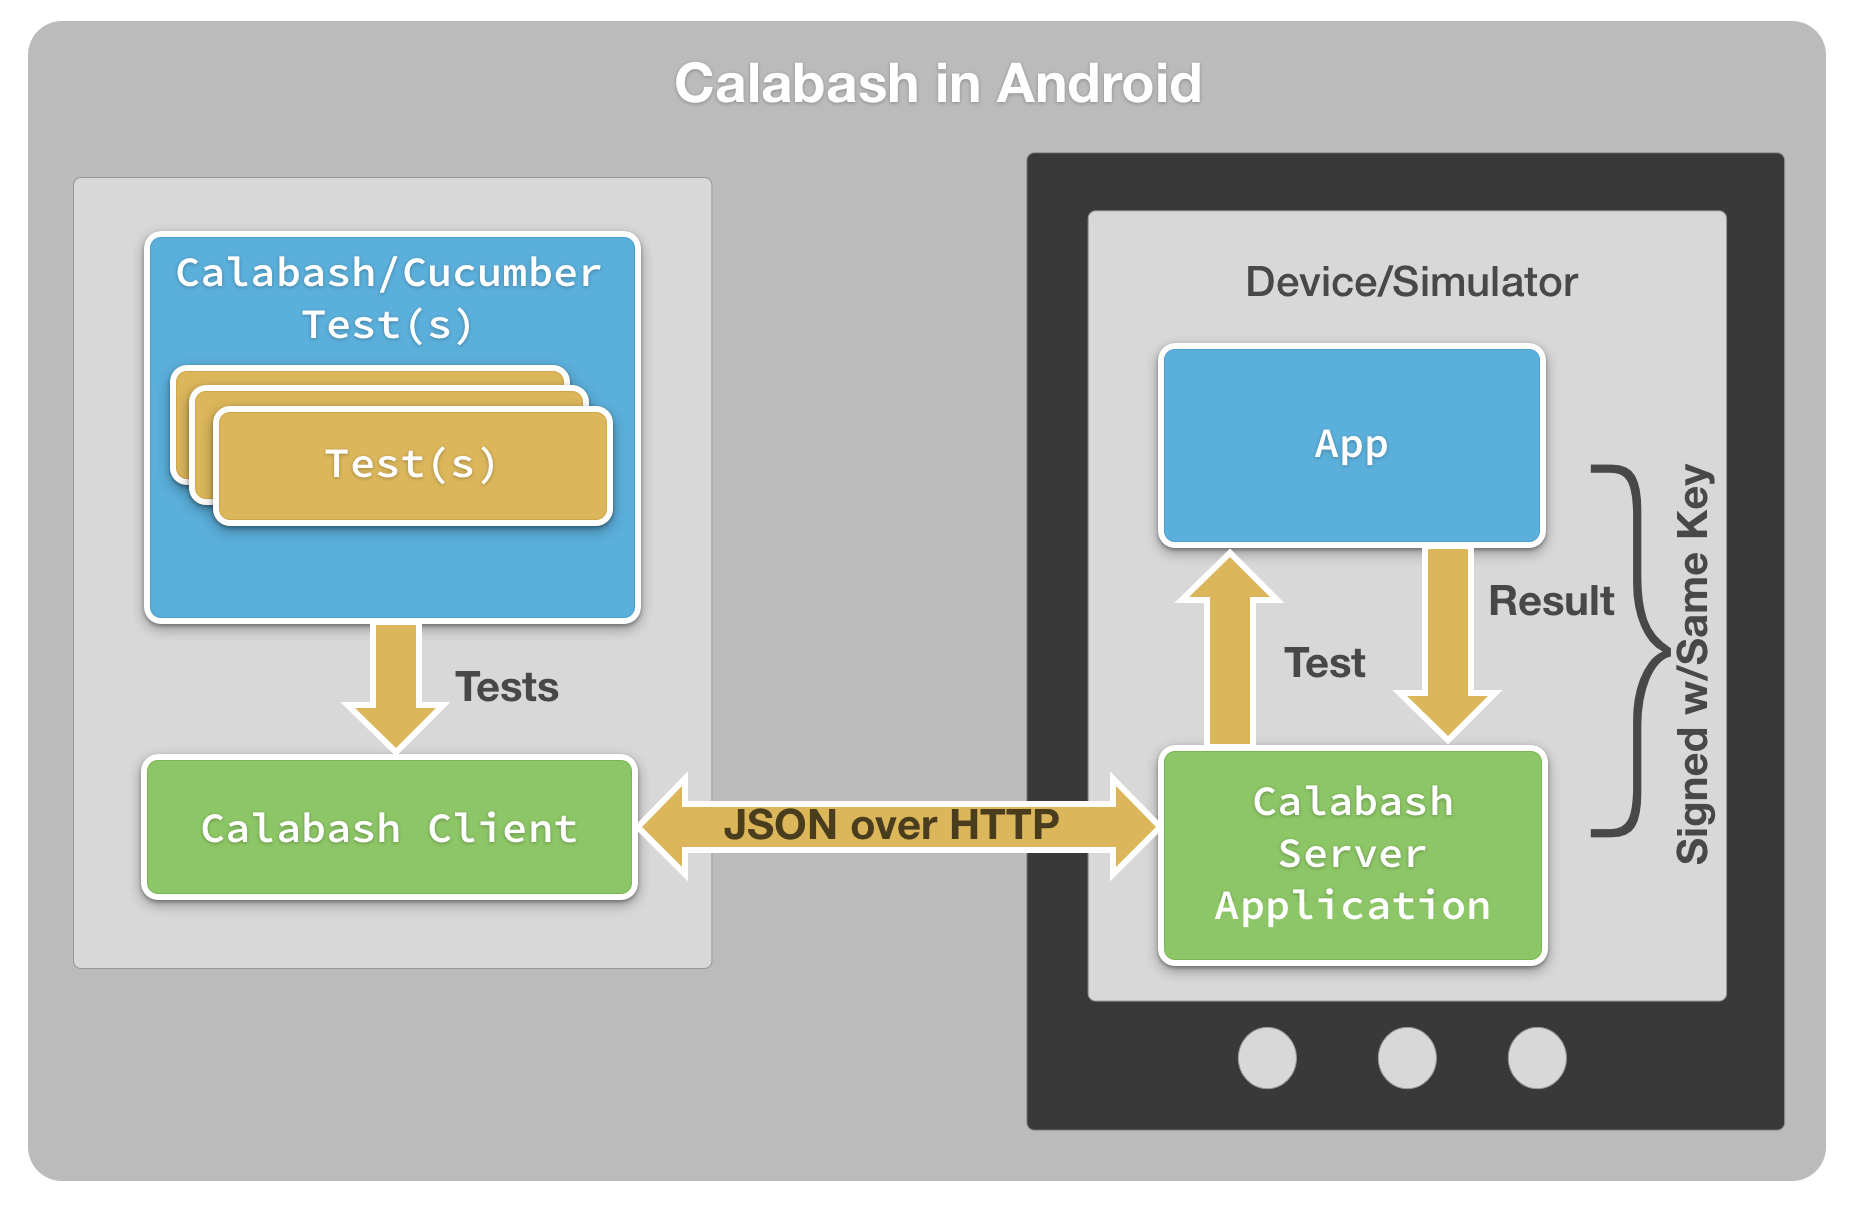
Image source
In this article I want to introduce you to another framework for automating the testing of mobile applications, namely Calabash, a cross-platform solution for acceptance testing of Android and iOS applications. The article is designed for beginners who are testing or would like to test Android applications.
Calabash
Calabash is an open source cross-platform framework for automating acceptance testing of Android and iOS applications. The development and support of the company is Xamarin. Xamarin also provides a commercial test opportunity in the cloud.
Calabash consists of libraries that allow the test programmatically interact with native and hybrid applications. The interaction is in the form of implemented user actions. Such actions may be:
- Gestures
Touch and gestures (tap, swipe, rotate, etc.). - Checks
For example: There should be a “Login” button on the screen. - Taking a snapshot of the screen of a mobile device
Calabash can be compared to Selenium WebDriver. However, it should be understood that interaction with a web application from a computer is significantly different from the interaction of native applications using a touch screen.
Calabash supports sucumber. Cucumber allows us to describe the behavior of the program using a simple “human” language that is understandable to a business analyst, manager and tester without programming knowledge. Take a look at an example:
')
Feature: Rating a stand Scenario: Find and rate a stand from the list Given I am on the foodstand list Then I should see a "rating" button And I should not see "Dixie Burger & Gumbo Soup" When I touch the "rating" button Then I should see "Dixie Burger & Gumbo Soup" When I touch "Dixie Burger & Gumbo Soup" Then I should see details for "Dixie Burger & Gumbo Soup" When I touch the "rate_it" button Then I should see the rating panel When I touch "star5" And I touch "rate" Then "Dixie Burger & Gumbo Soup" should be rated 5 stars You can learn more about Cucumber, for example, by reading the article: habrahabr.ru/post/62958
Benefits of Calabash for Application Testing:
- Ease of writing tests
- The ability to write cross-platform tests (for Android and iOS)
- Cucumber style scripts
- Great Ruby API
- Ability to run tests in the cloud
- Ability to run tests on the emulator
Disadvantages:
- Sometimes it is difficult to identify objects
- The prescribed steps are not always enough to write a test script.
- Apk-file of the tested application is required
- Long enough passing tests
Installation
You can test using Calabash on both Windows and Linux or MacOS, but in this case I use Windows 8 64-bit OS (Also tested on Windows 7 64x). To get started with Calabash, you need to install some components:
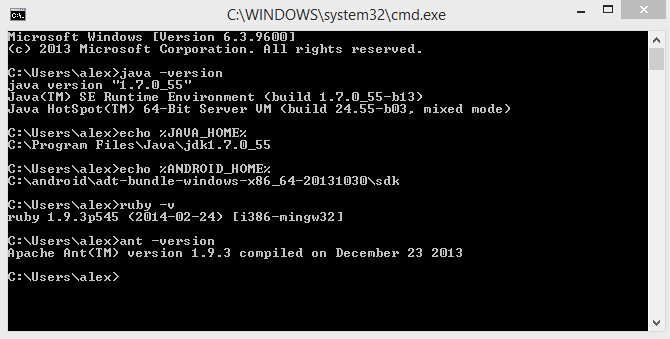
- JDK7 Standard Edition
If you do not have JDK7 (or 6) installed, then download and install it: www.oracle.com/technetwork/java/javase/downloads/jdk7-downloads-1880260.html . After you have installed the JDK, you need to create the JAVA_HOME system variable, which will indicate the location of the JDK. Also add the path to java to the PATH environment variable ( if you did not change the JDK installation path, then java is located here: C: \ Program Files \ Java \ jre7 \ bin ). - Android SDK
Download and unzip to a convenient place Android SDK (or ADT Bundle): developer.android.com/sdk/index.html?hl=sk . After this, you need to create a ANDROID_HOME variable indicating the location of the Android SDK ( I have: C: \ adt-bundle-windows-x86_64-20131030 \ sdk ), and also add the adb location to the PATH ( for example, C: \ adt-bundle-windows-x86_64 -20131030 \ sdk \ platform-tools ) - Ant
Download and unpack Ant (http://ant.apache.org/bindownload.cgi), and then create the ANT_HOME variable, in which you set the path to Ant and, as before, add the ant.exe location to the PATH environment variable, namely% ANT_HOME% \ bin - Ruby 1.9.3. (not 2.0 !!!)
Download the installation file from the site rubyinstaller.org/downloads and install, during the installation, check the box next to the option “Add ruby executables to your PATH”
- Ruby development kit
The Ruby Development Kit is also required to access Ruby gems (package manager). Download the installation file to the site: rubyinstaller.org/downloads . Install, follow the instructions on the screen.
After that check that you have correctly added the variables:
It's all right, install Calabash-android from the Ruby gems package manager (run the windows command line):
> gem install calabash-androidEverything is installed, now you can start testing.
Test case development
For review, we will not create complex scenarios: we will implement a check for the Dutch localization of the application menu. We will test the Clean Master (Free) version 3.8.1 known to many, the apk of which is available on the website: www.androiddrawer.com .
We define the actions that will be implemented in the test:
- Check for all the necessary options in the application menu
- Change the application language to Dutch
- Verifying the translation of menu options
Application analysis
To analyze the user interface of the application, we will use the Calabash console interesting environment. The Ruby API ( github.com/calabash/calabash-android/blob/master/documentation/ruby_api.md ) allows us to get the objects and their properties that are present on the screen. The most useful commands of the interactive calabash environment are: query to search for necessary objects and their properties, tap - command to click on an object, and also performAction - execute certain actions (click on the “back” button, “menu”, scroll, etc.). Analysis of the application's UI will greatly simplify the process of writing a test script.
To get started you need to:
- Create a directory where our project will be stored:
> mkdir calabash_habr && cd calabash_habr - Generate the Cucumber file structure, which includes directories with features (description), step definitions, support:
> calabash-android gen
- Put apk in the root directory of the project
- After that, you need to re-sign the application:
> calabash-android resign "Clean Master_3.8.1.apk"
If you failed to re-sign, you must first run the command:keytool -genkey -v -keystore ~/.android/debug.keystore -alias androiddebugkey -storepass android -keypass android -keyalg RSA -keysize 2048 -validity 10000 -dname "CN=Android Debug,O=Android,C=US" - Connect the device
- Install the application under test on the device:
> adb install "Clean Master_3.8.1.apk"
Now we can proceed to the analysis of the application interface:
- Launching the calabash-console interactive console environment
> calabash-android console "Clean Master_3.8.1.apk" - We start the test server:
irb(main):001:0> start_test_server_in_background
If you failed to start the test server, then run the command:irb(main):001:0> reinstall_apps - Click on the button "Menu":
irb(main):007:0> performAction('press_menu')
And we get:{ "bonusInformation" => [], "message" => "", "success" => true }
The menu has opened. - We need to go to “Settings”, for this we first find out which object has the text “Settings”:
irb(main):008:0> query("* text:'Settings'")
As a result, we learn that an object with the text “Settings” has the id “menuSettings”:[ [0] { "id" => "menuSettings", "enabled" => true, "contentDescription" => nil, "class" => "android.widget.Button", "text" => "Settings", "rect" => { "center_y" => 67.0, "center_x" => 720.0, "height" => 40, "y" => 47, "width" => 160, "x" => 640 }, "description" => "android.widget.Button@4280e6f8" } ] - Click on the button with the id “menuSettings”:
irb(main):011:0> tap('menuSettings')After that, the application settings are opened.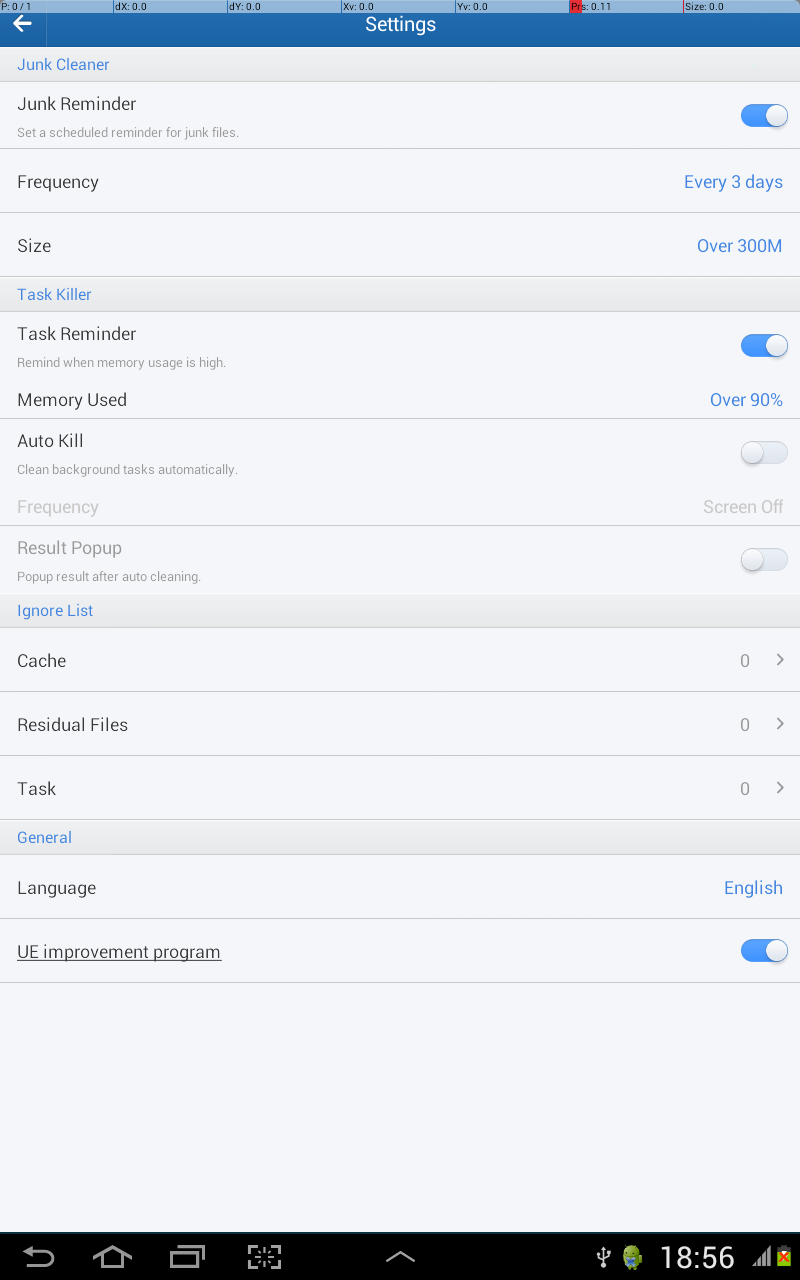
- That's enough, exit the interactive console:
irb(main):003:0> exit
Now let's start writing a test. Calabash has a sufficient number of steps created, which are practical to use when describing features. With the actions that are present by default, please visit: github.com/calabash/calabash-android/blob/master/ruby-gem/lib/calabash-android/canned_steps.md , but if there are not enough actions by default, then there is Description of the beautiful Ruby API available on the site: github.com/calabash/calabash-android/blob/master/documentation/ruby_api.md .
Open the file my_first.feature , which is located in the features directory and write our test script. In this example, let's use the steps that Calabash offers ( github.com/calabash/calabash-android/blob/master/ruby-gem/lib/calabash-android/canned_steps.md steps)
We get the following simple script
Feature: Menu localization # Scenario: As a user I can open a menu and verify options # "" When I press the menu key # , "Settings", "Update" .. Then I see "Settings" Then I see "Update" Then I see "Like us" Then I see "Rate us" Then I see "Feedback" Then I see "FAQ" Then I see "Fast Clean" Then I see "About" Scenario: As a user I can change language app to Nedelrands When I press the menu key When I press "Settings" Then I press "Language" When I press "Nederlands" Then I see "Taal" When I go back When I press the menu key Then I see "Instellingen" Then I see "Moderniseren" Then I see "Net als wij" Then I see "Beoordeel ons" Then I see "Terugcontact" Then I see "FAQ" Then I see "Snel schoonmaken" Then I see "Over ons" As you can see, everything is quite simple. Run the test:
> calabash-android run "Clean Master_3.8.1.apk" As a result of passing the script, we get: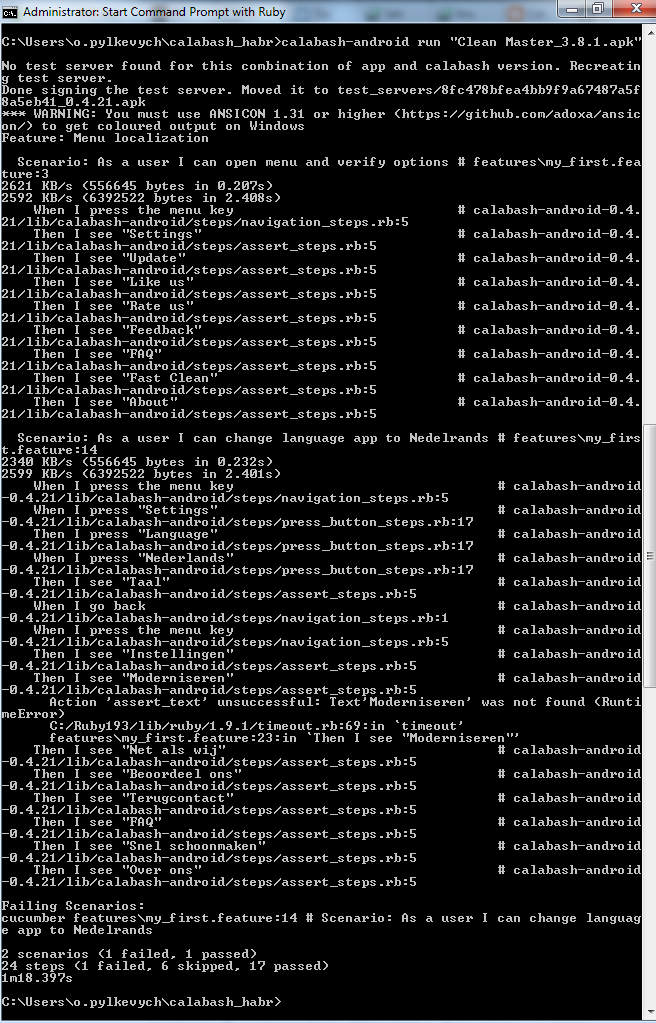
Of the two scenarios, one failed as one of the steps failed the test. In the project directory calabash generates a screenshot named screenshot_.png .
Indeed, the word "Update"
not translated into Dutch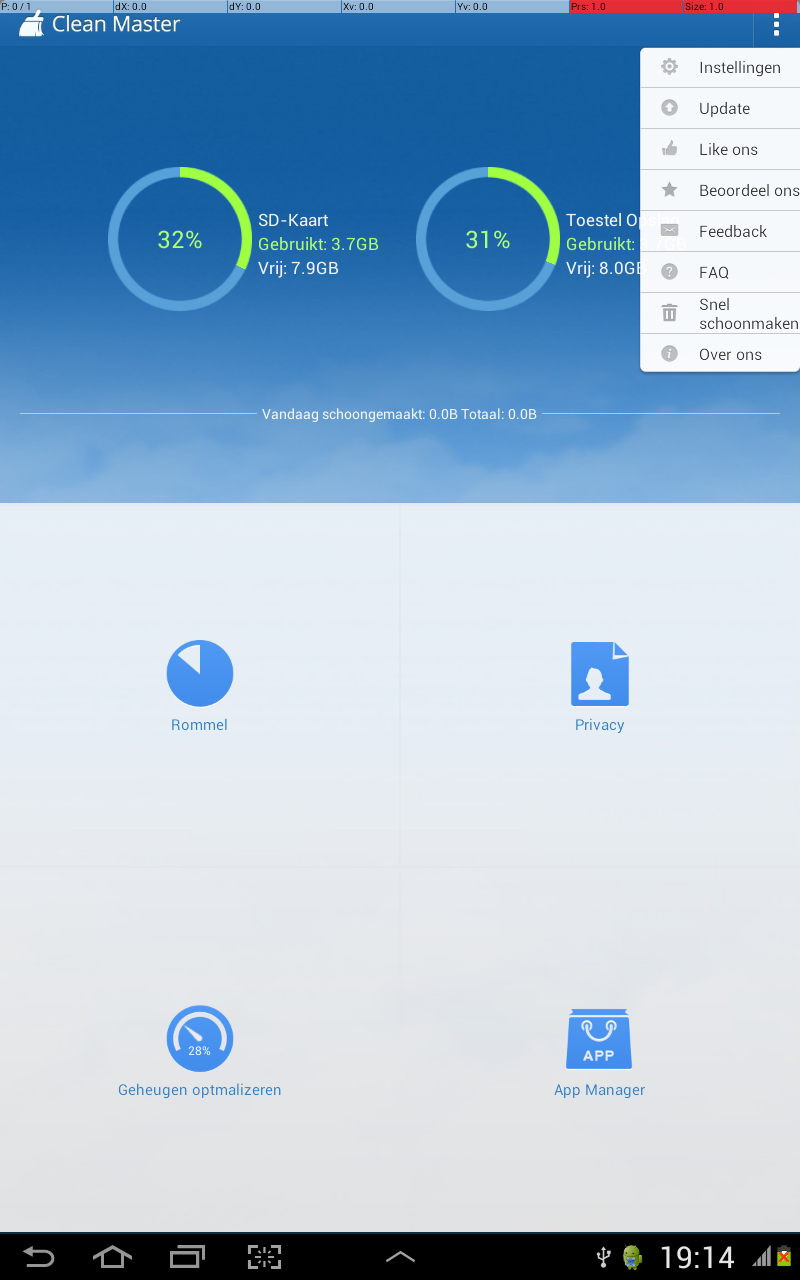
Conclusion
Using the Calabash framework is very convenient for high-quality acceptance testing of applications. You can write test scripts that will work for both Android and iOS applications without much effort. The framework is actively developing, easy to use and integrate. Over time, I'm going to write a small post about how to program my actions using the Calabash Ruby API. More information can be found at github.com/calabash/calabash-android .
For convenience, you can clone a finished project from GitHub: github.com/amazpyel/calabash_habr
Source: https://habr.com/ru/post/219655/
All Articles