As we were beaten by current on April 1
On fool's day this year, my colleagues and I decided to do a little more than just a joke. We came up with an interactive format with transmissions from our office and made it possible for everyone to tickle our volunteers with a small electrical discharge, literally live.
We will not touch on the moral and ethical side of this issue in the article, just to say that all participants had the opportunity only to simulate getting a discharge, but none of them practically used it.
Here we will talk about how the technical part of this event worked.
')
On the page there is a slider from three video streams, under each of which there are buttons like from Facebook and VK. Clicking on any of them should cause the relay corresponding to the slide to close.
Special thanks to Arduino, Qt and the wonderful QextSerialPort library.

The blue tape was not there because of the need to use non-Orthodox black tape.
First you had to figure out how to catch likes. API excavations on VK and Facebook led to the following:
inserting more than one button is a bit unpleasant, but possible
catching likes is easy. Distinguishing them is a little more difficult.
Let's do the insertion of several buttons and catching likes.
We read the manual vk.com/dev/widget_like , create three blocks:
And we initialize them:
With the last parameter, you need to be careful - it affects the cache of the remaining parameters and after any change in the second parameter, you must change the third one. Sad, but true.
Now catching likes. The documentation says that you can subscribe to the widgets.like.liked event. But the parameters of the handler function are not described and how to understand which button was pressed is not very clear. Through the debugger, we managed to find out that there are two parameters a and b, but using undocumented features is fraught. Remember the laws of Murphy. Behind this, we set up a global variable “slide number”, according to which we send to the server information about which relay should work (and whom, respectively, of our stars to hit with current). For maniacs who quickly flip through and like, we use the ostrich algorithm, that is, we will not do anything. So js begins to take the following form:
On the slideshow we put back and forth functions that change the current_slide variable to the value corresponding to the current frame.
Facebook
Now remember about Facebook. I do not like this social network, but as they say, the taste and color of all markers are different. In the documentation
developers.facebook.com/docs/plugins/like-button
developers.facebook.com/docs/reference/javascript/FB.Event.subscribe
find the opportunity to subscribe to the edge.create event and try to use it:
The get parameter only serves to ensure that the counters near the buttons work independently of each other.
Save, load the page and test the buttons. Hurray, the data goes to the server. For now, nowhere.
On the photo, the data has already come where it is necessary and the light bulb is lit.
In the absence of a large amount of time and the presence of a small laziness, the server part took the following form:
1. an ajax server that receives reports about http http and sends them to the socket on a daemon process that already stores all of the likes that were not sent to the performing part and sends them on request from the client.
2. a process daemon that is a server on sockets and understands two variants of the request: “give up the message” and “add a like to the queue”.
The first point is solved briefly and clearly:
“The Demon” is a little bit messed up, for he is smarter
So, now we run ...
screen php -f srv.php
And go to the part that will work with the Arduino. In the absence of the ethernet shield, we are doing a desktop application that will work as a daisy interface module on the server and Arduino.
Since I am a Linux user, and the “client” computers will work under Windows, then for the development of this module, we take Qt + Qt Creator. It can make the interface, works with the network, and indeed the thing is good and cross-platform. There is no standard library for working with the serial port, but there is a wonderful QextSerialPort project: code.google.com/p/qextserialport which I have been using for my own purposes for a long time.
We put Q-everything, make a new project, add the network module, QextSerialPort files and rivet a simple interface: a text field for entering the port name and a “connect” button, which starts an endless process of requesting new likes from the server and sending the entire answer to arduino.
I note that the information about the pressed like-buttons is sent to the qt-client in batches of no more than 5 events. The consideration is simple: this is enough for the receiving party to know what to do and not to strain too much, which can be blocked by the serial port buffer on the Arduino. Plus there are some considerations of humanity, which are a little lower.
The main instrument of torture.
The sketch is extremely simple. We read a digit from the serial port and feed HIGH to the corresponding pin. And after 1200ms turn off back.
From the code it is clear that if during the time between polls of the server (about 1-2c) five commands arrive with a current to hit one person, he will receive only one hit. Firstly, it is more humane. Secondly, in such a simple way we get rid of the problem with the fact that the distribution of electric shocks can be infinite, if people break in like a wild speed.
Switching on for 1200 ms was chosen empirically; this value was enough for the Chinese lighter for the stove to be guaranteed to “swing” a spark.
The same Chinese stove lighter is already half-assembled.
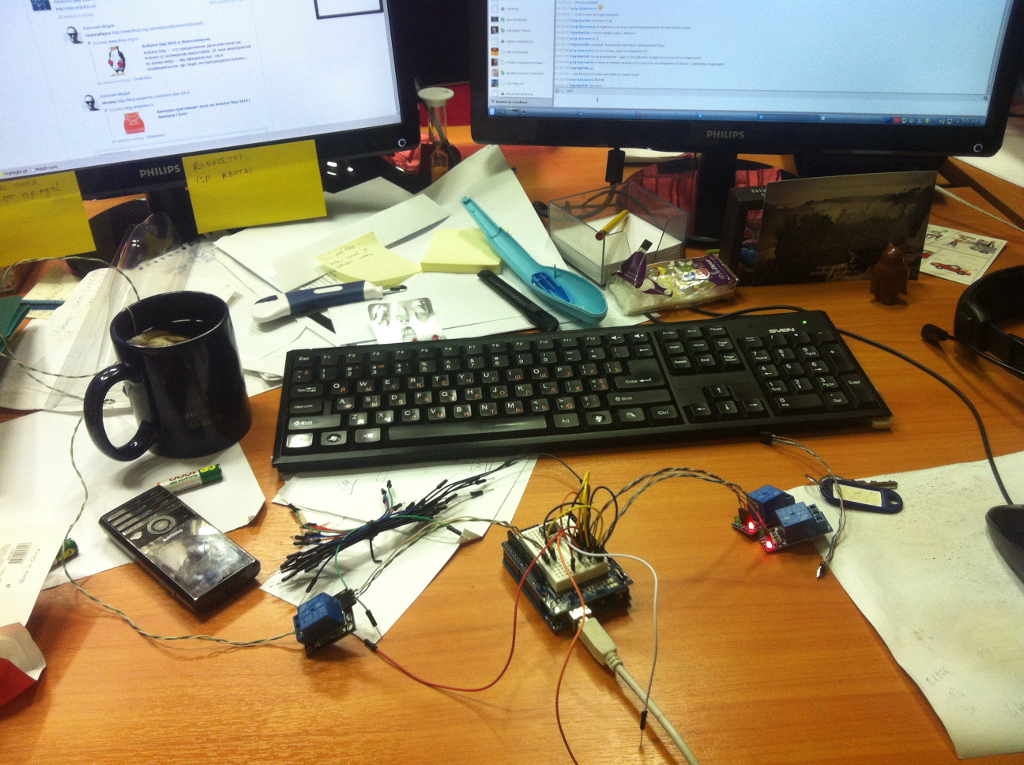
Take the Arduino Uno, prototype shield, three relays, wiring, twisted pair trim, 3 Chinese electric lighters and PLS-40 / PBS-40 bar for connections. While the soldering iron is heating up, we put the shield on the arduino, cut off the centimeters of the 15th twisted pair and cut the connector strips into 3 to 3. The twisted pair turned out to be copper, but mono-core, which was somewhat upsetting, as I was used to home (already deceased) stocks, where the wiring was multicore and soft. We solder the connecting wires, connect the relay to the Arduino and wiring check the operation of the relay. Click-Click-Click. Works.
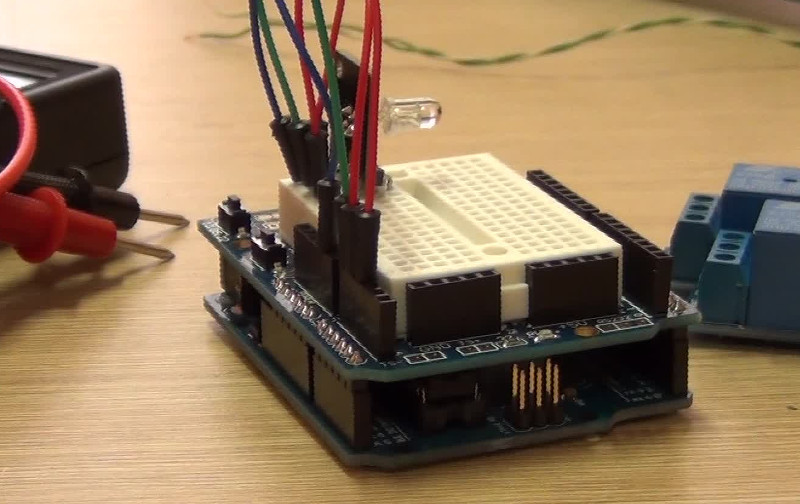
Arduino itself with the installed bar.
We disassemble the lighters, solder to the contacts that were closed with a button on the lighter, along a segment of a twisted pair. The second ends of these wires are inserted into the controlled contacts of the relay, we connect the batteries in the lighters, we try. We happily swear because we did not notice how we touched the contacts with the elbow =)
We stick Arduino in a computer, we fill in the sketch, starts the Qt-client, we try. The poisonous crackling of sparks from lighters shows what worked.
Understanding perfectly well that good people can calmly “fry” the test subjects, and the D-size battery is simply discharged, then parallel to the control contacts of each relay through 1K resistor we turn on the LED placed on the long wire to the upper edge of each monitor. Given that the lighter “swings” for almost a second, this alarm goes even before the relay clicks and the sparks from the lighter are about half a second.
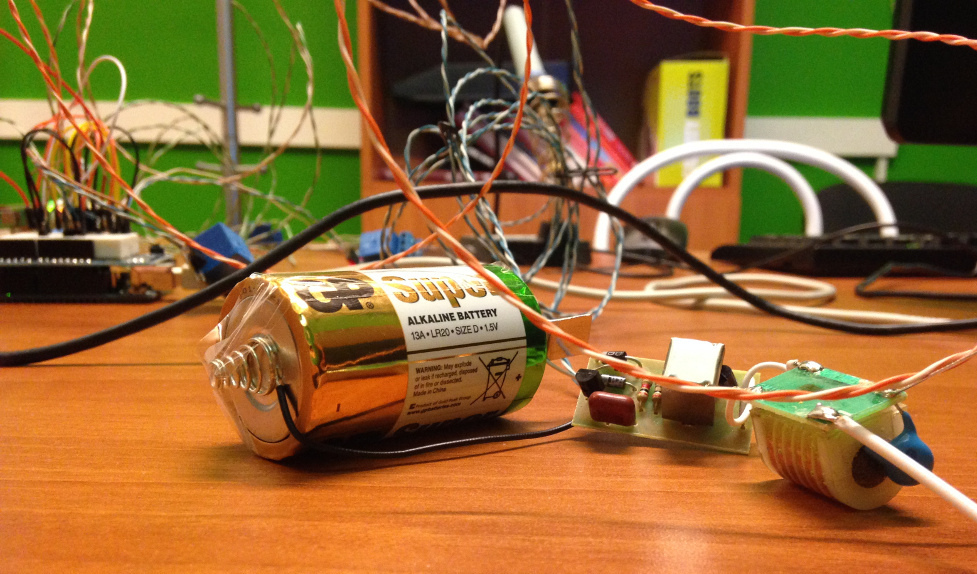
The battery was able to hold out all day.
Video broadcasting was implemented via youtube using Live events . Since one channel can only have one broadcast at a time, we had to make three confirmed channels. Plus, you need to install the Google hangouts extension in your browser. Both take not much time.
So, the software part is ready, the cameras are installed. We open on three computers of our youtube artists, we launch three broadcasts. We copy on them links for display and we insert them on our page with electrocontrol. The main thing is not to make a mess of matching cameras and relays. Well, do not forget the magic phrase “do not close this window!”.
The restriction on the length of the broadcast at 8h was bypassed simply: at the end of those 8h hours, the old ones were stopped and new broadcasts were launched for the remaining hour (the show lasted 9h). And the artists got five minutes of rest.
15 minutes before the start.
During operation, it turned out that there were cunning users who guessed that you could put like, then press dislike and so on ad infinitum.
We have not yet decided on this bug or feature, but still, having received lulz from users and fountains of joy and repost, we slightly covered this hole. We have three streams, each can put like in two social networks. Total 6 maximum for a “non-clinical” sadist. We give a small margin to play around and on the value 9 we begin to show a picture with the inscription “Sadist”. Yes, we leave the opportunity to play further.

The system is recognized as working and bringing a lot of joy. Hopefully, the description described here will be a source of inspiration for someone, and we will see other examples of connecting social mechanics with offline.
Screenshot of the site, as it looked live
UPD Video Broadcast. Video report about the event is mounted.
www.youtube.com/watch?v=G52Rfq6wrDk
www.youtube.com/watch?v=S4dwTEVqZIc
www.youtube.com/watch?v=p0ABXUK3tWo
We will not touch on the moral and ethical side of this issue in the article, just to say that all participants had the opportunity only to simulate getting a discharge, but none of them practically used it.
Here we will talk about how the technical part of this event worked.
')
Task
On the page there is a slider from three video streams, under each of which there are buttons like from Facebook and VK. Clicking on any of them should cause the relay corresponding to the slide to close.
Implementation in brief
- Clicking on the like-button causes an ajax request to the server. On the server, the receiving script collects a queue of “clicked” frames from the slider;
- On the computer to which the Arduino board is connected, a Qt application is running. It contacts the site once a second (the idea is to keep one connection burned out due to insufficiently stable connection in the office) and gets a list of “slides” slides;
- The same application sends the received slide numbers through the serial port to the Arduino, which, according to the received numbers for 1200 ms, turns on the relay;
Special thanks to Arduino, Qt and the wonderful QextSerialPort library.
Implementation details
The blue tape was not there because of the need to use non-Orthodox black tape.
First you had to figure out how to catch likes. API excavations on VK and Facebook led to the following:
inserting more than one button is a bit unpleasant, but possible
catching likes is easy. Distinguishing them is a little more difficult.
Let's do the insertion of several buttons and catching likes.
In contact with
We read the manual vk.com/dev/widget_like , create three blocks:
<div class="vk vk1"><div id="vk1"></div></div> <div class="vk vk2"><div id="vk2"></div></div> <div class="vk vk3"><div id="vk3"></div></div> And we initialize them:
<scrit> VK.Widgets.Like('vk1', {pageImage:'http://site.ru/i/vk.png', pageTitle:' — * !', pageUrl:'http://electro.eggo.ru/?1', width:80,type:'mini'}, 100); VK.Widgets.Like('vk2', {pageImage:'http://site.ru/i/vk.png', pageTitle:' — * !',pageUrl:'http://electro.eggo.ru/?2', width:80,type:'mini'}, 200); VK.Widgets.Like('vk3', {pageImage:'http://site.ru/i/vk.png', pageTitle:' — * !',pageUrl:'http://electro.eggo.ru/?3', width:80,type:'mini'}, 300); </scrit> With the last parameter, you need to be careful - it affects the cache of the remaining parameters and after any change in the second parameter, you must change the third one. Sad, but true.
Now catching likes. The documentation says that you can subscribe to the widgets.like.liked event. But the parameters of the handler function are not described and how to understand which button was pressed is not very clear. Through the debugger, we managed to find out that there are two parameters a and b, but using undocumented features is fraught. Remember the laws of Murphy. Behind this, we set up a global variable “slide number”, according to which we send to the server information about which relay should work (and whom, respectively, of our stars to hit with current). For maniacs who quickly flip through and like, we use the ostrich algorithm, that is, we will not do anything. So js begins to take the following form:
/* */ var current_slide = 1; function sendLike(type) { $.post('/sn/snh.php', {action:'like', socnet:type}, function(reply){}); } VK.Observer.subscribe("widgets.like.liked", function f(a, b) { sendLike(current_slide); }); On the slideshow we put back and forth functions that change the current_slide variable to the value corresponding to the current frame.
Now remember about Facebook. I do not like this social network, but as they say, the taste and color of all markers are different. In the documentation
developers.facebook.com/docs/plugins/like-button
developers.facebook.com/docs/reference/javascript/FB.Event.subscribe
find the opportunity to subscribe to the edge.create event and try to use it:
$(window).load(function(){ FB.Event.subscribe('edge.create', function(targetUrl) { sendLike( current_slide ); }); }); : <fb:like href="site.ru/?1" layout="button_count" show_faces="false" width="160" height="40" action="like" colorscheme="light"></fb:like> ... <fb:like href="site.ru/?2" layout="button_count" show_faces="false" width="160" height="40" action="like" colorscheme="light"></fb:like> ... <fb:like href="site.ru/?3" layout="button_count" show_faces="false" width="160" height="40" action="like" colorscheme="light"></fb:like> The get parameter only serves to ensure that the counters near the buttons work independently of each other.
Save, load the page and test the buttons. Hurray, the data goes to the server. For now, nowhere.
On the photo, the data has already come where it is necessary and the light bulb is lit.
Server part
In the absence of a large amount of time and the presence of a small laziness, the server part took the following form:
1. an ajax server that receives reports about http http and sends them to the socket on a daemon process that already stores all of the likes that were not sent to the performing part and sends them on request from the client.
2. a process daemon that is a server on sockets and understands two variants of the request: “give up the message” and “add a like to the queue”.
The first point is solved briefly and clearly:
ajax server
/sn/snh.php error_reporting(0); if ($_REQUEST['action'] == 'like' && intval($_REQUEST['socnet'])) { $address = "127.0.0.1"; $port = 13666; /* Create a TCP/IP socket. */ $socket = socket_create(AF_INET, SOCK_STREAM, SOL_TCP); if ($socket === false) { die(); } $result = socket_connect($socket, $address, $port); if ($result === false) { die(); } socket_write($socket, 'add '.trim(strval($_REQUEST['socnet']))."\n"); $_SESSION['count']++; // echo $_SESSION['count']; socket_close($socket); } “The Demon” is a little bit messed up, for he is smarter
Demon
srv.php <?php error_reporting(E_ALL); echo "starting...\n"; $address = "0.0.0.0"; $port = 13666; $sock = socket_create(AF_INET, SOCK_STREAM, 0); echo "socket ok\n"; socket_set_option($sock, SOL_SOCKET, SO_REUSEADDR, 1); if(!socket_bind($sock, $address, $port)) { socket_close($client); die('Could not bind to address'); } echo "bind ok\n"; socket_listen($sock); echo "listen ok\n"; $events = array(); echo "accepting...\n"; socket_set_nonblock($sock); ini_set('log_errors', false); $notify_socket = array(); while (true) { if ($client = @socket_accept($sock)) { if (is_resource($client)) { echo "connected client\n"; $command = trim(socket_read($client, 32, PHP_NORMAL_READ)); if (strpos($command, "get") !==false) { echo "send events\n"; $n = -1; $str = ''; while (++$n < 5 && count($events) > 0) { $str .= array_shift($events); } echo "\nsend events:".$str."\n\n"; if (strlen($str) > 0) { socket_write($client, $str."\n"); } else { socket_write($client, "none\n"); } } else if (strpos($command, "add")===0) { $what = explode(" ", $command); if (intval($what[1])) { socket_write($client, "ok\n"); $events[]=(int)$what[1]; echo "n/c. events: [".implode(" ", $events)."]\n"; } } socket_shutdown($client); socket_close($client); echo "end of chat\n"; }//if valid connection }//if accepted }//while true; socket_shutdown($sock); socket_close($sock); So, now we run ...
screen php -f srv.php
And go to the part that will work with the Arduino. In the absence of the ethernet shield, we are doing a desktop application that will work as a daisy interface module on the server and Arduino.
Since I am a Linux user, and the “client” computers will work under Windows, then for the development of this module, we take Qt + Qt Creator. It can make the interface, works with the network, and indeed the thing is good and cross-platform. There is no standard library for working with the serial port, but there is a wonderful QextSerialPort project: code.google.com/p/qextserialport which I have been using for my own purposes for a long time.
We put Q-everything, make a new project, add the network module, QextSerialPort files and rivet a simple interface: a text field for entering the port name and a “connect” button, which starts an endless process of requesting new likes from the server and sending the entire answer to arduino.
I note that the information about the pressed like-buttons is sent to the qt-client in batches of no more than 5 events. The consideration is simple: this is enough for the receiving party to know what to do and not to strain too much, which can be blocked by the serial port buffer on the Arduino. Plus there are some considerations of humanity, which are a little lower.
The main instrument of torture.
Arduino
The sketch is extremely simple. We read a digit from the serial port and feed HIGH to the corresponding pin. And after 1200ms turn off back.
Arduino code
#define LED_1 A0 #define LED_2 A1 #define LED_3 A2 void setup() { pinMode(LED_1, OUTPUT); pinMode(LED_2, OUTPUT); pinMode(LED_3, OUTPUT); Serial.begin(9600); } void LEDoff() { digitalWrite(LED_1, LOW); digitalWrite(LED_2, LOW); digitalWrite(LED_3, LOW); }//sub void loop() { if (Serial.available() > 0) { char ch; while (Serial.available()) { ch=Serial.read(); if (ch == '1') { digitalWrite(LED_1, HIGH); } else if(ch == '2') { digitalWrite(LED_2, HIGH); } else if (ch == '3') { digitalWrite(LED_3, HIGH); } }//while delay(1200); LEDoff(); }//if avail }//sub From the code it is clear that if during the time between polls of the server (about 1-2c) five commands arrive with a current to hit one person, he will receive only one hit. Firstly, it is more humane. Secondly, in such a simple way we get rid of the problem with the fact that the distribution of electric shocks can be infinite, if people break in like a wild speed.
Switching on for 1200 ms was chosen empirically; this value was enough for the Chinese lighter for the stove to be guaranteed to “swing” a spark.
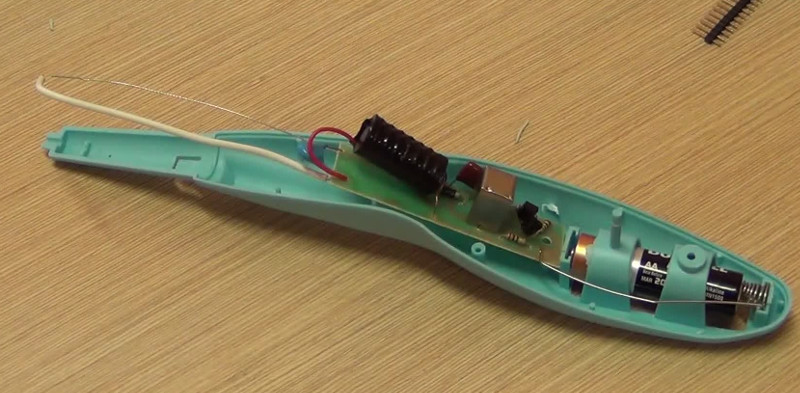
The same Chinese stove lighter is already half-assembled.
Iron part on Arduino
Take the Arduino Uno, prototype shield, three relays, wiring, twisted pair trim, 3 Chinese electric lighters and PLS-40 / PBS-40 bar for connections. While the soldering iron is heating up, we put the shield on the arduino, cut off the centimeters of the 15th twisted pair and cut the connector strips into 3 to 3. The twisted pair turned out to be copper, but mono-core, which was somewhat upsetting, as I was used to home (already deceased) stocks, where the wiring was multicore and soft. We solder the connecting wires, connect the relay to the Arduino and wiring check the operation of the relay. Click-Click-Click. Works.
Arduino itself with the installed bar.
We disassemble the lighters, solder to the contacts that were closed with a button on the lighter, along a segment of a twisted pair. The second ends of these wires are inserted into the controlled contacts of the relay, we connect the batteries in the lighters, we try. We happily swear because we did not notice how we touched the contacts with the elbow =)
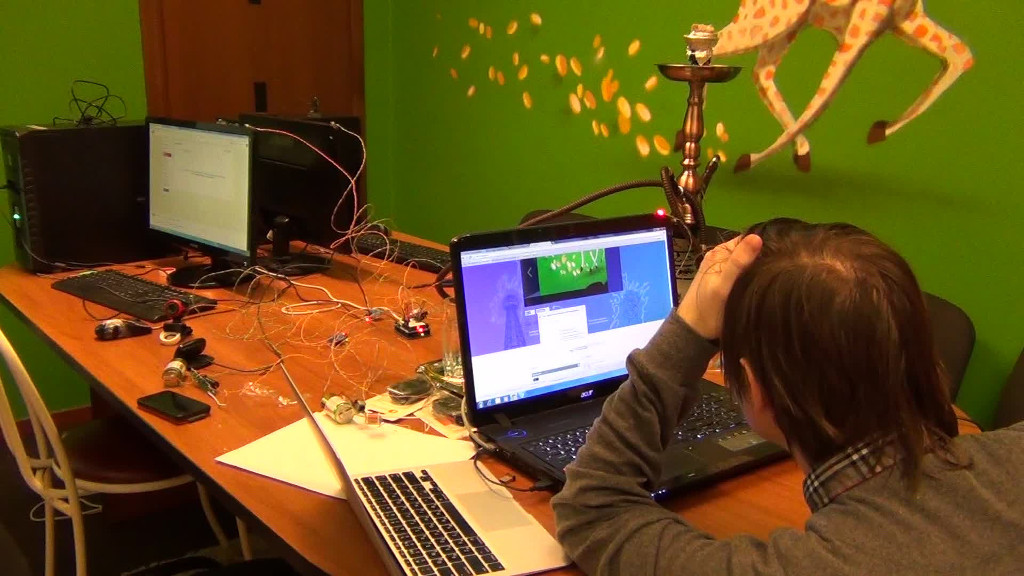
We stick Arduino in a computer, we fill in the sketch, starts the Qt-client, we try. The poisonous crackling of sparks from lighters shows what worked.
Understanding perfectly well that good people can calmly “fry” the test subjects, and the D-size battery is simply discharged, then parallel to the control contacts of each relay through 1K resistor we turn on the LED placed on the long wire to the upper edge of each monitor. Given that the lighter “swings” for almost a second, this alarm goes even before the relay clicks and the sparks from the lighter are about half a second.
The battery was able to hold out all day.
Video customization.
Video broadcasting was implemented via youtube using Live events . Since one channel can only have one broadcast at a time, we had to make three confirmed channels. Plus, you need to install the Google hangouts extension in your browser. Both take not much time.
So, the software part is ready, the cameras are installed. We open on three computers of our youtube artists, we launch three broadcasts. We copy on them links for display and we insert them on our page with electrocontrol. The main thing is not to make a mess of matching cameras and relays. Well, do not forget the magic phrase “do not close this window!”.
The restriction on the length of the broadcast at 8h was bypassed simply: at the end of those 8h hours, the old ones were stopped and new broadcasts were launched for the remaining hour (the show lasted 9h). And the artists got five minutes of rest.
15 minutes before the start.
Battle check
During operation, it turned out that there were cunning users who guessed that you could put like, then press dislike and so on ad infinitum.
We have not yet decided on this bug or feature, but still, having received lulz from users and fountains of joy and repost, we slightly covered this hole. We have three streams, each can put like in two social networks. Total 6 maximum for a “non-clinical” sadist. We give a small margin to play around and on the value 9 we begin to show a picture with the inscription “Sadist”. Yes, we leave the opportunity to play further.
Results
The system is recognized as working and bringing a lot of joy. Hopefully, the description described here will be a source of inspiration for someone, and we will see other examples of connecting social mechanics with offline.
Screenshot of the site, as it looked live
Tyts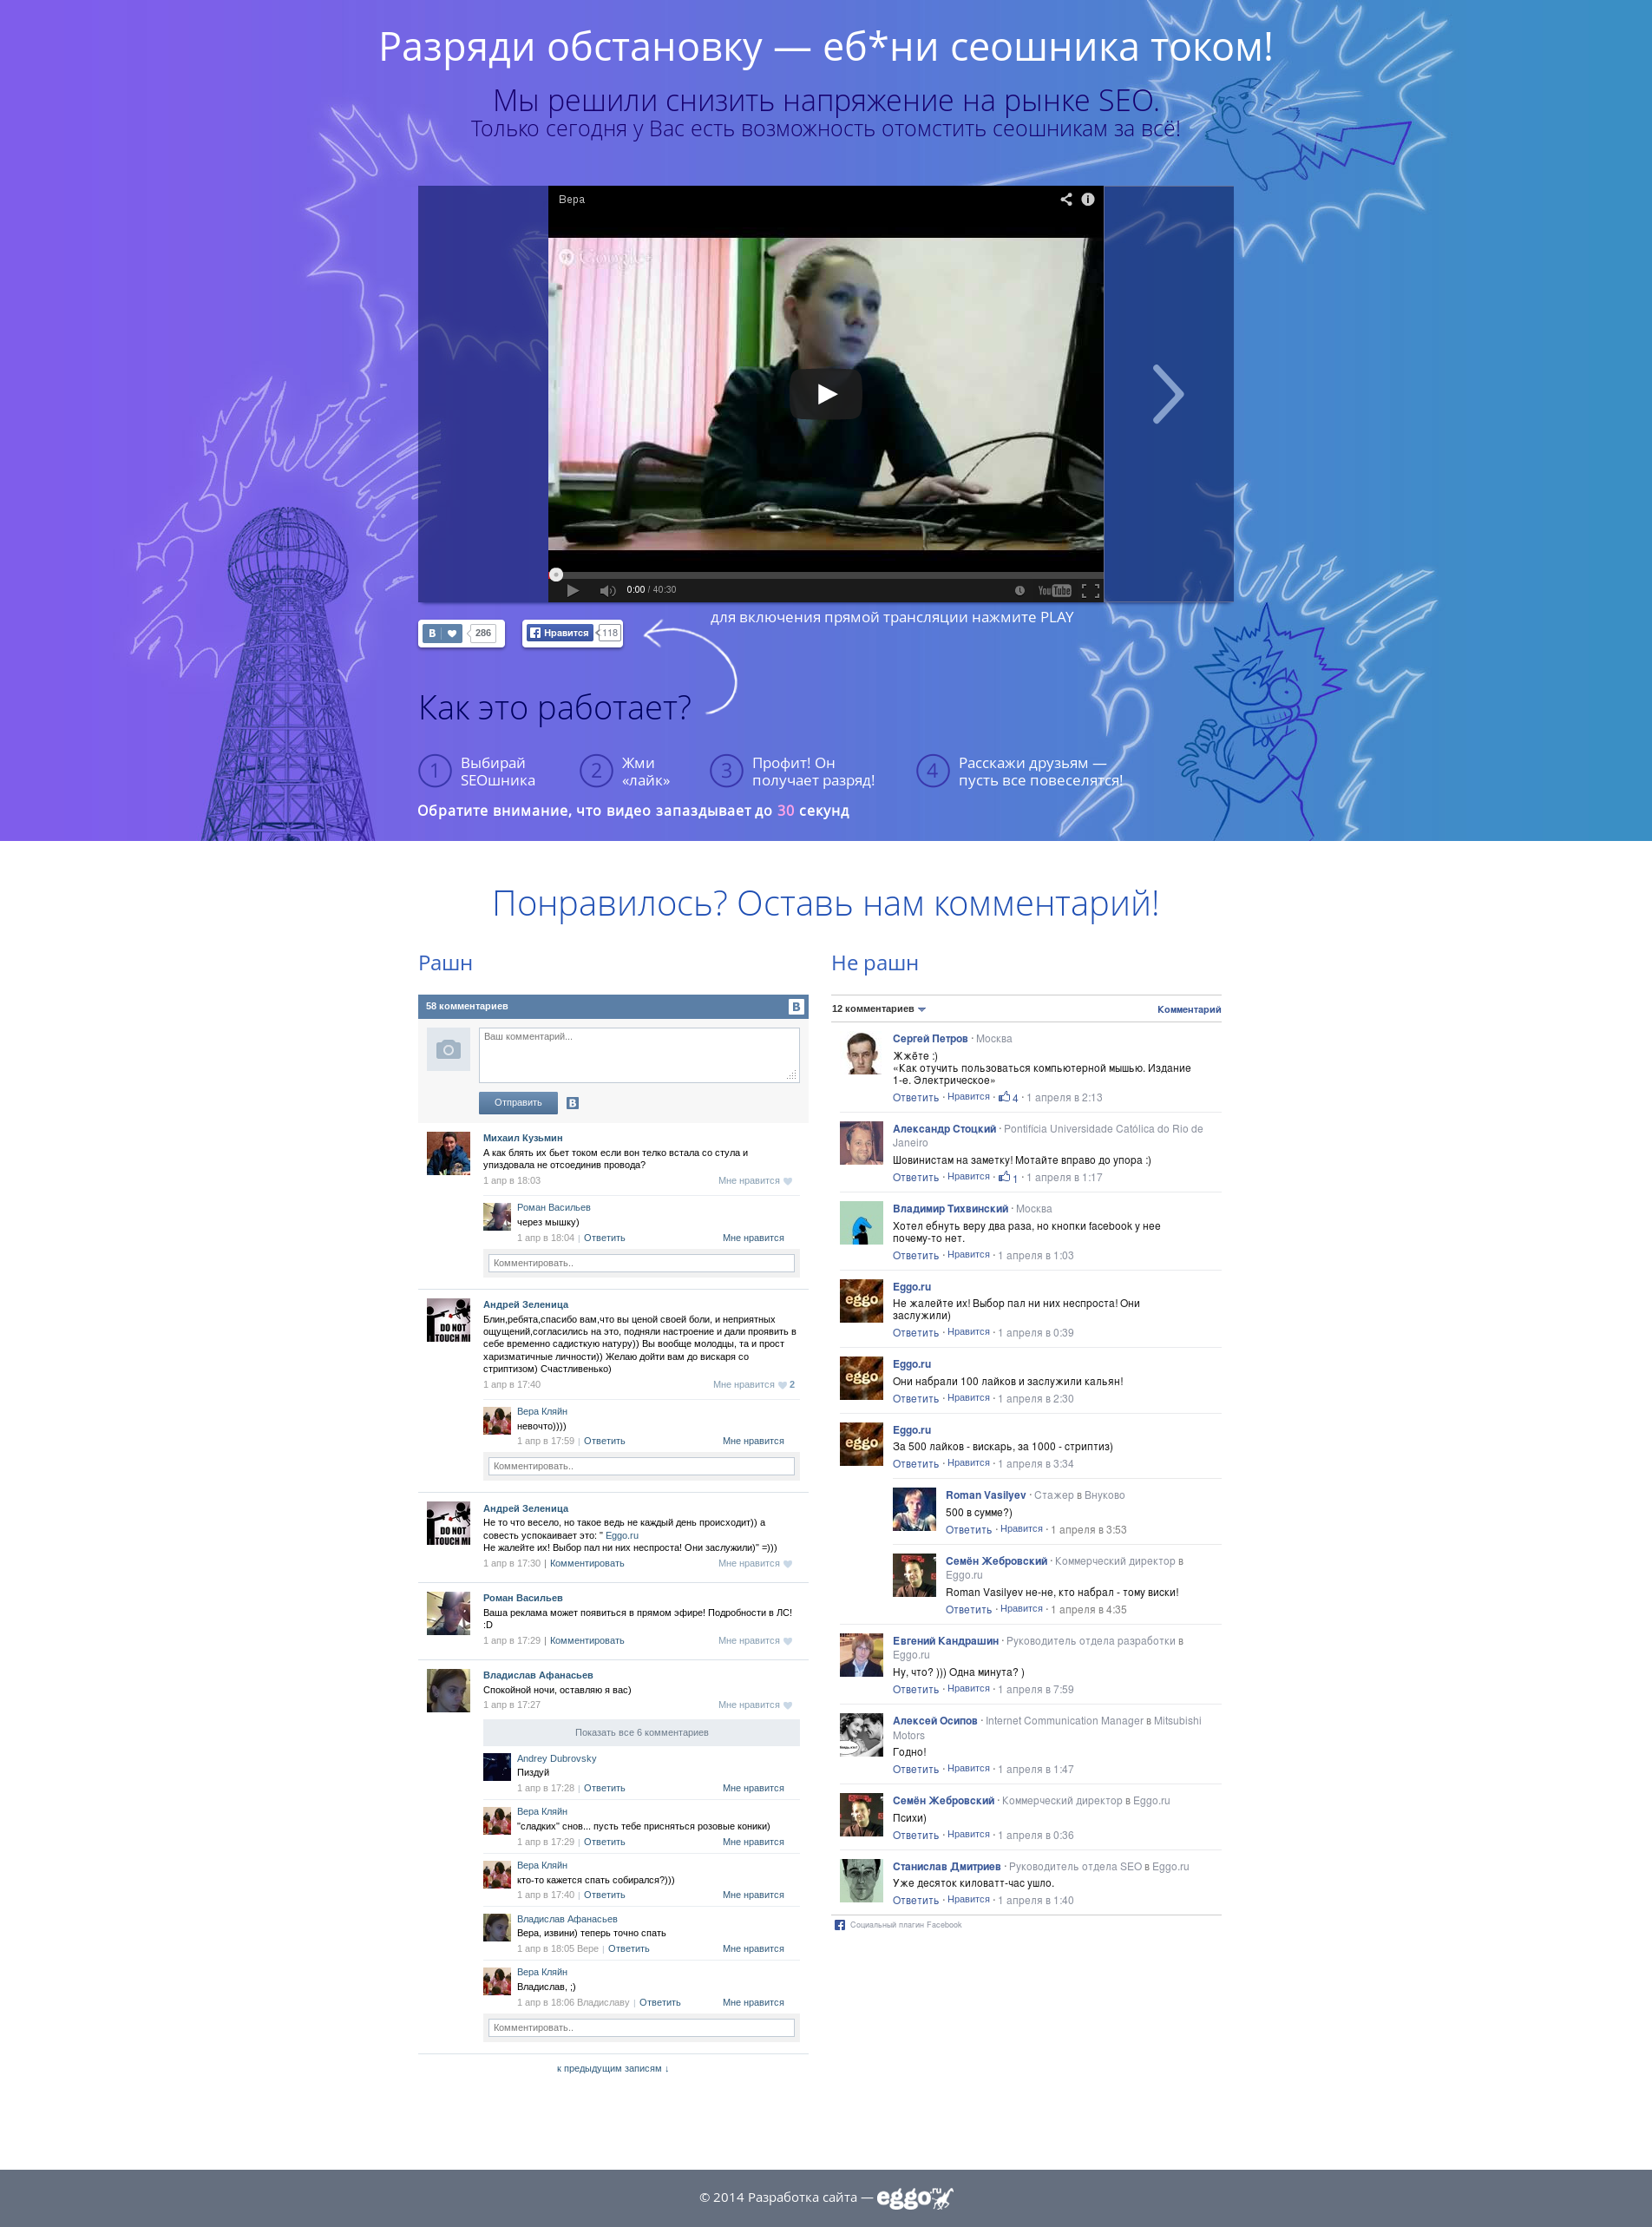
UPD Video Broadcast. Video report about the event is mounted.
www.youtube.com/watch?v=G52Rfq6wrDk
www.youtube.com/watch?v=S4dwTEVqZIc
www.youtube.com/watch?v=p0ABXUK3tWo
Source: https://habr.com/ru/post/219653/
All Articles