Capture video in Unity3d using Intel INDE Media Pack for Android
 In one of the comments on the article about capturing video in OpenGL applications , the possibility of capturing video in applications created using Unity3d was mentioned. We are interested in this topic, in fact - why only “clean” OpenGL applications, if many developers use different libraries and frameworks to create games? Today we are pleased to present a ready-made solution - video capture in applications written using Unity3d for Android.
Bonus!
Based on this article, you will not only learn how to embed video capture in Unity3d, but also create Unity plugins for Android.
Further two options of implementation of capture of video in Unity3d will be considered:
')
1. Full screen post effect. The method will work only in the Pro version, while the Unity GUI will not be captured in the video.
2. With frame buffer ( FrameBuffer ). Will work for all versions of Unity3d, including paid and free, Unity GUI objects will also be recorded in the video.
What we need
- Unity3d version 4.3 Pro version for the first and second methods, or a free version for which only the method with frame buffer is available
- Installed Android SDK
- Installed Intel INDE Media Pack
- Apache Ant (for building Unity plug-in for Android)
Creating a project
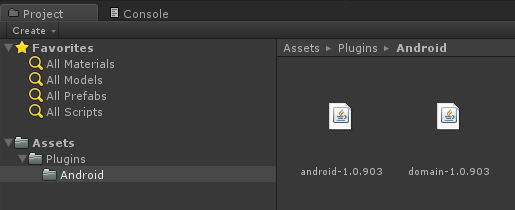
Open the Unity editor and create a new project. In the assets folder, create the Plugins folder, and in it the Android folder.
In the folder where Intel INDE Media Pack for Android was installed, from the libs directory, copy two jar files ( android- <version> .jar and domain- <version> .jar ) into the Android folder of your project.
In the same Android folder, create a new file named Capturing.java and copy the following code into it:
Capturing.java
package com.intel.inde.mp.samples.unity; import com.intel.inde.mp.android.graphics.FullFrameTexture; import android.os.Environment; import java.io.IOException; import java.io.File; public class Capturing { private static FullFrameTexture texture; public Capturing() { texture = new FullFrameTexture(); } // , public static String getDirectoryDCIM() { return Environment.getExternalStoragePublicDirectory(Environment.DIRECTORY_DCIM) + File.separator; } // public void initCapturing(int width, int height, int frameRate, int bitRate) { VideoCapture.init(width, height, frameRate, bitRate); } // public void startCapturing(String videoPath) { VideoCapture capture = VideoCapture.getInstance(); synchronized (capture) { try { capture.start(videoPath); } catch (IOException e) { } } } // public void captureFrame(int textureID) { VideoCapture capture = VideoCapture.getInstance(); synchronized (capture) { capture.beginCaptureFrame(); texture.draw(textureID); capture.endCaptureFrame(); } } // public void stopCapturing() { VideoCapture capture = VideoCapture.getInstance(); synchronized (capture) { if (capture.isStarted()) { capture.stop(); } } } } Add another Java file, this time with the name VideoCapture.java :
VideoCapture.java
package com.intel.inde.mp.samples.unity; import com.intel.inde.mp.*; import com.intel.inde.mp.android.AndroidMediaObjectFactory; import com.intel.inde.mp.android.AudioFormatAndroid; import com.intel.inde.mp.android.VideoFormatAndroid; import java.io.IOException; public class VideoCapture { private static final String TAG = "VideoCapture"; private static final String Codec = "video/avc"; private static int IFrameInterval = 1; private static final Object syncObject = new Object(); private static volatile VideoCapture videoCapture; private static VideoFormat videoFormat; private static int videoWidth; private static int videoHeight; private GLCapture capturer; private boolean isConfigured; private boolean isStarted; private long framesCaptured; private VideoCapture() { } public static void init(int width, int height, int frameRate, int bitRate) { videoWidth = width; videoHeight = height; videoFormat = new VideoFormatAndroid(Codec, videoWidth, videoHeight); videoFormat.setVideoFrameRate(frameRate); videoFormat.setVideoBitRateInKBytes(bitRate); videoFormat.setVideoIFrameInterval(IFrameInterval); } public static VideoCapture getInstance() { if (videoCapture == null) { synchronized (syncObject) { if (videoCapture == null) { videoCapture = new VideoCapture(); } } } return videoCapture; } public void start(String videoPath) throws IOException { if (isStarted()) { throw new IllegalStateException(TAG + " already started!"); } capturer = new GLCapture(new AndroidMediaObjectFactory()); capturer.setTargetFile(videoPath); capturer.setTargetVideoFormat(videoFormat); AudioFormat audioFormat = new AudioFormatAndroid("audio/mp4a-latm", 44100, 2); capturer.setTargetAudioFormat(audioFormat); capturer.start(); isStarted = true; isConfigured = false; framesCaptured = 0; } public void stop() { if (!isStarted()) { throw new IllegalStateException(TAG + " not started or already stopped!"); } try { capturer.stop(); isStarted = false; } catch (Exception ex) { } capturer = null; isConfigured = false; } private void configure() { if (isConfigured()) { return; } try { capturer.setSurfaceSize(videoWidth, videoHeight); isConfigured = true; } catch (Exception ex) { } } public void beginCaptureFrame() { if (!isStarted()) { return; } configure(); if (!isConfigured()) { return; } capturer.beginCaptureFrame(); } public void endCaptureFrame() { if (!isStarted() || !isConfigured()) { return; } capturer.endCaptureFrame(); framesCaptured++; } public boolean isStarted() { return isStarted; } public boolean isConfigured() { return isConfigured; } } Important : Pay attention to the package name com.intel.inde.mp.samples.unity . It should match the name in the project settings ( Player Settings / Other Settings / Bundle identifier ):
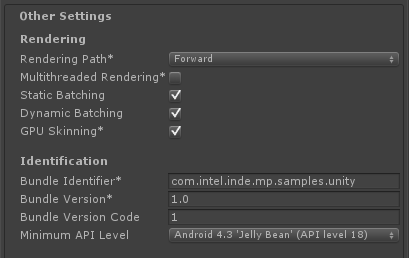
Moreover, you must use the same name in a C # script to call a Java class. If all these names do not match, your game will drop at the start.
Add some dynamic content to your scene. You can also integrate Intel INDE Media Pack for Android * with any existing project, rather than creating it from scratch. But try to have something dynamic in the scene. Otherwise, you will not be too interested to watch videos, in which nothing changes.
Now, like in any other Android application, we need to set up a manifest. Create an AndroidManifest.xml file in the / Plugins / Android folder and copy the contents into it:
AndroidManifest.xml
<?xml version="1.0" encoding="utf-8"?> <manifest xmlns:android="http://schemas.android.com/apk/res/android" package="com.intel.inde.mp.samples.unity" android:installLocation="preferExternal" android:theme="@android:style/Theme.NoTitleBar" android:versionCode="1" android:versionName="1.0"> <uses-sdk android:minSdkVersion="18" /> <uses-permission android:name="android.permission.WRITE_EXTERNAL_STORAGE"/> <uses-permission android:name="android.permission.INTERNET"/> <!— --> <uses-permission android:name="android.permission.RECORD_AUDIO" /> <!-- OpenGL ES >= 2.0. --> <uses-feature android:glEsVersion="0x00020000" android:required="true"/> <application android:icon="@drawable/app_icon" android:label="@string/app_name" android:debuggable="true"> <activity android:name="com.unity3d.player.UnityPlayerNativeActivity" android:label="@string/app_name"> <intent-filter> <action android:name="android.intent.action.MAIN" /> <category android:name="android.intent.category.LAUNCHER" /> </intent-filter> <meta-data android:name="unityplayer.UnityActivity" android:value="true" /> <meta-data android:name="unityplayer.ForwardNativeEventsToDalvik" android:value="false" /> </activity> </application> </manifest> Pay attention to the line:
package="com.intel.inde.mp.samples.unity" The package name must match the one you specified earlier.
Now we have everything you need. Since Unity will not be able to compile our Java files on our own, we will create an Ant script.
Note : If you use other classes and libraries, you must modify your Ant script accordingly (for more information, see the documentation ).
The following Ant script is for this lesson only. Create a file in the / Plugins / Android / build.xml file:
build.xml
<?xml version="1.0" encoding="UTF-8"?> <project name="UnityCapturing"> <!-- Change this in order to match your configuration --> <property name="sdk.dir" value="C:\Android\sdk"/> <property name="target" value="android-18"/> <property name="unity.androidplayer.jarfile" value="C:\Program Files (x86)\Unity\Editor\Data\PlaybackEngines\androiddevelopmentplayer\bin\classes.jar"/> <!-- Source directory --> <property name="source.dir" value="\ProjectPath\Assets\Plugins\Android" /> <!-- Output directory for .class files--> <property name="output.dir" value="\ProjectPath\Assets\Plugins\Android\classes"/> <!-- Name of the jar to be created. Please note that the name should match the name of the class and the name placed in the AndroidManifest.xml--> <property name="output.jarfile" value="Capturing.jar"/> <!-- Creates the output directories if they don't exist yet. --> <target name="-dirs" depends="message"> <echo>Creating output directory: ${output.dir} </echo> <mkdir dir="${output.dir}" /> </target> <!-- Compiles this project's .java files into .class files. --> <target name="compile" depends="-dirs" description="Compiles project's .java files into .class files"> <javac encoding="ascii" target="1.6" debug="true" destdir="${output.dir}" verbose="${verbose}" includeantruntime="false"> <src path="${source.dir}" /> <classpath> <pathelement location="${sdk.dir}\platforms\${target}\android.jar"/> <pathelement location="${source.dir}\domain-1.0.903.jar"/> <pathelement location="${source.dir}\android-1.0.903.jar"/> <pathelement location="${unity.androidplayer.jarfile}"/> </classpath> </javac> </target> <target name="build-jar" depends="compile"> <zip zipfile="${output.jarfile}" basedir="${output.dir}" /> </target> <target name="clean-post-jar"> <echo>Removing post-build-jar-clean</echo> <delete dir="${output.dir}"/> </target> <target name="clean" description="Removes output files created by other targets."> <delete dir="${output.dir}" verbose="${verbose}" /> </target> <target name="message"> <echo>Android Ant Build for Unity Android Plugin</echo> <echo> message: Displays this message.</echo> <echo> clean: Removes output files created by other targets.</echo> <echo> compile: Compiles project's .java files into .class files.</echo> <echo> build-jar: Compiles project's .class files into .jar file.</echo> </target> </project> Pay attention to the path source.dir , output.dir and, of course, to the name of the output jar-file output.jarfile .
In the command line mode, go to the project / Plugins / Android folder and start the plugin building process.
ant build-jar clean-post-jar If you did everything as described above, then after a few seconds you will receive a message that the assembly has been successfully completed!

A new Capturing.jar file containing the code of our plugin should appear at the entrance to the folder.
The plugin is ready, it remains to make the necessary changes to the Unity3d code, first of all we will create a wrapper linking Unity and our Android plugin. To do this, create a file in the project Capture.cs
Capture.cs
using UnityEngine; using System.Collections; using System.IO; using System; [RequireComponent(typeof(Camera))] public class Capture : MonoBehaviour { public int videoWidth = 720; public int videoHeight = 1094; public int videoFrameRate = 30; public int videoBitRate = 3000; private string videoDir; public string fileName = "game_capturing-"; private float nextCapture = 0.0f; public bool inProgress { get; private set; } private static IntPtr constructorMethodID = IntPtr.Zero; private static IntPtr initCapturingMethodID = IntPtr.Zero; private static IntPtr startCapturingMethodID = IntPtr.Zero; private static IntPtr captureFrameMethodID = IntPtr.Zero; private static IntPtr stopCapturingMethodID = IntPtr.Zero; private static IntPtr getDirectoryDCIMMethodID = IntPtr.Zero; private IntPtr capturingObject = IntPtr.Zero; void Start() { if(!Application.isEditor) { // IntPtr classID = AndroidJNI.FindClass("com/intel/inde/mp/samples/unity/Capturing"); // constructorMethodID = AndroidJNI.GetMethodID(classID, "<init>", "()V"); // , initCapturingMethodID = AndroidJNI.GetMethodID(classID, "initCapturing", "(IIII)V"); startCapturingMethodID = AndroidJNI.GetMethodID(classID, "startCapturing", "(Ljava/lang/String;)V"); captureFrameMethodID = AndroidJNI.GetMethodID(classID, "captureFrame", "(I)V"); stopCapturingMethodID = AndroidJNI.GetMethodID(classID, "stopCapturing", "()V"); getDirectoryDCIMMethodID = AndroidJNI.GetStaticMethodID(classID, "getDirectoryDCIM", "()Ljava/lang/String;"); jvalue[] args = new jvalue[0]; videoDir = AndroidJNI.CallStaticStringMethod(classID, getDirectoryDCIMMethodID, args); // IntPtr local_capturingObject = AndroidJNI.NewObject(classID, constructorMethodID, args); if (local_capturingObject == IntPtr.Zero) { Debug.LogError("Can't create Capturing object"); return; } // capturingObject = AndroidJNI.NewGlobalRef(local_capturingObject); AndroidJNI.DeleteLocalRef(local_capturingObject); AndroidJNI.DeleteLocalRef(classID); } inProgress = false; nextCapture = Time.time; } void OnRenderImage(RenderTexture src, RenderTexture dest) { if (inProgress && Time.time > nextCapture) { CaptureFrame(src.GetNativeTextureID()); nextCapture += 1.0f / videoFrameRate; } Graphics.Blit(src, dest); } public void StartCapturing() { if (capturingObject == IntPtr.Zero) { return; } jvalue[] videoParameters = new jvalue[4]; videoParameters[0].i = videoWidth; videoParameters[1].i = videoHeight; videoParameters[2].i = videoFrameRate; videoParameters[3].i = videoBitRate; AndroidJNI.CallVoidMethod(capturingObject, initCapturingMethodID, videoParameters); DateTime date = DateTime.Now; string fullFileName = fileName + date.ToString("ddMMyy-hhmmss.fff") + ".mp4"; jvalue[] args = new jvalue[1]; args[0].l = AndroidJNI.NewStringUTF(videoDir + fullFileName); AndroidJNI.CallVoidMethod(capturingObject, startCapturingMethodID, args); inProgress = true; } private void CaptureFrame(int textureID) { if (capturingObject == IntPtr.Zero) { return; } jvalue[] args = new jvalue[1]; args[0].i = textureID; AndroidJNI.CallVoidMethod(capturingObject, captureFrameMethodID, args); } public void StopCapturing() { inProgress = false; if (capturingObject == IntPtr.Zero) { return; } jvalue[] args = new jvalue[0]; AndroidJNI.CallVoidMethod(capturingObject, stopCapturingMethodID, args); } } Assign this script to the main camera. Before capturing video, you must configure the video format. You can do this directly in the editor by changing the corresponding parameters (videoWidth, videoHeight, etc.)
The Start () , StartCapturing () and StopCapturing () methods are quite trivial and are wrappers for calling the plugin code from Unity.
The OnRenderImage () method is more interesting. It is called after all rendering has been completed, immediately before the result is displayed on the screen. The input image is contained in the src texture, the result we have to write to the texture dest .
This mechanism allows you to modify the final picture, imposing various effects, but this is outside our area of interest, we are interested in the picture as it is. To capture video, we need to copy the final image into the video. To do this, we pass the texture Id to the Capturing object by calling captureFrame () and passing the texture Id as an input parameter.
To draw on the screen, simply copy src to dest :
Graphics.Blit(src, dest); For convenience, let's create a button with which we will enable, disable video recording from the game interface.
To do this, create a GUI object and assign a handler to it. The handler will be in the CaptureGUI.cs file .
CaptureGUI.cs
using UnityEngine; using System.Collections; public class CaptureGUI : MonoBehaviour { public Capture capture; private GUIStyle style = new GUIStyle(); void Start() { style.fontSize = 48; style.alignment = TextAnchor.MiddleCenter; } void OnGUI() { style.normal.textColor = capture.inProgress ? Color.red : Color.green; if (GUI.Button(new Rect(10, 200, 350, 100), capture.inProgress ? "[Stop Recording]" : "[Start Recording]", style)) { if (capture.inProgress) { capture.StopCapturing(); } else { capture.StartCapturing(); } } } } Remember to initialize the capture field to an instance of the Capture class.
Clicking on the object will start, stop the video capture process, the result will be saved in the / mnt / sdcard / DCIM / folder.
As I said earlier, this method will work only in the Pro version (in the free version you cannot use OnRenderImage () and call Graphics.Blit ), another feature is that the final video will not contain Unity GUI objects. These restrictions are eliminated in a number two way - using a FrameBuffer .
Capture video using framebuffer
Let's make changes to the Capturing.java file, for this we simply replace its contents.
Capturing.java
package com.intel.inde.mp.samples.unity; import com.intel.inde.mp.android.graphics.FullFrameTexture; import com.intel.inde.mp.android.graphics.FrameBuffer; import android.os.Environment; import java.io.IOException; import java.io.File; public class Capturing { private static FullFrameTexture texture; private FrameBuffer frameBuffer; public Capturing(int width, int height) { frameBuffer = new FrameBuffer(); frameBuffer.create(width, height); texture = new FullFrameTexture(); } public static String getDirectoryDCIM() { return Environment.getExternalStoragePublicDirectory(Environment.DIRECTORY_DCIM) + File.separator; } public void initCapturing(int width, int height, int frameRate, int bitRate) { VideoCapture.init(width, height, frameRate, bitRate); } public void startCapturing(String videoPath) { VideoCapture capture = VideoCapture.getInstance(); synchronized (capture) { try { capture.start(videoPath); } catch (IOException e) { } } } public void beginCaptureFrame() { frameBuffer.bind(); } public void captureFrame(int textureID) { VideoCapture capture = VideoCapture.getInstance(); synchronized (capture) { capture.beginCaptureFrame(); texture.draw(textureID); capture.endCaptureFrame(); } } public void endCaptureFrame() { frameBuffer.unbind(); int textureID = frameBuffer.getTexture(); captureFrame(textureID); texture.draw(textureID); } public void stopCapturing() { VideoCapture capture = VideoCapture.getInstance(); synchronized (capture) { if (capture.isStarted()) { capture.stop(); } } } } As you can see, there are not many changes. The main one is the emergence of a new object.
FrameBuffer frameBuffer; The constructor now takes the width and height of the frame as parameters, this is required to create the FrameBuffer 's desired size.
Three new public methods have appeared: frameBufferTexture () , beginCaptureFrame () and endCaptureFrame () . Their meaning will become clearer when we move on to C # code.
We leave the VideoCapture.java file unchanged.
Next, you need to build an Android plug-in, on how this is done, we have analyzed above.
Now we can switch to Unity. Open the Capture.cs script and replace its contents:
Capture.cs
using UnityEngine; using System.Collections; using System.IO; using System; [RequireComponent(typeof(Camera))] public class Capture : MonoBehaviour { public int videoWidth = 720; public int videoHeight = 1094; public int videoFrameRate = 30; public int videoBitRate = 3000; private string videoDir; public string fileName = "game_capturing-"; private float nextCapture = 0.0f; public bool inProgress { get; private set; } private bool finalizeFrame = false; private Texture2D texture = null; private static IntPtr constructorMethodID = IntPtr.Zero; private static IntPtr initCapturingMethodID = IntPtr.Zero; private static IntPtr startCapturingMethodID = IntPtr.Zero; private static IntPtr beginCaptureFrameMethodID = IntPtr.Zero; private static IntPtr endCaptureFrameMethodID = IntPtr.Zero; private static IntPtr stopCapturingMethodID = IntPtr.Zero; private static IntPtr getDirectoryDCIMMethodID = IntPtr.Zero; private IntPtr capturingObject = IntPtr.Zero; void Start() { if (!Application.isEditor) { // IntPtr classID = AndroidJNI.FindClass("com/intel/inde/mp/samples/unity/Capturing "); // constructorMethodID = AndroidJNI.GetMethodID(classID, "<init>", "(II)V"); // , initCapturingMethodID = AndroidJNI.GetMethodID(classID, "initCapturing", "(IIII)V"); startCapturingMethodID = AndroidJNI.GetMethodID(classID, "startCapturing", "(Ljava/lang/String;)V"); beginCaptureFrameMethodID = AndroidJNI.GetMethodID(classID, "beginCaptureFrame", "()V"); endCaptureFrameMethodID = AndroidJNI.GetMethodID(classID, "endCaptureFrame", "()V"); stopCapturingMethodID = AndroidJNI.GetMethodID(classID, "stopCapturing", "()V"); getDirectoryDCIMMethodID = AndroidJNI.GetStaticMethodID(classID, "getDirectoryDCIM", "()Ljava/lang/String;"); jvalue[] args = new jvalue[0]; videoDir = AndroidJNI.CallStaticStringMethod(classID, getDirectoryDCIMMethodID, args); // jvalue[] constructorParameters = new jvalue[2]; constructorParameters[0].i = Screen.width; constructorParameters[1].i = Screen.height; IntPtr local_capturingObject = AndroidJNI.NewObject(classID, constructorMethodID, constructorParameters); if (local_capturingObject == IntPtr.Zero) { Debug.LogError("Can't create Capturing object"); return; } // capturingObject = AndroidJNI.NewGlobalRef(local_capturingObject); AndroidJNI.DeleteLocalRef(local_capturingObject); AndroidJNI.DeleteLocalRef(classID); } inProgress = false; nextCapture = Time.time; } void OnPreRender() { if (inProgress && Time.time > nextCapture) { finalizeFrame = true; nextCapture += 1.0f / videoFrameRate; BeginCaptureFrame(); } } public IEnumerator OnPostRender() { if (finalizeFrame) { finalizeFrame = false; yield return new WaitForEndOfFrame(); EndCaptureFrame(); } else { yield return null; } } public void StartCapturing() { if (capturingObject == IntPtr.Zero) { return; } jvalue[] videoParameters = new jvalue[4]; videoParameters[0].i = videoWidth; videoParameters[1].i = videoHeight; videoParameters[2].i = videoFrameRate; videoParameters[3].i = videoBitRate; AndroidJNI.CallVoidMethod(capturingObject, initCapturingMethodID, videoParameters); DateTime date = DateTime.Now; string fullFileName = fileName + date.ToString("ddMMyy-hhmmss.fff") + ".mp4"; jvalue[] args = new jvalue[1]; args[0].l = AndroidJNI.NewStringUTF(videoDir + fullFileName); AndroidJNI.CallVoidMethod(capturingObject, startCapturingMethodID, args); inProgress = true; } private void BeginCaptureFrame() { if (capturingObject == IntPtr.Zero) { return; } jvalue[] args = new jvalue[0]; AndroidJNI.CallVoidMethod(capturingObject, beginCaptureFrameMethodID, args); } private void EndCaptureFrame() { if (capturingObject == IntPtr.Zero) { return; } jvalue[] args = new jvalue[0]; AndroidJNI.CallVoidMethod(capturingObject, endCaptureFrameMethodID, args); } public void StopCapturing() { inProgress = false; if (capturingObject == IntPtr.Zero) { return; } jvalue[] args = new jvalue[0]; AndroidJNI.CallVoidMethod(capturingObject, stopCapturingMethodID, args); } } In this code, we got a lot more changes, but the logic of the work remains simple. First we pass frame sizes to the Capturing constructor. Pay attention to the new signature of the constructor - (II) V. On the Java side, we create a FrameBuffer object and pass it the specified parameters.
The OnPreRender () method is called before the camera starts rendering the scene. This is where we switch to our FrameBuffer . Thus, the entire rendering is performed on the texture assigned to the FrameBuffer .
The OnPostRender () method is called after the end of rendering. We wait for the end of the frame, disable the FrameBuffer and copy the texture directly to the screen using the Media Pack (see the endCaptureFrame () method of the Capturing.java class).
Performance
Often, developers ask - how much does video capture affect performance, how will the FPS “squeeze”. The result always depends on the specific application, the complexity of the scene and the device on which the application is running.
So that you have a performance evaluation tool, let's add a simple FPS counter. To do this, add the Unity GUI object to the scene and attach the following code to it:
FPS.cs
using UnityEngine; using System.Collections; public class FPSCounter : MonoBehaviour { public float updateRate = 4.0f; // 4 updates per sec. private int frameCount = 0; private float nextUpdate = 0.0f; private float fps = 0.0f; private GUIStyle style = new GUIStyle(); void Start() { style.fontSize = 48; style.normal.textColor = Color.white; nextUpdate = Time.time; } void Update() { frameCount++; if (Time.time > nextUpdate) { nextUpdate += 1.0f / updateRate; fps = frameCount * updateRate; frameCount = 0; } } void OnGUI() { GUI.Label(new Rect(10, 110, 300, 100), "FPS: " + fps, style); } } This can be considered our work completed, run the project, experiment with the record. If you have questions about integration with Unity3d or about working with Intel INDE Media Pack , we will be happy to answer them in the comments.
Source: https://habr.com/ru/post/219649/
All Articles