Arch Linux on Raspberry Pi
After quite a long time using Raspberry Pi together with Raspbian I decided to try installing Arch Linux ARM . What came out of this is discussed in the article.
')
Since it’s inconvenient to connect anything to the HDMI or RCA Video and LAN connectors at the RPi installation site, I use a WiFi network connection and a USB-UART for terminal access. Therefore, I have noted some of the steps described as optional.
Used equipment: laptop with Windows, Raspberry Pi Model B, 4GB SD card, WiFi adapter , UART adapter .
Download and write to the SD-card image of the operating system. In my case it was ArchLinuxARM-2014.01-rpi.img , the recording was done using Win32DiskImager 0.9.5 .
After installation, you can log in as root , the root password. This can be done either via a local terminal or via a LAN using SSH.
To output boot messages to the serial port, you must add the parameter loglevel = 5 to the /boot/cmdline.txt file.
Allow getty to work on the serial port with the command:
Replace the created link ( why it is necessary ):
UART signals are output to the Raspberry Pi GPIO connector:
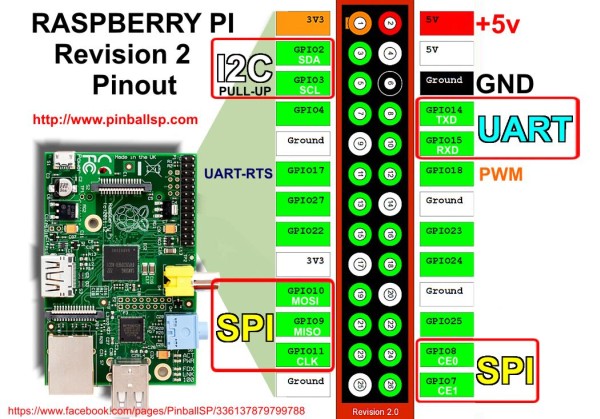
You need to connect a USB-UART converter to them and specify the following connection parameters in the terminal program: speed 115200, 8 data bits, 1 stop bit, no parity check, no flow control. Learn how to use PuTTY to work through the serial port here .
Copy and edit the desired profile, indicating in it the network name and password:
Profile:
Activate the created profile and allow it to run when turned on:
In ArchLinux for Raspberry Pi there is support for hardware random number generator, but the rngd daemon needs to be told how to find it. To do this, you need to edit the /etc/conf.d/rngd file as follows:
And restart rngd:
Remove the default time zone and set the desired one:
Run ntpd and allow it to work when turned on:
Just run the command:
Run fdisk and display the existing partition table:
On the SD card, as you can see, there are main (mmcblk0p1) and additional (mmcblk0p2) sections. The additional, in turn, contains one logical (mmcblk0p5) section. The mmcblk0p1 partition is small, mounted as / boot and used during boot. It does not need to be modified. Expand the need to section mmcblk0p5, which is mounted as / .
Delete the mmcblk0p2 section (the mmcblk0p5 section will also be deleted):
Now you need to create a new additional partition that occupies all available free space:
After that, inside the additional, you need to create a logical partition, which also occupies all the available space:
We check that sections are created correctly:
The starting blocks of the created sections must be the same as before the changes, and the total number of blocks will increase.
Save the changes and reboot:
After rebooting, you need to increase the size of the file system on the created logical partition. Current Size:
Increase size:
New size:
It makes sense to set the noatime parameter for the root partition in the / etc / fstab file to reduce the number of write operations to the SD card:
Add a user and set the password:
Install sudo:
Having opened the configuration using the visudo command, we will uncomment the following line:
Add the previously created user pi to the wheel group:
This will allow pi user to use sudo to execute commands that require elevated privileges.
Since I already had SSH keys, I will not dwell on their creation. How to create them can be read here .
Copy the public key on the RPi:
Open the sshd configuration file:
We set it to prohibit ssh login as root and disable password authentication:
Restart sshd:
As a result of performing the above steps, we get RPi connected to a WiFi network, which synchronizes time via the Internet. RPi can be accessed via SSH as an unprivileged user, with the ability to call system commands via sudo.
')
Since it’s inconvenient to connect anything to the HDMI or RCA Video and LAN connectors at the RPi installation site, I use a WiFi network connection and a USB-UART for terminal access. Therefore, I have noted some of the steps described as optional.
Used equipment: laptop with Windows, Raspberry Pi Model B, 4GB SD card, WiFi adapter , UART adapter .
Download and write to the SD-card image of the operating system. In my case it was ArchLinuxARM-2014.01-rpi.img , the recording was done using Win32DiskImager 0.9.5 .
After installation, you can log in as root , the root password. This can be done either via a local terminal or via a LAN using SSH.
Run getty on ttyAMA0 (optional)
To output boot messages to the serial port, you must add the parameter loglevel = 5 to the /boot/cmdline.txt file.
Allow getty to work on the serial port with the command:
[root@alarmpi ~]# systemctl enable getty@ttyAMA0 Replace the created link ( why it is necessary ):
[root@alarmpi ~]# rm /etc/systemd/system/getty.target.wants/getty\@ttyAMA0.service [root@alarmpi ~]# ln -s /usr/lib/systemd/system/serial-getty\@.service \ /etc/systemd/system/getty.target.wants/serial-getty@ttyAMA0.service UART signals are output to the Raspberry Pi GPIO connector:
You need to connect a USB-UART converter to them and specify the following connection parameters in the terminal program: speed 115200, 8 data bits, 1 stop bit, no parity check, no flow control. Learn how to use PuTTY to work through the serial port here .
Wireless setup (optional)
Copy and edit the desired profile, indicating in it the network name and password:
[root@alarmpi ~]# cd /etc/netctl/ [root@alarmpi ~]# install -m640 examples/wireless-wpa wireless-home Profile:
Description='A simple WPA encrypted wireless connection' Interface=wlan0 Connection=wireless Security=wpa IP=dhcp ESSID='< >' # Prepend hexadecimal keys with \" # If your key starts with ", write it as '""<key>"' # See also: the section on special quoting rules in netctl.profile(5) Key='<>' # Uncomment this if your ssid is hidden #Hidden=yes Activate the created profile and allow it to run when turned on:
[root@alarmpi ~]# netctl start wireless-home [root@alarmpi ~]# netctl enable wireless-home Hardware Random Number Generator
In ArchLinux for Raspberry Pi there is support for hardware random number generator, but the rngd daemon needs to be told how to find it. To do this, you need to edit the /etc/conf.d/rngd file as follows:
RNGD_OPTS="-o /dev/random -r /dev/hwrng" And restart rngd:
[root@alarmpi ~]# systemctl restart rngd Time zone and time synchronization
Remove the default time zone and set the desired one:
[root@alarmpi ~]# rm /etc/localtime [root@alarmpi ~]# ln -s /usr/share/zoneinfo/<> /etc/localtime Run ntpd and allow it to work when turned on:
[root@alarmpi ~]# systemctl start ntpd [root@alarmpi ~]# systemctl enable ntpd System update
Just run the command:
[root@alarmpi ~]# pacman -Syu Root partition extension
Run fdisk and display the existing partition table:
[root@alarmpi ~]# fdisk /dev/mmcblk0 Welcome to fdisk (util-linux 2.24.1). Changes will remain in memory only, until you decide to write them. Be careful before using the write command. Command (m for help): p Disk /dev/mmcblk0: 3.8 GiB, 4072669184 bytes, 7954432 sectors Units: sectors of 1 * 512 = 512 bytes Sector size (logical/physical): 512 bytes / 512 bytes I/O size (minimum/optimal): 512 bytes / 512 bytes Disklabel type: dos Disk identifier: 0x417ee54b Device Boot Start End Blocks Id System /dev/mmcblk0p1 2048 186367 92160 c W95 FAT32 (LBA) /dev/mmcblk0p2 186368 3667967 1740800 5 Extended /dev/mmcblk0p5 188416 3667967 1739776 83 Linux On the SD card, as you can see, there are main (mmcblk0p1) and additional (mmcblk0p2) sections. The additional, in turn, contains one logical (mmcblk0p5) section. The mmcblk0p1 partition is small, mounted as / boot and used during boot. It does not need to be modified. Expand the need to section mmcblk0p5, which is mounted as / .
Delete the mmcblk0p2 section (the mmcblk0p5 section will also be deleted):
Command (m for help): d Partition number (1,2,5, default 5): 2 Partition 2 has been deleted. Now you need to create a new additional partition that occupies all available free space:
Command (m for help): n Partition type: p primary (1 primary, 0 extended, 3 free) e extended Select (default p): e Partition number (2-4, default 2): First sector (186368-7954431, default 186368): Last sector, +sectors or +size{K,M,G,T,P} (186368-7954431, default 7954431): Created a new partition 2 of type 'Extended' and of size 3.7 GiB. After that, inside the additional, you need to create a logical partition, which also occupies all the available space:
Command (m for help): n Partition type: p primary (1 primary, 1 extended, 2 free) l logical (numbered from 5) Select (default p): l Adding logical partition 5 First sector (188416-7954431, default 188416): Last sector, +sectors or +size{K,M,G,T,P} (188416-7954431, default 7954431): Created a new partition 5 of type 'Linux' and of size 3.7 GiB. We check that sections are created correctly:
Command (m for help): p Disk /dev/mmcblk0: 3.8 GiB, 4072669184 bytes, 7954432 sectors Units: sectors of 1 * 512 = 512 bytes Sector size (logical/physical): 512 bytes / 512 bytes I/O size (minimum/optimal): 512 bytes / 512 bytes Disklabel type: dos Disk identifier: 0x417ee54b Device Boot Start End Blocks Id System /dev/mmcblk0p1 2048 186367 92160 c W95 FAT32 (LBA) /dev/mmcblk0p2 186368 7954431 3884032 5 Extended /dev/mmcblk0p5 188416 7954431 3883008 83 Linux The starting blocks of the created sections must be the same as before the changes, and the total number of blocks will increase.
Save the changes and reboot:
Command (m for help): w The partition table has been altered. Calling ioctl() to re-read partition table. Re-reading the partition table failed.: Device or resource busy The kernel still uses the old table. The new table will be used at the next reboot or after you run partprobe(8) or kpartx(8). [root@alarmpi ~]# reboot After rebooting, you need to increase the size of the file system on the created logical partition. Current Size:
[root@alarmpi ~]# df -h / Filesystem Size Used Avail Use% Mounted on /dev/root 1.7G 536M 1005M 35% / Increase size:
[root@alarmpi ~]# resize2fs /dev/mmcblk0p5 resize2fs 1.42.9 (28-Dec-2013) Filesystem at /dev/mmcblk0p5 is mounted on /; on-line resizing required old_desc_blocks = 1, new_desc_blocks = 1 The filesystem on /dev/mmcblk0p5 is now 970752 blocks long. New size:
[root@alarmpi ~]# df -h / Filesystem Size Used Avail Use% Mounted on /dev/root 3.7G 536M 3.0G 16% / It makes sense to set the noatime parameter for the root partition in the / etc / fstab file to reduce the number of write operations to the SD card:
/dev/mmcblk0p5 / ext4 defaults,noatime 0 1 Add unprivileged user
Add a user and set the password:
[root@alarmpi ~]# useradd -m pi [root@alarmpi ~]# passwd pi Enter new UNIX password: Retype new UNIX password: passwd: password updated successfully Install and configure sudo
Install sudo:
[root@alarmpi ~]# pacman -S sudo Having opened the configuration using the visudo command, we will uncomment the following line:
%wheel ALL=(ALL) NOPASSWD: ALL Add the previously created user pi to the wheel group:
[root@alarmpi ~]# usermod -aG wheel pi This will allow pi user to use sudo to execute commands that require elevated privileges.
Ssh setup
Since I already had SSH keys, I will not dwell on their creation. How to create them can be read here .
Copy the public key on the RPi:
$ ssh-copy-id pi@192.168.1.103 /usr/bin/ssh-copy-id: INFO: attempting to log in with the new key(s), to filter out any that are already installed /usr/bin/ssh-copy-id: INFO: 1 key(s) remain to be installed -- if you are prompted now it is to install the new keys pi@192.168.1.103's password: Number of key(s) added: 1 Now try logging into the machine, with: "ssh 'pi@192.168.1.103'" and check to make sure that only the key(s) you wanted were added. Open the sshd configuration file:
[root@alarmpi ~]# nano /etc/ssh/sshd_config We set it to prohibit ssh login as root and disable password authentication:
PermitRootLogin no PasswordAuthentication no Restart sshd:
[root@alarmpi ~]# systemctl restart sshd Conclusion
As a result of performing the above steps, we get RPi connected to a WiFi network, which synchronizes time via the Internet. RPi can be accessed via SSH as an unprivileged user, with the ability to call system commands via sudo.
Links to used resources
Source: https://habr.com/ru/post/219307/
All Articles