Eron-dong-dong or what else could your Windows Phone do?
Hello to all habrazhiteli!
Surely, many people in childhood liked cars on the radio. And not only in childhood: I am sure that in the age group of 30+ there will be a lot of fans of a dashing ride on a miniature scale. So I dreamed of such a typewriter since childhood, but girls are usually not given cars but dolls, and my dream remained unfulfilled until recently. But now I grew up, and a simple radio-controlled machine seemed rather boring to me. And one fine day I had an idea how to entertain myself and at the same time modernize a car: I decided to organize its management from a smartphone via WiFi.
')
I caught fire with this idea, especially since the target smartphone is the Nokia Lumia 620, and I was interested in programming in C # before. The work on the software part promised to be cloudless and fascinating, but with the hardware, everything was a little more complicated, and I began to google and study the hardware.
Since I am not an electrician, in order to organize the work of the hardware of my machine, I had to search around the Internet for a long time in search of guides on the basics of robotics for blondes. As always, the beloved Habr helped, namely this post , written in a language understandable even for a person very far from electronics. Everything is painted there very well, so I will not dwell on the hardware in detail; I will only tell you about the differences between my typewriter and the WiFi bot described there:
• Since the machine is intended for entertainment, and not for monitoring the premises, it doesn’t need a webcam (although it may be worth developing this topic in the future ...). The same applies to the autonomous charging system. A full battery charge (I used the Sanyo Eneloop AA with a capacity of 2500 mAh) is quite enough in time to play enough.
• So that all the stuffing got into the body of the machine, and also not to suffer especially with soldering (I'm blonde, after all ...) I used a slightly smaller Arduino Nano v3.0 microcontroller with a USB interface. The presence of a USB interface, in addition to connecting the MC to the router without soldering, also greatly simplifies the process of programming the arduin: connected to a computer -> filled in the sketch directly from the Arduino IDE -> enjoy. I also took the other router, TP-LINK WR703N, it is slightly less than the TL-MR3020, but otherwise they are almost identical.
• Since we do not solder the MK to the router, but connect via USB, then the UART's forwarding is performed virtually with the help of the ser2net daemon, which by default is present in the OR-WRT firmware of our router. All you have to do is add the following line to the ser2net.conf file on the router (or replace it if something is already written to port 2000):
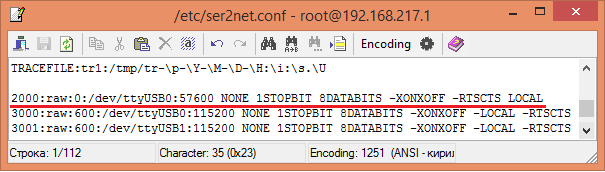
In principle, it is not necessary to use exactly 2000 port, you can take any free one.
So, to summarize. The hardware part of the machine in my version of kitchen robotics is “prepared” according to this recipe:
Ingredients:
Jeepik on radio control, TP-LINK TL-MR3020 or WR703N router, Arduino Nano microcontroller, L293D engine driver, 2 non-microUSB cables, 4 batteries.
Cooking:
1. Reflash the router with OR-WRT firmware and carry out the initial configuration.
2. Configure communication with arduine using ser2net.
3. Remove the radio control board from the machine.
4. Power up the router. Alternatively, this can be done in the simplest and most obvious way: since the router is powered through its microUSB interface, we cut a piece of the right size from one cable with the end on which there is a small connector. Cut off the end of the solder to the wiring coming from the battery compartment of the machine (pinout wires: pin1 - V + (5V), pin5 - V- (GND)), plug the connector into the appropriate slot.
5. Connect the MC to the router using the second microUSB cable and solder the required (see later) outputs of the MC to the corresponding inputs of the motor driver chip, and its outputs directly to the engines of the machine.
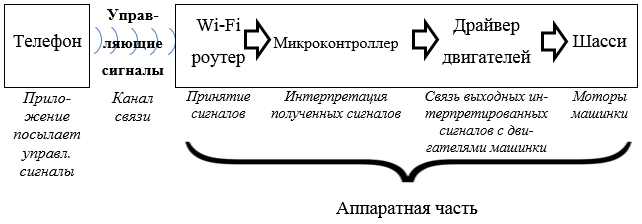
Structural scheme
Voila, the machine itself is ready! I repeat, this is a very schematic and simplified description of the procedure, more detailed instructions - in this source .
And now the most interesting and creative (at least for me) part of the work is the creation of a program that will manage all this happiness. Its essence lies in the fact that when you press the control buttons to send the appropriate signals to the router, which, in turn, will give them to Ardouin, and it controls the engines of the machine through the engine driver. That is, the software part consists of two components: a program for a smartphone and a program for MC.
I thought for a long time exactly how best to send a typewriter signals, tried a bunch of options and stopped at this: when you press a certain control button, the typewriter will send a signal about the beginning of movement (activation of the corresponding engine), and when released - about the termination of movement (engine deactivation) . I coded the control signals as follows:
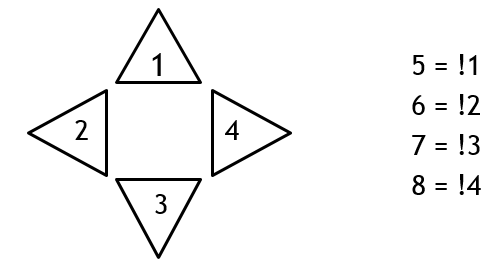
1 - start moving forward, 2 - start moving left, 3 - start moving back, 4 - start moving right. And, accordingly, 5 - to finish the movement forward, 6 - to finish the movement to the left, 7 - to finish the movement back, 8 - to finish the movement to the right. Buttons "forward" and "back" work with the main engine of the typewriter, and the "left" and "right" - with a rotary.
After that, you can safely begin programming the arduin, which is to check the presence of incoming data in the cycle while it is on, and set the HIGH or LOW level on the corresponding leg when you take a certain digit. The sketch code is elementary, switch / case to help us.
But the mobile application will be more difficult. First of all, we need to contact the machine, namely, with our machine, if there are several available WiFi networks around. First, let's configure the router to work in the access point mode using its new web interface.
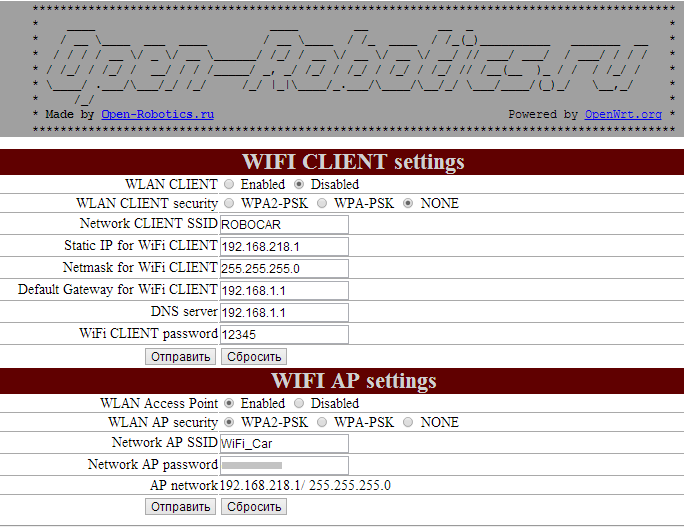
As you can see, after flashing, the IP address of the router in the access point mode - 192.168.218.1 - does not change. It is to this address that we will send data to the router. We will invent a network of our typewriter SSID and password to avoid connecting to the machine of other devices besides ours. Of course, we can not exclude the possibility of hacking our network, but it is extremely unlikely that someone will suffer such nonsense, for obvious reasons.
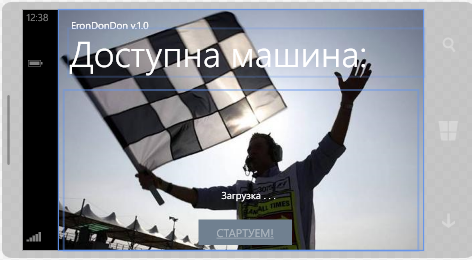
Now our network is unique and only our smartphone can connect to it. Therefore, the first thing that our application should do is to check the connection of the phone to the typewriter. And if the check is successful, you can start (the start button, inactive by default, is activated), and if not, you need to send the user to check the connection.
foreach (var network in new NetworkInterfaceList())// { if ((network.InterfaceType == NetworkInterfaceType.Wireless80211) && (network.InterfaceState == ConnectState.Connected) && (network.InterfaceName == "WiFi_Car"))// – І 80211 (WiFi), SSID SSID { CarName.Text = network.InterfaceName; // SSID StartButton.IsEnabled = true; // «» break; } else { CarName.Text = " . WiFi-."; StartButton.IsEnabled = false; } } Here is the layout of the application's start page:
When we have successfully connected to the typewriter, clicking on the “STARTING UP!” Button takes you to the main page of the application, from which we will control the machine:
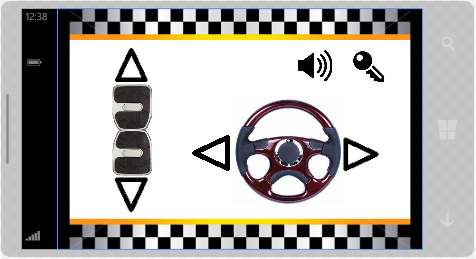
And here it is - the moment of truth: the transfer of typewriter control signals. We will organize this process using a socket. When you open this page, a socket connection with the router is established. To do this, we need to create several components:
IPEndPoint routerPort = new IPEndPoint(IPAddress.Parse("192.168.218.1"), 2000); // , IP- , ser2net Socket S = new Socket(AddressFamily.InterNetwork, SocketType.Stream, ProtocolType.Tcp); // SocketAsyncEventArgs socketEventArgs = new SocketAsyncEventArgs();// - byte[] buf = new byte[1]; // – ( 1 ) After that we will connect:
socketEventArgs.RemoteEndPoint = routerPort; // S.ConnectAsync(socketEventArgs); // socketEventArgs.SetBuffer(buf, 0, 1); // The functions of capturing pressing and releasing control buttons are implemented, respectively, by the methods MouseEnter and MouseLeave . To exclude emergency situations associated, for example, with simultaneous pressing of buttons of opposite directions, we enter for each button a flag that will be an indicator of the movement of the machine in the corresponding direction. The push and release functions of all the arrow buttons have the same structure.
Pressing:
private void [ ]_MouseEnter (object sender, System.Windows.Input.MouseEventArgs e) { if (![ ] && ![ ]) { buf[0] = [- ]; Socket.SendToAsync(socketEventArgs); [ ] = true; } } Release:
private void [ ]_MouseLeave(object sender, System.Windows.Input.MouseEventArgs e) { if ([ ]) { buf[0] = [ ]; Socket.SendToAsync(socketEventArgs); [ ] = false; } } It is worth noting here that the transfer of data to the remote node should be done using the SendToAsync method and not confuse it with a similar method, SendAsync . The difference is that SendAsync sends data from our socket to another socket, and SendToAsync is just to the remote node, which is what we need, so if you confuse the methods, the data will not be sent.
Also note that when I test-drive a car from a laptop, I discovered that when both engines, main and turn, are working simultaneously, there are occasional emergency situations like loss of communication with the router. I suspect that this is due to the subsidence of the voltage on the inside of the machine, because similar bugs were also noticed when the batteries are low. After all, so many consumers are fed by poor 4 batteries. Therefore, I removed the spring from the swivel wheels, which returned them to their original position, so that the motors could be started sequentially, and in the mobile application they did not intentionally provide for the possibility of simultaneous operation of both engines. So far, and when there is a way to improve the power supply system of the machine, then it will be possible to think about expanding its functional capabilities.
Now the matter remains for the small: to implement the closure of the socket connection and return to the start page when we roll. I have these functions as a button in the form of an ignition key:
private void key_MouseEnter(object sender, System.Windows.Input.MouseEventArgs e) { S.Close(); // NavigationService.Navigate(new Uri("/MainPage.xaml", UriKind.Relative)); } So, in general, that's all, now you can play safely! For full immersion, you can also add a button to turn on / off the music, and put some suitable song to play. For example, I could not resist, and my machine goes under Lil Jon & the Eastside Boyz - Get Low .
I offer you a short video about the results of my inspired work:
PS: I would be very happy for constructive criticism and optimization suggestions. But do not judge strictly, please, this is my first project of this magnitude.
PPS: Thank you so much svavan for help with the hardware! Since I was familiar with electronics and the process of flashing routers very vaguely, I would not have managed without this help.
Source: https://habr.com/ru/post/219257/
All Articles