Unity3d Lessons from Unity 3D Student (B17-B20)
Hello. DisaDisa started a good deal on translating Unity 3D lessons from www.unity3dstudent.com . I decided to continue what I started, so that the course would be complete.
Links to previous lessons:
The lesson describes how to get a component of another game object in the script of one game object and perform the necessary actions on it (component).
')
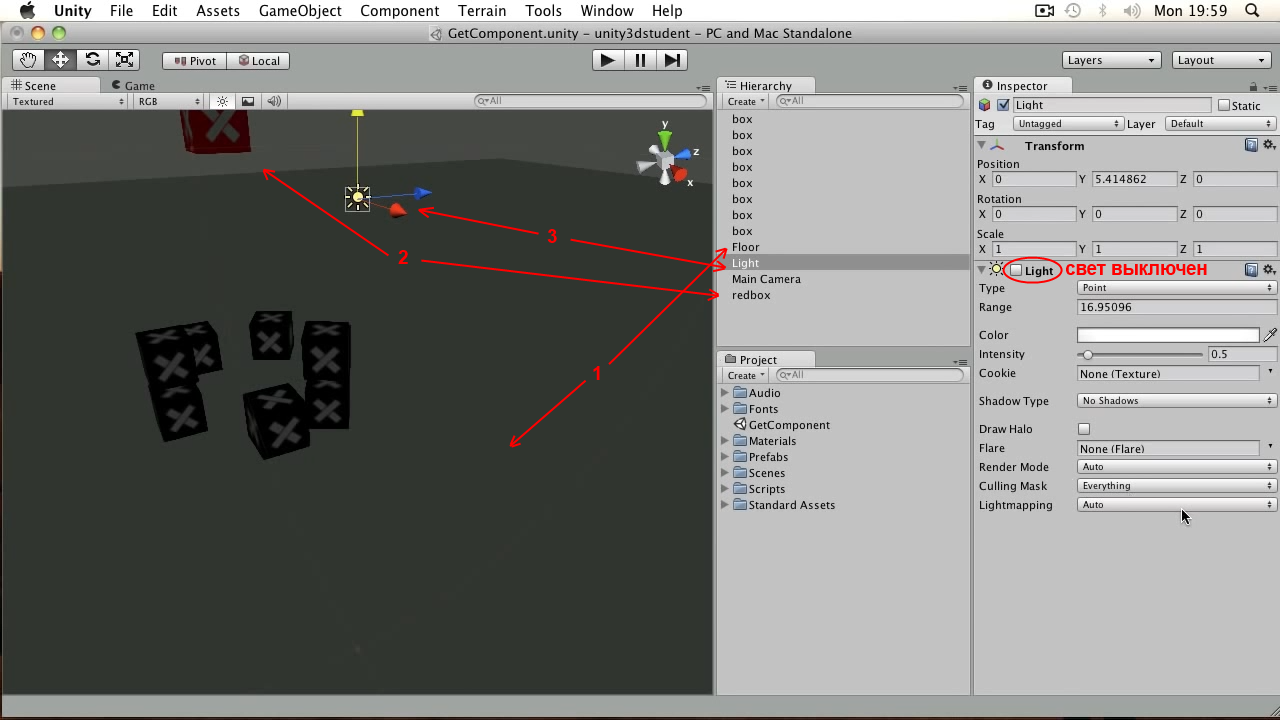
So, on our stage there are the following objects: the plane Floor [1], the red cube redbox [2] falling on it and the point light source Light [3]. At the same time, the light source is initially turned off (the flag of the corresponding component is cleared) he does not light the scene. We want the light source to turn on when the red cube falls onto the plane.
Create a new script and implement the OnCollisionEnter method in it. I remind you that this method is called when a collider of a game object collides with a collider of another game object. In our scene, there are colliders both on the Floor plane and on the redbox , so the method will be called.
JavaScript code:
C # code:
In the script, we first check if the cube collided with the plane. If yes, look for a game object named Light using the GameObject.Find method, and then at the found object we get the Light lighting component using the GetComponent method. Then we turn on the component by setting the enabled flag and set the intensity of radiation intensity equal to 5.
Add the script to the redbox , run the scene. The cube falls down, and when it touches the plane, the light comes on.

Note from the translator: in order to improve performance, you need to follow the competent call of the GetComponent method. In our example, it is called once when a collision is detected, and no problems arise from this. However, if you need to reuse the components obtained using the method, and you place a call to GetComponent , for example, in the code of the Update method, which is called in each frame of the game, there will be additional overhead for finding the component. You can avoid them by calling the GetComponent method in the code of the Start method (which is called once for a game object), save the resulting component to a variable and work further on this variable, rather than calling GetComponent again.
Link to the original lesson
GetComponent Method Reference
The lesson shows the features when moving a game object in the local and world coordinate systems.
When moving game objects, there can be a misunderstanding of the difference between the local coordinate system of the object and the world coordinate system. The direction of world coordinates always remains the same, while the direction of local coordinates may change and, as a result, differ from the world ones. Consider the scene in the image below. We have a game object Pengium . It is located so that the direction of its local coordinates differs from the direction of world coordinates.

Let's create and add a simple script to our object:
JavaScript code:
C # code:
In the script, we move our object along the Z axis, i.e. forward. But along which axis will the movement take place - global or local? Launch the scene and see that the object moves along its local Z axis.

Now let's change the script a bit. Comment out the first line and add the second:
JavaScript code:
C # code:
Now we move the object by applying force. I remind you that for this, the game object must have a Rigidbody component, otherwise an error will be generated . Launch the scene - the object flew away in the same direction along the Z axis, but now the movement has taken place in the direction of world coordinates.

How do we apply force so that the object moves forward in local coordinates? To do this, add a line to the script before calling the AddForce method, which saves the local direction of the object, and use this direction to apply force:
JavaScript code:
C # code:
The object will now move along its local Z axis.
Link to Transform class documentation
The lesson shows the application of the LookAt method for tracking a game object.
Imagine that we need to implement camera tracking for a moving game object. This behavior can be easily done using the TransAm LookAt method.
On our stage there is a plane on which the red cube of the redbox falls , bounces off the surface and flies out of the field of view of the Main Camera .

In order for the camera to follow the cube, it is enough to add the following script to it:
JavaScript code:
C # code:
In the script, we declared the variable myTransform to hold a reference to the Transform component of the object we are following. In the Update method for the Transform camera component, the LookAt method is called with the transfer as an argument to myTransform . Add a script to the camera Main Camera , drag the redbox object from the scene hierarchy to the My Transform field, launch the scene.

The camera now does not lower the “eye” from the cube, turning behind it in any direction. At the same time, the camera does not change its position in space, that is, only the angles of rotation change without changing the coordinates of the location.
Reference to the documentation of the Transform.LookAt method
The lesson explains the operation of the if / [else] condition operator and its relation to boolean expressions and boolean variables.
In programming, the if statement is important. It allows you to check a certain condition and, depending on whether it is fulfilled or not, to perform certain actions. In other words, with the help of this operator, the course of the program (game) can be divided into several possible options, depending on the specified conditions.
Let's look at the following simple scene: Camera Main Camera and text GUI Text .

Let's write the following script and add it to the text of the GUI Text :
JavaScript code:
C # code:
In the script, we first get the boolean variable myCheck . Boolean variables are able to take only two values, true or false (“true” or “false”). Initially, we set the variable value to true . Then, in the Update method, using the if operator checks the value of this variable. Such a record - if (myCheck) - means checking the value of a variable for equality to the value true . That is, if the value of the variable is true, the program will go to the code block immediately after the if statement , where we assign the text “Its on!” To the text.
If the test for true failed, the program would execute the code after the else operator. This is not a mandatory operator, it can be omitted if there is no need to do anything in case of verification failure. We in this case set the value to the text “Its Off!”.
Next comes another bundle of if / else statements . Now it checks not just a variable, but a whole boolean expression. We check if the jump key was pressed (the default is the spacebar key) and if our variable is true. If so, we change the value of the variable myCheck from true to false . In the else statement , we almost have the opposite situation: we also check the keystroke of the jump, but now the value of the variable myCheck is checked for false. If everything is so, change the value of the variable to true . In this case, we use not just the else operator, but also another if statement . In addition, the verification conditions are combined using the && operator - the logical “AND”, that is, our conditions must be met both. If we were satisfied with any of the conditions, it would be necessary to use the operator || - logical "OR".
Run the scene. “Its on!” Is displayed on the screen, since the variable myCheck is true . Press the space bar - the text will change to “Its Off!”. Once again, the space - again “Its on!”.

Note from the translator: in the version of the script for C # to check the variable for false, I used the following entry :! MyCheck , that is, simply added an exclamation mark in front of the variable. This is an abbreviated false test equivalent to the longer myCheck == false .
MSDN link about if / else statement
Links to previous lessons:
Basic lesson 17 - Working with components of game objects in scripts
The lesson describes how to get a component of another game object in the script of one game object and perform the necessary actions on it (component).
')
So, on our stage there are the following objects: the plane Floor [1], the red cube redbox [2] falling on it and the point light source Light [3]. At the same time, the light source is initially turned off (the flag of the corresponding component is cleared) he does not light the scene. We want the light source to turn on when the red cube falls onto the plane.
Create a new script and implement the OnCollisionEnter method in it. I remind you that this method is called when a collider of a game object collides with a collider of another game object. In our scene, there are colliders both on the Floor plane and on the redbox , so the method will be called.
JavaScript code:
function OnCollisionEnter (myCollision : Collision) { if(myCollision.gameObject.name == "Floor"){ var myLight : Light = gameObject.Find("Light").GetComponent(Light); myLight.enabled = true; myLight.intensity = 5; } } C # code:
void OnCollisionEnter(Collision myCollision) { if(myCollision.gameObject.name == "Floor") { var myLight = (Light)GameObject.Find("Light").GetComponent(typeof(Light)); myLight.enabled = true; myLight.intensity = 5; } } In the script, we first check if the cube collided with the plane. If yes, look for a game object named Light using the GameObject.Find method, and then at the found object we get the Light lighting component using the GetComponent method. Then we turn on the component by setting the enabled flag and set the intensity of radiation intensity equal to 5.
Add the script to the redbox , run the scene. The cube falls down, and when it touches the plane, the light comes on.
Note from the translator: in order to improve performance, you need to follow the competent call of the GetComponent method. In our example, it is called once when a collision is detected, and no problems arise from this. However, if you need to reuse the components obtained using the method, and you place a call to GetComponent , for example, in the code of the Update method, which is called in each frame of the game, there will be additional overhead for finding the component. You can avoid them by calling the GetComponent method in the code of the Start method (which is called once for a game object), save the resulting component to a variable and work further on this variable, rather than calling GetComponent again.
Link to the original lesson
Additional materials:
GetComponent Method Reference
Basic lesson 18 - Difference between local and world directions
The lesson shows the features when moving a game object in the local and world coordinate systems.
When moving game objects, there can be a misunderstanding of the difference between the local coordinate system of the object and the world coordinate system. The direction of world coordinates always remains the same, while the direction of local coordinates may change and, as a result, differ from the world ones. Consider the scene in the image below. We have a game object Pengium . It is located so that the direction of its local coordinates differs from the direction of world coordinates.
Let's create and add a simple script to our object:
JavaScript code:
function Update () { transform.Translate(Vector3(0,0,1) * Time.deltaTime); } C # code:
void Update() { transform.Translate(new Vector3(0, 0, 1) * Time.deltaTime); } In the script, we move our object along the Z axis, i.e. forward. But along which axis will the movement take place - global or local? Launch the scene and see that the object moves along its local Z axis.
Now let's change the script a bit. Comment out the first line and add the second:
JavaScript code:
function Update () { //transform.Translate(Vector3(0,0,1) * Time.deltaTime); rigidbody.AddForce(Vector3(0,0,100)); } C # code:
void Update() { //transform.Translate(new Vector3(0, 0, 1) * Time.deltaTime); rigidbody.AddForce(new Vector3(0, 0, 100)); } Now we move the object by applying force. I remind you that for this, the game object must have a Rigidbody component, otherwise an error will be generated . Launch the scene - the object flew away in the same direction along the Z axis, but now the movement has taken place in the direction of world coordinates.
How do we apply force so that the object moves forward in local coordinates? To do this, add a line to the script before calling the AddForce method, which saves the local direction of the object, and use this direction to apply force:
JavaScript code:
function Update () { //transform.Translate(Vector3(0,0,1) * Time.deltaTime); var fwd = transform.forward * 100; rigidbody.AddForce(fwd); } C # code:
void Update() { //transform.Translate(new Vector3(0, 0, 1) * Time.deltaTime); Vector3 fwd = transform.forward * 100; rigidbody.AddForce(fwd); } The object will now move along its local Z axis.
Additional materials:
Link to Transform class documentation
Basic Lesson 19 - Tracking Objects with LookAt
The lesson shows the application of the LookAt method for tracking a game object.
Imagine that we need to implement camera tracking for a moving game object. This behavior can be easily done using the TransAm LookAt method.
On our stage there is a plane on which the red cube of the redbox falls , bounces off the surface and flies out of the field of view of the Main Camera .
In order for the camera to follow the cube, it is enough to add the following script to it:
JavaScript code:
var myTransform : Transform; function Update () { transform.LookAt(myTransform); } C # code:
public Transform myTransform; void Update() { transform.LookAt(myTransform); } In the script, we declared the variable myTransform to hold a reference to the Transform component of the object we are following. In the Update method for the Transform camera component, the LookAt method is called with the transfer as an argument to myTransform . Add a script to the camera Main Camera , drag the redbox object from the scene hierarchy to the My Transform field, launch the scene.
The camera now does not lower the “eye” from the cube, turning behind it in any direction. At the same time, the camera does not change its position in space, that is, only the angles of rotation change without changing the coordinates of the location.
Additional materials:
Reference to the documentation of the Transform.LookAt method
Basic Lesson 20 - Detailed explanation of the if statement test and boolean variables
The lesson explains the operation of the if / [else] condition operator and its relation to boolean expressions and boolean variables.
In programming, the if statement is important. It allows you to check a certain condition and, depending on whether it is fulfilled or not, to perform certain actions. In other words, with the help of this operator, the course of the program (game) can be divided into several possible options, depending on the specified conditions.
Let's look at the following simple scene: Camera Main Camera and text GUI Text .
Let's write the following script and add it to the text of the GUI Text :
JavaScript code:
var myCheck : boolean = true; function Update () { if(myCheck){ guiText.text = "Its on!"; }else{ guiText.text = "Its Off!"; } if(Input.GetButtonUp("Jump") && myCheck){ myCheck = false; }else if(Input.GetButtonUp("Jump") && myCheck == false){ myCheck = true; } } C # code:
bool myCheck = true; void Update() { if(myCheck) { guiText.text = "Its on!"; } else { guiText.text = "Its Off!"; } if(Input.GetButtonUp("Jump") && myCheck) { myCheck = false; } else if(Input.GetButtonUp("Jump") && !myCheck) { myCheck = true; } } In the script, we first get the boolean variable myCheck . Boolean variables are able to take only two values, true or false (“true” or “false”). Initially, we set the variable value to true . Then, in the Update method, using the if operator checks the value of this variable. Such a record - if (myCheck) - means checking the value of a variable for equality to the value true . That is, if the value of the variable is true, the program will go to the code block immediately after the if statement , where we assign the text “Its on!” To the text.
If the test for true failed, the program would execute the code after the else operator. This is not a mandatory operator, it can be omitted if there is no need to do anything in case of verification failure. We in this case set the value to the text “Its Off!”.
Next comes another bundle of if / else statements . Now it checks not just a variable, but a whole boolean expression. We check if the jump key was pressed (the default is the spacebar key) and if our variable is true. If so, we change the value of the variable myCheck from true to false . In the else statement , we almost have the opposite situation: we also check the keystroke of the jump, but now the value of the variable myCheck is checked for false. If everything is so, change the value of the variable to true . In this case, we use not just the else operator, but also another if statement . In addition, the verification conditions are combined using the && operator - the logical “AND”, that is, our conditions must be met both. If we were satisfied with any of the conditions, it would be necessary to use the operator || - logical "OR".
Run the scene. “Its on!” Is displayed on the screen, since the variable myCheck is true . Press the space bar - the text will change to “Its Off!”. Once again, the space - again “Its on!”.
Note from the translator: in the version of the script for C # to check the variable for false, I used the following entry :! MyCheck , that is, simply added an exclamation mark in front of the variable. This is an abbreviated false test equivalent to the longer myCheck == false .
Additional materials:
MSDN link about if / else statement
Source: https://habr.com/ru/post/219193/
All Articles