Configuring HADR on DB2 servers and Configuring ACR on Websphere servers
HADR is a DB2 database mirroring tool. The ACR mechanism in Websphere allows in the event of a base failure, automatically switching clients to a backup server. Below I will tell how I set up both of these things 8-)
In Russian setting and description of HADR is described here.
Full HADR reference in English here.
You can configure HADR through the chart and through the console. We will do this through the terminal. Since it is a chore through the schedule, it is fraught with errors from both the system and the user. I had a hard time with Guys ... 8-)
Consider an example of configuring HADR between the SPDDATSERV (primary) and RSPDDATSERV (backup) servers.
Database DAT6.
1. First, on the main server, you need to change the configuration settings so that it can satisfy the conditions and work optimally in HADR.
2. Next, make a backup of this database in the folder G: \ DB2Dump
3. Transfer the backup to the backup directory in the directory G: \ 2restore \ hadr
4. On the backup server, we raise the backup of this database.
5. On both servers, edit the file C: \ Windows \ System32 \ drivers \ etc \ services, where for each database we specify the service name and port.
For example:
DB2_HADR_DAT 55001 / tcp
DB2_HADR_DAT2 55002 / tcp
DB2_HADR_DAT3 55003 / tcp
DB2_HADR_DAT4 55004 / tcp
DB2_HADR_DAT5 55005 / tcp
DB2_HADR_DAT6 55006 / tcp
Here ports for 6 bases are reserved. For example, the port 55005 is reserved for the DAT5 database and the service is called DB2_HADR_DAT5. It is better that the service names and ports match on both systems.
')
6. On the main server, we change the HADR configuration parameters for the database
HADR_SYNCMODE - Synchronous mode of operation, which makes it possible to completely eliminate the possibility of data loss (for more information about the modes refer to the link above)
HADR_TIMEOUT - Connection Timeout
HADR_LOCAL_HOST - Local machine name
HADR_LOCAL_SVC - The name of the service added in paragraph 5
HADR_REMOTE_HOST - Name of the backup machine
HADR_REMOTE_SVC - similar to the HADR_LOCAL_SVC parameter for the backup system
7. On the main server, specify the database for automatic client redirection.
8. On the primary server, we catalog the node, and then the database from the backup server
9. Perform similar manipulations with the backup server.
10. First run HADR on standby.
11. Then on the main
Below is a listing of HADR.txt files from both systems. This file is numbered the order of running scripts.
By creating the same files on the servers, you can easily and step-by-step configure HADR by replacing only the database name.! The main thing to remember to edit the file services!
File from the main system:
Backup file:
After each restart of the DB2 server or service, HARD pauses until the database is activated (both native and backup).
Activation occurs either on the first connection or by force using the ACTIVATE DB <db_name> command.
And if you don’t worry about the main database, since Websphere is constantly trying to connect, then the backup must be activated by force.
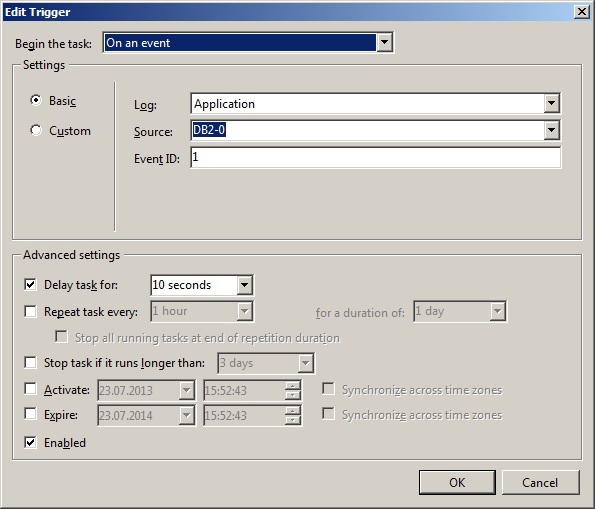
To do this, you can do the task in the Windows Scheduler to create an event in the application log. This event will be the execution of the DB2START command, which is always executed when the DB2 service starts. When you execute the DB2START command, an entry from the DB2-0 source with the EventID: 1 is recorded in the application log.
Here's what the triggered triger will look like.
This is how the window looks like, where you configure the action performed after the trigger triggers.
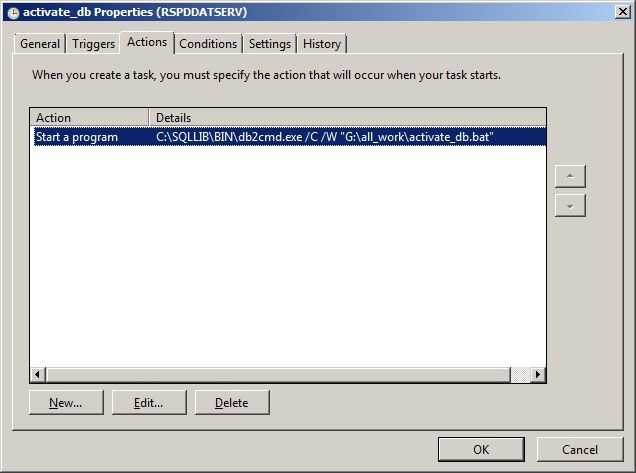
As you can see in the picture, the G: \ all_work \ activate_db.bat bat file is launched which activates 6 databases: dat, dat2, .., dat6. And here is its listing:
db2 activate db dat
db2 activate db dat2
db2 activate db dat3
db2 activate db dat4
db2 activate db dat5
db2 activate db dat6
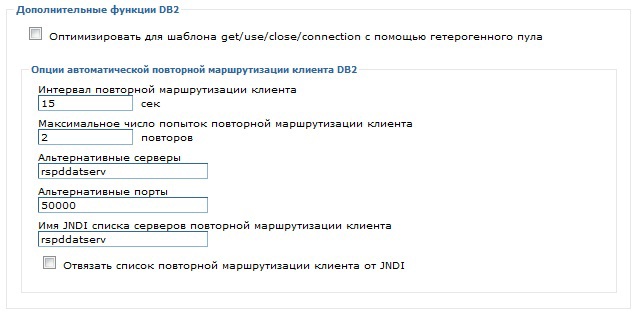
So that after stopping the main server and launching the backup server, you do not need to reconfigure data sources, configure ACR. In this case, when the main base is disconnected, the ACR tries to connect to the backup automatically. I checked switching roles between servers (main / standby) there was a slight delay, users did not even notice anything. In the event of the primary server crashing, the backup will have to be switched to the main role manually, but after that the ACR will be able to switch and work with the backup as with the main one.
To configure ACR on Websphere, go to the console JDBC communication complexes> DB2 Universal JDBC Driver Provider> Data Sources> <Source Name>> WebSphere Application Server data source properties and set the parameters as in
For a scheduled database change on the server, enter
For emergency
then after repairing the main base on it we enter
Configuring HADR on DB2 servers
In Russian setting and description of HADR is described here.
Full HADR reference in English here.
You can configure HADR through the chart and through the console. We will do this through the terminal. Since it is a chore through the schedule, it is fraught with errors from both the system and the user. I had a hard time with Guys ... 8-)
Consider an example of configuring HADR between the SPDDATSERV (primary) and RSPDDATSERV (backup) servers.
Database DAT6.
1. First, on the main server, you need to change the configuration settings so that it can satisfy the conditions and work optimally in HADR.
UPDATE DB CFG FOR DAT6 USING LOGINDEXBUILD ON; UPDATE DB CFG FOR DAT6 USING INDEXREC RESTART; UPDATE DB CFG FOR DAT6 USING LOGSECOND 10; 2. Next, make a backup of this database in the folder G: \ DB2Dump
-- CONNECT TO DAT6; QUIESCE DATABASE IMMEDIATE FORCE CONNECTIONS; UNQUIESCE DATABASE; CONNECT RESET; -- BACKUP DB DAT6 TO G:\DB2Dump COMPRESS;</code> 3. Transfer the backup to the backup directory in the directory G: \ 2restore \ hadr
4. On the backup server, we raise the backup of this database.
RESTORE DATABASE DAT6 FROM "G:\2restore\hadr" TO "D:" INTO DAT6 WITHOUT PROMPTING; 5. On both servers, edit the file C: \ Windows \ System32 \ drivers \ etc \ services, where for each database we specify the service name and port.
For example:
DB2_HADR_DAT 55001 / tcp
DB2_HADR_DAT2 55002 / tcp
DB2_HADR_DAT3 55003 / tcp
DB2_HADR_DAT4 55004 / tcp
DB2_HADR_DAT5 55005 / tcp
DB2_HADR_DAT6 55006 / tcp
Here ports for 6 bases are reserved. For example, the port 55005 is reserved for the DAT5 database and the service is called DB2_HADR_DAT5. It is better that the service names and ports match on both systems.
')
6. On the main server, we change the HADR configuration parameters for the database
UPDATE DB CFG FOR DAT6 USING HADR_SYNCMODE SYNC; UPDATE DB CFG FOR DAT6 USING HADR_TIMEOUT 120; UPDATE DB CFG FOR DAT6 USING HADR_LOCAL_HOST SPDDATSERV; UPDATE DB CFG FOR DAT6 USING HADR_LOCAL_SVC DB2_HADR_DAT6; UPDATE DB CFG FOR DAT6 USING HADR_REMOTE_HOST RSPDDATSERV; UPDATE DB CFG FOR DAT6 USING HADR_REMOTE_SVC DB2_HADR_DAT6; UPDATE DB CFG FOR DAT6 USING HADR_REMOTE_INST DB2; HADR_SYNCMODE - Synchronous mode of operation, which makes it possible to completely eliminate the possibility of data loss (for more information about the modes refer to the link above)
HADR_TIMEOUT - Connection Timeout
HADR_LOCAL_HOST - Local machine name
HADR_LOCAL_SVC - The name of the service added in paragraph 5
HADR_REMOTE_HOST - Name of the backup machine
HADR_REMOTE_SVC - similar to the HADR_LOCAL_SVC parameter for the backup system
7. On the main server, specify the database for automatic client redirection.
UPDATE ALTERNATE SERVER FOR DATABASE DAT6 USING HOSTNAME RSPDDATSERV PORT 50000; 8. On the primary server, we catalog the node, and then the database from the backup server
CATALOG TCPIP NODE DB2RES REMOTE RSPDDATSERV SERVER 50000 REMOTE_INSTANCE DB2; CATALOG DATABASE DAT6 AS RDAT6 AT NODE DB2RES; 9. Perform similar manipulations with the backup server.
-- HADR UPDATE DB CFG FOR DAT6 USING HADR_SYNCMODE SYNC; UPDATE DB CFG FOR DAT6 USING HADR_TIMEOUT 120; -- UPDATE DB CFG FOR DAT6 USING HADR_LOCAL_HOST RSPDDATSERV; UPDATE DB CFG FOR DAT6 USING HADR_LOCAL_SVC DB2_HADR_DAT6; -- UPDATE DB CFG FOR DAT6 USING HADR_REMOTE_HOST SPDDATSERV; UPDATE DB CFG FOR DAT6 USING HADR_REMOTE_SVC DB2_HADR_DAT6; UPDATE DB CFG FOR DAT6 USING HADR_REMOTE_INST DB2; -- , UPDATE ALTERNATE SERVER FOR DATABASE DAT6 USING HOSTNAME SPDDATSERV PORT 50000; -- CATALOG TCPIP NODE DB2DOR REMOTE SPDDATSERV SERVER 50000 REMOTE_INSTANCE DB2; CATALOG DATABASE DAT6 AS DDAT6 AT NODE DB2DOR; 10. First run HADR on standby.
DEACTIVATE DATABASE DAT6; START HADR ON DATABASE DAT6 AS STANDBY; 11. Then on the main
DEACTIVATE DATABASE DAT6; START HADR ON DATABASE DAT6 AS PRIMARY; Below is a listing of HADR.txt files from both systems. This file is numbered the order of running scripts.
By creating the same files on the servers, you can easily and step-by-step configure HADR by replacing only the database name.! The main thing to remember to edit the file services!
File from the main system:
-- 1. UPDATE DB CFG FOR DAT6 USING LOGINDEXBUILD ON; UPDATE DB CFG FOR DAT6 USING INDEXREC RESTART; UPDATE DB CFG FOR DAT6 USING LOGSECOND 10; -- 2. CONNECT TO DAT6; QUIESCE DATABASE IMMEDIATE FORCE CONNECTIONS; UNQUIESCE DATABASE; CONNECT RESET; BACKUP DB DAT6 TO G:\DB2Dump COMPRESS; -- 4. HADR UPDATE DB CFG FOR DAT6 USING HADR_SYNCMODE SYNC; UPDATE DB CFG FOR DAT6 USING HADR_TIMEOUT 120; UPDATE DB CFG FOR DAT6 USING HADR_LOCAL_HOST SPDDATSERV; UPDATE DB CFG FOR DAT6 USING HADR_LOCAL_SVC DB2_HADR_DAT6; UPDATE DB CFG FOR DAT6 USING HADR_REMOTE_HOST RSPDDATSERV; UPDATE DB CFG FOR DAT6 USING HADR_REMOTE_SVC DB2_HADR_DAT6; UPDATE DB CFG FOR DAT6 USING HADR_REMOTE_INST DB2; -- 5. UPDATE ALTERNATE SERVER FOR DATABASE DAT6 USING HOSTNAME RSPDDATSERV PORT 50000; -- 6. CATALOG TCPIP NODE DB2RES REMOTE RSPDDATSERV SERVER 50000 REMOTE_INSTANCE DB2; CATALOG DATABASE DAT6 AS RDAT6 AT NODE DB2RES; -- 11. DEACTIVATE DATABASE DAT6; START HADR ON DATABASE DAT6 AS PRIMARY; Backup file:
-- 3. RESTORE DATABASE DAT6 FROM "G:\2restore\hadr" TO "D:" INTO DAT6 WITHOUT PROMPTING; -- 7. HADR UPDATE DB CFG FOR DAT6 USING HADR_SYNCMODE SYNC; UPDATE DB CFG FOR DAT6 USING HADR_TIMEOUT 120; UPDATE DB CFG FOR DAT6 USING HADR_LOCAL_HOST RSPDDATSERV; UPDATE DB CFG FOR DAT6 USING HADR_LOCAL_SVC DB2_HADR_DAT6; UPDATE DB CFG FOR DAT6 USING HADR_REMOTE_HOST SPDDATSERV; UPDATE DB CFG FOR DAT6 USING HADR_REMOTE_SVC DB2_HADR_DAT6; UPDATE DB CFG FOR DAT6 USING HADR_REMOTE_INST DB2; -- 8. UDADATE ALTERNATE SERVER FOR DATABASE DAT6 USING HOSTNAME SPDDATSERV PORT 50000; -- 9. CATALOG TCPIP NODE DB2DOR REMOTE SPDDATSERV SERVER 50000 REMOTE_INSTANCE DB2; CATALOG DATABASE DAT6 AS DDAT6 AT NODE DB2DOR; -- 10. HADR DEACTIVATE DATABASE DAT6; START HADR ON DATABASE DAT6 AS STANDBY; Configuring the scheduler on DB2 servers
After each restart of the DB2 server or service, HARD pauses until the database is activated (both native and backup).
Activation occurs either on the first connection or by force using the ACTIVATE DB <db_name> command.
And if you don’t worry about the main database, since Websphere is constantly trying to connect, then the backup must be activated by force.
To do this, you can do the task in the Windows Scheduler to create an event in the application log. This event will be the execution of the DB2START command, which is always executed when the DB2 service starts. When you execute the DB2START command, an entry from the DB2-0 source with the EventID: 1 is recorded in the application log.
Here's what the triggered triger will look like.
This is how the window looks like, where you configure the action performed after the trigger triggers.
As you can see in the picture, the G: \ all_work \ activate_db.bat bat file is launched which activates 6 databases: dat, dat2, .., dat6. And here is its listing:
db2 activate db dat
db2 activate db dat2
db2 activate db dat3
db2 activate db dat4
db2 activate db dat5
db2 activate db dat6
Configuring ACR on Websphere servers
So that after stopping the main server and launching the backup server, you do not need to reconfigure data sources, configure ACR. In this case, when the main base is disconnected, the ACR tries to connect to the backup automatically. I checked switching roles between servers (main / standby) there was a slight delay, users did not even notice anything. In the event of the primary server crashing, the backup will have to be switched to the main role manually, but after that the ACR will be able to switch and work with the backup as with the main one.
To configure ACR on Websphere, go to the console JDBC communication complexes> DB2 Universal JDBC Driver Provider> Data Sources> <Source Name>> WebSphere Application Server data source properties and set the parameters as in
For a scheduled database change on the server, enter
db2 takeover hadr on db *DB* For emergency
db2 takeover hadr on db *DB* by force then after repairing the main base on it we enter
db2 start hadr on db <DB> as stanby Source: https://habr.com/ru/post/219053/
All Articles