Writing a file system in the Linux kernel
Who is this article for?

This article is based on the practice of operating systems at the Academic University . The material was prepared for students, and there will be nothing difficult here, just a basic knowledge of the command line, the C language, Makefile and general theoretical knowledge about file systems.
All material is divided into several parts, this article will describe the introductory part. I will briefly talk about what is needed for development in the Linux kernel, then we will write the simplest loadable kernel module, and finally write the skeleton of the future file system — a module that registers a rather useless (so far) file system in the kernel. People already familiar (albeit superficially) with the development of the Linux kernel will not find anything interesting here.
Introduction
The file system is one of the central OS subsystems. The development of file systems went along with the development of the OS. At the moment we have a whole zoo of a wide variety of file systems from the old “classic” UFS , to the new interesting NILFS (although the idea is not new, look at the LFS ) and BTRFS . So, one can say that the theory and practice of creating file systems is fully developed. We will not try to overthrow monsters like ext3 / 4 and BTRFS, our file system will be educational in nature, for example we will get acquainted with the Linux kernel.
')
Setting up the environment
Before we go into the kernel, let's prepare everything necessary to build our file system module. Everyone has their own preferences in Linux distributions, but I’m used to using Ubutnu, so I’ll show the environment settings using her example, fortunately it’s not at all difficult. First we need a compiler and tools for building:
sudo apt-get install gcc build-essential
Next, we will need the kernel sources, or not. We will go in a simple way - we will not rebuild the kernel from source, just set ourselves the kernel headers, this will be enough to write a loadable module. You can set the headers like this:
sudo apt-get install linux-headers-`uname -r`
Here I must make a small lyrical digression. Poking around in the kernel on a working machine is not the best idea, so I strongly advise you to do this all in a virtual machine. We will not do anything dangerous, so the saved data is safe, but if
something goes wrong, you will probably have to reboot the system, and this is pretty annoying. In addition, it is more convenient to debug kernel modules in a virtual machine (such as QEMU), although this issue will not be discussed in this article.
Checking the environment
To check the environment, we will write and run a kernel module that will not do anything useful (Hello, World!). Let's look at the module code, I called it super.c (do not think anything, super is from superblock):
#include <linux/init.h> #include <linux/module.h> static int __init aufs_init(void) { pr_debug("aufs module loaded\n"); return 0; } static void __exit aufs_fini(void) { pr_debug("aufs module unloaded\n"); } module_init(aufs_init); module_exit(aufs_fini); MODULE_LICENSE("GPL"); MODULE_AUTHOR("kmu"); At the very beginning there are two headers, consider that they are an obligatory part of any loadable kernel module, there is nothing interesting in them. Next come the two functions aufs_init and aufs_fini - they will be called after loading and before unloading the module, respectively.
Some of you may be confused by the label __init. __init is a hint to the kernel that the function is used only during module initialization, which means that after module initialization this function can be unloaded from memory. There is a similar marker for the data, however, the kernel may well ignore these hints. Accessing __init functions and data from the main module code is a potential error, so it is checked during module building that there are no such references. If such an appeal is found, the kernel build system will issue a warning. Similarly, validation is done for __exit functions and data. If you are interested in the details of what __init and __exit are, then you can refer to the sources .
Note that aufs_init returns an int. Thus, the kernel finds out that something went wrong during the module initialization - if the module returned a non-zero value, it means an error occurred during the initialization.
To specify which functions to call when loading and unloading a module, two macros are used: module_init and module_exit. They are revealed in a certain amount of compiler magic, but we will not go into details, interested people can turn to lxr and follow the links (I must say, it’s a very handy thing to master the kernel).
pr_debug is a function (actually it is a macro, but so far it doesn’t matter to us) output to the kernel log, the printf family of functions with some extensions is very similar, for example, for printing IP and MAC addresses. A complete list of modifiers can be found in the kernel documentation . Together with pr_debug, there is a whole family of macros: pr_info, pr_warn, pr_err, and others. Those who are a little familiar with the development of Linux modules surely know about the printk function, in principle, the pr_ * macros are expanded into printk calls, so printk can be used instead.
Next come the macros with information for descendants - the license and the author. There are other macros that allow you to save a wide variety of information about the module, for example, MODULE_VERSION, MODULE_INFO, MODULE_SUPPORTED_DEVICE and others. By the way, the funny fact is that if you use a license other than the GPL, then you cannot use some of the functions available to the GPL modules.
Now we will collect and load our module. To do this, write a Makefile that will build our module:
obj-m := aufs.o aufs-objs := super.o CFLAGS_super.o := -DDEBUG all: make -C /lib/modules/$(shell uname -r)/build M=$(PWD) modules clean: make -C /lib/modules/$(shell uname -r)/build M=$(PWD) clean In fact, this build Makefile calls the kernel Makefile, which should be located in the / lib / modules / $ (shell uname -r) / build directory (uname -r is a command that returns the version of the running kernel) if you have headers (or sources) kernels are in a different directory, then you need to fix it.
obj-m - allows you to specify the name of the future module, in our case, the module will be called aufs.ko (namely ko - from the kernel object). And aufs-objs allows you to specify from which source files to collect the aufs module, in our case only one file super.c will be used. In addition, you can specify various compiler flags to be used (in addition to those used by the kernel Makefile) when building object files, in our case I pass the -DDEBUG flag when building super.c. If you do not pass the -DDEBUG flag, then we will not see the pr_debug output in the system log.
To build a module you need to run the command make. If all is well, then the file aufs.ko should appear in the directory - this is our loadable module. Downloading a module is quite simple:
sudo insmod ./aufs.ko
To make sure that the module is loaded, you can look at the output of the lsmod command:
lsmod | grep aufs
To view the system log, you need to call the dmesg command, and there we need to see messages from our module. Unloading the module is also not difficult:
sudo rmmod aufs
Back to the file system
So, the environment is set up and working, we have learned how to build the simplest module, load and unload it, it's time to take up the file system. Designing a file system should begin "on a piece of paper," with a thorough thought through the data structures used and so on. But we will go in a simple way and postpone the details of storing files and folders (and much more) on the disk for the next time, and now we will write the skeleton of our future file system.
The life of the file system begins with registration. You can register the file system by calling register_filesystem . We will register the file system in the module initialization function. To unregister a file system there is a function unregister_filesystem , and we will call it in the function aufs_fini of our module.
Both functions take as a parameter a pointer to the file_system_type structure - it will “describe” the file system, consider that it is a file system class. There are enough fields in this structure, but we are only interested in some of them:
static struct file_system_type aufs_type = { .owner = THIS_MODULE, .name = "aufs", .mount = aufs_mount, .kill_sb = kill_block_super, .fs_flags = FS_REQUIRES_DEV, }; First of all, we are interested in the name field, it stores the name of the file system, this is the name that will be used when mounting, but more on that later, just remember it.
mount and kill_sb - two fields storing pointers to functions. The first function will be called when mounting the file system, and the second when unmounting. We only need to implement one, and instead of the second we will use kill_block_super, which the kernel kindly provides.
The fs_flags field stores various flags, in our case it stores the FS_REQUIRES_DEV flag, which says that our file system needs a disk to work with (although this is not the case yet). You can not specify this flag, everything will work fine without it.
Finally, the owner field is needed to organize the counter of links to the module. The reference counter is needed so that the module is not unloaded ahead of time, for example, if the file system was mounted, then unloading the module can lead to a crash, the reference counter will not allow unloading the module while it is being used, that is, until we unmount the file system.
Now consider the function aufs_mount. It should mount the device and return the structure describing the root directory of the file system. It sounds quite difficult, but, fortunately, even here the kernel will do almost everything for us:
static struct dentry *aufs_mount(struct file_system_type *type, int flags, char const *dev, void *data) { struct dentry *const entry = mount_bdev(type, flags, dev, data, aufs_fill_sb); if (IS_ERR(entry)) pr_err("aufs mounting failed\n"); else pr_debug("aufs mounted\n"); return entry; } In fact, most of the work happens inside the moun_bdev function, we are only interested in its parameter aufs_fill_sb - this is a pointer to a function (again) that will be called from mount_bdev to initialize the superblock. But before we move on to it, we will focus on the dentry structure, which is important for the core file subsystem. This structure represents the path section in the file name, for example, if we refer to the file / usr / bin / vim, then we will have instances of the dirent structure representing the path sections / (root directory), bin / and vim. The kernel supports the cache of these structures, which allows you to quickly search for inode (another center structure) by the name (path) of the file. So, the aufs_mount function should return the dentry representing the root directory of our file system, and the aufs_fill_sb function will create it.
So, aufs_fill_sb so far the most important function in our module, and it looks like this:
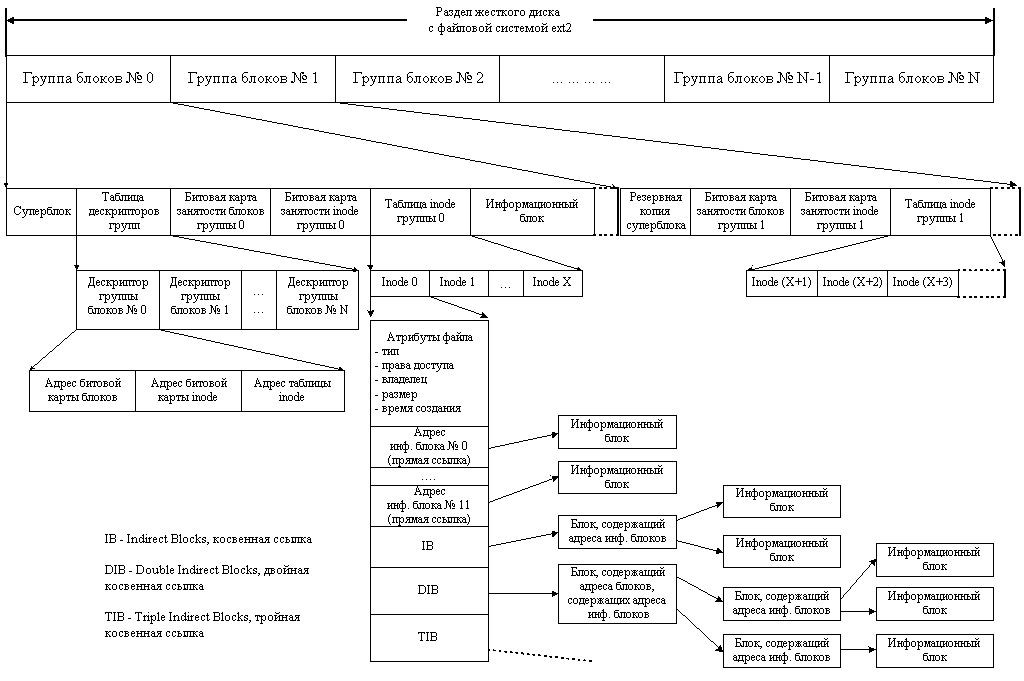
static int aufs_fill_sb(struct super_block *sb, void *data, int silent) { struct inode *root = NULL; sb->s_magic = AUFS_MAGIC_NUMBER; sb->s_op = &aufs_super_ops; root = new_inode(sb); if (!root) { pr_err("inode allocation failed\n"); return -ENOMEM; } root->i_ino = 0; root->i_sb = sb; root->i_atime = root->i_mtime = root->i_ctime = CURRENT_TIME; inode_init_owner(root, NULL, S_IFDIR); sb->s_root = d_make_root(root); if (!sb->s_root) { pr_err("root creation failed\n"); return -ENOMEM; } return 0; } First of all, we fill out the super_block structure. What kind of structure is this? Usually, file systems store in a special place on a disk partition (this place is chosen by the file system) a set of file system parameters, such as block size, number of free / occupied blocks, file system version, “pointer” to the root directory, magic number by which the driver the file system can verify that the exact file system is stored on the disk, and not something else, well, and other data. This structure is called the superblock (see picture below). The super_block structure in the Linux kernel, in general, is designed for similar purposes, we keep in it the magic number and the dentry for the root directory (the same one that mount_bdev returns).
In addition, in the s_op field of the super_block structure, we store a pointer to the super_operations structure — these are the “class methods” of super_block, i.e., another structure that stores a bunch of function pointers.
Here I will make another digression, the Linux kernel is written in C, that is, without support for various OOP features from the language, but you can structure the program following OOP ideas without support from the language, so structures containing a bunch of function pointers are quite common in the core, this is the way to implement polymorphism of subtypes (aka virtual functions) with available means.
But back to the super_block structure and its “methods”, we will not go into the details of the super_operations structure now, we will be interested only in one of its fields - put_super. In put_super, we will keep the “destructor” of our superblock:
static void aufs_put_super(struct super_block *sb) { pr_debug("aufs super block destroyed\n"); } static struct super_operations const aufs_super_ops = { .put_super = aufs_put_super, }; While the aufs_put_super function does nothing useful, we use it exclusively to print another line to the system log. The aufs_put_super function will be called inside kill_block_super (see above) before destroying the super_block structure, i.e., when the file system is unmounted.
Now back to our most important function, aufs_fill_sb. Before creating a dentry for the root directory, we need to create a root inode. The inode structure is perhaps the most important in the file subsystem; each file system object (file, folder, special file, journal, etc.) is identified by an inode. As with super_block, the inode structure reflects how file systems are stored on disk. The inode name comes from index node, i.e. it indexes files and folders on the disk. Usually inside the inode on the disk is stored an indication of where the file data is stored on the disk (in which blocks the file contents are stored), various access flags (read / write / execute), information about the file owner, time of creation / modification / access and other similar things (see picture above).
While we are not able to read from a disk, so we fill inode with dummy data. We use the current time as the creation / modification / access time, and delegate the assignment of the owner and access rights to the kernel (call the inode_init_owner function). Well, finally create a dentry associated with the root inode.
Check the frame
The frame of our file system is ready, it's time to check it out. Building and loading the file system driver is no different from building and loading a regular module. Instead of a real disk for experiments, we will use a loop device. This is such a “disk” driver that writes data not to a physical device, but to a file (disk image). Create a disk image until it stores any data, so everything is simple:
touch image
In addition, we need to create a directory that will be the mount point (root) of our file system:
mkdir dir
Now using this image we will mount our file system:
sudo mount -o loop -t aufs ./image ./dir
If the operation was completed successfully, then we should see messages from our module in the system log. To unmount the file system, do this:
sudo umount ./dir
And again we check the system log.
Total
We are superficially acquainted with the creation of loadable kernel modules and the basic structures of the file subsystem. We also wrote a real file system, which can only be mounted and unmounted, while it is pretty stupid, even cd to the root of the file system does not work, but we are going to fix it in the future.
Next, we plan to consider reading data from the disk, to begin with, we will determine how we will store the data on the disks, and learn how to read the superblock and inodes from the disk.
References and references
- The code for the article is on github
- Not so long ago, an Indian had already written a simple file system from scratch for educational purposes, he did a great job.
- I understand that sending newbies to the source code of the kernel is not very pedagogical (although it is useful to read the source code), but nevertheless I advise anyone interested to look at the source code of a very simple ramfs file system. In addition, unlike our file system, ramfs does not use a disk, but stores everything in memory.
Source: https://habr.com/ru/post/218833/
All Articles