Using the QtCreator Mode Panel + 2 Plugins

Following the notes on plug-in development for QtCreator, this article describes how to place widgets directly in the mode switching panel. With a screen resolution of 1920x1080, there remains over 373x70 pixels of free space in it, which can be usefully used in its plugin. As an example, two new plugins for QtCreator are provided. Descriptions of the plug-ins, links to source repositories and binaries compiled for Windows and Linux for QtCreator 3.xx are attached.
Api Description
First of all, you need to create a plugin (in the dialog File-> New File or Project ... select the project type Libraries-> Qt Creator Plugin ). In the project creation dialog, you will need to specify the path to the QtCreator source codes (which you got from the git repository) and the directory with the QtCreator compiled. We assume that the framework of the plugin has been created and proceed to the description of Api for placing widgets. In this case, Api will be understood as methods available to the plugin developer (located in public and not included in the namespace Internal ).
You can add widgets both during plug-in initialization (in the initialize function) and after initializing all the plug-ins on which it depends (in the extensionsInitialized function).
There are three ways to use the modes panel: add widgets (QWidget), add actions (QAction), and add modes (IMode derivatives). In all cases, you will need to include the mode manager header file:
#include <coreplugin/modemanager.h> 1. Adding Widgets (QWidget)
Adding a widget is done using the static function Core :: ModeManager :: addWidget (QWidget * widget) .
Consider the code that adds a simple label (QLabel) to the panel. To do this, in the implementation of the initialize function of the plugin, add the following code:
// - QWidget *container = new QWidget(); // QLabel *info = new QLabel(QString::fromUtf8("hello habrahabr!")); // , info->setStyleSheet(QString::fromUtf8("QLabel {color: white; }")); // QHBoxLayout *containerLayout = new QHBoxLayout(); // containerLayout->addWidget(info); // - container->setLayout(containerLayout); // - Core::ModeManager::addWidget(container); If you run this example, it will be seen how, having contained the entire caption, the panel “stretched out” in width.

For size control, it will be useful for QHBoxLayout to independently define indents, distances between widgets and also to fix the maximum size of the widget container, then the widgets located in the container will “shrink” to the specified size and you can modify them:
containerLayout->setContentsMargins(0,0,0,0); containerLayout->setSpacing(0); container->setMaximumWidth(70); 
In the above code, the indents are zero and the widget may take the maximum available size (70). If you change the left and right margins, the value of the maximum width for the widget also needs to be reduced by the sum of the left and right margins.
In height is available all the free space. But it should be borne in mind that if the widget begins to claim the space occupied by the mode buttons, they will move around (while hiding the icons, as shown in the figure):
This is worth remembering if you intend to use the plug-in on a computer with a relatively low resolution (for example, like on my laptop: at a resolution of 1366x768 without a “cutback” I could barely fit 2 plug-ins listed at the end of the article). You can simulate this situation by setting a larger minimum value for the height of the widget container, for example:
container->setMinimumHeight(600); 2. Adding actions (QAction)
Adding actions is performed using the function:
Core::ModeManager::addAction(QAction *action, int priority) where action is a necessary action (created by the developer), and priority determines the order in which actions are to be placed. The smaller the value, the lower will be the button to activate the action among others (Run, Start Debugging, Build Project)
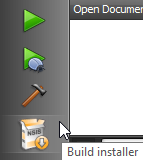
In the example below, an action (QAction) is created, which (for example) will run the installer build script (for example, NSIS):
QAction *buildInstallerAction = new QAction(this); buildInstallerAction->setIcon(QIcon(QString::fromUtf8(":/icons/icons/nsis48x48.png"))); buildInstallerAction->setText(QString::fromUtf8("Build installer")); Core::ModeManager::addAction(buildInstallerAction, 0); The text “Build installer” will be displayed in ToolTip. Since the priority is “0”, the action call GUI will be at the bottom, as shown in the figure:
Images for QIcon should be used with a size of 32x32 px, since the larger ones will still be compressed to that size.
Note: if you need to add a lot of actions, then you may want to consider adding a QToolBar to QtCreator:
QMainWindow *mainWindow = qobject_cast<QMainWindow *> (Core::ICore::mainWindow()); QToolBar *toolbar = new QToolBar(); toolbar->addAction(action); mainWindow->addToolBar(Qt::TopToolBarArea, toolbar); 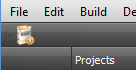
You can also add actions to the project selection area using the function
Core::ModeManager::addProjectSelector(QAction *action); but due to the specificity of the purpose of this area (the choice of the current project and the type of assembly) its use in plug-ins seems to me not promising.')
3. Creating a new mode
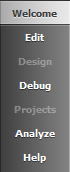
Currently there are 7 modes in QtCreator (from “Welcome” to “Help” ). If you want to create your own mode, then it will be necessary to create the corresponding class, inheriting from Core :: IMode, and then add it to the extension system:
ExtensionSystem::IPlugin::addObject(myMode); Creating a new mode (IMode) may be necessary if there is not enough display capacity in the Output Panel (OutputPanel). For example, if you decide to create a UML editor integrated into QtCreator. This topic is quite voluminous, so we will not consider it in this article and proceed directly to the plugins.
Plugin for displaying user statistics Habrahabr

Suppose you have written an article and placed it on Habré. It is reasonable to assume that you are interested in how the community perceived it. There are not many options here: either it will be evaluated positively and, as a result, the rating will rise, or negatively - then the rating will fall. There is a third option, when the article among users Causes the desire to put a minus in karma. In this case, it may be worth it (until it is too late) to remove the article from the publication. Of course, you can write a script and put it in cron on the server that will monitor these indicators and, in the case of a minus, send an SMS message to the user, but in my opinion this is too much. However, each time, switching from IDE to the browser only to see the statistics, the developer spends not only time, but also attention. In such situations, I recall the phrase: "If you repeat any sequence of actions more than 5 times, then this sequence needs to be automated." So actually the idea of a small automation appeared, which will allow monitoring the state of affairs without interrupting programming.
The developed plug-in for a given user with a certain periodicity (which is also set in the settings in the range from 1 to 60 minutes) accesses the site's api (http://habrahabr.ru/api/profile/username/), receives xml data, parses them and updates the values of karma and rating. Settings are located on the “Habrahabr” tab of the “Environment” section.
It should be noted that during testing of the plug-in, it was noted that the values obtained through api may be lagging behind the data on the site.
References:
Audio Player Control Plugin

This plugin is designed to control audio playback without leaving the development environment. It uses emulation of pressing multimedia keys (i.e., it controls a working audio player). After installing the plug-in in QtCreator, a panel with three buttons appears: go to the previous track, switch between pause and audio playback, and go to the next track.
The plugin was tested with Aimp, iTunes and Audacious audio players.
References:
To install both plugins, the contents of the archives must be unpacked into the directory where the plugins are located:
for Windows, typically C: \ Qt \ Tools \ QtCreator \ lib \ qtcreator \ plugins.
for Lunux-based systems /home/username/Qt5.2.0/Tools/QtCreator/lib/qtcreator/plugins when installing Qt in the user directory. Or (as an option) /opt/Qt5.2.0/Tools/QtCreator/lib/qtcreator/plugins (installed on Ubuntu).
Conclusion
Perhaps the reader will have the idea of an interesting plugin (please write about it in the comment or in a personal message to the author). Using the described api you can, for example, create a plugin that will display the build status on the server
Source: https://habr.com/ru/post/218311/
All Articles