Autoconfiguration (Auto Setup) of Polycom Phones Using Asterisk
Task: Set up phones (or any other subscriber device) automatically based on the MAC address, preferably without getting the device out of the box.
The idea of centralized configuration of subscriber devices has been with me for a long time and, finally, it has been implemented in one of the projects. Video at the end of the post.
Virtually all (Cisco, Polycom, D-Link, Escene) IP phones I have met with in one form or another support centralized configuration from a server, i.e. Auto-Provisioning for our autos. In this case, an example is considered with Polycom phones, but in fact, a similar approach will allow you to configure any phone with certain adjustments.
How does it work (about Polycom)?
The default phone is configured to receive an IP address via DHCP, in addition to the address itself, the phone receives a number of options from DHCP, including the gateway, network mask and DNS server, besides, you can specify the SNTP server and much more. Polycoms look at options 66 and 160 by default, where they try to find the address of the auto provision server. If the phone detects the server's address, it tries to connect to it by default via FTP (it supports HTTP, HTTPS, TFTP) using the login and password as:
| Username | PlcmSpIp |
| Password | PlcmSpIp |
The phone requests the server version (sip.ver file) and the firmware files and configuration files themselves. The phone downloads the new firmware, updates it, then, after rebooting, it accesses the server again, sees that the software does not require updating, downloads and applies the XML configuration files. In general, the machine requests the following files.
| File name | Description |
| 0000000000.cfg | General configuration file (says what to download from where) |
| * .sip.ld (for split) sip.ld (for combined) * | Phone firmware of the corresponding model (set with 0000000000.cfg), |
| sip.ver | Software version |
| 1234123adba.cfg | Phone configuration with MAC address 1234123adba |
* - the polycom has two versions of software combined (weighs a lot) - suitable for everyone, split - for each line of phones a separate small * sip.ld file (reduces the load on the network).
')
It would seem, that's all, the phone is ready to go! In fact, for small systems this is the case, i.e. enough:
- Download firmware from the manufacturer's website for your phones support.polycom.com/PolycomService/support/us/support/voice/index.html
- In 0000000000.cfg specify which configuration files the phone should download from the server (CONFIG_FILES = "custom.cfg"), this is enough, because default.
- Create custom.cfg containing settings common to all devices.
- Create several .conf files for each of the devices <MAC address> .cfg which will contain information unique for each subscriber i.e. in general, only his SIP login and password.
This solution allows you to quickly deploy a small VoIP-infrastructure, but on large systems, you will have to create many files of the same type and is convenient and does not have much flexibility. Besides, it's boring.
Therefore, I went in a more sophisticated way:
- Through FTP, we configure the phone so that it receives files via HTTP: 8088
- On Asterisk, using phoneprov, we dynamically generate a configuration file for each phone based on the users.conf file.
With this method of configuration, it will be enough to add a new device to the MAC in users.conf and assign a username and password to it there, the rest of the settings will be done automatically.
Now let's take a closer look at what needs to be done:
DHCP setup
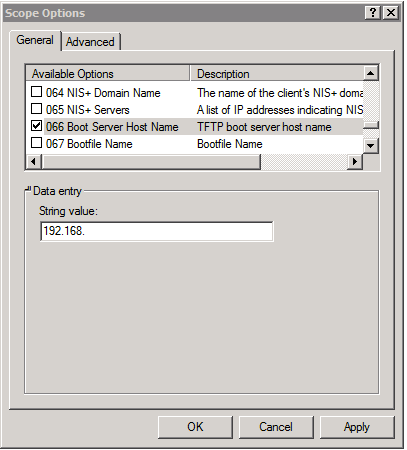
In this case, I set the static addresses for each device through the config, i.e. dynamic address is needed by the device only in the first and second boot, after the third one it is already fully configured and has a static IP. Therefore, I set up the lease time - 5 minutes, so as not to occupy the pool of addresses in the empty. In the general case, addresses can be distributed dynamically by making a reservation for each MAC. In addition, you need to add option 66 or 160 - to taste, containing the address of the provisioning server. In Windows, it is done like this:
In my case Mikrotik:
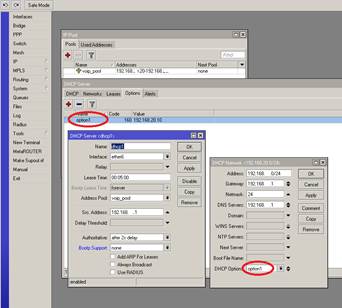
So, it is necessary that the addresses and options 66 are dynamically distributed with the address of the provision server. In my case, the range of dynamic addresses from 20 to 99, and 101-199 range for static addresses, made it so that the internal number of the subscriber coincides with its IP.
FTP Phone Setup
To configure via FTP, you need FTP, set (CentOS):
yum install -y vsftpd chkconfig vsftpd on service vsftpd start You can configure it via /etc/vsftpd/vsftpd.conf.
Create a user under which polycom will try to connect:
useradd PlcmSpIp passwd PlcmSpIp Given the complexity of the password, it will be useful to ensure that this user is as powerless as possible.
Now download the archive with the firmware and unpack it in / home / PlcmSpIp
When you download the firmware, read carefully the warnings, you will most likely have to download the bootloader updates as well, unpack them in the / home / PlcmSpIp directory as well.

At the moment, the phone connected to the network must, when turned on, deflate a new bootloader and firmware and update the software.
Work with configuration files
Then I lost a lot of time trying to edit XML with my hands, and I conjure you, oh, reader, do not rule configs with a text editor, unless you are Obi-Wan-Kenobi in the XML world. To work with configs, I used XML Notepad 2007. If you downloaded the combined-version firmware, then in the config folder there will be several configuration files with the extension * .cfg and the XML schema polycomConfig.xsd.
* .cfg - examples of configuration files are grouped thematically
| polycomConfig.xsd | Scheme |
| video-integration.cfg | Video integration setup |
| video.cfg | Setting up video calls |
| site.cfg | There are a lot of things, maybe even all the settings |
| sip-interop.cfg | Settings sip, calls, tones |
| sip-basic.cfg | Sip settings |
| region.cfg | Regional Settings |
| reg-basic.cfg | SIP Registration - Basic |
| reg-advanced.cfg | SIP Registration - Extended |
| H323.cfg | H323 settings |
| features.cfg | Transfer Forwarding Transfer Settings |
| device.cfg | Device settings, network system |
| applications.cfg | Application settings |
Each file has the following line:
<polycomConfig xmlns:xsi="http://www.w3.org/2001/XMLSchema-instance" xsi:noNamespaceSchemaLocation="polycomConfig.xsd"> This means that if you open the configuration file with an XML editor, it will search the polycomConfig.xsd schema file in the same folder, it contains all possible configuration file fields and a list of available values or a short comment. At this stage, we need to show the device that the download should be via HTTP and specify the http-path to the configuration files.
Create a custom.cfg text file in the folder with polycomConfig.xsd.
<?xml version="1.0" encoding="UTF-8" standalone="yes"?> <polycomConfig xmlns:xsi="http://www.w3.org/2001/XMLSchema-instance" xsi:noNamespaceSchemaLocation="polycomConfig.xsd"> </polycomConfig> Open it with an XML editor. What fields that contain need to search by Google or use the 600-page instructions for the administrator to configure the phone manufacturer.
But for the most part, everything is intuitive. First, we create an element (probably we should speak a section or something else, but I don’t know and therefore I will call it what they are called XML editor, that is, an element) using the context menu polycomConfig or simply ctrl + insert while standing on polycomConfig.
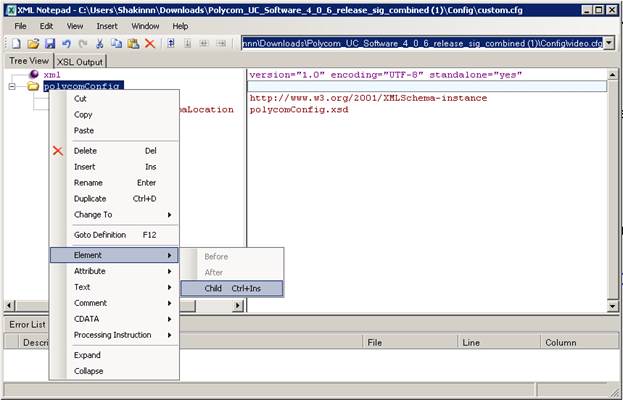
In the drop-down list, select the device. We are interested in device settings, in the same way we create the device.dhcp element in the device element.
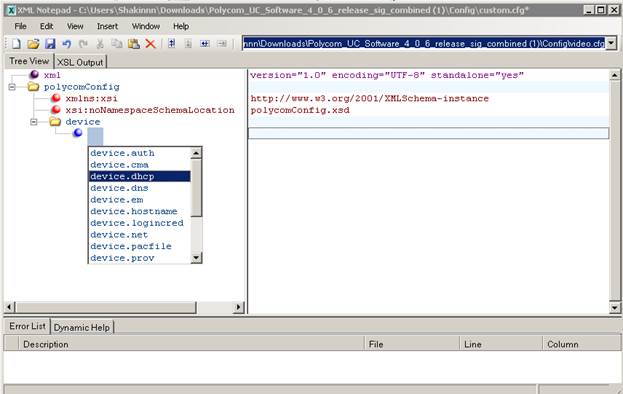
Now in it we create the Alt + Insert attribute or from the context menu on device.dhcp, a drop-down list of available attributes is opened, a tooltip with available values pops up when hovering.
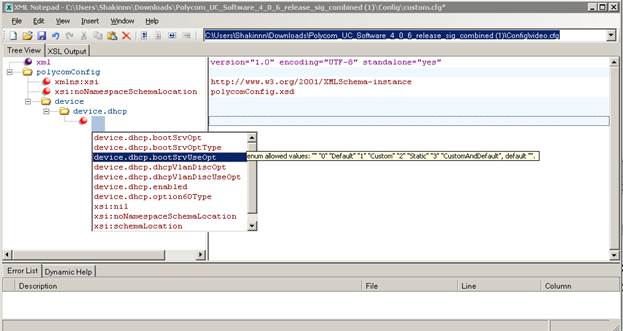
We put Static - in our case, this means that options 160 and 66 of DHCP should be ignored. Similarly, we set other parameters, as a result we have the following file:
<?xml version="1.0" encoding="utf-8" standalone="yes"?> <polycomConfig xmlns:xsi="http://www.w3.org/2001/XMLSchema-instance" xsi:noNamespaceSchemaLocation="polycomConfig.xsd"> <device device.set="1"> <device.dhcp device.dhcp.bootSrvUseOpt="Static" device.dhcp.enabled="1"> <device.dhcp.enabled device.dhcp.enabled.set="1" /> <device.dhcp.bootSrvUseOpt device.dhcp.bootSrvUseOpt.set="1" /> </device.dhcp> <device.prov device.prov.serverName="http://192.168..:8088/phoneprov/" device.prov.serverType="HTTP"> <device.prov.serverName device.prov.serverName.set="1" /> <device.prov.serverType device.prov.serverType.set="1" /> </device.prov> </device> </polycomConfig> | <device device.set = "1"> | Set device settings |
| device.dhcp.bootSrvUseOpt = "Static" | Ignore options 66 and 160 of DHCP |
| device.dhcp.enabled = "1" | Use DHCP |
| <device.dhcp.enabled device.dhcp.enabled.set = "1" /> | Set dhcp.enabled value |
| <device.dhcp.bootSrvUseOpt device.dhcp.bootSrvUseOpt.set = "1" /> | Set the bootSrvUseOpt value |
| device.prov.serverName = "http: //192.168.xxx.xxx: 8088 / phoneprov /" | File path |
| device.prov.serverType = "HTTP" | Provision server type |
| <device.prov.serverName device.prov.serverName.set = "1" /> | Set serverName value |
| <device.prov.serverType device.prov.serverType.set = "1" /> | Set serverType value |

Particular attention should be paid to the attributes highlighted in a living font, it is something like a switch, i.e. it is not enough to simply enter the value of some parameter and it is necessary to say “Yes” specifically, this parameter should be applied. Especially important <device device.set = "1"> if this parameter is 0, then all device element settings will be ignored.
Asterisk settings
Everything, now our phones will ask for files when downloading from 192.168.xxx.xxx : 8088 / phoneprov /. It is necessary to sublimate them there from non-existence. For this price, Asterisk has a special module, it allows you to automatically generate files based on templates and send them through the built-in HTTP server of the asterisk. More information can be found here and in particular it says:
Make sure that /etc/asterisk/manager.conf contains:
[general]
enabled = yes; - probably so necessary, although I don’t understand why
webenabled = yes; - probably so necessary, although I don’t understand why
Make sure that /etc/asterisk/http.conf contains:
[general]
enabled = yes; includes embedded HTTP server
bindaddr = 192.168.xxx.xxx; IP - on which the server will be available
bindport = 8088; - because Port 80 is busy with apache, use 8088
When requesting a file from the http-server, phoneprov takes the template of the file and inserts variables into it that it takes from users.conf and, which is especially nice, you can use the text functions of the dial plan. For example, $ {TOLOWER ($ {MAC})} in the template will be replaced when generating the configuration file with the MAC address of the user in lower case.
The template can use the following variables:
fullname = User Two ; ${DISPLAY_NAME} secret = test ; ${SECRET} username = 6001 ; ${USERNAME} macaddress = deadbeef4dad ; ${MAC} label = 6001 ; ${LABEL} cid_number = 6001 ; ${CALLERID} : ${SERVER} – phoneprov.conf , bindaddr http.conf ${SERVER_PORT} - bindport sip.conf, , 5060 The configuration file of res_phoneprov itself is /etc/asterisk/phoneprov.conf, in it you need to specify the directory of static files relative to the / var / lib / asterisk / phoneprov / path, the list of static files, the list of templates and the templates of the names of dynamically-formed files. Here is an example:
[general] serveraddr=192.168.. ; ${SERVER}. serverport=5060 ; ${SERVER_PORT}. default_profile=polycom ; users.conf [polycom] staticdir => configs/ ; , , , .., /var/lib/asterisk/phoneprov/ mime_type => text/xml static_file => 2345-12345-001.bootrom.ld static_file => 2345-12360-001.bootrom.ld static_file => 2345-12365-001.bootrom.ld static_file => 2345-12365-002.bootrom.ld static_file => 2345-12375-001.bootrom.ld static_file => 2345-12375-002.bootrom.ld static_file => 2345-12450-001.bootrom.ld static_file => 2345-12450-002.bootrom.ld static_file => 2345-12500-001.bootrom.ld static_file => 2345-12560-001.bootrom.ld static_file => 2345-12600-001.bootrom.ld static_file => 2345-12600-002.bootrom.ld static_file => 2345-12670-001.bootrom.ld static_file => 2345-12670-002.bootrom.ld static_file => 3111-15600-001.bootrom.ld static_file => 3111-30900-001.bootrom.ld static_file => 3111-40000-001.bootrom.ld static_file => bootrom.ld static_file => sip.ver static_file => sip.ld static_file => 000000000000-directory.xml ;- static_file => languages/Website_dictionary_language_ru-ru.xml static_file => SoundPointIPLocalization/Russian_Russia/SoundPointIP-dictionary.xml ;------------ ${TOLOWER(${MAC})}.cfg => 000000000000.cfg ; , http://192.168..:8088/phoneprov/111111111111.cfg 000000000000.cfg 111111111111.cfg, users.conf macaddress=111111111111 ${TOLOWER(${MAC})}-custom.cfg => 000000000000-phone.cfg ; http://192.168..:8088/phoneprov/111111111111-custom.cfg 111111111111-custom.cfg users.conf macaddress=111111111111 With static files, everything is simple, if the file is registered in phoneprov.conf and located at the corresponding address, it will be accessible from the web server.
With dynamic it seems a bit more complicated, but now everything will become clear. Here is an example of templates:
000000000000.cfg
<?xml version="1.0" encoding="utf-8" standalone="yes"?> <APPLICATION APP_FILE_PATH="sip.ld" CONFIG_FILES="${TOLOWER(${MAC})}-custom.cfg" MISC_FILES="" LOG_FILE_DIRECTORY="" OVERRIDES_DIRECTORY="" CONTACTS_DIRECTORY="" LICENSE_DIRECTORY="" USER_PROFILES_DIRECTORY="" CALL_LISTS_DIRECTORY=""> </APPLICATION> By default, all phones request the file 1234123adba.cfg, where 1234123adba is the MAC address of the phone, i.e. The phone will send the request http: //192.168.xxx.xxx: 8088 / phoneprov / 1234123adba.cfg . There is only one variable in this template, and the directive CONFIG_FILES = "$ {TOLOWER ($ {MAC})} - custom.cfg" turns into CONFIG_FILES = "1234123adba-custom.cfg", which tells the phone that it should download the configuration file 1234123adba -custom.cfg. The phone will send the request http: //192.168..: 8088 / phoneprov / 1234123adba.cfg-custom.cfg. In response to this request, the server will generate another dynamic file based on the second pattern 000000000000-phone.cfg:
000000000000-phone.cfg
<?xml version="1.0" encoding="utf-8" standalone="yes"?> <polycomConfig xmlns:xsi="http://www.w3.org/2001/XMLSchema-instance" xsi:noNamespaceSchemaLocation="polycomConfig.xsd"> <call call.callsPerLineKey="2"></call> <reg reg.1.address="${USERNAME}" reg.1.auth.password="${SECRET}" reg.1.auth.userId="${USERNAME}" reg.1.label="${USERNAME}" reg.1.outboundProxy.address="${SERVER}" reg.1.lineKeys="2" reg.1.auth.domain="${SERVER}" reg.1.displayName="${USERNAME}" reg.1.server.1.address="${SERVER}" reg.1.server.1.register="1"></reg> <device device.set="1"> <device.dhcp device.dhcp.bootSrvUseOpt="Static" device.dhcp.enabled="0"> <device.dhcp.enabled device.dhcp.enabled.set="1" /> <device.dhcp.bootSrvUseOpt device.dhcp.bootSrvUseOpt.set="1" /> </device.dhcp> <device.dns device.dns.serverAddress="192.168.xxx.1" device.dns.altSrvAddress="8.8.8.8"> <device.dns.serverAddress device.dns.serverAddress.set="1" /> </device.dns> <device.prov device.prov.serverName="http://192.168.xxx.xxx:8088/phoneprov/" device.prov.serverType="HTTP"> <device.prov.serverName device.prov.serverName.set="1" /> <device.prov.serverType device.prov.serverType.set="1" /> </device.prov> <device.net device.net.ipAddress="192.168.XXX.${USERNAME}" device.net.subnetMask="255.255.255.0" device.net.IPgateway="192.168.xxx.1"> <device.net.ipAddress device.net.ipAddress.set="1" /> <device.net.subnetMask device.net.subnetMask.set="1" /> <device.net.IPgateway device.net.IPgateway.set="1" /> </device.net> <device.sntp device.sntp.gmtOffset="14400" device.sntp.serverName="pool.ntp.org"> <device.sntp.gmtOffset device.sntp.gmtOffset.set="1" /> <device.sntp.serverName device.sntp.serverName.set="1" /> </device.sntp> </device> <dialplan dialplan.1.digitmap="" dialplan.1.digitmap.timeOut="" dialplan.1.impossibleMatchHandling="2" /> <lcl> <lcl.ml lcl.ml.lang="Russian_Russia" /> </lcl> <tcpIpApp> <tcpIpApp.sntp.daylightSavings tcpIpApp.sntp.daylightSavings.enable="0" /> </tcpIpApp.sntp> </tcpIpApp> </polycomConfig> Several variables are used here:
$ {SECRET} will substitute the secret value from the user description with the poppy 1234123adba from users.conf
$ {USERNAME} will substitute the value of username from the description of the user with the poppy 1234123adba from users.conf.
$ {SERVER} will substitute the value from phoneprov.conf
Note! After changing phoneprov.conf, you need to reload so that the settings are pulled.
After everything is ready check through the console:
phoneprov show routes
Static routes should be displayed, dynamic will be only if users.conf have users who have autoprov = yes and set the mass-address
Configuring users.conf
Almost everything left to create /etc/asterisk/users.conf. There is also an opportunity for optimization. With the zxing application for android, I scanned all the MAC addresses of the phones, straight from the boxes, and from the same application sent them to my email. It remains the case for small to compare each Maca some account. Hands to write for each macaddress = ... ..., somehow I did not want to. I made a file for automatic generation of Asterisk configs based on tabular data , it also has a password generator.
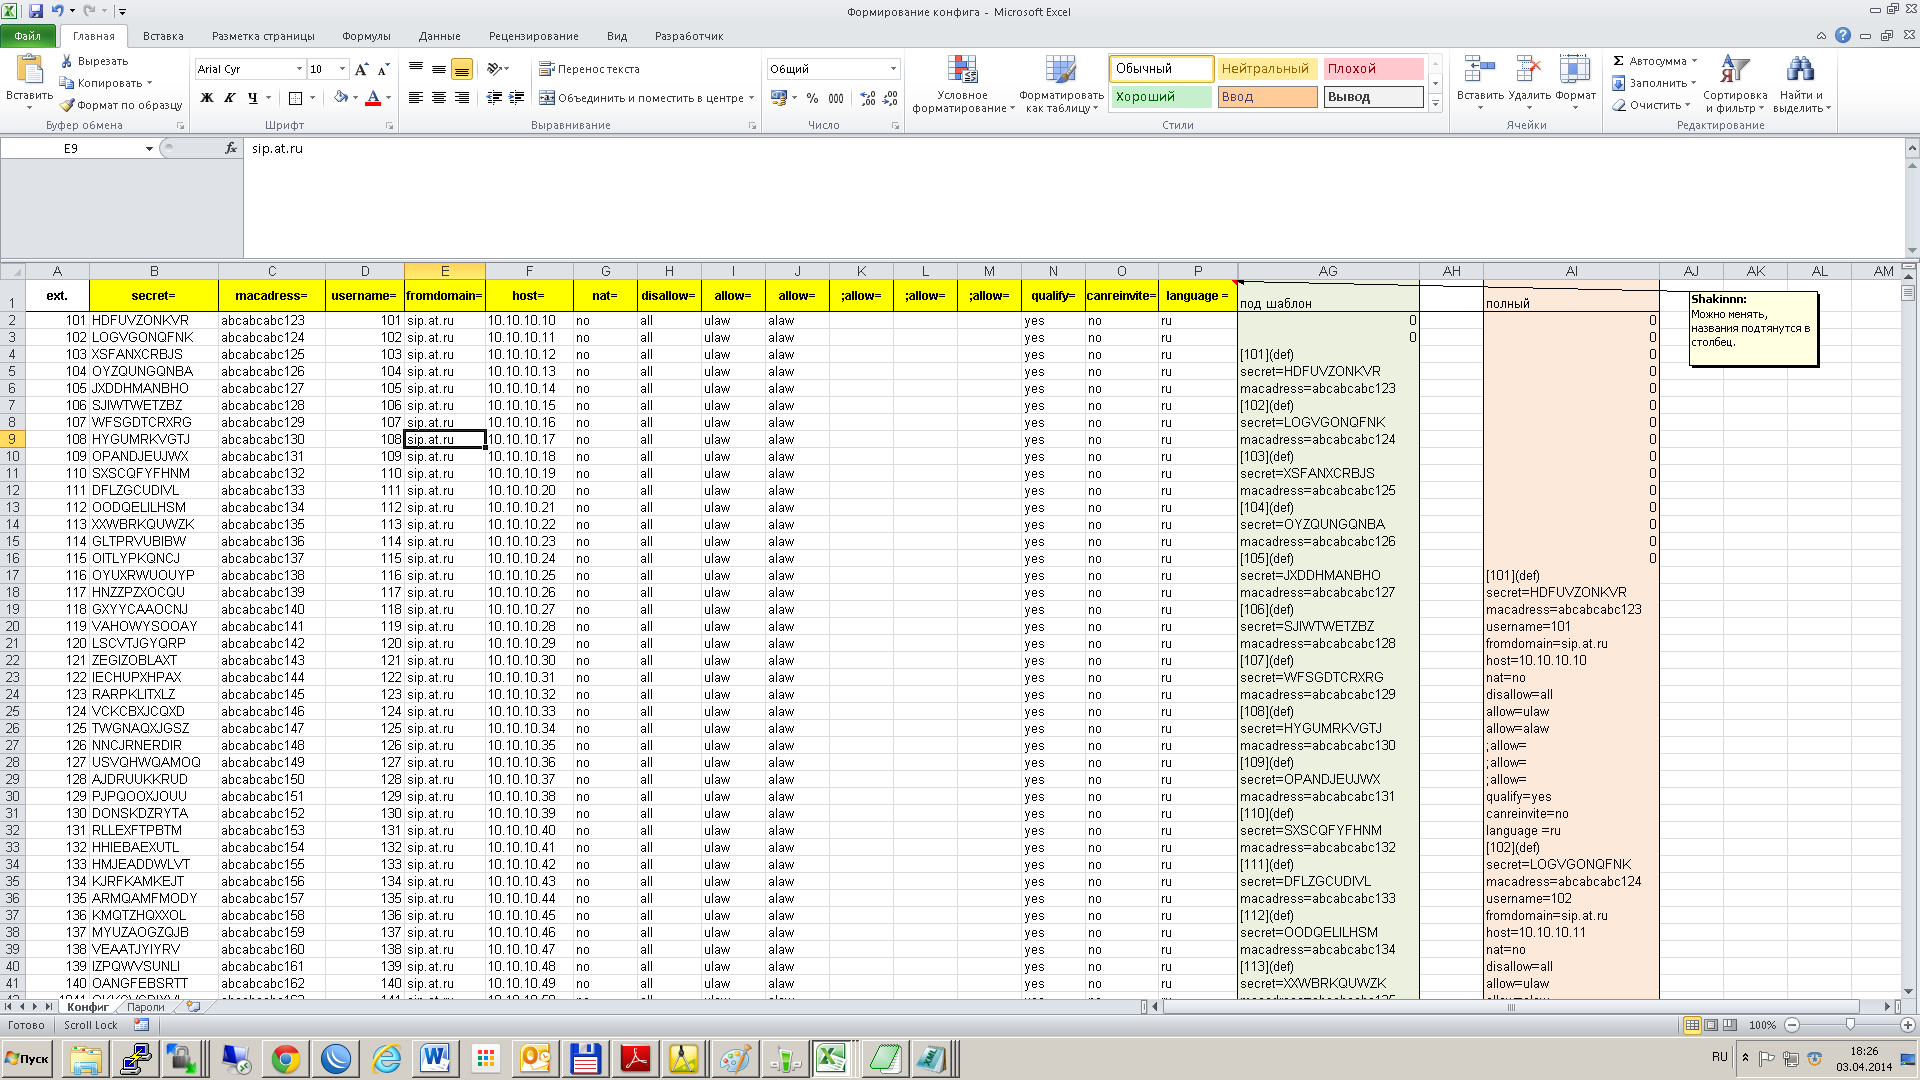
It remains only to copy the column and paste into users.conf. The phones in this project are all the same, so it makes sense to create a template for everyone, and in the user description only add the MAC and password.
/etc/asterisk/users.conf
... [def](!) ;- type=friend fromuser="CPZ" host=dynamic nat=no disallow=all allow=ulaw allow=alaw hasvoicemail = no hassip = yes hasiax = no hash323 = no hasmanager = no qualify=yes autoprov = yes ;- context=full [101](def) secret=XAHNGNCCXGR macaddress=0004f24ab859 [102](def) secret=OSANPHVZIEX macaddress=0004f24abdd6 [103](def) secret=AHUDYLSXFGT macaddress=0004f24ab766 …… Everything is ready check through the console: phoneprov show routes
Both static routes and dynamic routes should be displayed. It remains to check the browser 192.168.xxx.xxx : 8088 / phoneprov / 1234123adba.cfg for example, and you can turn on the phones, then everything happens by itself.
Do not forget about security, after deploying the infrastructure, it is better to disable the FTP server and on the asterisk the embedded web server, before the need to update configs or software. If you need to change the configuration often, use HTTPS.
Source: https://habr.com/ru/post/218227/
All Articles