We write client for Yandex. Metrics for iPhone

As many of you probably know, Yandex.Metrics has a great API that allows you to get data on your counters in XML or JSON.
My hands have long been itching to write a mobile client, because during the day, I often look at the numbers of attendance of the resources that I do.
Existing customers for the iPhone seemed awful to me and finally my hands stopped scratching and got to writing
Creating a client can be divided into the following steps:
')
- Application registration in Yandex
- OAuth-user authorization and getting token
- Saving token
- Receiving various data
- Display
check in
With the registration of the application, everything is clear - we add the application, mark the rights that the application wants to receive. During authorization, the user will have to allow or deny permission to receive data, and will see what rights the application asks for.
OAuth authorization
Personally, I am slightly podbivaet when you install an unofficial client for any service, and he asks to enter the login and password in your form. You never know where they go then. In my opinion, the authorization procedure looks more transparent if a browser window pops up with authorization on the service website.
Technically, OAuth authorization is quite simple - we add our own URL-Scheme (for example, myapp) to the application, in the application settings on the Yandex website (where the application was registered), we specify something like myapp: // in the Callback URI, after which Code, so that after authorization, the application tried to open the url at myapp: //, so the url will open in our application, and it already contains all the data, including access_token.
On Habré there is an excellent article with exactly this authorization, and it is for Yandex, which saved me time, so I won’t describe the authorization in particular so as not to repeat myself. After authorization, we have a token, which we will save.
Technical nuance : it is logical that someday the user will want to log in to the application. So that someone does not have access to statistics other than him, or, for example, to log in under a different account. When authorizing through a browser (that is, through UIWebView), it is not enough to delete the previously received token. Your authorization in UIWebView is remembered, so when logging out of the user, you need to clean the cookies in the sandbox of the application, otherwise during authorization you will automatically log in to the same account. Simple code in my case was enough:
NSHTTPCookie *cookie; NSHTTPCookieStorage *storage = [NSHTTPCookieStorage sharedHTTPCookieStorage]; for (cookie in [storage cookies]) { [storage deleteCookie:cookie]; } [NSUserDefaults standardUserDefaults] synchronize]; Saving token
An important point
Picking his opportunities for the first time, even with articles in his native language, there is a slight desire to beat his head about something. To understand this all, when you just need to save the n-characters, and then take them from there, really do not want to. For lazy people like me, Apple has attached the KeychainItemWrapper class to the documentation. The name speaks for itself - a wrapper around KeyChain. True, this class was written long ago and without the support of ARC, but on github you can easily find its fork with ARC support. This one , for example (it can also be connected via CocoaPods).
Well, now saving and deleting token'a comes down to several lines:
// KeychainItemWrapper *keychainWrapper = [[KeychainItemWrapper alloc] initWithIdentifier:@"OAuthToken" accessGroup:nil]; [keychainWrapper setObject:@"accountName" forKey:(__bridge id)(kSecAttrAccount)]; [keychainWrapper setObject:tokenToSave forKey:(__bridge id)(kSecValueData)]; // KeychainItemWrapper *keychainWrapper = [[KeychainItemWrapper alloc] initWithIdentifier:@"OAuthToken" accessGroup:nil]; [keychainWrapper resetKeychainItem]; Receiving various data
Personally, I prefer to get data in JSON. With requests everything is quite simple - we send the necessary request to the method from the API, we include Authorization: OAuth <access_token> in the header. By the way, token can also be passed as a get-parameter, for example:
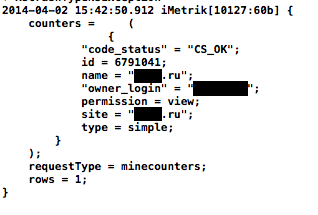
api-metrika.yandex.ru/counters?oauth_token=<access_token>Since we are paranoid about security from the very beginning, then all requests can be sent via https (but you can also via http). We receive data in JSON, parsing them through the built-in NSJSONSerialization:
dataObject = [NSJSONSerialization JSONObjectWithData:result options:NSJSONReadingMutableContainers error:&e]; The result, for example, for a list of counters:
Well, then the data must be somehow displayed.
Display
If you look at the Metrics web-interface, then there are basically 2 data views - tables with text data and graphics.
With tables, everything seems to be understandable - we use UITableView. Almost all data contain the same general indicators - views, visits, unique visitors, depth of viewing, time on the site, bounce rate. So I made a descendant class of UITableViewCell, so as not to produce a bunch of identical code in each of the UIViewController, and then in the method
- (UITableViewCell *) tableView: (UITableView *) tableView cellForRowAtIndexPath: (NSIndexPath *) indexPath
we simply create a cell with the data already received, for example:
NSString *CellIdentifier = [NSString stringWithFormat:@"CellId_%li_%li", (long)indexPath.section, (long)indexPath.row]; SourcesTableViewCell *cell = [tableView dequeueReusableCellWithIdentifier:CellIdentifier]; if ( cell == nil ) { cell = [[SourcesTableViewCell alloc] initWithStyle:UITableViewCellStyleDefault reuseIdentifier:CellIdentifier textOnLabel:@"" labelTextColor:[UIColor black]]; } // [cell changeValuesWithpageViewsNum:pageViewsNum visitTime:visitTime denials:denialsValue visitsNum:visitsNum ]; The time spent on the site, by the way, is returned in seconds, so it still needs to be nicely output in the mm: ss format, and the failure rate is from 0 to 1, so 50% will return as 0.5.
There are several ready-made solutions for drawing graphs. Something, again, can be found on Habré. Personally, I liked PNChart on a githaba - minimalist, cute. We connect through CocoaPods and go.
Examples of creating graphs in PNChart are on the project page on Github.
We compile everything in UITabsViewController, make out a little bit and get fast statistics in our pocket.

I decided to upload the result to the AppStore, anyone can install it .
For an incentive to continue development, made the application paid. I enclose 10 promotional codes:
A49RNFA4W6KR
37LWRW7TYH36
RMPHML3EL6EL
JKWWFATEJ4YE
4RETFRLEPRFW
AWKN4LYRM4LK
L4K6NJNTN4RJ
NT9Y97HN7HKA
TRPXHFXX47PE
E96MN3JP9X9Y
Useful links:
CocoaPods - a powerful tool in the hands of an Objective-C developer
Yandex OAuth authorization in iOS
PNChart (drawing graphs)
KeychainItemWrapper (wrapper around KeyChain)
Source: https://habr.com/ru/post/217989/
All Articles