TYPO3 CMS cluster in Jelastic cloud
TYPO3 is a great solution for websites of all sizes, from small to corporate. This CMS makes it easy to create and manage multilingual corporate sites for large organizations. Such websites can scale and adapt to any emerging needs.
Jelastic makes it possible to make your site on TYPO3 not only very flexible and affordable, but also stable and high-performance. To achieve this result, you need to configure a high-availability cluster with two Apache application servers, an NGINX balancer, a Memcached node, and two replicated MySQL databases .
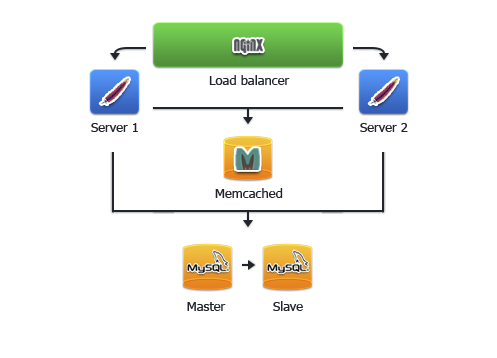
Memcached server is used to store Apache server sessions. Thanks to the backup sessions, if one of the Apache servers fails, the second will “pick up” the sessions from the Memcached node and continue processing them. The NGINX balancer distributes traffic within the cluster. In addition, replication of the master and slave MySQL databases improves performance, improves the reliability of data availability and the resiliency of your environment.
')
Now let's proceed to the step-by-step configuration of a highly available clustered TYPO3 application.
First of all, you need to create the necessary Jelastic environment and deploy the TYPO3 application.
1. Sign up (if you haven’t done this before) or log in to your Jelasti account.
2. Click Create Environment .
3. Select the Apache application server , MySQL database, and Memcached node. Set the limits of the cloudlet and enter the environment name (for example, typo-cluster ). Click Create .

4. Wait for the environment to be created.

5. Go to the official TYPO3 website and download the zip archive with the latest version of the application.

6. Using the Distribution Manager, download the archive to the control panel.

7. Then deploy it to the environment you just created.


High availability of PHP applications can be achieved by applying clustering of PHP sessions in the cloud. To maintain performance in the event of an application server failure (we will add another server in the next steps of the instructions) we will use Memcached.
1. Click the Configuration button for the Apache server. In the configuration manager, open the file etc> php.ini and enable the Memcached module by adding the following line:

2. To activate support for working with sessions, add the following lines to the Session block of the php.ini configuration file:

Jelastic makes it possible to make your site on TYPO3 not only very flexible and affordable, but also stable and high-performance. To achieve this result, you need to configure a high-availability cluster with two Apache application servers, an NGINX balancer, a Memcached node, and two replicated MySQL databases .
Memcached server is used to store Apache server sessions. Thanks to the backup sessions, if one of the Apache servers fails, the second will “pick up” the sessions from the Memcached node and continue processing them. The NGINX balancer distributes traffic within the cluster. In addition, replication of the master and slave MySQL databases improves performance, improves the reliability of data availability and the resiliency of your environment.
')
Now let's proceed to the step-by-step configuration of a highly available clustered TYPO3 application.
A. Deploying a TYPO3 application
First of all, you need to create the necessary Jelastic environment and deploy the TYPO3 application.
1. Sign up (if you haven’t done this before) or log in to your Jelasti account.
2. Click Create Environment .
3. Select the Apache application server , MySQL database, and Memcached node. Set the limits of the cloudlet and enter the environment name (for example, typo-cluster ). Click Create .
4. Wait for the environment to be created.
5. Go to the official TYPO3 website and download the zip archive with the latest version of the application.
6. Using the Distribution Manager, download the archive to the control panel.
7. Then deploy it to the environment you just created.
To install and run your TYPO3 application, you need to disable the zend_extension extension.
Go to the etc> php.ini file and comment out the following line:#zend_extension=/usr/lib64/php/modules/opcache.so
B. Configuring PHP Clustering Sessions
High availability of PHP applications can be achieved by applying clustering of PHP sessions in the cloud. To maintain performance in the event of an application server failure (we will add another server in the next steps of the instructions) we will use Memcached.
1. Click the Configuration button for the Apache server. In the configuration manager, open the file etc> php.ini and enable the Memcached module by adding the following line:
extension=memcached.so 2. To activate support for working with sessions, add the following lines to the Session block of the php.ini configuration file:
session.save_handler = memcached session.save_path = "<server>:11211" Instead,IP Memcached . , Memcached .IP Memcached . , Memcached .
3. Save the changes and restart the Apache server.C. Database Setup
The next step is to configure MySQL database replication (master and slave) to protect the application from downtime or data loss.
MySQL in an environment with deployed TYPO3 will be used as the main database. For the subordinate base, you need to create a separate environment.
Go to the Jelastic control panel and create a new environment with a MySQL node that will be used as a subordinate database. Name your environments (for example, slave-db) and click Create .
And now let's configure each database separately:Master database
As mentioned above, we use MySQL in an environment with a deployed application (ie, typo-cluster ) as our main database.
1. Click the Configuration button for the main database.
2. Go to the my.cnf file in the etc folder and set the following parameters, as shown in the image below (you need to uncomment only two lines):server-id = 1 log-bin = mysql-bin binlog-format=mixed
We use binlog-format = mixed to allow replication of operations with foreign keys.Do not use binlog_format = statement , otherwise there will be errors later!
3. Save the changes and Restart MySQL to apply the new configuration settings.
4. Click the Open in browser button near the main MySQL database. Log into the MySQL administration panel using the credentials you received via email after creating the environment.
5. Go to the Replication tab and click Add Replication Sub - User .
6. Enter the name and password for the replication subordinate user and click OK .
Your subordinate user has been successfully created.Slave Database
Now let's establish a connection between the master and slave MySQL databases.
1. Click the Configuration button for the subordinate database.
2. Open the file etc> my.cnf and add the following lines:server-id = 2 slave-skip-errors = all
We allow our subordinate database to skip all errors of the main one ( slave-skip-errors = all ) in order not to interrupt the normal operation in case of their occurrence.
This is not recommended at the development stage to be able to find bugs, etc. However, in this instruction, we focus on the production stage when your code has already been tested. Any error on the side of the main base, even a minor one, can stop the subordinate or lead to out of sync.
3. Save the changes and Restart the slave database server to apply the new configuration settings.
4. Log in to phpMyAdmin using the account information that Jelastic sent you when creating the environment for the subordinate database.
5. Go to the Replication tab and click the setting in the Replication section of the slave server .
6. Configure the core server (enter the name, password, and host of the slave replication user).
Now the main server is configured.
7. Click on the Control slave> Full start for the slave server to start the Slave SQL and Slave IO streams.
8. Check the subordinate server status table to make sure everything is in order.
As a result, replication is configured and all data is synchronized between the main and subordinate databases.D. Installing TYPO3
Now we can complete the installation of TYPO3.
1. Go to the Jelastic control panel and click the Open in browser button for the TYPO3 environment. Installation will begin. Click Continue .
2. In the Connect to your database host window:
- select MySQL / MySQL driver
- fill in the Username and Password fields with credentials of your main database (received by email when creating the environment)
- in the Host field enter the address of the database server
Click Continue .
3. At the Select database stage, create a new database: enter a name for the TYPO3 database (for example, typo_db ) and click Continue .Thanks to the database replication we configured earlier, the created database will automatically appear on both MySQL servers, master and slave.
4. In the next window, select the Introduction package . Click Continue .
5. Installation will begin. Wait a few minutes to complete it.
6. Finally, enter the password to access the TYPO3 admin panel and select the color of the TYPO3 main page.
Congratulations! TYPO3 installed.E. Cluster Setup
After the TYPO3 installation has been successfully completed, we can proceed to setting up a highly available cluster.
1. Open the Jelastic control panel and click the Change Environment Topology button for the environment with the TYPO3 application.
2. Add another Apache application server by clicking the + button (highlighted in the image below). NGINX balancer will be added automatically. Click Apply .
- The reason that we add a second application server only after installation is that in this way we synchronize all the data between two Apache nodes and avoid reinstalling and configuring.
- You can also configure file synchronization between cluster servers using the instructions in the document File Synchronization
Your highly reliable and scalable clustered solution with TYPO3 installed is ready for use. Click Open in browser and get to work.
Using another TYPO3 clustering method? Please share your experience with us in the comments below.


Source: https://habr.com/ru/post/217213/
All Articles