Guide on basis.js. Part 1: Getting Started, Views, Modules, Tools

basis.js is a JavaScript framework for developing one-page web applications focused on speed and efficiency. Perhaps he is not so popular yet. But thanks to my speeches at various conferences and meetups, some have already heard about him and became interested. However, most people lack guidance to begin using or understanding the framework.
And so, having gathered the will into a fist (well, what programmer does not like to write documentation?), I sat down to write a manual. Simple, affordable, consistent.
After writing the first part, I gave it to others. They read and convinced me that this should be published on Habré. After all, what can be better to tell about the instrument than examples of its use?
')
In the first part of the tutorial, we will look at how to start working with
basis.js and what tools you can use. As an example, several simple ideas will be created, the issue of modularity and organization of project files will be raised.Training
For development we will need:
- console (command line)
- local web server
- browser (preferably
Google Chrome) - your favorite editor
Initially, we believe that we are in the project folder and this folder is absolutely empty.
Dev server
Projects on
basis.js do not require assembly during development. But for their work requires a web server. Any web server may be suitable, but it is better to use the dev-server included in basisjs-tools , as it provides more opportunities for development.basisjs-tools is a set of console tools written in javascript and running under node.js This kit includes a collector, a dev server and a code generator. It is installed as a normal npm module: > npm install -g basisjs-tools If you install the tools globally (the
-g flag), then the basis command will be available in the console.Let's start the dev server, for this we will execute a simple command in the console:
> basis server After that, the server will start on port
8000 (this can be changed using the --port or -p flag). Now you can open http://localhost:8000 in the browser and make sure that the server is working. Nevertheless, it gives an error, since the folder of our project is still empty. Let's fix this.Index file and connection basis.js
First you need to add the
basis.js to the project. To do this, you can either clone the project from the repository , or use bower . > bower install basis And now we will create the main
html file of the application, which so far will only basis.js - index.html . <!doctype html> <html> <head> <meta charset="utf-8"> <title>My first app on basis.js</title> </head> <body> <script src="bower_components/basisjs/src/basis.js" basis-config=""></script> </body> </html> Nothing unusual yet. The only thing that can cause questions is the
basis-config attribute of the <script> .This attribute allows the core
basis.js find the <script> to which it was connected. This is necessary in order to determine the path to the basis.js sources and allow the paths to its modules.First presentation
Now our page is like a white sheet of paper - absolutely empty. Let's fill it with meaning and derive the traditional “hello world”.
We do this by creating a view with this mapping. This is what should happen:
<!doctype html> <html> <head> <meta charset="utf-8"> <title>My first app on basis.js</title> </head> <body> <script src="bower_components/basisjs/src/basis.js" basis-config=""></script> <script> basis.require('basis.ui'); var view = new basis.ui.Node({ container: document.body, template: '<h1>Hello world!</h1>' }); </script> </body> </html> Having updated the page, we will see our plans - “Hello world!”. Consider what happens here.
First, we said that we need the
basis.ui module, using the basis.require function. This function works in almost the same way as the require function in node.js and can connect modules by their name or file name. In this case, basis.ui is the name of the module. As we will see, this function can “connect” any file by its name.We needed the
basis.ui module, since it provides everything needed to build the interface. This module requires other modules, but this does not need to be taken care of, leave it basis.js . It is necessary to connect only what is directly used in the code that you write.Secondly, we created the view itself, an instance of the class
basis.ui.Node . Do not be confused by the name Node , instead of the traditional View . The fact is that in basis.js all components and views are embedded in each other. So, a block may look like a whole, but in fact it may consist of a set of nested representations (nodes).In general, the entire interface is organized as one large tree. Its leaves are nodes (nodes), which are representations and have cross-references. You can transform this tree by adding, removing, and moving nodes. The main API for this has a lot in common with the browser
DOM . But we will come back to this.In the meantime, let's see how we created the presentation. To do this, we passed an object with “settings” to the constructor - the config. By setting the
container property, we specified where to put the DOM view fragment when it is created. This must be a DOM element. And in the template property indicated the description of the template. This description is specified in the config for example. Such an opportunity to specify the description of the template in the config line is convenient for prototyping and examples. But for published (production) applications it is not used and we will redo it later.Modules
When developing, we try to isolate the logical parts and put them into separate files - modules. The less code contains a file, the easier it is to work with its code. Ideally, the module code should fit in one screen, a maximum of two. But, of course, there are always exceptions.
Let's put the presentation code into a separate module. To do this, create a file
hello.js and transfer to it what was specified in the <script> .This is enough, and so far nothing more needs to be done with the code. It remains only to connect the module to
index.html : <!doctype html> <html> <head> <meta charset="utf-8"> <title>My first app on basis.js</title> </head> <body> <script src="bower_components/basisjs/src/basis.js" basis-config=""></script> <script> basis.require('./hello.js'); </script> </body> </html> Here again, the
basis.require function is basis.require , but this time the path to the file is passed to it. It is important that the file path starts with " ./ ", " ../ " or " / ". So basis.require will unambiguously understand that the value is the path to the file, and not the name of the module. The same convention applies to node.jsContinue to deal with modularity. For example, the markup in the code is useless. And if so, we will take out the description of the template in a separate file -
hello.tmpl . Then the presentation code will look like this: basis.require('basis.ui'); var view = new basis.ui.Node({ container: document.body, template: basis.resource('./hello.tmpl') }); Everything remains as before, but the line with the description of the template is replaced with the function call
basis.resource . This function creates an "interface" to the file. This approach makes it possible to determine which files are needed, without downloading them until there is no need for it.The interface created by
basis.resource is a function with additional methods. Calling such a function, or its fetch method, causes the file to be loaded. The file is loaded only once, and the result is cached. More details can be found in Resources (modularity) .Another point: in fact, calling
basis.require('./file.name') equivalent to basis.resource('./file.name').fetch() .In this case, it would be possible to use the
basis.require . But templates are often described in classes, and for these cases it is not necessary to load the file until the first instance of the class is created. We will see this in other examples. Therefore, for consistency: when assigning a template, it is better to always use basis.resource .Module Benefits
When the code is described in a separate file and is connected as a module, it turns around in a special way, and several additional variables and functions become available in the code.
For example, the file name can be obtained from the variable
__filename , and the folder where the module is located from the variable __dirname .But more importantly, the local functions
require and resource become available. They work in the same way as basis.require and basis.resource , except for how relative file paths are resolved. If a relative path is passed for the functions basis.require and basis.resource , then it resolves the relative html file (in our case, this is index.html ). At the same time, require and resource allow such paths relative to the module (that is, its __dirname ).In modules, it is more convenient to use the local functions
require and resource . Thus, the hello.js code hello.js bit simpler: require('basis.ui'); var view = new basis.ui.Node({ container: document.body, template: resource('./hello.tmpl') }); But modularity gives additional features not only to
javascript modules, but also to other types of content. So, for example, if the template description is in a separate file, then when it is changed, it is not necessary to refresh the page. As soon as changes are saved, all instances of views that use the modified template independently update their DOM fragments. And all this happens without reloading the page, while maintaining the current state of the application.The same applies to
css , localization files and other file types. The only changes that require reloading the page are changing the html file and changing the javascript modules that have already been initialized.The file update mechanism is provided by the
basisjs-tools dev server. This is one of the main reasons why it is worth using it, and not a regular web server.Let's try how it works. Create a file
hello.css , such as: h1 { color: red; } After this we will
hello.tmpl template a bit ( hello.tmpl ): <b:style src="./hello.css"/> <h1>Hello world!</h1> As soon as changes to the template are saved, the text will turn red. At the same time do not need to refresh the page.
We have added a special
<b:style> tag to the template. This tag says that when this template is used, the specified style file must be connected to the page. Relative paths are resolved relative to the template file. One template can include an arbitrary number of style files. We do not need to worry about adding and deleting styles, the framework takes care of this.So we created a simple static view. But web applications, this is primarily a dynamic. So let's try to use in the template the values from the view and how to interact with it. For the first, bindings are used, and for the second, actions are used.
Binding and action
Bindigs allow you to transfer values from a view to its
DOM fragment. Unlike most template engines, basis.js templates basis.js not have direct access to presentation properties. And they can use only those values that the representation itself provides to the template.To set the values available to the template, use the
binding property in the description of the instance or class inherited from basis.ui.Node . Values are specified as an object, where the key is the name that will be available in the template, and the value is the function that calculates the value for the template. To such functions, the only parameter is the template owner, that is, the representation itself. This is how you can provide the name value to the template: require('basis.ui'); var view = new basis.ui.Node({ container: document.body, name: 'world', template: resource('./hello.tmpl'), binding: { name: function(node){ return node.name; } } }); It is worth adding that the
binding property is an auto-extensible property . When a new value is set for a property, when an instance or class is created, the new value extends the previous one by adding and overriding the previous values. By default, basis.ui.Node already has several useful values that can be used along with the name we defined.Change the template (
hello.tmpl ) to use the name . <b:style src="./hello.css"/> <h1>Hello, {name}!</h1> The templates use special inserts - markers. They are used to obtain references to specific parts of the template and the arrangement of values. Such inserts are indicated in curly braces. In this case, we added
{name} , to insert the value as plain text.Template description looks like the description format in other template engines. But unlike them, the
basis.js template basis.js works with DOM nodes. For this description will be created the element <h1> , which will contain the three text nodes " Hello, ", " {name} " and " ! ". The first and last will be static and their text will not change. But the average will be assigned the value from the view (its nodeValue property will change).But enough words, let's refresh the page and see the result!
And now we will add a field in which we will enter the name and so that it is substituted into the header. Let's start with the template:
<b:style src="./hello.css"/> <div> <h1>Hello, {name}!</h1> <input value="{name}" event-keyup="setName"/> </div> A
<input> element has been added to the template. For its value attribute, the same binding is used as in the header - {name} . But this only works for writing to the DOM .In order for the view to react to events in its
DOM fragment, an attribute is added to the desired element, the name of which is the name of the event with the prefix " event- ". We can add the execution of an action to any element on any event. And there can be several actions for one event, the main thing is to separate the names of actions by a space.In our example, we added the
event-keyup , which requires the view to perform a setName action when the keyup event keyup . If the view does not have any action defined, then we will see a warning message on the console and nothing more will happen.Now add a description of the action. To do this, use the
action property. It works like binding , but only describes actions. Functions in action receive a parameter event object. This is not an original event, but a copy of it with additional methods and properties (the original event is stored in its event_ property).Here's what the view will now look like (
hello.js ): require('basis.ui'); var view = new basis.ui.Node({ container: document.body, name: 'world', template: resource('./hello.tmpl'), binding: { name: function(node){ return node.name; } }, action: { setName: function(event){ this.name = event.sender.value; this.updateBind('name'); } } }); Here we read the value from
event.sender , and this is the element at which the event occurred - <input> . In order for the view to re-evaluate the value and pass it to the template, we called the updateBind method.It is not always necessary to cause explicit recalculation of values for a template. If, when changing the values used to calculate the binding, events occur, you can specify these events in the description and the binding will be recalculated automatically when they occur.
Views, like models, can store data as key-value. Data is stored in the
data property and changed by the update method. When values in data change, the update event is fired. We use this mechanism to store the name: require('basis.ui'); var view = new basis.ui.Node({ container: document.body, data: { name: 'world' }, template: resource('./hello.tmpl'), binding: { name: { events: 'update', getter: function(node){ return node.data.name; } } }, action: { setName: function(event){ this.update({ name: event.sender.value }); } } }); Now
updateBind not called explicitly. But to describe the bindig it took more code. Fortunately, binders have helpers that reduce the description of common situations. Synchronization with the field of data one of them. Such a binding can be written in a shorter form, like this: require('basis.ui'); var view = new basis.ui.Node({ container: document.body, data: { name: 'world' }, template: resource('./hello.tmpl'), binding: { name: 'data:name' }, action: { setName: function(event){ this.update({ name: event.sender.value }); } } }); The helper used is just syntactic sugar. It will unfold into the full form that was in the previous example. More details can be found in the article Bindings .
The main thing to remember. The view computes and passes the values to the template, using
binding for this. And the template intercepts and transfers to representation of an event, causing actions from action . In fact, binding and action main points of contact between the view and the template. At the same time, the representation knows practically nothing about the device of the template, and the template knows about the presentation device. All logic ( javascript ) is on the side of the view, and work with the display ( DOM ) is on the side of the template. So, in most cases, a complete separation of logic and representation is achieved.
List
So now we know how to create a simple presentation. Let's create another one, a little more complicated - a list. To do this, create a new
list.js file with the following content: require('basis.ui'); var list = new basis.ui.Node({ container: document.body, template: resource('./list.tmpl') }); var Item = basis.ui.Node.subclass({ template: resource('./item.tmpl'), binding: { name: function(node){ return node.name; } } }); list.appendChild(new Item({ name: 'foo' })); list.appendChild(new Item({ name: 'bar' })); list.appendChild(new Item({ name: 'baz' })); The code for this module is similar to
hello.js , but new constructions have been added.Before
basis.js them, we note that the component.js approach is used in basis.js . So, if we make, for example, a list, then it will be not one presentation, but several. One view is the list itself. And each element of the list is also a representation. So we separately describe the behavior of the list, and the behavior of the elements of the list. A little more detail about this approach, for example, is described in the report “Component Approach: Boring, Uninteresting, Unpromising”: slides and video .As mentioned earlier, views can be embedded into each other. In this case, the elements of the list are embedded in the list. In this case, the nested views are child (stored in the
childNodes property), and for them, the view in which they are nested is the parent (the link is stored in the parentNode property).The description of the list itself is no different from what we did earlier. Next, the code created a new class inherited from
basis.ui.Node . This class contains the template file and simple binding. After that, three instances of this class were created and added to the list.As mentioned above,
DOM principles are used to organize the tree of representations. Use the appendChild and insertBefore methods for insertion, removeChild to remove, and replaceChild to replace. There are also non-standard methods: setChildNodes allows setChildNodes to set a list of child views, and clear deletes all child views in one go.Therefore, now you can make the code a little easier:
require('basis.ui'); var list = new basis.ui.Node({ container: document.body, template: resource('./list.tmpl') }); var Item = basis.ui.Node.subclass({ template: resource('./item.tmpl'), binding: { name: function(node){ return node.name; } } }); list.setChildNodes([ new Item({ name: 'foo' }), new Item({ name: 'bar' }), new Item({ name: 'baz' }) ]); The list of child nodes can be specified at the time of creating the view. Let's try:
require('basis.ui'); var Item = basis.ui.Node.subclass({ template: resource('./item.tmpl'), binding: { name: function(node){ return node.name; } } }); var list = new basis.ui.Node({ container: document.body, template: resource('./list.tmpl'), childNodes: [ new Item({ name: 'foo' }), new Item({ name: 'bar' }), new Item({ name: 'baz' }) ] }); Independently creating the same type of child nodes is not so interesting. I would like to just specify the config and make the list create them themselves, if necessary. And there is such an opportunity. This is governed by two properties
childClassand childFactory. The first defines an instance class that can be added as a child node. And the second property defines the function that is passed, added as a child node, a value that is not an instance childClass. The task of such a function is to create a suitable instance. By default, this function creates an instance childClassusing the transferred value as a config: basis.ui.Node.prototype.childFactory = function(value){ return new this.childClass(value); }; So this property is defined by default. Most often this is sufficient and does not need to override. But there are cases when child representations may be of different classes. In this case, the selection logic is described in this method.
So all we need to do is define
childClass. Then it will be possible to add new items to the list not only by creating an instance Item, but also by passing the config. require('basis.ui'); var Item = basis.ui.Node.subclass({ template: resource('./item.tmpl'), binding: { name: function(node){ return node.name; } } }); var list = new basis.ui.Node({ container: document.body, template: resource('./list.tmpl'), childClass: Item, childNodes: [ { name: 'foo' }, { name: 'bar' }, { name: 'baz' } ] }); Continue to improve the code. After all, it can be made even easier.
The class
Itemis not used anywhere else, so it makes no sense to save it to a variable. This class can be immediately set in the config. But this is not all that we can do. When a new class or instance is created and some of its property is a class, and we want to create a new class based on it, it is not necessary to create a class explicitly; you can simply specify an object with extensions of the new class. It sounds difficult, but, in fact, it’s all about the fact that we don’t have to specify basis.ui.Node.subclass, you can just pass the object. And we get: require('basis.ui'); var list = new basis.ui.Node({ container: document.body, template: resource('./list.tmpl'), childClass: { template: resource('./item.tmpl'), binding: { name: function(node){ return node.name; } } }, childNodes: [ { name: 'foo' }, { name: 'bar' }, { name: 'baz' } ] }); Now, so much better. It remains only to describe the patterns.
First create a list template
list.tmpl: <div id="mylist"> <h2> </h2> <ul{childNodesElement}/> </div> A completely ordinary markup, except that after the name of the tag
ulis an unfamiliar construction {childNodesElement}. Meet this is also a marker. So we say that we want to refer to this element by name childNodesElement. In fact, we personally do not need this link yet. But it is necessary for the list view to understand where to insert DOMfragments of child nodes. If you do not specify it, then the child nodes will be inserted into the root element (in our case it is <div id="mylist">).So we do not manage
DOMdirectly, this is what performances do. We only suggest what and where to place. And since representations are involved in moving nodes, they know perfectly well where they are and try to do their job as optimally as possible. Moreover, this is why it is possible to update templates without reloading the page. When the description of the template changes, the presentation creates a new DOMfragment and transfers everything from the old fragment to the new one.Now you need to create a template for the list item (
item.tmpl): <li> {name} </li> And finally, you need to connect the module to our page:
<!doctype html> <html> <head> <meta charset="utf-8"> <title>My first app on basis.js</title> </head> <body> <script src="bower_components/basisjs/src/basis.js" basis-config=""></script> <script> basis.require('./hello.js'); basis.require('./list.js'); </script> </body> </html> By updating the page, we will see our wonderful list of three items.
Composition
We have created two views that are displayed on the page. It seems all is well, but in fact there is a problem. We do not manage the insertion of views into the document and their order, it all depends on the order in which we connected the modules. Also, usually, not all views, in plug-ins, need to be displayed immediately. We will understand how we can manage it.
The basic idea is that we create one view that we insert into the document. This presentation is described in a separate module. This module connects other child modules and determines how their views will be included in its
DOMfragment. Plug-ins, their views, may also include other child views, and they are their child views, etc. Thus, representations determine which representations are included in them, but not vice versa. Usually, child views do not know who and how includes them.To begin, change the modules themselves. First, you need to remove the use of the property
container, since their location will determine the parent view. And secondly, it is necessary that the module returns the view itself so that it can be used. To do this, use exportsor module.exports(all as in node.js).Now
hello.jstake the following form: require('basis.ui'); module.exports = new basis.ui.Node({ data: { name: 'world' }, template: resource('./hello.tmpl'), binding: { name: 'data:name' }, action: { setName: function(event){ this.update({ name: event.sender.value }); } } }); And the list module (
list.js) is: require('basis.ui'); module.exports = new basis.ui.Node({ template: resource('./list.tmpl'), childClass: { template: resource('./item.tmpl'), binding: { name: function(node){ return node.name; } } }, childNodes: [ { name: 'foo' }, { name: 'bar' }, { name: 'baz' } ] }); Apparently, not much has changed.
Any application usually has a single entry point. This is the module that creates the root view and makes the key settings. Create this file
app.js: require('basis.ui'); new basis.ui.Node({ container: document.body, childNodes: [ require('./hello.js'), require('./list.js') ] }); Everything should be familiar here. You may notice that we have not set a template for the presentation. In this case, the default will be empty
<div>. While we are satisfied.It remains to change myself
index.html: <!doctype html> <html> <head> <meta charset="utf-8"> <title>My first app on basis.js</title> </head> <body> <script src="bower_components/basisjs/src/basis.js" basis-config=""></script> <script> basis.require('./app.js'); </script> </body> </html> Two calls
basis.requirewere replaced by one. But do not write it, but use the option autoloadin basis-config: <!doctype html> <html> <head> <meta charset="utf-8"> <title>My first app on basis.js</title> </head> <body> <script src="bower_components/basisjs/src/basis.js" basis-config="autoload: 'app'"></script> </body> </html> Agree, it became much better.
And still there was a small problem. Yes, the order of the child views is set in the root view. But they are added sequentially, one by one. And often enough, we need to place the child views at specific markup points, more complex than just empty
<div>. For this you must use - satellites.Satellites
Satellites are named child views. This mechanism is used for performances that play a role and are not repeated.
To set the satellites used property
satellite. In binders, you can use a helper satellite:to provide a template with the ability to place their DOMfragments within its DOMfragment. At the same time, the root element of the satellite is transmitted to the template (after all, they operate in terms of DOM), and the point to insert is defined in the template itself.This is what it will look like
app.jswith the use of satellites: require('basis.ui'); new basis.ui.Node({ container: document.body, template: resource('./app.tmpl'), binding: { hello: 'satellite:hello', list: 'satellite:list' }, satellite: { hello: require('./hello.js'), list: require('./list.js') } }); Everything should be clear here, the code is not very complicated. This is a complete record, an explicit announcement of the satellites and their use in binding. But the same can be described and shorter:
require('basis.ui'); new basis.ui.Node({ container: document.body, template: resource('./app.tmpl'), binding: { hello: require('./hello.js'), list: require('./list.js') } }); In this case, the satellites are defined implicitly. As a value of binding, in fact, you can specify any instance
basis.ui.Node. In this case, he implicitly becomes a satellite with the name of binding.It remains to describe the pattern that defines the layout and location of the satellites:
<div> <div id="sidebar"> <!--{list}--> </div> <div id="content"> <!--{hello}--> </div> </div> Here comments are used with a marker. You can use other types of nodes, elements, or text nodes. Which will also be replaced by the root elements of the satellites. But more often the use of comments is more profitable: if there is no necessary satellite, then simply nothing will come out.
Satellites, in fact, have much more opportunities. For example, they can be automatically created and destroyed depending on a particular condition. We will be returning to other parts of the guide. And more about them can be found in the article Satellites .
Restructuring project files
Our experiments resulted in three main ideas, three modules and 9 files:

In these applications, dozens and hundreds of modules. And the average application for
basis.jsthis is usually 800-1200 files. It is inconvenient and unreasonable to store all files in one folder. Let's try to restructure the file location.Create a folder
helloand transfer files related to this module (ie hello.js, hello.tmpland hello.css). As well as the folder listin which we transfer list.js, list.tmpland item.tmpl. All that is left for us is to change the ways of connecting modules to app.js: require('basis.ui'); new basis.ui.Node({ container: document.body, template: resource('./app.tmpl'), binding: { hello: require('./hello/hello.js'), // list: require('./list/list.js') // } }); There is no need to change anything else. You can make sure that everything works as before, but the file structure is now this:

It looks not bad, but the files and folders of the application itself are mixed with files and folders for other purposes. Therefore, it would be better if we place all the source files of the application in one separate folder. Create a folder
srcand put there all the files and folders except bower_componentsand index.html. After that, you need to fix one path to index.html: <!-- --> <script src="bower_components/basisjs/src/basis.js" basis-config="autoload: 'app'"></script> <!-- --> <script src="bower_components/basisjs/src/basis.js" basis-config="autoload: 'src/app'"></script> The file structure should be like this:

If we follow the path of universalization, we can organize files, for example, like this:

So the child modules are located in the folder
module. The main javascriptfile of the module is called index.js. Templates and all that applies to them (styles, images, etc.) are located in a folder template. This is the most frequent project organization structure at the moment.Such an organization makes it easier to transfer modules, both within the project itself and within the framework of several projects. It becomes easier to take modules into separate packages (libraries) or to make reused components out of them. It is also not difficult to remove a module from a project or replace it with another implementation.
Of course, you can come up with your own file structure, as you like best. In this, no one limits you.
You may notice that we moved several files at once, but after moving, it was necessary to make changes only to one file in one place. It usually happens. This is the main advantage given by relative paths.
The final result can be found here .
Instruments
As the application grows, the number of files and its complexity grow. To make it easier to develop the necessary tools. There
basis.jsare two auxiliary tools: devpaneland a plugin for Google Chrome.devpanel- This is a small panel with buttons that can be dragged. It looks like this:
To connect it you need to add such a call, it is best to the main module (
app.js): /** @cut */ require('basis.devpanel'); After reloading the page, a panel should appear. A special comment is used here
/** @cut */, it allows you to cut lines at the assembly. We do not need to show this panel to users, right?The panel allows you to switch the current theme and language. And also choose templates and translatable texts for further editing. You can edit templates, styles and localization strings in the plugin.
The plugin is installed from
Google Web Storehere on this link . For his work is necessary devpanel, as it provides an API to work with basis.js.Plugin provides:
- viewing and editing localization dictionaries
- view and edit templates and styles
- list of problems in the project that the collector has discovered
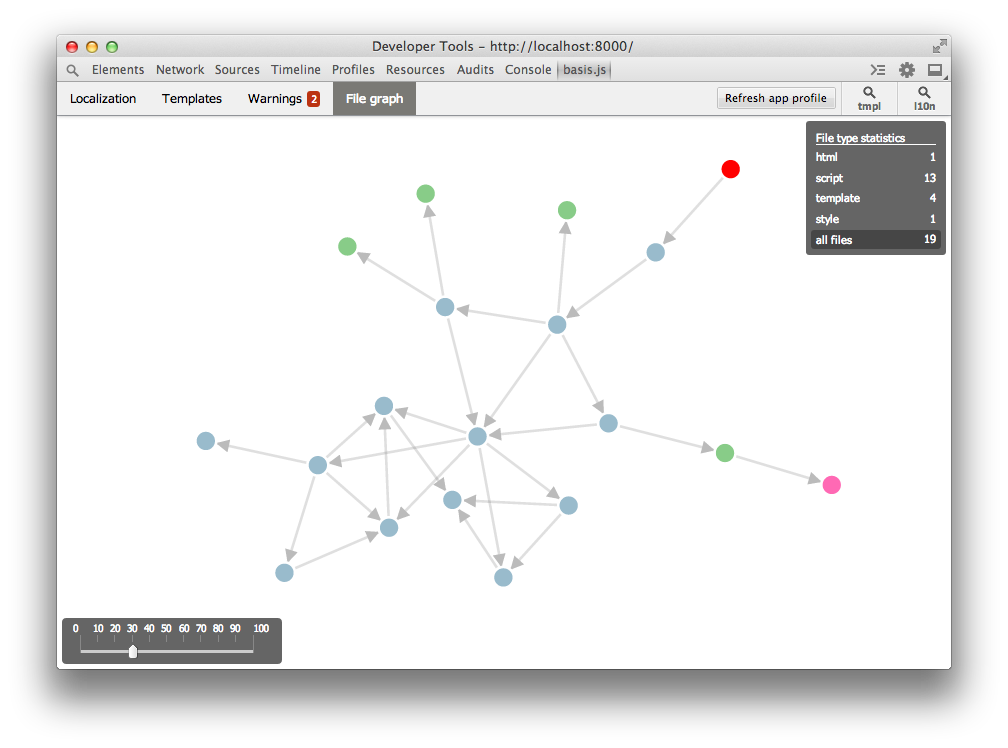
- the file graph of the application as the collector sees it
This is what our application looks like through the eyes of a collector:
Assembly
In the development process there is no need to build, everything works and so. Build is needed only for publishing a project in order to reduce the number of files and their size. To perform this work, the collector from is used
basisjs-tools.As you remember, we changed the structure of the project several times. When we start developing, we often do not know how best to organize modules and arrange files. And in the course of working on a project, tasks and requirements often change, as well as more effective solutions and ideas for organizing a project. Therefore, the variability of the project structure is a normal phenomenon.
The collector tries to independently disassemble and understand the structure of the project. He practically does not need to specifically explain something. After all, how do you know where and what is connected and used? You open the source code, read and understand. The collector works in the same way
basisjs-tools.First, it receives a
htmlfile as input (in our case index.html). He analyzes it finds the tags <script>, <link rel="stylesheet">, <style>and others. Understands what files are connected. Then proceeds to analyze these files, finds them in the design to connect other files (such as javascriptcalls basis.require, basis.resourceand others, and in the css- @import,url(..)etc.). So, recursively processing all files, the collector builds an application graph. After that, it analyzes the links, rebuilds and optimizes files. And the result of their work is stored in a separate folder, in the form of a much smaller number of files.Let's build a project. All you need to do is execute a simple command:
> basis build That's all.The result of the assembly will be three files
index.html, script.jsand style.csslocated in the folder build. These three files are our application in assembled form. All you need to do after assembly is to copy the contents of the folder buildto the server. All the necessary files for the application will be in it.By default, the collector does not make strong optimizations, but only finds all the project files, concatenates and links them. To apply optimization, you need to use flags, a list of which can be obtained by calling the command help
build: > basis build --help For example, the most frequent optimizations, such as the removal of the debugging code and compression,
javascriptand cssyou can perform by specifying the flag --pack(or its short version -p): > basis build --pack Here’s what we’ll see in the console by running this command:

As you can see, the collector does a lot of work. And if you use the flag in the team
--verbose, you can see all of his actions in detail. But we should not take care of it. After all, our main task is not to build, but to create applications and do cool stuff.Conclusion
So, we reviewed the main stages of developing an application on
basis.js, tried various options for creating views and organizing project files. The acquired knowledge will help in the study of the remaining parts of the manual.In the next part, we will discuss the mechanisms for working with data and their use in conjunction with views.
If you find a mistake, inaccuracy or know how to improve the article - write me on habraposhta. This article is also available on GitHub , you can make PR and I will carefully transfer the edits here.
So that you do not have to torment the search engines, here is a list of useful links on the topic:
- GitHub Repositories: Framework , Tools , Plugin, and Documentation
- Framework site
- Blog
- Demonstrations
- Interactive tour
- Slides of some presentations
Any questions, criticism, support and help are welcome, whatever it is expressed :)
Source: https://habr.com/ru/post/216577/
All Articles