Intel INDE Media Pack
Last time in the review article about Intel INDE we mentioned the Media Pack and its key features. In this article we will focus on it in more detail.
INDE Media Pack is a library that includes various components for working with audio and video. In terms of implementation, this is an add-on to Android’s media components that uses hardware acceleration to encode and decode video. Compared to the use of classes for working with multimedia in Android, it is much easier to use, the developer does not need to understand all the intricacies of the work of media codecs, extractor, muxer, just to embed the ability to work with video into your application.
Applications using Media Pack will work on all architectures ( ARM , IA ), on devices running Android 4.3 and higher.
You can download the library using the link on the official Intel INDE page. After installing the Intel INDE Manager, open it, select the Media component, then Download , after it is downloaded, launch the Install .
')
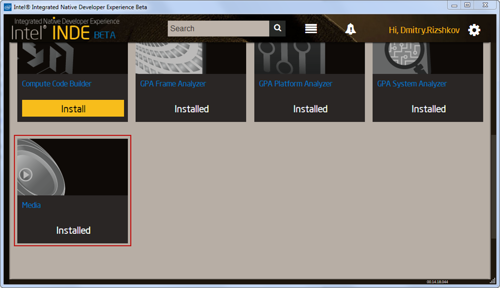
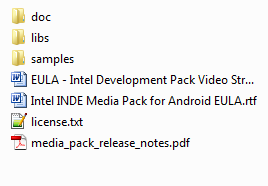
When the installation is completed, a folder will be created in the selected directory containing everything you need to start working with the Media Pack .
Let's start by building and running the examples, because This is the fastest and most visual way to evaluate what the Media Pack is capable of. To do this, we need Eclipse and a device on Android version 4.3 or higher.
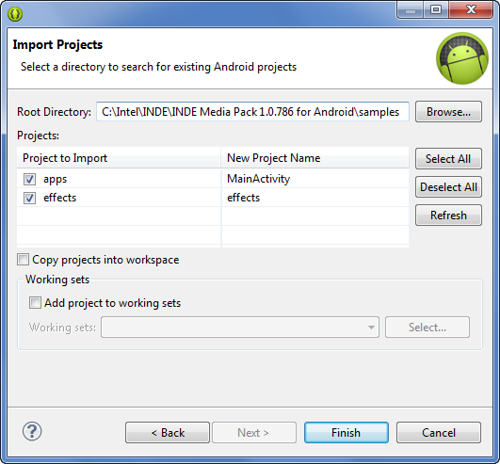
Run Eclipse next File -> New -> Project -> Android Project From Existing Code

The samples project has a dependency on project effects , so that Eclipse correctly identifies all the dependencies, you need to import both projects at once. To do this, as the root directory, you must specify the path to the samples folder and mark both projects for import - apps and effects .
We launch the imported apps package as an Android application, after building and launching the application, the main activity of the application will appear, which presents the various usage patterns that the Media Pack offers.

Game Capturing - capturing video from an application using OpenGL
Transcode Video - convert video with specified parameters
Join Video - gluing two video files
Cut Video - cut from the video of a given segment
Video Effect - video conversion with video effect overlay
Audio Effect - convert video with audio effect overlay
Streaming from Camera - broadcast video from camera to Wowza service
Get Media File Info - getting information about the media file
Having played enough with the samples, you can begin to study the insides, the first candidate for the analysis will be
This example contains two activities.
The key element in this example is the MediaComposer class, which accepts one or more media files as inputs and converts them to match the specified parameters.
In order to convert the video, we need to perform five simple steps.
Video conversion in MediaComposer occurs asynchronously, in a separate stream. In order for the application to be notified of the start and end of the conversion process, receive progress messages, errors that occur, it must implement the MediaComposer.IProgressListener interface and pass a pointer to it to the MediaComposer object.
The final step in which the conversion process starts with the specified parameters.
Yes, the code has turned out a lot, but basically it refers to the transfer of coding parameters and the processing of the current state. Again, if compared with the implementation using the "regular" Android classes, such as MediaCodec , MediaExtractor , MediaMuxer , then the code in our example turned out to be incommensurably less.
Video conversion is not the only model using Media Pack . In the following articles, we will explain how, using the GLCapture class , you can add the ability to capture and encode video in Android applications that use Open GL or are based on popular frameworks such as Unity and libGDX .
INDE Media Pack is a library that includes various components for working with audio and video. In terms of implementation, this is an add-on to Android’s media components that uses hardware acceleration to encode and decode video. Compared to the use of classes for working with multimedia in Android, it is much easier to use, the developer does not need to understand all the intricacies of the work of media codecs, extractor, muxer, just to embed the ability to work with video into your application.
Applications using Media Pack will work on all architectures ( ARM , IA ), on devices running Android 4.3 and higher.
You can download the library using the link on the official Intel INDE page. After installing the Intel INDE Manager, open it, select the Media component, then Download , after it is downloaded, launch the Install .
')
When the installation is completed, a folder will be created in the selected directory containing everything you need to start working with the Media Pack .
Let's start by building and running the examples, because This is the fastest and most visual way to evaluate what the Media Pack is capable of. To do this, we need Eclipse and a device on Android version 4.3 or higher.
Run Eclipse next File -> New -> Project -> Android Project From Existing Code
The samples project has a dependency on project effects , so that Eclipse correctly identifies all the dependencies, you need to import both projects at once. To do this, as the root directory, you must specify the path to the samples folder and mark both projects for import - apps and effects .
We launch the imported apps package as an Android application, after building and launching the application, the main activity of the application will appear, which presents the various usage patterns that the Media Pack offers.
Game Capturing - capturing video from an application using OpenGL
Transcode Video - convert video with specified parameters
Join Video - gluing two video files
Cut Video - cut from the video of a given segment
Video Effect - video conversion with video effect overlay
Audio Effect - convert video with audio effect overlay
Streaming from Camera - broadcast video from camera to Wowza service
Get Media File Info - getting information about the media file
Having played enough with the samples, you can begin to study the insides, the first candidate for the analysis will be
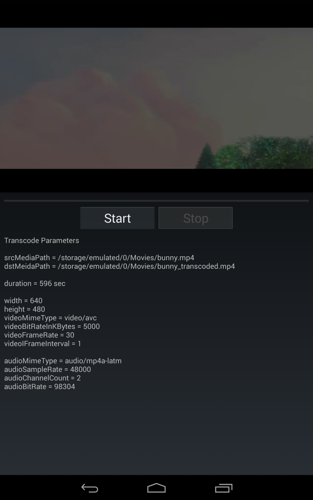
Transcode Video
This example contains two activities.
- ComposerTranscodeActivity - provides a choice of video file and displays it on a preview, nothing interesting
- ComposerTranscodeCoreActivity - displays detailed information about the selected video file, converts it
The key element in this example is the MediaComposer class, which accepts one or more media files as inputs and converts them to match the specified parameters.
In order to convert the video, we need to perform five simple steps.
1. Create a MediaComposer object
MediaComposer mediaComposer = new AndroidMediaObjectFactory(getApplicationContext()); 2. Specify the path to the source and result files
String srcPath = “…”; String dstPath = “…”; mediaComposer.addSourceFile(srcPath); mediaComposer.setTargetFile(dstPath); 3. Set the parameters of the resulting video
// // String videoMimeType = “video/avc”; // int videoFrameWidth = 640; // int videoFrameHeight = 480; // int videoBitRate = 5000; // int videoFrameRate = 30; // int videoIFrameInterval = 1; VideoFormatAndroid videoFormat = new VideoFormatAndroid(videoMimeType, videoFrameWidth, videoFrameHeight); videoFormat.setVideoBitRateInKBytes(videoBitRate); videoFormat.setVideoFrameRate(videoFrameRate); videoFormat.setVideoIFrameInterval(videoIFrameInterval); // mediaComposer.setTargetVideoFormat(videoFormat); // // Audio String audioMimeType = “audio/mp4a-latm”; // int audioSampleRate = 48000; // int audioChannelCount = 2; // int audioProfile = MediaCodecInfo.CodecProfileLevel.AACObjectLC; AudioFormatAndroid audioFormat = new AudioFormatAndroid(audioMimeType , audioSampleRate, audioChannelCount); audioFormat.setAudioBitrate(audioBitRate); audioFormat.setAudioAacProfile(audioProfile); // mediaComposer.setTargetAudioFormat(audioFormat); 4. Implement the MediaComposer.IProgressListener interface
Video conversion in MediaComposer occurs asynchronously, in a separate stream. In order for the application to be notified of the start and end of the conversion process, receive progress messages, errors that occur, it must implement the MediaComposer.IProgressListener interface and pass a pointer to it to the MediaComposer object.
public MediaComposer.IProgressListener progressListener = new MediaComposer.IProgressListener() { @Override public void onMediaStart() { // } @Override public void onMediaProgress(float progress) { // } @Override public void onMediaDone() { // } @Override public void onMediaPause() { // } @Override public void onMediaStop() { // } @Override public void onError(Exception exception) { // } }; // MediaComposer mediaComposer.addProgressListener(progressListener); 5. Starting the conversion process
The final step in which the conversion process starts with the specified parameters.
mediaComposer.start(); Yes, the code has turned out a lot, but basically it refers to the transfer of coding parameters and the processing of the current state. Again, if compared with the implementation using the "regular" Android classes, such as MediaCodec , MediaExtractor , MediaMuxer , then the code in our example turned out to be incommensurably less.
Video conversion is not the only model using Media Pack . In the following articles, we will explain how, using the GLCapture class , you can add the ability to capture and encode video in Android applications that use Open GL or are based on popular frameworks such as Unity and libGDX .
Source: https://habr.com/ru/post/216545/
All Articles