Creating your WebRTC application on the 1C-Bitrix platform

In the open spaces of Habr, articles about WebRTC technology are increasingly published , several good articles have already been written on how to start working with WebRTC technology (for example: one , two ).
In this article I want to tell how using WebRTC and Bitrix technologies to create my own multimedia web application.
')
Little about technology
The WebRTC technology appeared relatively recently, the first draft was submitted in November 2012 and in just a year the technology reached a good level and it can and should be used.
The technology offers developers the opportunity to create multimedia web applications (video / audio calls) without the need to download and install additional plugins.
Its goal is to build a unified platform for real-time communication that will work in any browser and on any operating system.
Most recently, the list of supported applications was very small and consisted of only one browser: Google Chrome.
Over the past year, this list has expanded considerably and almost all modern browsers have begun to support technology.
Currently these are: Mozilla Firefox 27+ and WebKit-based browsers - Google Chrome 29+, Opera 18+, Yandex Browser 13+.
It is hoped that Safari should be on the list soon, as the company joined the WebRTC working group in February 2014 .
Unfortunately, Microsoft does not plan to implement WebRTC and is creating its own CU-RTC-Web technology, but they may make their technology more or less compatible .
For Internet Explorer users, we suggest releasing a desktop application based on Chromium and offering it to browser users without the support of this technology.
I talked about how we use WebRTC technologies and about the work of the desktop application at the Winter Partner Conference 1C-Bitrix , you can watch my report online or download the video .
How does WebRTC work?
In fact, everything works very simply , literally three points.
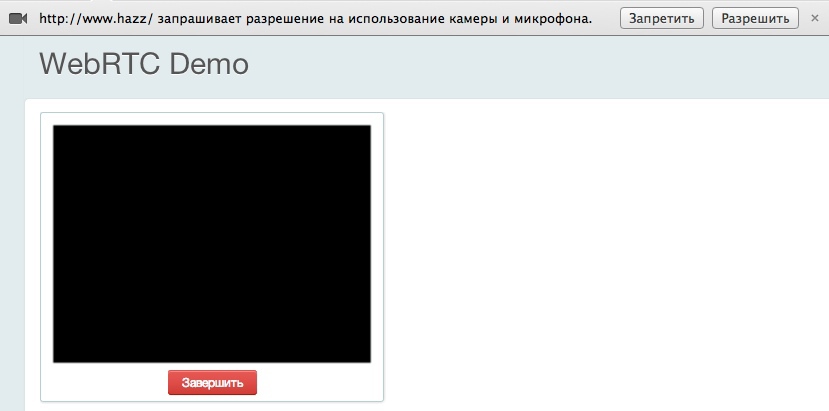
1. The user is asked for permission to use the video camera and microphone;
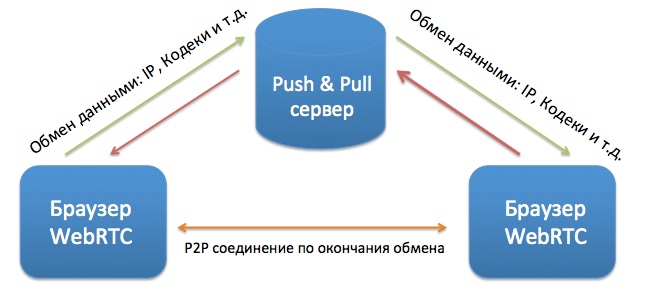
2. We connect with another user (who also gave permission to use the equipment), exchanging with him data about codecs and ip addresses for direct connection;
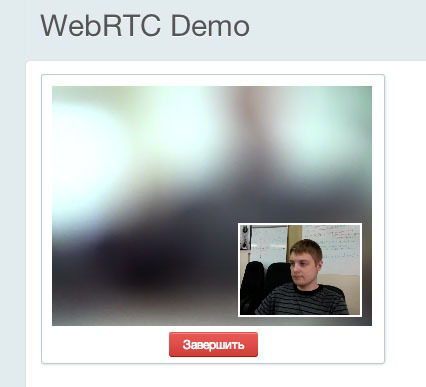
3. Show the video and play the sound;
Is everything so simple? Yeah almost :)
The WebRTC technology does not provide tools for the initial binding of users, it is this part that you have to do yourself, this part is called “Signaling” or “Signaling Protocol”.
What is the "Signaling Protocol"?
Signaling protocol or Signaling means the organization of communications between users for the exchange of commands and data.
In the simplest scheme, you need to organize the processing of the following commands:
1. invite - Invitation to call (the user is calling you, answer or not);
2. answer - Answer the call;
3. decline - Cancel the call;
4. busy - The user is busy with another call;
5. ready - The user is ready to exchange data;
6. signaling - data exchange;
The above are just basic commands, there may actually be more of them:
- join — connect to an existing conversation;
- wait - online user, wait for a response;
- waitTimeout - another user did not wait for a response;
- errorAccess - the user has technical problems;
- reconnect - the user was unable to establish a connection, reconnection is required;
What will happen when you receive a command, what messages will be displayed and what the interface will be, you decide, for your business objectives.
I understood everything, I want to create an application!
To work with WebRTC, you need to understand that while this is not an approved standard , the API is slightly different in different browsers.
It is also worth thinking about how to organize a realtime transport for signaling, think about how to bypass NAT, and read instructions on how to make it all work .
After reading the lines above, you most likely have already lost the desire to make the WebRTC application and almost closed the page

But set aside the panic! We already have everything in the product, see for yourself:
1. On the basis of our module Push & Pull and the module for the nginx server - nginx-push-stream-module , you can organize the signal protocol in real time, how to work with them in detail is written in my Bitrix blog. not satisfied, you can easily replace it with another product (for example, Socket.io );
2. To bypass NATA, we created a cloud service that is available to all product users at turn.calls.bitrix24.com ;
3. In the core of the product, we have added a special core_webrtc library which will hide from you a discrepancy in the API and most of the logic of WebRTC operation (the library is available in the “Main Module” from version 14.0.15);
and the most pleasant
4. We have developed a special component in which all the logic is implemented so that you can quickly penetrate and start writing your application (the component is available in the Push & Pull module starting from version 14.1.5);
Run the demo application
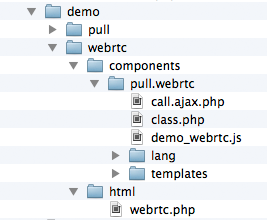
In the “Push & Pull” module (/ bitrix / modules / pull /) since version 14.1.5, a demo folder has appeared in it at the moment two examples:
1. An example of working with the “Push & Pull” module;
2. Example of working with WebRTC;
I wanted to talk about the second one:
To get started, follow these steps:
1. Copy the component from the folder / bitrix / modules / pull / demo / webrtc / compontents /, for example, here / bitrix / compontens / yourcompanyprefix /
2. Copy the page / bitrix / modules / pull / demo / webrtc / html /, for example, to the root of your site;
3. Configure the Push & Pull module to work with the Queue Server;
4. Register two users;
Everything, now you can go to this page under two different users and start calling each other!
The best documentation is the source code.
I will briefly describe the purpose of each function that is used in demo_webrtc.js (located in the component), everything else, I hope, will be clear from the source code.
To better understand the component and how it works, read these two articles, it will help you to more easily navigate:
Creating your own JS library: JS, CSS, Phrases, Dependencies.
Work with the module "Push & Pull"
WebRTC: Initialization
YourCompanyPrefix.webrtc ()
This is the class for working with WebRTC. It describes the default values and work with Signaling.
To the note: BX.garbage will work when leaving the page or reloading, thus you can terminate the call.
BX.inheritWebrtc (YourCompanyPrefix.webrtc);
This function must be performed immediately after initialization, it will inherit all the base classes of our base library BX.webrtc
WebRTC: UserMedia API
YourCompanyPrefix.webrtc.startGetUserMedia
Function to request access to the video camera and microphone
YourCompanyPrefix.webrtc.onUserMediaSuccess
This function is called when the “Successful Access to Equipment” event is triggered.
YourCompanyPrefix.webrtc.onUserMediaError
This function is called when the “Error while accessing equipment” event is triggered.
WebRTC: PeerConnection API
YourCompanyPrefix.webrtc.setLocalAndSend
The function sets the meta-information about the current user and transfers it to another user.
YourCompanyPrefix.webrtc.onRemoteStreamAdded
This function is called when the “Remote media stream received” event is triggered, to display it in the video tag.
YourCompanyPrefix.webrtc.onRemoteStreamRemoved
This function is called when the “Remote media stream disconnected” event is triggered, to turn it off in the video tag.
YourCompanyPrefix.webrtc.onIceCandidate
This function is called when the event "On the need to transfer meta-information about codecs, ip and other information" to another user is triggered.
YourCompanyPrefix.webrtc.peerConnectionError
The function is called when there is an error creating a connection between users.
YourCompanyPrefix.webrtc.peerConnectionReconnect
The function sends a request to attempt to reconnect the user to an existing session, for example, due to an error
YourCompanyPrefix.webrtc.deleteEvents
The function clears all changed variables for a new call.
WebRTC: Signaling API
YourCompanyPrefix.webrtc.callInvite
Function to send another user's invitation to a video call
YourCompanyPrefix.webrtc.callAnswer
The function to send confirmation for the installation of a video call
YourCompanyPrefix.webrtc.callDecline
Function to send cancel or end video call
YourCompanyPrefix.webrtc.callCommand
The function to send other commands to another user (the user is ready to connect, the user is busy, etc.)
WebRTC: Basic Commands (from core_webrtc.js)
YourCompanyPrefix.webrtc.ready
Check if WebRTC is available in the current browser
YourCompanyPrefix.webrtc.signalingReady
Check whether Signaling is available on the current page
YourCompanyPrefix.webrtc.toggleAudio
Microphone On / Off
YourCompanyPrefix.webrtc.toggleVideo
Turn on / off camera
YourCompanyPrefix.webrtc.onIceConnectionStateChange
The function is called when the event "Setting a connection"
YourCompanyPrefix.webrtc.onSignalingStateChange
The function is called when the event "Change communication state"
YourCompanyPrefix.webrtc.attachMediaStream
The function to set the video / audio stream in the video tag
YourCompanyPrefix.webrtc.log
Logging function
I hope this article will be useful to you.
If you have any questions, write in the comments.
Source: https://habr.com/ru/post/216539/
All Articles