Use of the developer RAWTherapee in applied tasks of the amateur photographer

In previous articles, I raised the topic of the possibility of effectively using the bundle of RAWTherapee + GIMP in the practice of amateur photographer who does not want to get involved with hacked products or overpay for partly unnecessary Adobe Photoshop functionality. The use of RAWTherapee is in many cases preferable to the use of the built-in utility Adobe Camera Raw, and in all cases known to me provides a faster and at least no less qualitative result than the converters supplied with the cameras. (The exception here is, perhaps, Olympus Viewer, monstrously slow, but able to fully let the user feel the famous "magic of the Olympus brand colors." How to achieve this using RAWTherapee will be discussed a little lower.)
I just want to warn you that the full course of working with RAWTherapee is, as they say, not for the faint of heart. While most converters provide only a certain set of the most optimal, from the developers' point of view, algorithms and approaches for performing various operations on RAW files, everything is shoved into RAWTherapee. To get lost in the algorithms and settings used for an inexperienced user is easier than the easy one.
That is why today I want to touch on the main operations performed using the developer RAWTherapee in amateur practice. The fact is that there is still no detailed textbook (not to be confused with the manual!) In Russian by RAWTherapee, and many things have to be determined intuitively, especially since from version to version the methods and interface of work undergo quite significant changes. Here I set myself the goal of eliminating the main gaps that an amateur (especially not sleeping for several years in an embrace with Margulis's book about digital photo processing) when working with this remarkable developer in all respects. And everyone will discover additional opportunities and knowledge as he develops specific needs.
Photo operations at the stage of digital development
In the last article (“ Using RAWTherapee in conjunction with GIMP ”), I recommended to transfer to the stage of digital image development in RAWTherapee the maximum possible number of available color operations. The reason for this is simple: RAWTherapee maintains a 16-bit color depth (typical for professional TIFF work and superior to a chamber RAW color depth), while the main disadvantage of GIMP is its ability to work with 8-bit color for a long time, which leads to posterization, excessive clipping and other interesting problems.
')
In order to properly distribute the work being done, I will give here a typical list of operations on the image in RAW format, usually performed in amateur practice.
1. Preview and Sort
2. Digital display (demosaic, debayer)
3. Exposure correction (restoration of lights, shadows, general and local contrast)
4. Correction of image geometry (elimination of distortions, inclinations, undesirable angles, distortions)
5. White balance and color balance fixes
6. Noise Removal
7. Correction of sharpness, microcontrast, selection of parts
8. Correction of individual sections of the image by the above methods
9. Retouching
10. Completion of processing (overlay frames, collages, drawing details)
Some will find this list self-evident, but it is not. Do not forget, for example, that many amateurs are shooting in JPEG. (By the way, RAWTherapee remarkably allows you to edit JPEG, applying almost all program features to files in this format.) In most cases, “image processing” comes down to the notorious “red-eye removal” sharpe with default settings and, for the most advanced, to fix BB on "Auto". Those for whom it is not so, sit on Photoshop, or sigh languidly, looking at other people's "professional" pictures and scolding their "soap box". Hence the need to name the above steps.
I proceed in the future from the following two parcels, tested by the practice of amateur photo (and also professional, taking the tradition of film times):
• Steps 1 through 7, like many other operations, are more correct and easier to perform in a specialized developer than in the utility to open RAW files with a photo editor.
• It’s best to do without steps 8-10. If you can not do without them, GIMP contains all or almost all that is necessary for their implementation.
Therefore, below I describe in detail the strategy for performing steps 1-7 for amateur photographers using RAWTherapee. I warn you again: this is not a manual! This is the answer to the question “why” or “why”, but not to the question “how”. However, in the last question, anyone who wishes will understand intuitively.
How to work with RAWTherapee
The RAWTherapee interface is organized using tool tabs. True, in order to understand what a particular tab means, you must either read the instructions, or tense up and act by scientific tyke. For simplicity, I present here a picture with tabs buttons RAWTherapee.
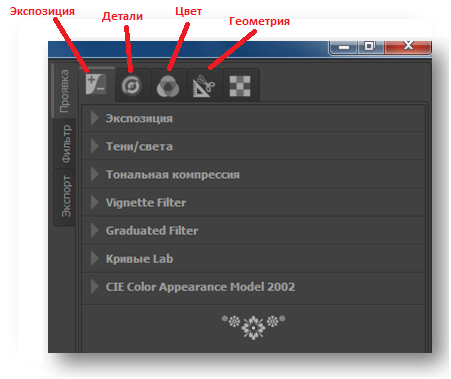
What I can do in general in amateur practice using the tools on these tabs, I will briefly describe below.
Preview and Sort
Everything is simple here. Open the folder in the RAWTherapee browser. Select a "star rating" for each image in the folder, based on personal preference. Do not forget to carefully look at the EXIF data displayed on each image.
Two gears in the corner of the picture will put the file in the batch processing list. I will not cover the necessity and scope of this opportunity; who knows will understand. Let me just say that for an amateur it is not shameful to process a packet of images at once with a manifestation in JPEG or not, but using common settings, for example, to suppress noise and halos.
The icon with the image of the trash can in the corner of each file is also not just.
Digital display
The algorithms of debayer (demosaic) are quite diverse. In all cases, if you do not want something special, use AMAZE. But if you have an old Olympus (SLR), you may prefer the VNG4 recommended for it. Although I showed it with AMAZE and had no problems with sharpness, color or moire.
RAWTherapee supports ICC profiles. If you got a profile that suits you for your camera, load it in the corresponding interface panel (in the same place where you switch between the tool tabs). In the old versions of RAWTherape it was possible to shove color profiles for Photoshop (DCP up to version 4); as with this in new versions, I do not know.
Exposure Correction
Full, terrifying totalitarian control provided by RAWTherapee on the very first tab processing. It is better for those who do not read Margulis to do this: open the Curves tool (the first of the proposed curves), select a custom curve shape and carefully pull the polos on the histogram, monitoring the result on the monitor.
I think it would be useful to remind you that in order to “pull out” a picture from a shadow, you need to “push” the left part of the curve upwards, and for greater contrast and juiciness, on the contrary, lower the right part a little downwards and raise the curve to the left so that the whole curve will look like a little to Latin S. You will not believe it, but many do not know these two operations, continuing to use the Brightness / Contrast skids in the old manner, giving far less control over the picture.
The curves in the RAWTherapee interface are implemented directly on the toolbar, and not in the form of a floating window, which makes them not very convenient to use, especially on a laptop with a relatively small screen.
Image Geometry Correction
Use the "Geometry" tab. Distortion for most lenses can be removed automatically. I do not advise touching on this tab correction of chromatic aberrations unnecessarily, for most tasks there is a more convenient tool.
Before rotating or correcting perspectives, and indeed by any geometric procedures, I advise you to turn on the AutoFill box. The RAWTherapee interpolation algorithm for autofilling is very good; I did not manage to notice significant loss of detailing on real objects even once.
By the way, these tools perfectly fix the geometry and on JPEG files.
WB and color balance fixes
As for all converters, there are fanatical fans of the default color issued by the developer in RAWTherapee, as well as his ardent haters. We will be moderate positivists and recognize that the color in RAWTherapee is at least as good as in Adobe Camera Raw / Adobe Lightroom, but inferior, perhaps, to color from RPP or Capture One. However, the color profiles already mentioned above are at the service of lovers of “genuine” colors.
White balance, as expected, is corrected in one click. You can adjust the color temperature and shade manually after installing the most suitable preset.
I will not go into the details of the theory, but I note that on the old Nikon's crops (Nikon D5000, Nikon D7000) I quietly removed the famous “carrot” from the skin tones, the vile yellow-orange tone that made many portraitist amateurs “jump off” from Nikon. All that was required for this was to unblock the pastel and saturated colors, then slightly reduce the overall chromaticity and enhance it back only for pastel shades.
Another excellent, but powerful tool for editing exposure and chromaticity is Lab curves. I recommend using it in all problem cases, but only when you realize what you are doing.
Noise removal
"Shumodav" in the old versions of RAWTherapee, many did not like. I, on the contrary, never had problems with him.
To remove noise, open a picture at 100% or larger. Evaluate whether your noise is luminance or color. Color can be removed safely, without losing colors and sharpness, to a value of at least 40-50%. With brightness, be careful not to “smooth out” the picture. The optimal values for suppressing the brightness noise - from 2.5 to 5. Large values should be resorted to only when the image is doomed to resize or when the situation is completely hopeless.
The Lab method when removing noise intuitively seems to me better than the RGB method, but perhaps this is just prejudice.
Correction of sharpness and microcontrast
Leave the photo in zoom mode (100% or more). Find a plot with important details for the plot.
It's time to push the chromatic aberrations (if you have them in the picture)! Use the “Halo Suppression” tool on the “Details” tab.
Sharpness can be corrected (there are 2 methods - the well-known method of unsharp masks and the method of reversed convolution RL), and you can clear this box and adjust the sharpness later in the graphical editor. I recommend contacting sharpness only if the image is not planned to be processed further. In general, it must be borne in mind that some increase in sharpness is necessary for all digital photos without fail.
For the unsharp mask method, the optimal radius value is from 0.3 to 1, the mask strength is from 125 to 333. Higher values lead to the appearance of artifacts around the borders of objects, and even in uniform zones.
Microcontrast is a separate function, which has no analogue in GIMP. In fact, it allows you to further emphasize or blur the details of different sizes, depending on their relative size in the picture. Using the scooters in the section “Contrast by the level of detail”, under visual control at 100% magnification, see which combination of settings best conveys the texture of your image. The game is worth the candle, believe me.
Do not forget that sharpening and playing with detail is always one of the last stages of processing, in any case, applied after noise reduction and geometry correction. Otherwise, you can accidentally make objects such as noises and halos, as well as unwanted color reflexes and glare sharper, more contrast and noticeable!
I emphasize once again that all the means of treatment mentioned above are potent. Incorrectly selected settings, too much interference with the picture can completely kill the picture. Fortunately, RAWTherapee does not edit the source file, but creates a separate file with snapshot settings. At any time, you can cancel all unsuccessful corrections and return to the original, or correct what was done incorrectly.
The final stage
At the last stage, the images are either processed in batch using the settings you have made, or using the special button the current image is transferred to Photoshop or GIMP for final editing. This is a topic for a separate discussion, and I leave it for the future.
I recommend using any backup utility before transferring images for processing in RAWTherapee, despite the “non-destructive editing” practiced in this developer (as in the absolute majority of others). Errors in work are possible at any stage, and better foreseeability and vigilance than to remain without the results of their labor.
Once again I will repeat my main conclusion: RAWTherapee provides almost absolute control over the manifestation and formation of a digital image, so the study and use of this program is certainly worth the labor involved!
Source: https://habr.com/ru/post/216465/
All Articles