Integration of Android Studio, Gradle and NDK
In light of recent changes (starting with release 0.7.3 of December 27, 2013), the new build system for Android is becoming very interesting, including for those who use NDK. Now it became really easy to integrate native libraries into your build and generate an APK for different architectures, correctly handling version codes.
If you are using Android Studio, then the integration of native libraries into the application used to require the use of various complex methods, including maven and .aar / .jar packages ... The good news is that this is no longer required.
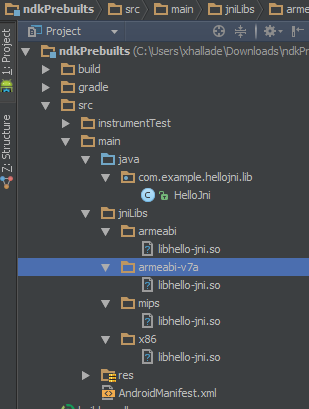
You only need to put the .so libraries in the jniLibs directory in the subdirectories named respectively for each supported ABI (x86, mips, armeabi-v7a, armeabi) - and that's it! Now all .so files will be integrated into the APK during build:
')

If the jniLibs folder name does not suit you, you can specify a different location in build.gradle :
Building one APK on the architecture is very simple using the abiFilter property.
By default, ndk.abiFilter (s) is set to all . This property has an impact on the integration of .so files, as well as on calls to ndk-build (we'll talk about this at the end of the post).
Let's add some architectural features (configurations) to build.gradle :
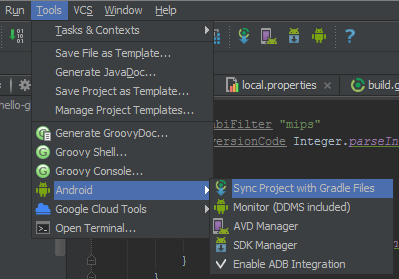
And then synchronize the project with the gradle files:
Now you can enjoy the new features by choosing the desired build options:
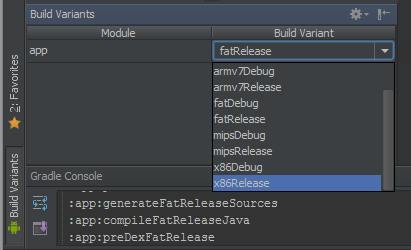
Each of these options will give you an APK for the selected architecture:

The full (Release | Debug) APK will still contain all the libraries, like the standard package mentioned at the beginning of this post.
But do not stop reading at this place! Architecture-specific APKs are convenient for development, but if you want to upload a few of them to the Google Play Store, you need to set a different versionCode for each. Doing this with the latest build system is easy.
The android.defaultConfig.versionCode property is responsible for the versionCode for your application. By default, it is set to -1 and, if you do not change this value, the versionCode specified in the AndroidManifest.xml file will be used.
Since we want to dynamically change our versionCode , we first need to specify it inside build.gradle :
However, it is still possible to store this variable in AndroidManifest.xml if you get it “manually” before the change:
Now you can use versionCode with various modifiers:
Here we set the prefix 6 for x86, 4 for mips, 2 for ARMv7 and 1 for ARMv5.
If the project source has a jni folder, the build system will try to invoke ndk-build automatically.
In the current implementation, your Android.mk makefiles are ignored; instead, a new one is created on the fly. This is really convenient for small projects (you no longer need .mk files!), But for large projects it can be annoying if you need all the features provided by makefiles. It is possible to disable this property in build.gradle :
If you want to use the on-the-fly makefile, you can configure it initially by setting the ndk.moduleName property, for example:
You can also set other ndk properties:
Debug APK generation is achieved by setting the value to true for the android.buildTypes.debug.jniDebugBuild property; in this case, ndk-build will be passed to NDK_DEBUG = 1 .
If you use RenderScript from the NDK, you will need to set the value of true for the defaultConfig.renderscriptNdkMode property.
If you trust auto-generated makefiles, you can set different cFlags depending on the final architecture when you build multi-architecture APKs. So if you want to fully trust gradle, we recommend generating different APKs for architectures using the configuration modifiers described earlier:
Putting it all together, I bring in the file build.gradle , which I use now. It does not have modifiers for various supported ABIs, it does not use integration with ndk-build , therefore it works in the Windows environment and does not require any changes to the usual source and library locations, nor the contents of my .mk files.
If you get an error:
This means that the tools are not found in the NDK directory. There are two ways to do this: set the ANDROID_NDK_HOME variable according to your NDK directory and delete local.properties, or set it manually inside local.properties :
If you get an error:
It can be caused by an existing error in the NDK for Windows when there is only one source file to compile. Add one more empty file and it will work.
You may be able to find answers to your questions in the google adt-dev group .
The best place to find more details is the official project page .
Look at the list of changes and, if you scroll through it in its entirety, you will find examples of projects related to the integration of NDK within the most recent archives of gradle-samples-XXX.zip.
The video below shows how to set up a project with NDK sources from Android Studio.
Integrating .so files into APK
If you are using Android Studio, then the integration of native libraries into the application used to require the use of various complex methods, including maven and .aar / .jar packages ... The good news is that this is no longer required.
You only need to put the .so libraries in the jniLibs directory in the subdirectories named respectively for each supported ABI (x86, mips, armeabi-v7a, armeabi) - and that's it! Now all .so files will be integrated into the APK during build:
')
If the jniLibs folder name does not suit you, you can specify a different location in build.gradle :
android { ... sourceSets.main { jniLibs.srcDir 'src/main/libs' } } We build one APK on architecture and achieve success!
Building one APK on the architecture is very simple using the abiFilter property.
By default, ndk.abiFilter (s) is set to all . This property has an impact on the integration of .so files, as well as on calls to ndk-build (we'll talk about this at the end of the post).
Let's add some architectural features (configurations) to build.gradle :
android{ ... productFlavors { x86 { ndk { abiFilter "x86" } } mips { ndk { abiFilter "mips" } } armv7 { ndk { abiFilter "armeabi-v7a" } } arm { ndk { abiFilter "armeabi" } } fat } } And then synchronize the project with the gradle files:
Now you can enjoy the new features by choosing the desired build options:
Each of these options will give you an APK for the selected architecture:
The full (Release | Debug) APK will still contain all the libraries, like the standard package mentioned at the beginning of this post.
But do not stop reading at this place! Architecture-specific APKs are convenient for development, but if you want to upload a few of them to the Google Play Store, you need to set a different versionCode for each. Doing this with the latest build system is easy.
Automatically install different version codes for ABI-dependent APK
The android.defaultConfig.versionCode property is responsible for the versionCode for your application. By default, it is set to -1 and, if you do not change this value, the versionCode specified in the AndroidManifest.xml file will be used.
Since we want to dynamically change our versionCode , we first need to specify it inside build.gradle :
android { ... defaultConfig{ versionName "1.1.0" versionCode 110 } } However, it is still possible to store this variable in AndroidManifest.xml if you get it “manually” before the change:
import java.util.regex.Pattern android { ... defaultConfig{ versionCode getVersionCodeFromManifest() } ... } def getVersionCodeFromManifest() { def manifestFile = file(android.sourceSets.main.manifest.srcFile) def pattern = Pattern.compile("versionCode=\"(\\d+)\"") def matcher = pattern.matcher(manifestFile.getText()) matcher.find() return Integer.parseInt(matcher.group(1)) } Now you can use versionCode with various modifiers:
android { ... productFlavors { x86 { versionCode Integer.parseInt("6" + defaultConfig.versionCode) ndk { abiFilter "x86" } } mips { versionCode Integer.parseInt("4" + defaultConfig.versionCode) ndk { abiFilter "mips" } } armv7 { versionCode Integer.parseInt("2" + defaultConfig.versionCode) ndk { abiFilter "armeabi-v7a" } } arm { versionCode Integer.parseInt("1" + defaultConfig.versionCode) ndk { abiFilter "armeabi" } } fat } } Here we set the prefix 6 for x86, 4 for mips, 2 for ARMv7 and 1 for ARMv5.
Working with ndk in Android Studio
If the project source has a jni folder, the build system will try to invoke ndk-build automatically.
In the current implementation, your Android.mk makefiles are ignored; instead, a new one is created on the fly. This is really convenient for small projects (you no longer need .mk files!), But for large projects it can be annoying if you need all the features provided by makefiles. It is possible to disable this property in build.gradle :
android{ ... sourceSets.main.jni.srcDirs = [] //disable automatic ndk-build call } If you want to use the on-the-fly makefile, you can configure it initially by setting the ndk.moduleName property, for example:
android { ... defaultConfig { ndk { moduleName "hello-jni" } } } You can also set other ndk properties:
- cFlags ,
- ldLibs
- stl (i.e .: gnustl_shared , stlport_static ...),
- abiFilters (i.e .: "x86" , "armeabi-v7a" ).
Debug APK generation is achieved by setting the value to true for the android.buildTypes.debug.jniDebugBuild property; in this case, ndk-build will be passed to NDK_DEBUG = 1 .
If you use RenderScript from the NDK, you will need to set the value of true for the defaultConfig.renderscriptNdkMode property.
If you trust auto-generated makefiles, you can set different cFlags depending on the final architecture when you build multi-architecture APKs. So if you want to fully trust gradle, we recommend generating different APKs for architectures using the configuration modifiers described earlier:
... productFlavors { x86 { versionCode Integer.parseInt("6" + defaultConfig.versionCode) ndk { cFlags cFlags + " -mtune=atom -mssse3 -mfpmath=sse" abiFilter "x86" } } ... My sample .gradle file
Putting it all together, I bring in the file build.gradle , which I use now. It does not have modifiers for various supported ABIs, it does not use integration with ndk-build , therefore it works in the Windows environment and does not require any changes to the usual source and library locations, nor the contents of my .mk files.
import java.util.regex.Pattern buildscript { repositories { mavenCentral() } dependencies { classpath 'com.android.tools.build:gradle:0.9.0' } } apply plugin: 'android' android { compileSdkVersion 19 buildToolsVersion "19.0.3" defaultConfig{ versionCode getVersionCodeFromManifest() } sourceSets.main { jniLibs.srcDir 'src/main/libs' jni.srcDirs = [] //disable automatic ndk-build call } productFlavors { x86 { versionCode Integer.parseInt("6" + defaultConfig.versionCode) ndk { abiFilter "x86" } } mips { versionCode Integer.parseInt("4" + defaultConfig.versionCode) ndk { abiFilter "mips" } } armv7 { versionCode Integer.parseInt("2" + defaultConfig.versionCode) ndk { abiFilter "armeabi-v7a" } } arm { versionCode Integer.parseInt("1" + defaultConfig.versionCode) ndk { abiFilter "armeabi" } } fat } } def getVersionCodeFromManifest() { def manifestFile = file(android.sourceSets.main.manifest.srcFile) def pattern = Pattern.compile("versionCode=\"(\\d+)\"") def matcher = pattern.matcher(manifestFile.getText()) matcher.find() return Integer.parseInt(matcher.group(1)) } Trouble-shooting
NDK not configured
If you get an error:
Execution failed for task ':app:compileX86ReleaseNdk'. > NDK not configured This means that the tools are not found in the NDK directory. There are two ways to do this: set the ANDROID_NDK_HOME variable according to your NDK directory and delete local.properties, or set it manually inside local.properties :
ndk.dir=C\:\\Android\\ndk There is no rule to create a goal.
If you get an error:
make.exe: *** No rule to make target ...\src\main\jni It can be caused by an existing error in the NDK for Windows when there is only one source file to compile. Add one more empty file and it will work.
Other matters
You may be able to find answers to your questions in the google adt-dev group .
Getting NDK Integration Information
The best place to find more details is the official project page .
Look at the list of changes and, if you scroll through it in its entirety, you will find examples of projects related to the integration of NDK within the most recent archives of gradle-samples-XXX.zip.
The video below shows how to set up a project with NDK sources from Android Studio.
Source: https://habr.com/ru/post/216353/
All Articles