Creating a failover IPSec VPN tunnel between Mikrotik RouterOS and Kerio Control
Starting with version 8.1 Kerio Control, you can use not only the proprietary protocol Kerio VPN to create VPN tunnels, but also quite a racially correct IPSec. And of course, I immediately wanted to cross Mikrotik and Kerio Control.
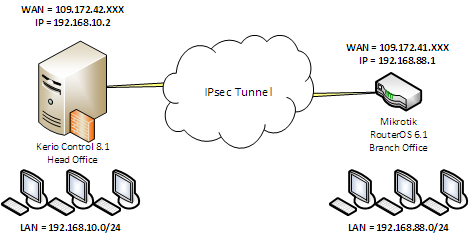
In this article I will talk about several connection diagrams. So, the first scheme.
')
Combining two subnets. It's simple.
And right away a small lyrical digression on the theme of the connection setup. Those. which end of the tunnel accepts and which one initiates the VPN connection. The scheme when Kerio Control initiates a connection is selected to simplify the provision of fault tolerance for VPN tunnels in case Kerio Control and Mikrotik have several WAN interfaces. Details on this, I will focus in the fourth part of this article. In all cases, I will use predefined key authentication (password).
To connect to the IPsec protocol between Kerio Control and the Mikrotik RouterBoard on RouterOS 6.1, you need to create a new IPsec tunnel on the Control side with the following settings:
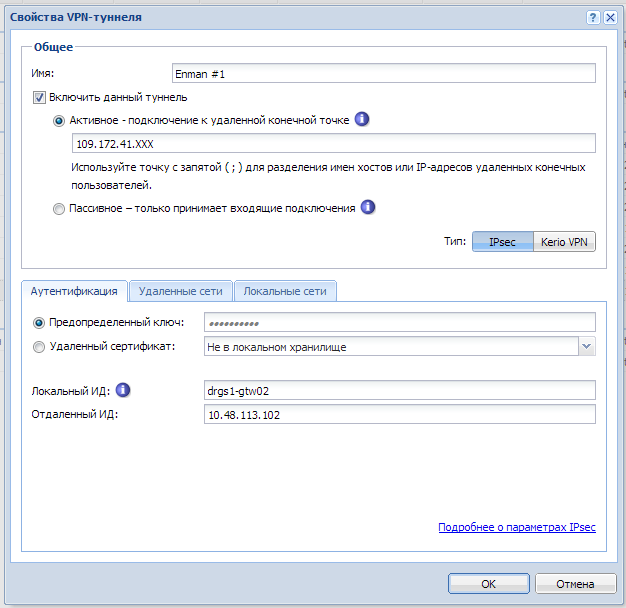
- Common parameters. Active mode (Control initiates connection to Mikrotik). Enter the IP address or DNS name of the Mikrotik frontend. In the example, 109.172.41.XXX
- Authentication. Predefined key. Enter a strong password.
- Local ID An arbitrary name for the gateway Control or the external IP address Control. In the example, drgs1-gtw02
- Remote ID External address Mikrotik. If the address of the Mikrotik WAN interface is different from the external address - specify the address of the WAN interface in Mikrotik. The classic example is when a provider issues to the Mikrotik network interface an IP address via DHCP from its gray local network to which it sends packets coming to the external static IP address given to you. This article describes exactly this option. Therefore, in the example - 10.48.113.102.
- Remote networks. Specify the network \ local subnet mask for Mikrotik. For example, 192.168.88.0/24.
- Local Area Networks Specify the network \ local subnet mask for Kerio Control. For example, 192.168.10.0/24.
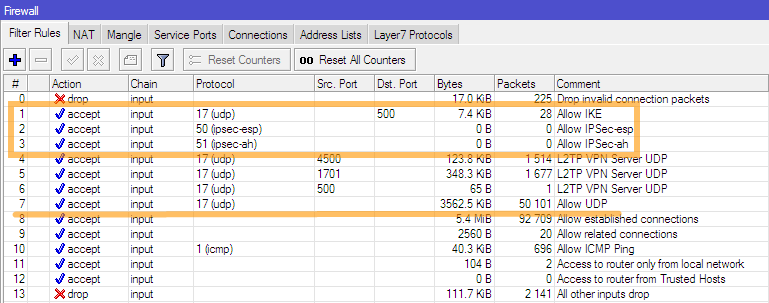
To configure the tunnel on the Mikrotik side, you need to connect to the router via Winbox and add firewall rules that allow IKE, IPSec-esp, IPSec-ah or temporarily debug all UDP traffic (I do not advise resolving all UDP - evil people like DNS forwarders at least) in the input chain. To do this, in the terminal window, you must run the following commands:
/ip firewall filter add chain=input comment="Allow IKE" dst-port=500 protocol=udp/ip firewall filter add chain=input comment="Allow IPSec-esp" protocol=ipsec-esp/ip firewall filter add chain=input comment="Allow IPSec-ah" protocol=ipsec-ah/ip firewall filter add chain=input comment="Allow UDP" protocol=udpThe result of the command will be added firewall filter rules. I think that this is obvious to everyone, but for beginners I will note that these rules must be above the prohibiting rules in the input chain. In my example, the rule above is number 13.
Next, you need to edit (or create) encryption policies (Proposals) in the IPsec configuration. Adjust your settings in accordance with the picture or execute the command below in the terminal window.
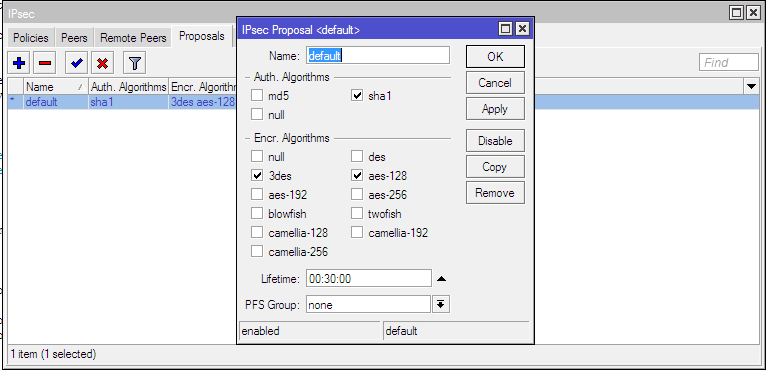
This is a command that edits an existing policy value. In case your proposal has no default values (empty at all, none at all), you must create them in accordance with the figure. And in this case, the command does not need to perform.
/ip ipsec proposal set [find default=yes] enc-algorithms=3des,aes-128 pfs-group=noneWe need to set up a peer and we’ll dwell on this. It should be noted that in the Router OS version higher than 6.0, some settings regarding the IPsec Peers and IPSec Policies have changed. In particular, new options have been added to Peers settings. Now for Peer, you can specify whether Mikrotik initiates or accepts a connection (analogous to passive / active in Kerio Control). The nuance is that the “passive” parameter cannot be set via the GUI. It is not in the Winbox or the web interface control of the router. By default, when creating a peer through Winbox, it becomes active and begins to continuously try to establish a connection to the address specified in its configuration. Therefore, to create the passive end of our tunnel, it is necessary to use the CLI and in the terminal window, execute the command where instead of “password” you need to specify the predefined key that you specified on the Kerio Control side when configuring it.
/ip ipsec peer add address=109.172.42.XXX/32 dh-group=modp1536 exchange-mode=main-l2tp generate-policy=port-override hash-algorithm=sha1 passive=yes secret=passwordThe result of the command is a peer created waiting for a connection. In case your WAN interfaces are behind a NAT provider - check the NAT-Travesal checkbox

When configuring Peer, we specified the option to automatically generate IPsec policies. Therefore, we do not need to create anything in / ip ipsec policies. The necessary policies will be created automatically after the connection is established. If you did not forget to enable it in the tunnel configuration in Kerio Control, this will happen immediately after adding a peer.
After that, the tunnel on the Kerio Control side should go to the “Connected” status. In Mikrotik, an automatically created policy should appear on the “Policies” tab for subnets that you specified when setting up Kerio Control in “Remote networks” and “Local networks”. In “Installed SAs” you will see that your tunnel ends are “friends” and finally you will see connection status in “Remote Peers”.


The tunnel is installed. But to pass traffic between subnets behind Kerio Control and Mikrotik, you need to add a rule to the NAT rules of the firewall that will not allow traffic that you send to the tunnel to be disguised. If you do not make this rule, the networks will not be friends, even if the tunnel is established. To do this, in the terminal window, run the following command:
/ip firewall nat add chain=srcnat dst-address=192.168.10.0/24 src-address=192.168.88.0/24Important! The rule should be above the rules of masquerading. Ie be the topmost in the list of rules NAT.
After that, the communication to the internal addresses between the subnets 192.168.88.0/24 and 192.168.10.0/24 should work. This completes the tunnel setup between the two subnets. But it was easy. More interesting ...
Networking for Mikrotik and several VPN networks for Kerio Control
Consider a more complicated option when you need to provide local network access for Mikrotik to local networks for Kerio Control connected to the central office using other VPN tunnels using the Kerio VPN protocol (for example). The approximate scheme is shown in the figure below.

It would seem, what is easier? In the configuration of the VPN tunnel in Kerio Control, you just need to add a list of all subnets to which you need to access from the local network behind Mikrotik and that the Head Office already knows in the “Local networks” list. And accordingly expand the range of addresses in the NAT rule in Mikrotik that will not be masqueraded, for example, by creating a group of such addresses in the Address List and specifying this group in the rule assignment.
Add, reinstall the tunnel. We see that the tunnel is established, automatic policies for all subnets have been cheerfully added to IPsec Policies, which we have specified in the configuration of the tunnel on the Kerio Control side. In Installed SAs, we see created SAs for all subnets. Bingo? And it was not there ...
Thoughtful smoking of the Internet on the topic of IPsec in Mikrotik and the unification of local networks for different types of routers made it clear that with such a scheme everyone has the same type of problem - the inability to explain to Mikrotik where to send packets. Practically on all types of IPSec routers, the tunnel is a separate network interface, which is logical. But it is not in Mikrotik, and therefore it is impossible to determine for it the route for passing packets to a remote subnet. In practice, in conjunction with Kerio Control, Mikrotik persistently sent packets through the last added SAs. The packages honestly came to the central office and Kerio Control was dropped there. In no article did I find an explanation for the logic of the behavior of Mikrotik in this case. I tried everything, it seems, the possible options with the same result. With zero. Communication was only with one subnet - with the last one automatically added when the tunnel was installed.
Five days of brainstorm, lost sleep,
If Mikrotik works fine with one subnet in IPSec policies, then we need to logically combine our subnets behind a Kerio Control subnet mask. Those. aggregate subnets behind Kerio Control into one. Addresses in subnets 192.168.10.0/24, 192.168.20.0/24, 192.168.30.0/24 and 192.168.40.0/24 will be within the same subnet 192.168.0.0/18, we will add this subnet to the “Local networks” list when configuring the tunnel in Kerio Control and establish a tunnel connection. Mikrotik will create a single IPsec Policies and create a single SAs. Now he simply can not make a mistake where to send packets. The ping check should show the availability of all subnets for Control for the network behind Mikrotik. If you check ICMP accessibility from Mikrotik, you should not ping from the WAN interface, but from the bridge, for example . This is a very common mistake that leads to moanings in the style of the CHTDT, nothing works, we will all die, the paws ache and the tail falls off, save-help.
To return packets from a remote VPN network to the network behind Mikrotik, you need to add an analogue of the rule to Mikrotik, which does not allow for masquerading packets sent to the tunnel. Since all traffic to the network for Mikrotik from VPN networks goes from the central branch office VPN interface, we need traffic rules that Mikrotik would cheat by changing the source from the VPN address to an address from a subnet that Mikrotik knows about. The rules in the picture. The address 192.168.10.2 is the internal address of the central office gateway.

After that, the exchange of traffic between the subnets will go in all directions.
Now about the shortcomings of this method. With this scheme, it is impossible to issue a local network "routes" (I intend to take the word in quotation marks, since in reality there are no familiar paths in the Mikrotik routing table to remote subnets in general) only for specific remote subnets connected to Head Office. Theoretically, there is a possibility that you can not logically combine addresses in remote subnets into one with a mask. Since they may even be in different classes of networks. Due to the fact that a huge number of addresses fall into the range, in theory there is a possibility that you will need to use other addresses from this range not in the IPSec tunnel, which will be impossible. Attention , if your Mikrotik address falls into this range (!!!) then installing a tunnel will cause you to lose connection with Mikrotik. In this case, log in to it via Winbox at the MAC address and disable the tunnel or disable it on the Kerio Control side. After that, either take out the local address of Mikrotik outside the range that it receives from Contol when setting up a VPN tunnel or this (i.e., the option of aggregating local networks for Kerio Control) is not your case at all.
In general, I would say that the solution is not crooked. Curved, but working. In the already established infrastructure, you may have to saw through the local addresses of the subnets. But the RouterOS developers left me no choice. The addition of an interface for IPSec in the helpers, as far as I know, has long been. In English-speaking forums, I have repeatedly seen petitions to developers, full of tears and despair.
We use Mikrotik router as a VPN client
Using Mikrotik as a client will make it possible to forget about dancing with IPSec and non-routable routing. But keep in mind that access to the network for Mikrotik from the local network side for Kerio Control will not be. And this is logical. Note that because Kerio Control is licensed for connections including VPN clients - this type of connection reduces the number of licensed connections by one. Well or if in a simple way - uses one license for connection.
Everything is very simple here. Create a user in Kerio Control or edit an existing one. On the tab "Rights" set the checkbox "Users can connect via VPN."

We add a rule to the traffic rules that allows you to connect to Kerio Control via L2TP from the Internet, or you can limit the source to a list of trusted addresses. In the figure I only have the connection allowed for the list of trusted addresses of remote administrators.

On the Mikrotik side, you need to add a new L2TP Client interface by running the command in the terminal window:
add comment="L2TP VPN Client" connect-to=109.172.42.XXX disabled=no max-mru=1460 max-mtu=1460 name=INTERFACE-NAME password=password user=usernameThe values of the address, interface name, connection name and password you need to replace with your address Kerio Control, your arbitrary interface name and your login \ password that you created or edited in the user settings. The result of the command should be a newly created interface that immediately establishes a connection to the server.

A new address will appear in the Mikrotik address list, dynamically assigned to it by the VPN server Kerio Control.

In order for the local network for Mikrotik to access the network for Kerio Control, you must add static routes to the routing table. To do this, you need to execute commands in the terminal window, replacing the interface name with the one you have:
/ip route add comment="Route to 192.168.20.0/24" distance=1 dst-address=192.168.20.0/24 gateway=INTERFACE-NAME/ip route add comment="Route to 192.168.30.0/24" distance=1 dst-address=192.168.30.0/24 gateway=INTERFACE-NAME/ip route add comment="Route to 192.168.40.0/24" distance=1 dst-address=192.168.40.0/24 gateway=INTERFACE-NAMEThe result will be added static routes to remote subnets behind Kerio Control via the VPN interface.
Now add a masquerading rule to Mikrotik. To do this, in the terminal window execute the command:
/ip firewall nat add action=masquerade chain=srcnat out-interface=INTERFACE-NAME src-address=192.168.88.0/24That's all, access from the local network for Mikrotik to the network for Kerio Control and to all networks connected to it via other VPN tunnels. Do not forget to correct my values in the commands on your own.
Failover VPN Tunnel
Well, the snack is the sweetest. The promised story about the organization of failover tunnels. Prior to Kerio Control 8.1, it was impossible to specify more than one address of the receiving end of the tunnel in the configuration of an active connection, so to ensure the fault tolerance of VPN tunnels, I would vote for the scheme when Kerio Control at the central office accepts connections. In this case, fault tolerance could be provided by monitoring the incoming channels of the central office and automatically changing the only DNS name to which the branches establish connections. I use the DynDNS service and the PRTG Network Monitor monitoring system for this. The brief essence of the method is as follows. With the help of PRTG, the availability of central office channels is checked and if a drop is recorded on the channel to which the branches establish connections, then through the DynDNS API, the PRTG automatically changes the DNS name registered on the DynDNS service to which the branches establish a connection by pulling a link on the Internet. The method is working 146%. I checked for more than fifty tunnels connected to the central office by a classic star. In the case of recovery, you can change the IP address back, you can leave it as is. Then as you wish.
It would seem that prevents in the case of Mikrotik to do the same? But here is a step from RouterOS. In the peer settings, you can even specify the DNS name of the receiving end of the tunnel, but when saved, it will be cut off and recorded as an IP address. In this case, you will have to reinvent the scripts that will monitor the channels (instead of PRTG) on Kerio Control and change the peer settings in case the current channel to which the connection is established becomes unavailable. Plus a lot of dancing with IPSec policies. And this seems to me a terrible head wash.
Now Kerio Control itself is remarkably able to provide fault tolerance in case it initiates a connection, you can specify several IP addresses (or DNS names) of the receiving end of the tunnel in the tunnel setup. Thus, by creating on the Mikrotik side two peers accepting a connection, you can achieve the desired resiliency. Well, we drove our urban ... The approximate scheme is shown in the figure. It is necessary to ensure the survivability of the tunnel when any WAN interface crashes on Kerio or ISP on Mikrotik (they are named differently to avoid confusion).

Let's start with the Mikrotik setup. Since he cannot understand DNS names in the meaning of the IPsec Peers settings address, then we will have to create two peers for both WAN interfaces of the central office. To do this, go to the terminal window and enter the command, replacing the values of the addresses and the predefined key with your own:
/ip ipsec peer add address=109.172.42.XXX/32 dh-group=modp1536 exchange-mode=main-l2tp generate-policy=port-override hash-algorithm=sha1 nat-traversal=yes passive=yes secret=PASSWORD/ip ipsec peer add address=95.179.13.YYY/32 dh-group=modp1536 exchange-mode=main-l2tp generate-policy=port-override hash-algorithm=sha1 nat-traversal=yes passive=yes secret=PASSWORDI draw your attention that if you have already created a peer according to the instructions given in the previous parts of the article and decided to use Winbox instead of CLI and copied the peer already created before, the passive setting (the one that determines initiates or accepts Mikrotik connections) is not copied . Therefore, at this stage, I strongly recommend using the command line tools. The result of the command should be the successful creation of two peers waiting to be connected by Kerio Control.
But this is not enough. If WAN1 crashes on Kerio Control, the tunnel will be successfully reinstalled, but if the ISP1 channel on Mikrotik drops, then the “remote ID” of the tunnel settings in Kerio Control in which we specified the gray provider IP on the Mikrotik ISP interface does not match the real value . And instead of a successful reconnection, we will get a nice error in the Kerio Control administration console - “ID mismatch”.
Ambush? Ambush ... And I almost despaired, because the fountain of thoughts was exhausted, I definitely did not understand how to automate the change of this ID. Conjured with the hosts file, but to no avail. The time has come to remember the words of one clever uncle with an already, probably, completely gray ass, who told me in a shaggy year more - if nothing helps, then it's time to look into manuals and logs. Well ... the manuals are not about us (here the author’s laughter), got into the debug-log Kerio Control, having included in it all the messages related to IPSec. What can I say - the seeker, let him find. In our case, when the “remote ID” parameter may dynamically change depending on which IP address the tunnel is connected to — in the Kerio Control tunnel settings, you can specify the value “% any” in the remote ID.
In the host names, we enter a semicolon after all the ISP1 AND ISP2 addresses on Mikrotik and the value “% any” in the “Remote ID” as in the figure below.

We keep, we apply, with happy eyes we look at the changed status of the tunnel on "Connected" and proceed to the test. We emulate the fall of the main channel on Kerio Control by changing the places of the backup and the main channel - the tunnel is reconnected and alive. We emulate the fall of the main channel on Mikrotik by pulling out the provider cord from it. So far, Kerio Control has mastered that the tunnel is gone - about two minutes have passed, but he still took the VPN to the reserve. Bingo!
All experiments were performed on Kerio Control 8.1 and RouterOS 6.1. The names of the variables and ROS settings in the terminal commands given here correspond to this version (6.1). To date, version 6.10 has several changed settings names, but with minimal tuning, everything works on current versions of Kerio Control 8.2 and RouterOS 6.10. All of the above may be a little less than the delirium of a crazy IT person, I do not pretend to the correct wording and definitions and I will accept comments and recommendations with pleasure, because Mikrotik is a new and mysterious animal for me, unlike Kerio Control, which is almost a read book.
Source: https://habr.com/ru/post/216215/
All Articles