How to create a product in the field of consumer electronics for a couple of weeks with a minimum budget
Not so long ago, I wrote a small post on Habré on how to organize automatic watering of indoor plants on Arduino. In the comments to the post, many expressed the opinion that it is implemented too simply, that there is no magic, as the wires stick out and everything looks unaesthetic. There were also very useful notes on the functionality of the device, related to the need to use a soil moisture sensor and others. In the end, I decided in a fairly short time to make a device that, both in appearance and filling, would be comparable to an industrial product. Perhaps this story will inspire someone to create their own products or help in terms of the dissemination of experience.

After publication, I decided that I could try to implement some of the ideas expressed in the comments. First of all, the notorious magic - in the form of a decent body. He told about the idea of the project to his friend. After some discussion, we came to the following requirements for the device:
')
Each of us has a lot of core business, so we could not spend much time on a side project, and came to the conclusion that you need to try to make a device by spending no more than a week on it. The result was longer, but it was with this concept that we began to work.
The control controller is based on the parts that were at hand. It was originally planned to use a microcontroller from the 16th MicroChip family and the DS1302 real-time clock as a basis. But from the "peaks" at hand were either controllers with a small number of outputs, or in large cases - DIP40, and the board wanted to be made compact, then a 32-bit ARM microcontroller STM32F100C8T6 came to hand. Of the real-time clock, there were only PCF8283. As an indicator for the controller, the following options were considered: symbolic displays from WinStar, a graphic display with a resolution of 128x64 on the ST7565R controller, and another possibility of using the display from a cell phone. Character displays disappeared immediately, because they would have looked very cumbersome in the construction of a muller, among the remaining graphic display options, the display on the ST7565R controller was inferior to the display from the nokia1100 due to the simpler installation and layout of the latter

So, now you need to make a pleasant appearance of the device. To do this, I contact a familiar industrial designer with a request to help us with the form. After a couple of hours, he sends some pictures:

Looks beautiful. Functional details, of course, can be discussed, but we do not do this, since our task is to meet several days, and sometimes the design can be discussed for weeks. A couple of nights to think through the design decisions and the choice of materials that we will use and in front of us a small stack of drawings and the need to make 10 types of parts.

We start with the metal. To do this, we go to one of the hackspots of Yekaterinburg, in which there are metalworking machines and the opportunity to work with them for a small monthly fee. From metal we need to make, firstly, a ring-body to get a saucepan like on a design, secondly, to carve a fitting that will connect the hoses, and several racks with internal threads on which the panel with electronics will be installed.
The most difficult thing is to make an aluminum ring - a body: first we cut down a strip of aluminum sheet on the guillotine of the right size and drill holes on it in the right places. Then we roll on the rollers and get a ring that needs to be carefully cooked. Especially for this, we master welding with argon. (although they killed half a day to view welding manuals on youtube on welding and a trip for argon to the other end of the city). After a few workouts, we get a less suitable seam.
We considered two ways to make a metal surface attractive:
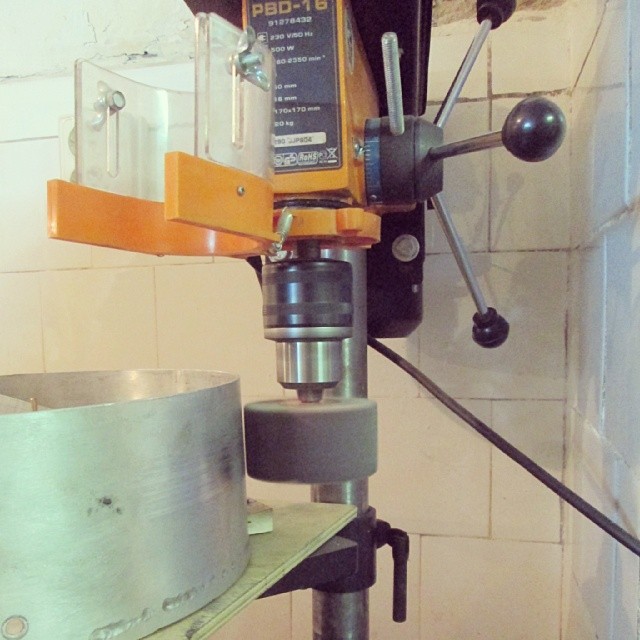
We stop on grinding, as in our opinion this is a simpler way. When grinding it is extremely important that the direction of movement of the grinding surface on the part is always constant, otherwise grinding will not be accurate. Therefore, we make a small tooling for a drilling machine, in the spindle of which we clamp a petal grinding wheel.
So, with the metal finished. We turn to plastic parts, of which we have three: two covers that cover our case at the top and bottom, and an electronics panel with openings under the buttons and a window for the display.
We cut the covers on the laser - for this we have to get out of the hackspace, since there is no laser machine here and contact the profile company. Here is how the cutting process takes place according to our drawings:
Panel for electronics made of thick plexiglass. Since there are blind holes in the layout, the laser does not fit - we cut on a milling machine

It remains to make the top wooden cover, which will be put a pot with a plant. Here it is important to choose the right sort of tree - firstly, it is necessary that the tree has a beautiful pattern on the cut, and secondly, it is important that the tree does not lead in the process of use. Therefore, we buy beech furniture board - you can buy it in any specialized shop. And cut the workpiece on a milling machine
Since the workpiece was 20 mm high, and the lid height according to the drawings is less than 10, we have to first cut down more than half the height of our shield. Seeing how the material is being translated, the rest of the hackspeys indignant and frighten me by Lavrentiy Pavlovich Beria. But the deadlines set by us for the project are burning and there is no time to look for a sheet of the desired height, so we do milling and proceed to the next stage - assembly.
The CNC pays for itself and there were no special problems on the assembly — I had to work a little with the file nonetheless.

The first tests show that, in general, everything works as it should. Here is how the polivalk looks like in work:
In the future, I plan to add management of autowatering settings via the web interface.
I hope that this article will inspire someone to incarnate in the good iron of their ideas and ideas.
After publication, I decided that I could try to implement some of the ideas expressed in the comments. First of all, the notorious magic - in the form of a decent body. He told about the idea of the project to his friend. After some discussion, we came to the following requirements for the device:
- The device should be implemented as a stand for a pot with a houseplant and contain at least two liters of water
- On the control panel, you must install the display in order to control the irrigation settings
- It is necessary to control the water level in the tank so that the device can remind us of the need to add water in time.
- It is also important to lay further extensibility for communication with the Internet in order to be able to manage the device through a web form or mobile application.
')
Each of us has a lot of core business, so we could not spend much time on a side project, and came to the conclusion that you need to try to make a device by spending no more than a week on it. The result was longer, but it was with this concept that we began to work.
The control controller is based on the parts that were at hand. It was originally planned to use a microcontroller from the 16th MicroChip family and the DS1302 real-time clock as a basis. But from the "peaks" at hand were either controllers with a small number of outputs, or in large cases - DIP40, and the board wanted to be made compact, then a 32-bit ARM microcontroller STM32F100C8T6 came to hand. Of the real-time clock, there were only PCF8283. As an indicator for the controller, the following options were considered: symbolic displays from WinStar, a graphic display with a resolution of 128x64 on the ST7565R controller, and another possibility of using the display from a cell phone. Character displays disappeared immediately, because they would have looked very cumbersome in the construction of a muller, among the remaining graphic display options, the display on the ST7565R controller was inferior to the display from the nokia1100 due to the simpler installation and layout of the latter
So, now you need to make a pleasant appearance of the device. To do this, I contact a familiar industrial designer with a request to help us with the form. After a couple of hours, he sends some pictures:
Looks beautiful. Functional details, of course, can be discussed, but we do not do this, since our task is to meet several days, and sometimes the design can be discussed for weeks. A couple of nights to think through the design decisions and the choice of materials that we will use and in front of us a small stack of drawings and the need to make 10 types of parts.
We start with the metal. To do this, we go to one of the hackspots of Yekaterinburg, in which there are metalworking machines and the opportunity to work with them for a small monthly fee. From metal we need to make, firstly, a ring-body to get a saucepan like on a design, secondly, to carve a fitting that will connect the hoses, and several racks with internal threads on which the panel with electronics will be installed.
The most difficult thing is to make an aluminum ring - a body: first we cut down a strip of aluminum sheet on the guillotine of the right size and drill holes on it in the right places. Then we roll on the rollers and get a ring that needs to be carefully cooked. Especially for this, we master welding with argon. (although they killed half a day to view welding manuals on youtube on welding and a trip for argon to the other end of the city). After a few workouts, we get a less suitable seam.
We considered two ways to make a metal surface attractive:
- anodizing
- fine grinding
We stop on grinding, as in our opinion this is a simpler way. When grinding it is extremely important that the direction of movement of the grinding surface on the part is always constant, otherwise grinding will not be accurate. Therefore, we make a small tooling for a drilling machine, in the spindle of which we clamp a petal grinding wheel.
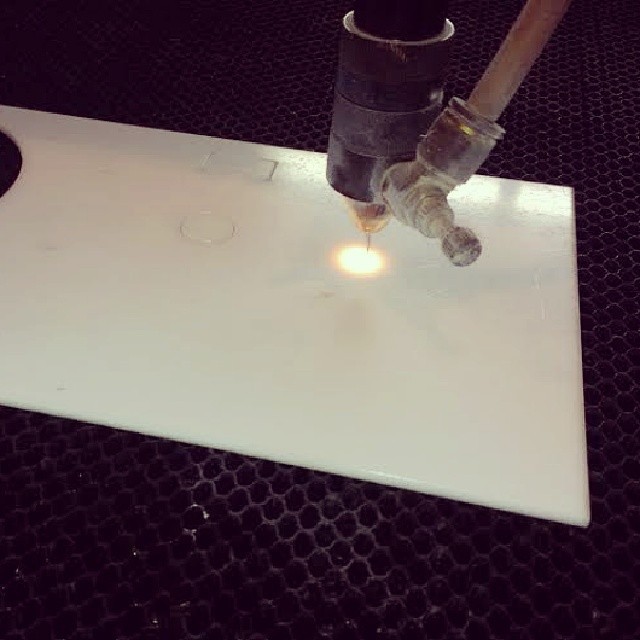
So, with the metal finished. We turn to plastic parts, of which we have three: two covers that cover our case at the top and bottom, and an electronics panel with openings under the buttons and a window for the display.
We cut the covers on the laser - for this we have to get out of the hackspace, since there is no laser machine here and contact the profile company. Here is how the cutting process takes place according to our drawings:
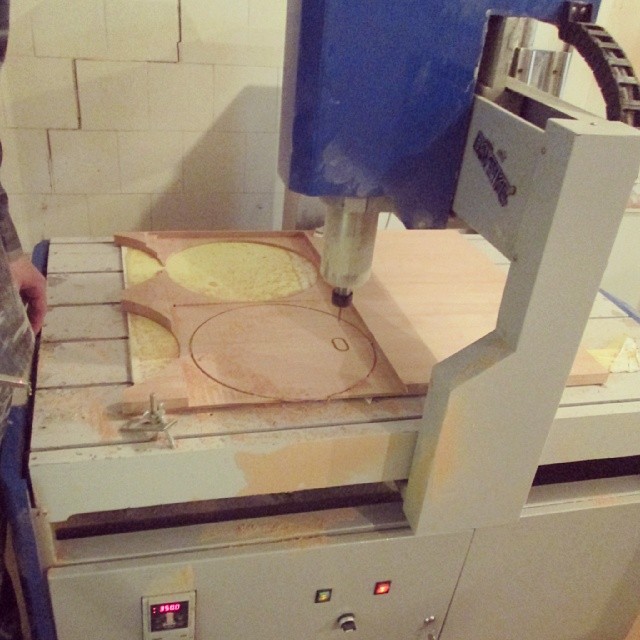
Panel for electronics made of thick plexiglass. Since there are blind holes in the layout, the laser does not fit - we cut on a milling machine
It remains to make the top wooden cover, which will be put a pot with a plant. Here it is important to choose the right sort of tree - firstly, it is necessary that the tree has a beautiful pattern on the cut, and secondly, it is important that the tree does not lead in the process of use. Therefore, we buy beech furniture board - you can buy it in any specialized shop. And cut the workpiece on a milling machine
Since the workpiece was 20 mm high, and the lid height according to the drawings is less than 10, we have to first cut down more than half the height of our shield. Seeing how the material is being translated, the rest of the hackspeys indignant and frighten me by Lavrentiy Pavlovich Beria. But the deadlines set by us for the project are burning and there is no time to look for a sheet of the desired height, so we do milling and proceed to the next stage - assembly.
The CNC pays for itself and there were no special problems on the assembly — I had to work a little with the file nonetheless.
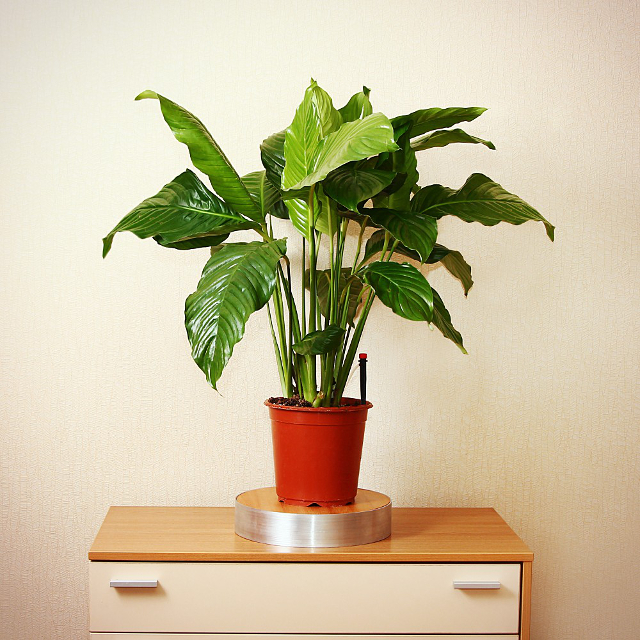
The first tests show that, in general, everything works as it should. Here is how the polivalk looks like in work:
In the future, I plan to add management of autowatering settings via the web interface.
I hope that this article will inspire someone to incarnate in the good iron of their ideas and ideas.
Source: https://habr.com/ru/post/216109/
All Articles