Transcend WiFi. We write client Shoot & View for Windows, Mac and Linux
 On Habré, they repeatedly mentioned the SDHC memory card with an integrated WiFi transmitter. Having bought this card, I was disappointed with the terrible software that comes bundled with the card. If an application for iOS and Android can be used at least as it is, then the lack of a client under windows and macos prevents the card from being used by professionals. More precisely, the PC has a web interface, but apart from the terrible appearance, I was disappointed by the lack of the Shoot & View function in demand by photographers, which allows you to see the result of shooting on the big computer screen almost instantly.
Fans of geek-porno will most likely be disappointed - we will not modify the firmware, hack it, open the memory card itself. We will work with the "stock" memory card, without any modifications.
So, in this article, we will analyze the Transcend WiFi card's Shoot & View protocol and write a cross-platform client on python that will run on windows, linux and MacOS. And for the most impatient, at the end of the article you will find a ready python module for your projects, a console client, as well as a GUI utility that runs on windows, linux and macos.
')
Search memory card online.
A memory card can operate in two modes - the access point mode, when the card creates its own access point, and the connection mode to the access point, when the card “clings” to the access points previously set in its settings. For our experiments, it is better to enable the connection mode to the access point, having previously configured the connection from the application to android or ios. Just do not forget to configure “Turn Off WiFi” by setting Never. This option is responsible for disabling WiFi, if no one has connected to the map. In the first stage, I advise you to connect the card to the card reader, or set up the camera so that it does not turn off when idle.
Perhaps we begin to program. For the console client, we will not need any additional modules, only “batteries included”. And we begin with:
import socket class SDCard: def __init__(self,home_dir=''): self.home_dir=home_dir # ip , self.ip=socket.gethostbyname(socket.gethostname()) # ip self.card_ip=None if __name__=='__main__': # HOME_DIR=os.path.expanduser('~') if not os.path.exists(HOME_DIR+'/'+'ShootAndView'): os.mkdir(HOME_DIR+'/'+'ShootAndView') HOME_DIR=HOME_DIR+'/ShootAndView/' sd=SDCard(home_dir=HOME_DIR) If the card is connected to an access point, its ip-address can be viewed, for example, in the router's web interface, and if we have a direct connection to the card, then its ip-address is 192.168.11.254 (in accordance with the default settings).
But I don’t want to search for it manually, especially as the map creators provided for searching it on the network, as it was done in a mobile application. For this we need:
- Create a socket on port 58255
- Send an empty broadcast request to port 55777
- Expect a
miraclecard response
If we are lucky, we will receive the following text in response:
Transcend WiFiSD - interface=mlan0 ip=192.168.0.16 netmask=255.255.255.0 router=192.168.0.1 mode=client essid=WiFiSDCard apmac=CE:5D:4E:5B:70:48 From all this, we need only the ip address. Now it remains to program the whole thing:
import os import socket import thread import time class SDCard: def __init__(self,home_dir=''): self.home_dir=home_dir self.ip=socket.gethostbyname(socket.gethostname()) self.card_ip=None def find_card(self,callback=None): """ """ thread.start_new_thread(self.find_card_thread,(callback,)) def find_card_thread(self,callback=None): while not self.card_ip: """ UDP """ s = socket.socket(socket.AF_INET, socket.SOCK_DGRAM) s.settimeout(5) s.setsockopt(socket.SOL_SOCKET, socket.SO_REUSEADDR, 1) s.setsockopt(socket.SOL_SOCKET, socket.SO_BROADCAST, 1) """ """ try:s.bind((self.ip, 58255)) except socket.error: s.close() time.sleep(1) continue """ 55777""" s.sendto('', ('<broadcast>', 55777)) try: resp=s.recv(400) s.close() try: """ """ self.card_ip=resp.split('ip=')[1].split('\n')[0] except IndexError: """ """ if callback:callback(None) """ ip""" if callback:callback(self.card_ip) except socket.timeout: callback(self.card_ip) finally: time.sleep(2) def monitor(ip): if not ip:return print 'Find card on ip:',ip if __name__=='__main__': HOME_DIR=os.path.expanduser('~') if not os.path.exists(HOME_DIR+'/'+'ShootAndView'): os.mkdir(HOME_DIR+'/'+'ShootAndView') HOME_DIR=HOME_DIR+'/ShootAndView/' if options.dir:HOME_DIR=options.dir sd=SDCard(home_dir=HOME_DIR) # "", # GUI sd.find_card(callback=monitor) # , # while 1: time.sleep(1) In fact, the hard part is over. It remains only to find out how we can receive information about the “arrival” of new photos and download them.
Getting new photos.
With the receipt of photos, everything is very simple. After we have found the card, it is enough to join the card on port 5566.
Now, as soon as the camera makes a new frame, after 7-8 seconds, information about new files that appeared on the card will come to us through an open socket, it looks like this:
>/mnt/DCIM/101CANON/IMG_1754.JPG
If you took several photos, in one message these lines are separated by zero byte (0x00)
I want to emphasize - in just 7-8 seconds. Why this is done is not entirely clear, but we cannot influence this. Also, only information about new images in jpeg format comes, and the map software has the ability to pull out the jpg stitched preview from the RAW file (more on this below), but programmers chose to prevent us from shooting in jpg, forcing to shoot in RAW + jpg, or write RAW on one card, and jpg on another. Also, I could not copy photos from the card reader, Shoot & View responds only to new pictures taken by the camera.
Program the whole thing easy. I’ll probably begin to show code snippets, and you can find the full code at the end of the article:
def listener_thread(self,callback): sock=socket.socket(socket.AF_INET, socket.SOCK_STREAM) # sock.connect((self.card_ip, 5566)) while self.listen_flag: message=sock.recv(1024) # ( ) new_files=message.split('\00') for x in new_files: if x: # self.all_files.append(x[1:]) # x[1:] - ">", # self.download_list.put(self.all_files[-1]) if callback:callback(self.all_files[-1]) Download photos from a memory card
Now we have a list of new files, the very last step remains - uploading photos to your computer. By itself, the download is implemented through the built-in web server card. Surprisingly, but the fact is that everything we did before, as well as downloading photos and some actions, such as getting a list of files, getting previews, etc., DO NOT DEMAND AUTHORIZATION at all. That is, if the card is configured as an access point, and the user has not changed the WiFi password, you can safely connect to it and download everything there. It will be necessary as a walk in the summer at tourist places and look for a WiFi network among tourists with cameras.
If you look into the cgi-bin folder, we will find a lot of interesting things that may be needed in other projects. It is easy to look into it, just pick it up on a telnet card, according to simple instructions . And inside of us:
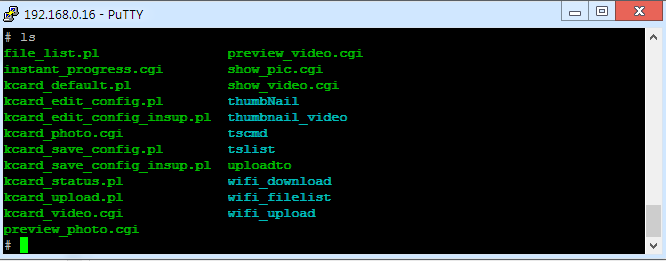
For example, the wifi_filelist binary will give us a list of files in a directory (in XML format), just refer to it like this: CARD_IP / cgi-bin / wifi_filelist? Fn = DIR , where CARD_IP is the ip address of the memory card we already found, and DIR - directory (for example, / mnt / DCIM). Binary thumbNail will give us a thumbnail of the photo, just feed him the same way to the file. And on the server side the resource-intensive photo resizing is not done, but the thumbnail sewn in jpg or raw is pulled out.
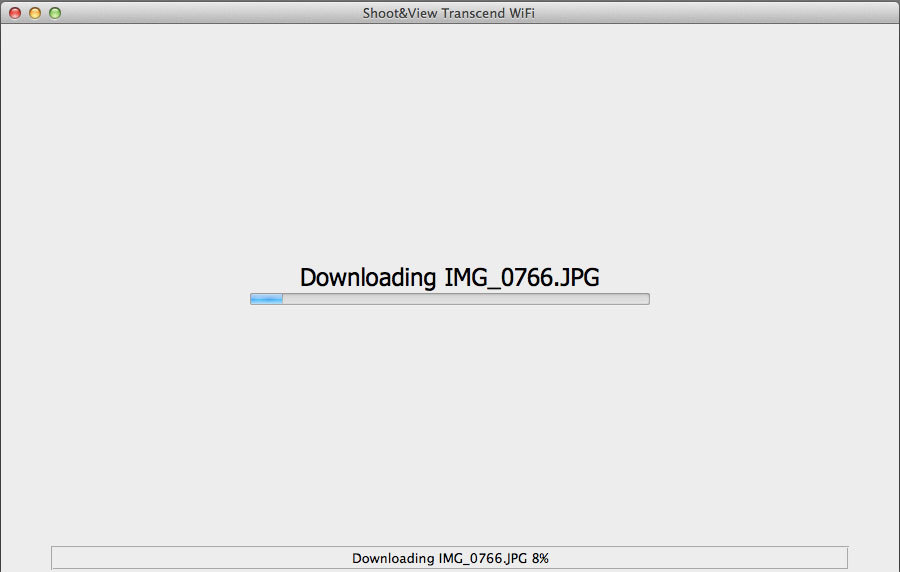
But we are interested in downloading photos. Getting the photo you want is done with a simple GET request to the address CARD_IP / cgi-bin / wifi_download? Fn = IMAGE_PATH , where IMAGE_PATH is the path to the photos that comes to us on the socket that we created above. For loading in python, the urlretrieve function of the urllib library is suitable in this case. It allows you to immediately save the result of the request to a file, and most importantly - to get the download progress, which is then useful in the GUI.
The download function looks like this:
def download_thread(self,download_callback,download_complete): while self.listen_flag: # if not self.download_list.empty(): # fl=self.download_list.get(block=0) # urllib.urlretrieve('http://%s/cgi-bin/wifi_download?fn=%s'%(self.card_ip,fl),self.home_dir+fl.split('/')[-1],download_callback if download_callback else None) if download_complete:download_complete(self.download_now) time.sleep(0.1) Now we put everything together, creating a ready-made module, at the same time getting a console client that will work on windows, linux and macos.
sdwificard.py
#coding:utf-8 """ Copyright (C) 2010 Igor zalomskij <igor.kaist@gmail.com> This program is free software; you can redistribute it and/or modify it under the terms of the GNU General Public License as published by the Free Software Foundation; either version 2 of the License, or (at your option) any later version. This program is distributed in the hope that it will be useful, but WITHOUT ANY WARRANTY; without even the implied warranty of MERCHANTABILITY or FITNESS FOR A PARTICULAR PURPOSE. See the GNU General Public License for more details. You should have received a copy of the GNU General Public License along with this program; if not, write to the Free Software Foundation, Inc., 51 Franklin Street, Fifth Floor, Boston, MA 02110-1301 USA. """ import os import socket import thread import time import ping import Queue import urllib import sys class SDCard: def __init__(self,home_dir=''): self.home_dir=home_dir # ip self.ip=socket.gethostbyname(socket.gethostname()) self.card_ip=None # ip self.all_files=[] # self.download_list=Queue.Queue() # self.in_queue=[] # , GUI def find_card(self,callback=None): # thread.start_new_thread(self.find_card_thread,(callback,)) def find_card_thread(self,callback=None): """ """ while not self.card_ip: # UDP s = socket.socket(socket.AF_INET, socket.SOCK_DGRAM) s.settimeout(5) s.setsockopt(socket.SOL_SOCKET, socket.SO_REUSEADDR, 1) s.setsockopt(socket.SOL_SOCKET, socket.SO_BROADCAST, 1) try:s.bind((self.ip, 58255)) # except socket.error: s.close() time.sleep(1) continue # 55777 s.sendto('', ('<broadcast>', 55777)) try: resp=s.recv(400) s.close() try: # self.card_ip=resp.split('ip=')[1].split('\n')[0] except IndexError: # if callback:callback(None) if callback:callback(self.card_ip) except socket.timeout: callback(None) finally: time.sleep(2) def start_listen(self,callback=None,download_callback=None,download_complete=None): """ . """ self.listen_flag=True # , thread.start_new_thread(self.listener_thread,(callback,)) # , . thread.start_new_thread(self.ping_card,()) # thread.start_new_thread(self.download_thread,(download_callback,download_complete)) def ping_card(self): # 20 . while self.listen_flag: try: resp=ping.do_one(self.card_ip) except socket.error: # , pass time.sleep(20) def listener_thread(self,callback): # sock=socket.socket(socket.AF_INET, socket.SOCK_STREAM) # 5566 sock.connect((self.card_ip, 5566)) while self.listen_flag: message=sock.recv(1024) new_files=message.split('\00') # ( ) for x in new_files: if x: # ;) self.all_files.append(x[1:]) # x[1:] ">", self.download_list.put(self.all_files[-1]) # self.in_queue.append(self.all_files[-1]) # , GUI if callback:callback(self.all_files[-1]) def download_thread(self,download_callback,download_complete): # while self.listen_flag: if not self.download_list.empty(): # fl=self.download_list.get(block=0) self.download_now=fl # , GUI # urllib.urlretrieve('http://%s/cgi-bin/wifi_download?fn=%s'%(self.card_ip,fl),self.home_dir+fl.split('/')[-1],download_callback if download_callback else None) if download_complete:download_complete(self.download_now) time.sleep(0.1) def find_callback(ip): if not ip:return print 'Find card on ip:',ip # IP , sd.start_listen(download_complete=download_complete) def download_complete(fname): print 'New image: %s'%(HOME_DIR+fname.split('/')[-1]) if __name__=='__main__': """ , . , ip """ from optparse import OptionParser parser = OptionParser() parser.add_option("-d", "--dir", dest="dir",default=None,help="directory for storing images") parser.add_option("-i", "--ip", dest="ip",default=None,help="ip address of the computer (default %s)"%(socket.gethostbyname(socket.gethostname()))) (options, args) = parser.parse_args() # . HOME_DIR=os.path.expanduser('~') if not os.path.exists(HOME_DIR+'/'+'ShootAndView'): os.mkdir(HOME_DIR+'/'+'ShootAndView') HOME_DIR=HOME_DIR+'/ShootAndView/' if options.dir:HOME_DIR=options.dir sd=SDCard(home_dir=HOME_DIR) if options.ip:sd.ip=options.ip print 'Finding sd card...' # sd.find_card(callback=find_callback) while 1: time.sleep(1) I ask you not to scold me for possible deviations from pep-8, now I practice programming quite rarely, and I like to repeat to myself: “I’m not reading pep-8 in my sawdust head, I didn’t read pep-8, yes-yes ".
All source code you can get at github.com/kaist/shoot-and-view
I forgot to mention that while working with a memory card, it is desirable to ping it from time to time. In the script, I did not look for ways to do ping on different platforms, especially since the console ping utility on some platforms requires administrator privileges. I just used the ping implementation on pure python. This module must be placed next to the script.
GUI
For the GUI, I used the simplest tool in python, this is Tkinter. It is available “out of the box” in windows and MacOS, and also takes up little space if you build a standalone application. Perhaps I will not describe the process of writing a GUI, I will confine myself to a small instruction:
- Import Tkinter
from Tkinter import * - Write GUI

The console application does not require additional libraries, but the GUI version wants different buns, such as reading exif, working with images, etc. If you want to run it from source (sorry, I only prepared this option on Linux), then you will need:
sudo apt-get install python-tk python-imagetk python-imaging libimage-exiftool-perlAnd also, manually install the binding to exiftool (
sudo python setup.py install )In windows, besides python 2.7 and binding to exiftool, PIL and exiftool are required .
Just installing exiftool and binding to it is required on MacOS, see links above.
The application is built using py2exe on windows and py2app on MacOS, you can also find scripts among the sources.
Total
As promised, ready-made builds for Windows and MacOS are available for the laziest. You can take them on this page .
Some of the possibilities:
- Shooting history - the ability of the left-right keys to view the previous or next captured photo.
- Zoom - when you press the "problems" key, the photo is zoomed to 100%
- Automatic memory card search
- And of course, everything is free for commercial and non-commercial use. Sources are available under the GPL v2 license
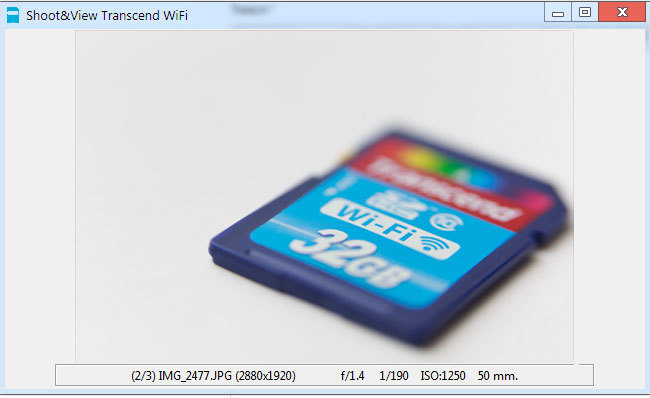
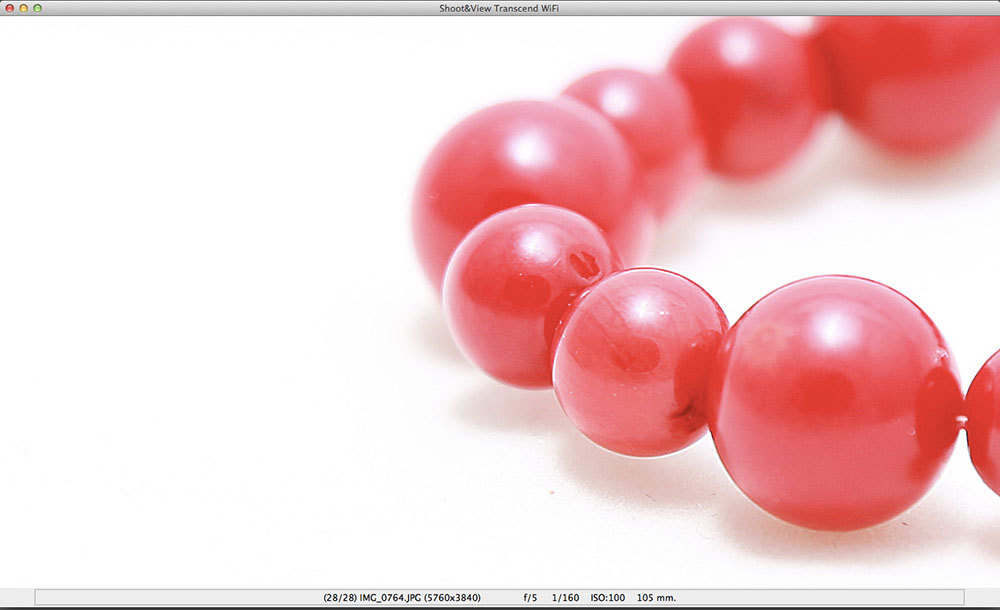
And finally, a couple of screenshots:

PS I was building an application for MacOS for the first time, please test whether it works, especially not on the python developers' machine)
This article is distributed under the Creative Commons Attribution 3.0 Unported License (CC BY 3.0)
Source: https://habr.com/ru/post/216039/
All Articles