Writing documentation for Ruby on Rails projects using YARD
 Good day, habrazhiteli! Found that the site has no article on how to organize the process of creating documentation for Ruby on Rails projects. Fix this problem.
The article will explain how to use the YARD gem to write competent documentation for rail projects and automatically generate a document where this documentation will be presented in a presentational form. An example of the documentation can be found in the site code ValiIzRashki .
For a start - a little theory. To some, this may seem like captaincy, but my goal now is to convince those who do not write code documentation that this is very useful and not at all difficult. The documentation, as a rule, is understood as comments to the code or a separate document where the site code is described.
Theory: why write documentation?
Answering is simple: so that the code is clearer. Your colleague will not need to distract you and ask a thousand questions, and you will not have to wrestle with your head, remembering the intricacies of your own code. In clear code, it is easier to find and destroy the bug. It will also be easier for you yourself to add a new feature to the code that the customer or designer just invented.
')
But the best comment is one you don’t need to write?
Indeed, it is necessary to write such clear code so that the amount of comments necessary for understanding it is minimal. This is achieved by using variables with clear names, predictable and modular code structure, and so on. I myself have tried to write code without resorting to comments. But I soon realized that it would be more profitable to spend two seconds reading a code comment than spending 5-10 reading and understanding even the most understandable code. Like it or not, in normal language it is possible to transfer the essence of the code much easier and more efficiently.
But writing documentation is very long!
Nothing like this. According to the method described here, on writing the documentation for the code that you just wrote, you will spend, on average, a minute. This minute will more than pay off as soon as you return to the code next time.
If you want more arguments in the plus documentation, you can read other articles by smart people on this topic, for example, view this presentation. And we proceed to practice.
Practice: structured YARD comments
First, in my Ruby on Rails projects, I wrote comments without a specific structure. Before each method he briefly wrote what was happening there. Then I realized that it would be convenient to describe, for example, the parameters that this method takes; as well as what it returns. The question arose, why not stick to a single comment template everywhere?

Found YARD heme. Its essence is that you write comments to your code using a certain simple syntax, something remotely resembling xml / html. Then you run a command that will create html files, where your code and documentation for it will be written in a convenient format. The analogue is the RDOC gem, but its syntax seemed more complicated.
Set the heme
$ gem install yard either add to gemfile
gem 'yard' and run bundle install.
Take the approximate method from the site valiizrashki.ru
def try_to_evacuate(country_id) country = Country.find(country_id) if country.allows_immigrants? evacuate! true else false end end The method determines whether it is possible to immigrate to another country and is evacuated. So we will write down before the declaration of the method as a comment.
# , def try_to_evacuate(country_id) country = Country.find(country_id) ... The method is called when you click on the button "throw". We'll write this with the help of the YARD @note tag, which is responsible for various additional data. The syntax is:
@_ () If we want to fit several lines in one tag, we use tabulation
@_ Let's write information about the place of the call with the
@note tag in the same place before declaring the method: # , # @note "" def try_to_evacuate(country_id) ... We write that a parameter accepts a parameter using the
@param tag. The data type of this parameter is written in square brackets, followed by the parameter description. # @param country_id [Integer] id We write what exactly this method returns with the
@return tag. Here we write in square brackets the type of data that will be returned to us, followed by a description of the value. # @return [Boolean] For clarity, we will write an example of using this method. We do this with the
@example tag, in this case using tabulation. # @example # try_to_evacuate(2) Also leave a link to the country model documentation using the
@see tag so that you can quickly jump over there. # @see Country The result was:
# , # @param country_id [Integer] id # @note "" # @example # try_to_evacuate(2) # @return [Boolean] # @see Country def try_to_evacuate(country_id) country = Country.find(country_id) if country.allows_immigrants? evacuate! true else false end end There are other tags in the YARD documentation that you can learn from this link.
Documentation time!
To make everything incredibly mathematically, create a configuration file in a project called
.yardopts with the following contents: --private --protected -o doc/ruby After that, go to the terminal in the folder of your project and run the command there
$ yard Created folder doc / ruby. Let's open it in the explorer and open _index.html there. In the browser, go to our method and see this:
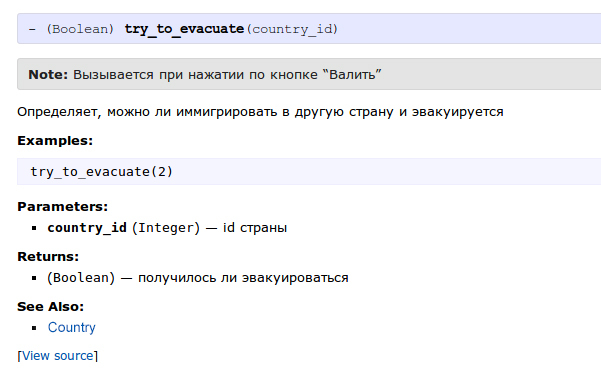
Looks good. And the reference to the model method works.
Why did we make the settings file? That each time it was possible to start generation documentation the simple
yard command. The first two lines in the file are responsible for adding private methods to the documentation, and the third - assigns the folder in which the documentation will appear.Bonus: documenting coffeescript

For coffeescript they made a tool with similar syntax and functionality called codo . I see no reason to limit myself to the Ruby code documentation and not to write it for scripts.
An example of a documented function that converts a number to radians:
# # @param x [Integer] # @return [Integer] rad:(x) -> x * Math.PI / 180 Create a
.codoopts file in the project root and write there: -o doc/coffee After that, when you run the command in the root of the project
$ codo We will create documentation for coffeescript in the doc / coffee folder.
Done, you are amazing!
Conclusion
In the end I want to note that even if you do not intend to use automatic documentation generation, I still advise you to start writing comments on the code in a structural form. It will make life easier for you and your colleagues!
Source: https://habr.com/ru/post/215879/
All Articles