Apply visual effects to images in Django
When writing your own instagram, it became necessary to apply filters to the image when apload. Initially, in order not to particularly stress the server, it was decided to bring the process of converting the image to the client side. The main idea is to load the image into the canvas, manipulate it and upload the stream of bytes (the resulting image) to the server. For implementation, the js-library CamanJS was chosen, which can work both in the browser and on the server side through NodeJS. However, I had to give it up for three reasons:
Then an attempt was made to use CamanJS on the server side. The result was again unsatisfactory:
As a result, we had to completely abandon CamanJS.
For image processing on the server side, the most optimal option turned out to be the ImageMagick software package, which has rather rich functionality and has many extensions for various programming languages. Since our project works on django, we were primarily interested in python extensions for ImageMagick - PythonMagick and Wanda. As it turned out, they do not support all the features of ImageMagick, some of the graphic effects are simply missing, so we used the direct call to imagemagick through the subprocess.
The effects are applied through special bash scripts that were obtained using very useful resources http://www.fmwconcepts.com/imagemagick - here are the scripts themselves with a description, http://jqmagick.imagemagick.org - and here you can experiment With different effects and pick up options.
')
First, go to http://jqmagick.imagemagick.org , upload the picture, select the desired effect, select the parameters for it. If everything is beautiful and everything suits us, copy the sample command to run the script with the necessary parameters from the bottom field of the “options” section (by default, the bottom right of the jqmagick interface). For example:
The script we are interested in is called vintage1.sh. Moving to http://www.fmwconcepts.com/imagemagick , we find the necessary script, download it and do not forget to set the checkbox "for execution". And in this way we select all the effects we need.
Now everything is ready for software implementation.
So, the task:
To enable users (in our case, these are sellers on the e-commerce platform selling unique products) to upload images to the server, apply effects to them from a pre-arranged set with the ability to display the result.
To upload the image to the server, we used the js library filereader.js . The usage and sample configuration can be found in the specification for this library. We directly sent the file to the server using the send () method of the XMLHttpRequest object after the file has been completely uploaded to the browser's FileReader object. To do this, define the option "load":
We don’t accept the image to be uploaded to the server, create a copy of it for previews and return the name of the original image and the name of the preview to it to the client in order to fill in the src attribute of the preview element.
TEMP_IMG_DIR itself in setting.py is defined as:
The main idea here is that the effects will be applied not to the original image, but to its preview, and only after the final click on the “Save” button the selected effect is applied to the image itself.
The function of applying the effect on the client side:
On the server side, we define the commands for applying effects and match them with the names of the filters, here it is convenient to use a dictionary:
The function of applying the effect on the server side:
The apply_filter function calls the set_filter handler, which takes 2 arguments: the path to the image and the name of the filter, and returns the path to the modified image.
After the user has decided on the desired effect, he presses the Save button, and the set_filter function is called, the previously saved path to the original image and the resulting effect are passed as an argument.
Finally, I will attach a screen of how it all looks at us:
- CamanJS is not supported by mobile browsers (Safari, Chrome in particular);
- CamanJS causes memory to flow in the browser (especially when working with large images);
- CamanJS greatly slows down in Firefox when applying filters.
Then an attempt was made to use CamanJS on the server side. The result was again unsatisfactory:
- After conversion, the image was increased 3-4 times;
- Image conversion did not happen very quickly.
As a result, we had to completely abandon CamanJS.
For image processing on the server side, the most optimal option turned out to be the ImageMagick software package, which has rather rich functionality and has many extensions for various programming languages. Since our project works on django, we were primarily interested in python extensions for ImageMagick - PythonMagick and Wanda. As it turned out, they do not support all the features of ImageMagick, some of the graphic effects are simply missing, so we used the direct call to imagemagick through the subprocess.
The effects are applied through special bash scripts that were obtained using very useful resources http://www.fmwconcepts.com/imagemagick - here are the scripts themselves with a description, http://jqmagick.imagemagick.org - and here you can experiment With different effects and pick up options.
')
First, go to http://jqmagick.imagemagick.org , upload the picture, select the desired effect, select the parameters for it. If everything is beautiful and everything suits us, copy the sample command to run the script with the necessary parameters from the bottom field of the “options” section (by default, the bottom right of the jqmagick interface). For example:
bash scripts/vintage1.sh -b 0 -c 35 -s roundrectangle -T torn -I grunge -C white output/8526-603.jpg output/3347-9458.jpg The script we are interested in is called vintage1.sh. Moving to http://www.fmwconcepts.com/imagemagick , we find the necessary script, download it and do not forget to set the checkbox "for execution". And in this way we select all the effects we need.
Now everything is ready for software implementation.
So, the task:
To enable users (in our case, these are sellers on the e-commerce platform selling unique products) to upload images to the server, apply effects to them from a pre-arranged set with the ability to display the result.
Upload image to server
To upload the image to the server, we used the js library filereader.js . The usage and sample configuration can be found in the specification for this library. We directly sent the file to the server using the send () method of the XMLHttpRequest object after the file has been completely uploaded to the browser's FileReader object. To do this, define the option "load":
var opts = { // … load: function(e, file) { var xhr = new XMLHttpRequest(); xhr.open('POST', '{% url upload_file %}', true); xhr.onload = function() { if (this.status == 200) { // var resp = JSON.parse(this.response); // ( ) filter_image = resp['image']; filter_thumb = resp['thumb']; } }; xhr.send(file); }, //… }; We don’t accept the image to be uploaded to the server, create a copy of it for previews and return the name of the original image and the name of the preview to it to the client in order to fill in the src attribute of the preview element.
import os import datetime from PIL import Image try: from cStringIO import StringIO except ImportError: from StringIO import StringIO import simplejson as json from django.http import HttpResponse from django.conf import settings def upload_file(request): max_size = (2560, 2048) # thumb_size = (325, 325) # f_data = request.body fake_file = StringIO() fake_file.write(f_data) fake_file.seek(0) img = Image.open(fake_file) img.thumbnail(max_size, Image.ANTIALIAS) # tmp_dir = settings.TEMP_IMG_DIR # if not os.path.exists(tmp_dir): os.makedirs(tmp_dir) # inner_dir_name = datetime.datetime.now().strftime('%d.%m.%Y') inner_dir = os.path.abspath(os.path.join(tmp_dir, inner_dir_name)) if not os.path.exists(inner_dir): os.makedirs(inner_dir) tmp_file_name = generate_tmp_file_name() # thumb_tmp_file_name = 'thumb_' + tmp_file_name # output = os.path.abspath(os.path.join(inner_dir, tmp_file_name)) output_thumb = os.path.abspath(os.path.join(inner_dir, thumb_tmp_file_name)) if not img.mode == 'RGB': img = img.convert('RGB') img.save(output, "JPEG") # jpeg img.thumbnail(thumb_size, Image.ANTIALIAS) img.save(output_thumb, "JPEG") # to_response = json.dumps({ 'image': ''.join([settings.MEDIA_URL, '/'.join([settings.TEMP_IMG_DIR_NAME, innder_dir_name, tmp_file_name])]), 'thumb': ''.join([settings.MEDIA_URL, '/'.join([settings.TEMP_IMG_DIR_NAME, innder_dir_name, thumb_tmp_file_name])]), }) return HttpResponse(to_response, mimetype="application/json") TEMP_IMG_DIR itself in setting.py is defined as:
# TEMP_IMG_DIR = os.path.abspath(os.path.join(MEDIA_ROOT, 'temp_img')) Applying effects to an image
The main idea here is that the effects will be applied not to the original image, but to its preview, and only after the final click on the “Save” button the selected effect is applied to the image itself.
The function of applying the effect on the client side:
function setFilter(filter_name) { result_filter = filter_name $.ajax({ url: '{% url set_filter %}', method: 'POST', data: { 'img_path': filter_thumb, // 'filter_name': filter_name // }, success: function(response) { $('#result_img').attr('src', response); // } }) } On the server side, we define the commands for applying effects and match them with the names of the filters, here it is convenient to use a dictionary:
FILTERS_COMMAND = { 'f1': "bash_scripts/colortemp.sh -t 10950 {file_name} {output}", 'f2': "bash_scripts/colortemp.sh -t 5736 {file_name} {output}", # … 'f8': "bash_scripts/colorfilter.sh -c sepia -m 1 -d 28 {file_name} {output}", 'f9': "bash_scripts/colorfilter.sh -c underwater -m 1 -d 20 {file_name} {output}" } The function of applying the effect on the server side:
import os import sys import subprocess def apply_filter(img_path, filter_name, output=None): if output is None: output_file_name = ''.join([filter_name, '_', os.path.basename(img_path)]) output_file = os.path.abspath(os.path.join(img_path.replace(os.path.basename(img_path), ''), output_file_name)) if os.path.exists(output_file): return output_file else: output_file = output command = FILTERS_COMMAND[filter_name] # bash, , : command = command.replace('(', '\(').replace(')', '\)') command = command.format(file_name=img_path, output=output_file) subprocess.check_output(command, shell=True, stderr=subprocess.STDOUT) return output_file The apply_filter function calls the set_filter handler, which takes 2 arguments: the path to the image and the name of the filter, and returns the path to the modified image.
After the user has decided on the desired effect, he presses the Save button, and the set_filter function is called, the previously saved path to the original image and the resulting effect are passed as an argument.
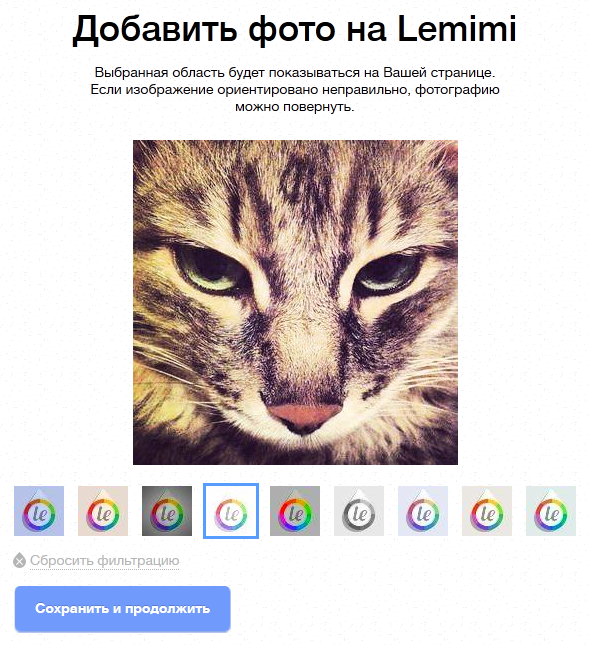
Finally, I will attach a screen of how it all looks at us:
Source: https://habr.com/ru/post/215811/
All Articles