Clever image cropping using point of focus
Recently, I was faced with the task of cutting off about a hundred huge images from a photo bank for several dozen different sizes. These ready-made pictures will then be used by CMS clients to design their sites. Having estimated how long this process will take in Photoshop, I became sad - to meet the next New Year for cropping images is not included in my plans.
The brain of a programmer cannot exist without programming. Any task that requires repetition of routine operations more than 3 times, immediately begins to give birth in my head the questions "How to automate it?" And make sketches of algorithms. It happened this time.
Having a little bit “brained” with brains, I came to the conclusion that it is necessary to introduce the concept of a focal point and take it into account when pruning. If the proportions of the new image are close to the original ones, for example, we cut out a rectangle from a square with a 3: 4 aspect ratio, then everything is great - the new image will not even lose in the composition. If the size of the new image differs dramatically, for example, it is a narrow strip for the slider, then at least we will keep the most significant information. Do not forget, we are still talking about automatic pruning.
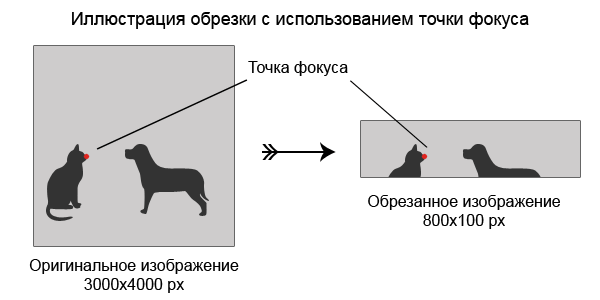
Here is an illustration to demonstrate the mechanism.
')
So, the focal point is the point in the center of the area containing the most important part of the image, and which, when cropped, should remain in any case. For an ordinary photo, the lens will be focused in this area when shooting; this is especially obvious if the shooting was done with a shallow depth of field. Hence, in fact, the name for the concept.
I decided to check my conclusions and didn’t anyone search for something like this. Found HTML / CSS library for adaptive image cropping github.com/adamdbradley/focal-point . Here, too, the concept of "point of focus" is used, so my idea is correct! But I needed a ready-made utility that could generate physical images. This could not be found.
Then I took on Node.js, which, although not my permanent work tool, but which I really like to use for automation and small utilities.
The algorithm for cropping a new image is as follows:
For image processing, I took the GraphicsMagick for node module, because it promised trouble-free work with graphic libraries under Windows. And almost did not lie. I didn’t manage to start ImageMagick with it (and the older imagemagick-node module worked without problems), but the alternative in the form of GraphicsMagick was launched immediately and without shamanism. Theoretically, ImageMagick should earn on another platform, there is no hard link to the library in the gm module.
In the final utility, I added a bit of optimization for the web: the whole EXIF, ICM, etc. is cut out of the final image. The information and the resulting small image are driven by the sharpness filter. When reducing from 3000x4000px to 200x300px, this is really necessary.
For convenience, the source data is received in the form of 2 files:
Detailed information about file formats, installation and additional features can be found in the repository on GitHub github.com/fetis/fcrop . There you can find a demo for examples.
And finally, an example of the utility
Link to the original image 5.4 MB

200x135

500x180

900x172
Idea
The brain of a programmer cannot exist without programming. Any task that requires repetition of routine operations more than 3 times, immediately begins to give birth in my head the questions "How to automate it?" And make sketches of algorithms. It happened this time.
Having a little bit “brained” with brains, I came to the conclusion that it is necessary to introduce the concept of a focal point and take it into account when pruning. If the proportions of the new image are close to the original ones, for example, we cut out a rectangle from a square with a 3: 4 aspect ratio, then everything is great - the new image will not even lose in the composition. If the size of the new image differs dramatically, for example, it is a narrow strip for the slider, then at least we will keep the most significant information. Do not forget, we are still talking about automatic pruning.
Here is an illustration to demonstrate the mechanism.
')
So, the focal point is the point in the center of the area containing the most important part of the image, and which, when cropped, should remain in any case. For an ordinary photo, the lens will be focused in this area when shooting; this is especially obvious if the shooting was done with a shallow depth of field. Hence, in fact, the name for the concept.
I decided to check my conclusions and didn’t anyone search for something like this. Found HTML / CSS library for adaptive image cropping github.com/adamdbradley/focal-point . Here, too, the concept of "point of focus" is used, so my idea is correct! But I needed a ready-made utility that could generate physical images. This could not be found.
Implementation
Then I took on Node.js, which, although not my permanent work tool, but which I really like to use for automation and small utilities.
The algorithm for cropping a new image is as follows:
- We calculate the proportions of the final image:
k=Wr/Hr,
where Wr and Hr are the width and height of the future image - Determine the maximum rectangle that will fit into the original image:
if Wr >= Hrthen Wm = Wi, Hm = Wi/kelse Hm = Hi, Wm = Hm*k,
where Wi, Hi are the dimensions of the original, and Wm, Hm are the dimensions of the maximum rectangle. - We calculate the new coordinates for the focal point:
fx2 = fx*Wm/Wi,fy2 = fy*Hm/Hi,
fx, fx - coordinates of the focal point on the original image - We do the actual trimming by shifting the rectangle by the difference between the old and new coordinates of the focal point:
crop(Wm, Hm, (fx-fx2), (fy-fy2)) - Reduce the result to the desired size:
resize(Wr, Hr)
For image processing, I took the GraphicsMagick for node module, because it promised trouble-free work with graphic libraries under Windows. And almost did not lie. I didn’t manage to start ImageMagick with it (and the older imagemagick-node module worked without problems), but the alternative in the form of GraphicsMagick was launched immediately and without shamanism. Theoretically, ImageMagick should earn on another platform, there is no hard link to the library in the gm module.
In the final utility, I added a bit of optimization for the web: the whole EXIF, ICM, etc. is cut out of the final image. The information and the resulting small image are driven by the sharpness filter. When reducing from 3000x4000px to 200x300px, this is really necessary.
For convenience, the source data is received in the form of 2 files:
- formats.json - a file that lists the formats in which you want to cut
- images.json is a file that lists images and sets focus points. Here you can specify where and in what quality to save the image.
Detailed information about file formats, installation and additional features can be found in the repository on GitHub github.com/fetis/fcrop . There you can find a demo for examples.
And finally, an example of the utility
Link to the original image 5.4 MB
200x135
500x180
900x172
Source: https://habr.com/ru/post/215645/
All Articles