Arduino: IR control appliances
Hello! My name is Konstantin and I am a programmer, in particular, I am engaged in programming systems “Smart Home”.
During the four years of work in this area, I had the opportunity to try many interesting controllers and software for solving home automation problems. One of the most interesting devices with which I had to deal was the Global Cache IP2IR series devices. Their purpose is to accept a text command from a client and emit it through the LED of the IR spectrum.
The use of such devices simplifies the life of users in several directions at once:
Such a toy makes life easier, of course, but it also hits the pocket, if memory serves me, GlobalCache for managing three devices costs about 6000-7000 wooden rubles. Not very humane pricing, so it was decided to make their own implementation of such a device.
Honestly, the idea has been going around for a long time, but I don’t have experience, or almost no experience, for the circuitry and the MK programmer, because of these considerations, the Arduino platform was chosen with its short-term development. Searches in the open spaces of the web gave me a ready-made solution called IRRemote, how did I spit when I found out that this module was sharpened to work with a single exit, obviously not what I needed, for viewing the source code gave me confidence in my theoretical knowledge of IR equipment control .
The theory is simple, although manufacturers like to use their own protocols to describe commands, it all comes down to the same principle of data transfer. On some sites you can find commands for their devices in the format of HEX or ProntoHEX, which is essentially the same thing.
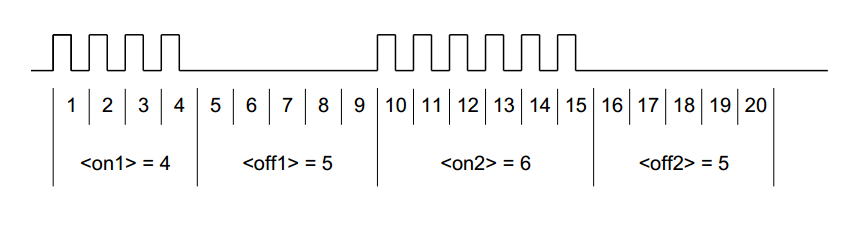
The command in HEX format is as follows: 0000 FREQ CNT1 CNT2 ON_1 OFF1 ON_2 OFF2 ON_n OFFn.
The bottom line is:
In order not to force you to read thoughtfully into this theory, we simply illustrate the above:
Well, when we figured out the theory, it's time to start programming, I will not describe all the difficulties that I had at the beginning of work with a new animal for me and perhaps start with the following:
As part of the Arduino environment, there is a special function tone (pin, frequency, duration), it generates a signal at the input / output port — a rectangular “wave” of a given frequency and with a 50% duty cycle using a timer interrupt.
Svarganov in a hurry, more or less, working version using this function, I wanted to increase the accuracy of the results obtained, for this in the directory "\ Arduino \ hardware \ arduino \ cores \ arduino \" the file Tone.cpp was copied and renamed to IR_Gen.cpp . Then in the resulting file I declared the missing variables and deleted the unnecessary ones, and there were those too. The tone function has been modified to the startIR (frequency) function which is not declared anywhere and can only be used inside this file.
We also added two more declared functions sendIR (char ir_string []) and sendLastIR () - which call the former tone () (startIR ()), but before starting the modulation you need to make sure that the string passed to sendIR is a set data of the IR command, the ParseIRString parsing function was enabled for this purpose, it will return zero if the data does not match the format of the IR command and returns the value of the reference frequency if the data matches. I will give the code just in case that it would be clear how the string is parsed:
Then we correct the interruption of the timer for our purposes and, as a result, we have something like:
At the end of this extravaganza in the Arduino.h file, you need to declare the newly created functions byte sendIR (char ir_string []); byte sendLastIR (); and voila, it's a hat. The result was a slightly expanded environment of Arduino, which included a ready-made tool for controlling household appliances.
I know, not everyone is fan of fixing anything in the development environment, but I honestly said it was more convenient, and in the end nothing hinders to do it just a third-party module.
')
Related information:
Global Cache Company Website
PDF with a description of the API of Global Cache devices
Russian-language help function tone
As promised for the curious, add. infa on IR control
Well-known library IRRemote
During the four years of work in this area, I had the opportunity to try many interesting controllers and software for solving home automation problems. One of the most interesting devices with which I had to deal was the Global Cache IP2IR series devices. Their purpose is to accept a text command from a client and emit it through the LED of the IR spectrum.
The use of such devices simplifies the life of users in several directions at once:
- as a remote control, you can use tablets, phones and a PC (with a small reservation, you need a special software);
- management can be centralized i. special software can be raised on the server and access it;
- There is no need for aimed shooting, if you don’t have such problems with a TV (we’re looking at it), then for devices like Blu-Ray players or MediaServer’s this can be a problem if they are locked in a cabinet or work in multiroom mode;
- One button of the remote control can perform a whole macro, for example, turn on the TV and Blu-Ray, then switch the TV to the desired source, for example HDMI1, and the user may not even bother about where and how his devices are connected.
Such a toy makes life easier, of course, but it also hits the pocket, if memory serves me, GlobalCache for managing three devices costs about 6000-7000 wooden rubles. Not very humane pricing, so it was decided to make their own implementation of such a device.
Honestly, the idea has been going around for a long time, but I don’t have experience, or almost no experience, for the circuitry and the MK programmer, because of these considerations, the Arduino platform was chosen with its short-term development. Searches in the open spaces of the web gave me a ready-made solution called IRRemote, how did I spit when I found out that this module was sharpened to work with a single exit, obviously not what I needed, for viewing the source code gave me confidence in my theoretical knowledge of IR equipment control .
The theory is simple, although manufacturers like to use their own protocols to describe commands, it all comes down to the same principle of data transfer. On some sites you can find commands for their devices in the format of HEX or ProntoHEX, which is essentially the same thing.
The command in HEX format is as follows: 0000 FREQ CNT1 CNT2 ON_1 OFF1 ON_2 OFF2 ON_n OFFn.
The bottom line is:
- 0000 is always four zeros, but for our own purposes we will use the first two zeros with the number of repetitions of the code, the second two zeros will be the output number on the arduinka. Thus, code 010D will repeat the command twice and send it to output 13 (the one with the built-in LED);
- FREQ is the reference frequency of the signal. Usually in the range of 35-40 kHz and recorded cleverly - 36 kHz = 0073 = 115, it is not very clear why the decimal 115 gives the frequency of 36 kHz, I can only say that you can calculate it so 4145 / FREQ;
- CNT1 is not the most obligatory part, I ignore it;
- CNT2 - I also ignore, if anyone is interested, that this is the link below;
- ON - and this is the data. This is the number of periods at the reference frequency when we “flicker” with an infrared diode;
- OFF is the number of periods when we hold a logical zero on the leg.
In order not to force you to read thoughtfully into this theory, we simply illustrate the above:
Well, when we figured out the theory, it's time to start programming, I will not describe all the difficulties that I had at the beginning of work with a new animal for me and perhaps start with the following:
As part of the Arduino environment, there is a special function tone (pin, frequency, duration), it generates a signal at the input / output port — a rectangular “wave” of a given frequency and with a 50% duty cycle using a timer interrupt.
Svarganov in a hurry, more or less, working version using this function, I wanted to increase the accuracy of the results obtained, for this in the directory "\ Arduino \ hardware \ arduino \ cores \ arduino \" the file Tone.cpp was copied and renamed to IR_Gen.cpp . Then in the resulting file I declared the missing variables and deleted the unnecessary ones, and there were those too. The tone function has been modified to the startIR (frequency) function which is not declared anywhere and can only be used inside this file.
We also added two more declared functions sendIR (char ir_string []) and sendLastIR () - which call the former tone () (startIR ()), but before starting the modulation you need to make sure that the string passed to sendIR is a set data of the IR command, the ParseIRString parsing function was enabled for this purpose, it will return zero if the data does not match the format of the IR command and returns the value of the reference frequency if the data matches. I will give the code just in case that it would be clear how the string is parsed:
unsigned int ParseIRString(char IRString[]){ byte xBool = 0; unsigned int bInt = 0; ir_data_array_length = 0; unsigned int IR_Frequency = 0; unsigned int IR_String_Length = 1024; char Separator = ' '; unsigned int i = 5; char bChArr[4] = {0}; byte NumSys = 16; ir_out_pin = 255; if(IRString[0]=='s'){ // Global Cache ir_out_pin = (((IRString[7]-48)*3)-(3-(IRString[9]-48)))-1; bChArr[0] = IRString[19]; bChArr[1] = IRString[20]; bChArr[2] = IRString[21]; bChArr[3] = '\r'; ir_repeat_count = StrToInt(bChArr,10)-1; Separator = ','; i = 13; NumSys = 10; }else{ // HEX bChArr[0] = IRString[3]; bChArr[1] = IRString[4]; bChArr[2] = '\r'; ir_out_pin = StrToInt(bChArr,16); bChArr[0] = IRString[0]; bChArr[1] = IRString[1]; ir_repeat_count = StrToInt(bChArr,16); } if ((ir_out_pin>13)||(ir_out_pin<0)){return 0;} for (i; i<IR_String_Length; i++){ if((IRString[i]>='a')&&(IRString[i]<='f')){IRString[i]-=32;} //UpperCase if((IRString[i] != Separator)&&(IRString[i] != '\r')){ // , if((IRString[i]>47)&&(IRString[i]<58)){ // bInt = bInt * NumSys + (IRString[i] - 48); // }else{ if ((IRString[i]>='A')&&(IRString[i]<='F')&&(NumSys==16)){// A F bInt = bInt * NumSys + (IRString[i] - 55); // }else{ return 0; } } }else{ if(IR_Frequency==0){ if(NumSys==16){ // HEX IR_Frequency = (4145/bInt)*1000; // }else{ // Global Cache IR_Frequency = bInt; // } xBool++; }else{ if(xBool>2){ ir_data_array[ir_data_array_length]=bInt*2; // ir_data_array_length++; }else{ xBool++; } } bInt = 0; if(IRString[i] == '\r'){Serial.println(IR_Frequency,DEC); return IR_Frequency;} } } } Then we correct the interruption of the timer for our purposes and, as a result, we have something like:
ISR(TIMER2_COMPA_vect){ if (ir_data_array[ir_data_current_step] > 0){ if(ir_data_current_step%2==0){ *timer2_pin_port ^= timer2_pin_mask; // }else{ *timer2_pin_port &= ~(timer2_pin_mask); // } ir_data_array[ir_data_current_step]--; }else{ ir_data_array[ir_data_current_step] = ir_data_buffer; ir_data_current_step++; ir_data_buffer = ir_data_array[ir_data_current_step]; } if (ir_data_current_step == ir_data_array_length){ if(ir_repeat_count>0){ ir_repeat_count--; ir_data_current_step = 0; }else{ stopIR(tone_pins[0]); } } } At the end of this extravaganza in the Arduino.h file, you need to declare the newly created functions byte sendIR (char ir_string []); byte sendLastIR (); and voila, it's a hat. The result was a slightly expanded environment of Arduino, which included a ready-made tool for controlling household appliances.
I know, not everyone is fan of fixing anything in the development environment, but I honestly said it was more convenient, and in the end nothing hinders to do it just a third-party module.
')
Related information:
Global Cache Company Website
PDF with a description of the API of Global Cache devices
Russian-language help function tone
As promised for the curious, add. infa on IR control
Well-known library IRRemote
Source: https://habr.com/ru/post/215521/
All Articles