Turn Zalman into Noctua (or fan upgrade)
Hi, to you, <% username%>.
In the process of bringing the relatively old system unit to mind, I came up with the idea of upgrading the CPU cooling system. The reason is trivial - the noise from the fan.
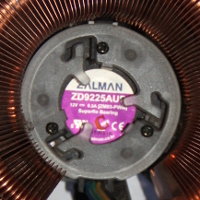
At one time, the purchase was installed Zalman CNPS9300 AT . The cooler is beautiful and rather cold for AMD Phenom II X4 BE, but as it turned out right away and was confirmed further by numerous reviews on the Internet, it is extremely noisy even at low revs.
Since there were no complaints about the radiator, plus itching to twist my hands, and the younger generation wanted to teach a lesson, I decided not to change the whole refrigerator completely, but to try to replace only the fan.
If you make a very brief summary of the entire article, then it will fit in two photos:


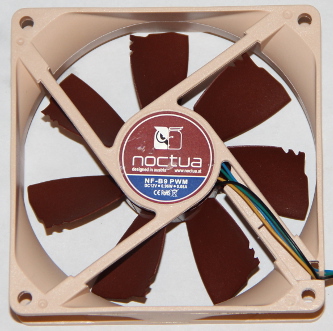
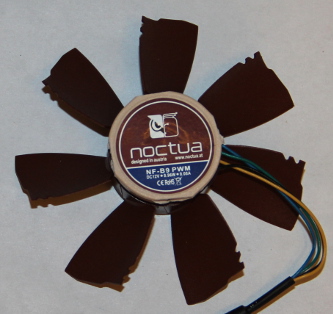
I needed a quiet and reliable fan. Focusing on fan reviews on various Runet sites, I identified three manufacturers in the shortlist: Noctua , Scythe , Ice Hammer (they are also one of the most popular in the corresponding section on Yandex.Market). And then I turned on the purest subjectivism and in appearance, I chose Noctua in my country of origin and emblem.
Noctua has two fans with this diameter:
The second is a low profile. Due to the smaller size it has less air consumption, even at higher speeds (which also give increased noise). So I decided to stop at the first option.
The fan from Noctua is better than that from Zalman in all given parameters (13-18 dBA, 150000 hours) except for one - rotational speed. Plus (or rather, this is a risk, that is, a minus), Zalman's air flow rate is unknown.
')
 Analysis of the cooler took place as a journey through a minefield. The only similar article is in the "Personal Pages" on Overclocker, but there is about my older brother ( CNPS9500A LED ) of my cooler. The mount in my case was more difficult.
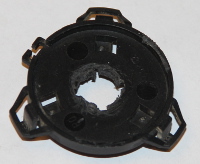
Now you need to prepare the fan. This was done just physically, but it is difficult morally ... Still, it is difficult to break beauty. I broke off the fasteners of the fan with pliers, next to the fan itself, I finished them with a jigsaw (not electric, but usual - for sawing wood).
I hurried to glue the new fan to the black fastening (with the usual superglue for 26 rubles). Now I would first assemble the mount on the radiator, fix it, and only then put a fan on it - it would have been possible to avoid unnecessary loads on the fan bearing when I had to apply force to insert the mount into the radiator.
When installing the black mount, you should pay attention to the cable holder of the motor - it should be below. When installing a transparent mate, it should be noted that it has two projections - they are located near one of the locks (just opposite the cable holder). Next, fix all the screws and get the assembled cooling system.
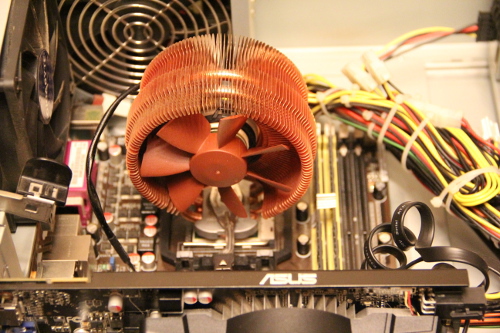
Next, the standard procedure for installing the cooling system on the processor. In BIOS, I set the mode of operation to the most powerful. Intermediate results: CPU temperature 30-50 degrees with an average office load, fan speed: 1000 - 1600 rpm, the sound from the system unit has changed dramatically. Now the case fans make noise more noticeable, but it is an even noise that is easier to ignore. In the near future, I want to drive the CPU under 100% load, see how the new fan can handle, because His turnover is almost 25% lower than the old one.
Photo of the cooling system at the native place. As if it always was.
Disclaimer
- Yes, I know that the title gives to yellowness - well, this is to attract a bit of attention.
- If the impersonal <% username%> is already crammed, there is a great solution from Wott
- And finally - this is my first post (not only on Habré, but also in general ...) so, if you want to kick, kick
In the process of bringing the relatively old system unit to mind, I came up with the idea of upgrading the CPU cooling system. The reason is trivial - the noise from the fan.
At one time, the purchase was installed Zalman CNPS9300 AT . The cooler is beautiful and rather cold for AMD Phenom II X4 BE, but as it turned out right away and was confirmed further by numerous reviews on the Internet, it is extremely noisy even at low revs.
Since there were no complaints about the radiator, plus itching to twist my hands, and the younger generation wanted to teach a lesson, I decided not to change the whole refrigerator completely, but to try to replace only the fan.
If you make a very brief summary of the entire article, then it will fit in two photos:
Donor selection
I needed a quiet and reliable fan. Focusing on fan reviews on various Runet sites, I identified three manufacturers in the shortlist: Noctua , Scythe , Ice Hammer (they are also one of the most popular in the corresponding section on Yandex.Market). And then I turned on the purest subjectivism and in appearance, I chose Noctua in my country of origin and emblem.
Parameters of the fan installed in Zalman:
- Dimensions: 92 * 25 mm (diameter * height)
- Connection: 4-pin plug (with PWM-controlled speed, PWM - in English terms)
- Rotational speed: 1500 - 2400 rpm
- Noise: 20 - 30 dBA from a distance of 1m
- Volume of air pumped: not found anywhere in specifications
- Stated resource: 50,000 hours
Noctua Offers
Noctua has two fans with this diameter:
The second is a low profile. Due to the smaller size it has less air consumption, even at higher speeds (which also give increased noise). So I decided to stop at the first option.
The fan from Noctua is better than that from Zalman in all given parameters (13-18 dBA, 150000 hours) except for one - rotational speed. Plus (or rather, this is a risk, that is, a minus), Zalman's air flow rate is unknown.
')
We disassemble the old fan
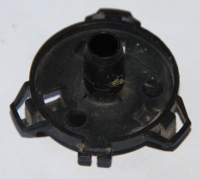
Analysis of the cooler took place as a journey through a minefield. The only similar article is in the "Personal Pages" on Overclocker, but there is about my older brother ( CNPS9500A LED ) of my cooler. The mount in my case was more difficult.- Unscrew the three small screws with a cross-head screwdriver (also small).
- Gently hook the flat screwdriver and remove the top plastic cover. It just rises up without any torsion, which I thought about because of the tricky shape of the lid itself. Its main task is to open the locks of the black part, on which the fan stator is fixed (I learned about the stator a bit later, already in the process of breaking it off).
- We remove from three clamps (I shot them in turn) and remove the fan from the radiator.
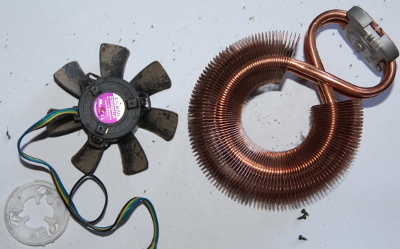 At that moment, it became clear that the fan would not survive, since The mount to the radiator was also the stator holder. At the same time, the dense wall of dust that had accumulated between the fan and the radiator became visible.
 - Remove with effort the impeller with the rotor
- Next, a little vandalism. One could guess and pull the stator of the motor off the pin on which it was worn, but I am also strong in the “back mind”. Thus, the stator with the PWM control system also turned out to be removed, and the children had a new toy ...
- There is a part that holds the fan to the radiator, but, the Noctua fan is attached to it by a protruding hollow shaft.
- I removed it with a drill and pliers (partially drilled, and partially breaking off the remaining parts).
Cooking new
Now you need to prepare the fan. This was done just physically, but it is difficult morally ... Still, it is difficult to break beauty. I broke off the fasteners of the fan with pliers, next to the fan itself, I finished them with a jigsaw (not electric, but usual - for sawing wood).
We collect
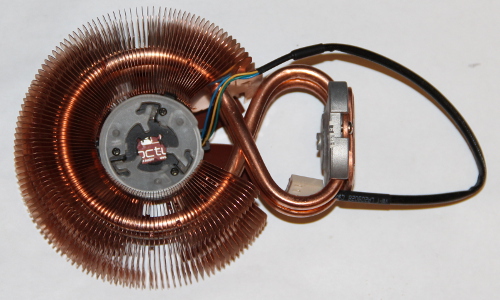
I hurried to glue the new fan to the black fastening (with the usual superglue for 26 rubles). Now I would first assemble the mount on the radiator, fix it, and only then put a fan on it - it would have been possible to avoid unnecessary loads on the fan bearing when I had to apply force to insert the mount into the radiator.
When installing the black mount, you should pay attention to the cable holder of the motor - it should be below. When installing a transparent mate, it should be noted that it has two projections - they are located near one of the locks (just opposite the cable holder). Next, fix all the screws and get the assembled cooling system.
Install
Next, the standard procedure for installing the cooling system on the processor. In BIOS, I set the mode of operation to the most powerful. Intermediate results: CPU temperature 30-50 degrees with an average office load, fan speed: 1000 - 1600 rpm, the sound from the system unit has changed dramatically. Now the case fans make noise more noticeable, but it is an even noise that is easier to ignore. In the near future, I want to drive the CPU under 100% load, see how the new fan can handle, because His turnover is almost 25% lower than the old one.
Photo of the cooling system at the native place. As if it always was.
findings
- Everything's possible!
- Sometimes it's easier (and cheaper) to buy a new ready-made cooler.
- Pleasures from the moment of successful launching of your own crafts will definitely not replace the purchase (and this is worth the amount spent on the new fan and the time for rework)
Source: https://habr.com/ru/post/215361/
All Articles