Optimizing Gruntfile
Introduction
If Grunt is a new word to you, then you can first read Chris Koyers ’s article “Grunt for people who think things like Grunt are ugly and heavy . ” After the introduction from Chris, you will have your own Grunt project and you will already taste all the possibilities that Grunt gives us.
In this article, we will focus not on what numerous plug-ins for Grunt should be added to your project, but on the process of creating the assembly itself. You will gain practical skills in the following aspects of working with Grunt:
- How to keep your gruntfile neat and tidy
- How to greatly improve your build time
- How to be constantly aware of the state of the assembly
Lyrical digression: Grunt is just one of many things you can use to complete your tasks. If Gulp more suits you in style, super! If after reviewing the features that are described in this article, you still want to create your own set of tools for the assembly - no problem! We are considering Grunt in this article, as this is an established ecosystem with a large number of users.
')
Organizing your gruntfile
If you connect a lot of Grunt plugins or are going to write a lot of tasks in your Gruntfile, then it will quickly become cumbersome and hard to support. Fortunately, there are several plugins that specialize in this particular issue: returning a clean and tidy look to your Gruntfile.
Gruntfile before optimization
This is how our Gruntfile looks like before optimization:
module.exports = function(grunt) { grunt.initConfig({ pkg: grunt.file.readJSON('package.json'), concat: { dist: { src: ['src/js/jquery.js','src/js/intro.js', 'src/js/main.js', 'src/js/outro.js'], dest: 'dist/build.js', } }, uglify: { dist: { files: { 'dist/build.min.js': ['dist/build.js'] } } }, imagemin: { options: { cache: false }, dist: { files: [{ expand: true, cwd: 'src/', src: ['**/*.{png,jpg,gif}'], dest: 'dist/' }] } } }); grunt.loadNpmTasks('grunt-contrib-concat'); grunt.loadNpmTasks('grunt-contrib-uglify'); grunt.loadNpmTasks('grunt-contrib-imagemin'); grunt.registerTask('default', ['concat', 'uglify', 'imagemin']); }; If now you are going to say “Hey! I thought it would be much worse! It is quite possible to support it! ”, Then maybe you will be right. For simplicity, we have added only three plug-ins without any customization. If this article were to give an example of a real Gruntfile that is used on “combat” projects, we would need endless scrolling. Well, let's see what we can do about it!
Autoload your plugins
Hint: load-grunt-config includes load-grunt-tasks , so if you don’t want to read about it, you can skip this piece, it won’t touch my feelings.
When you want to add a new plugin to your project, you will have to add it to your package.json as a dependency for your project and then load it into your Gruntfile. For the plugin " grunt-contrib-concat ", it will look like this:
// tell Grunt to load that plugin grunt.loadNpmTasks('grunt-contrib-concat'); If you remove the plugin with npm and edit your package.json, but forget to update Gruntfile, your build will break. This is where a small load-grunt-tasks plugin comes to our rescue.
Up to this point, we had to manually load our Grunt plugins:
grunt.loadNpmTasks('grunt-contrib-concat'); grunt.loadNpmTasks('grunt-contrib-uglify'); grunt.loadNpmTasks('grunt-contrib-imagemin'); With load-gurnt-tasks, you can reduce the amount of code to one line:
require('load-grunt-tasks')(grunt); After connecting the plugin, it will analyze your package.json, determine the dependencies tree of your plug-ins and load them automatically.
Splitting configuration file
load-grunt-tasks reduces the size and complexity of your Gruntfile, but if you intend to build a large application, the file size will still grow steadily. At this point, a new plugin comes into play: load-grunt-config! It allows you to divide the Gruntfile by task. Moreover, it encapsulates load-grunt-tasks and its functionality!
Important: Splitting your Gruntfile is not always the best solution. If you have many related settings between tasks (for example, for Gruntfile templating), you should be somewhat more careful.
When using the “load-grunt-config” plugin, your Gruntfile will look like this:
module.exports = function(grunt) { require('load-grunt-config')(grunt); }; Yes this is true! That's the whole file! But where are the configuration files now?
Create a directory and name it grunt. We do this right in the directory where your Gruntfile is located. By default, the plugin includes files from this directory by the names specified in the tasks you are going to use. The structure of our project should look like this:
- myproject/ -- Gruntfile.js -- grunt/ --- concat.js --- uglify.js --- imagemin.js Now let's set the settings for each of the tasks in separate files (you will see that this is almost the usual copy-paste from Gruntfile).
grunt / concat.js
module.exports = { dist: { src: ['src/js/jquery.js', 'src/js/intro.js', 'src/js/main.js', 'src/js/outro.js'], dest: 'dist/build.js', } }; grunt / uglify.js
module.exports = { dist: { files: { 'dist/build.min.js': ['dist/build.js'] } } }; grunt / imagemin.js
module.exports = { options: { cache: false }, dist: { files: [{ expand: true, cwd: 'src/', src: ['**/*.{png,jpg,gif}'], dest: 'dist/' }] } }; If the JavaScript configuration blocks are not yours, load-grunt-tasks also allows you to use YAML or CoffeeScript syntax. Let's write our last required file using YAML. This will be the aliases file. It is a file in which all task aliases are registered. This is what we need to do before calling the registerTask function. Here is the actual file:
grunt / aliases.yaml
default: - 'concat' - 'uglify' - 'imagemin' That's all! Run the following command in the console:
$ grunt If everything worked, then in fact, we formed with you a “default” task for Grunt. It will run all the plugins in the order we specified in the file of associations. Well, now that we have reduced the Gruntfile to three lines of code, we will never have to go into it to fix the line in any task, this is finished. But stop, it still works very slowly! I mean, you have to wait a lot of time before everything gets together. Let's see how we can improve this!
Minimize build time
Even though the download speed and launch time of your web application are more important than the time required for the build, the slow onn speed can still cause us a lot of inconvenience. This makes it pretty “hard” to automatically build an application with plugins, such as grunt-contrib-watch , or build after a commit in Git — this turns into real torture. The bottom line is this: the faster the build takes place, the better and faster your workflow will occur. If your production assembly takes more than 10 minutes, you will resort to it only in extreme cases, but until it is collected, you will go to drink coffee. This is killing productivity. But do not despair, we have something that can make a difference.
Collect only what has changed: grunt-newer
Oh, this feeling, when after assembling the entire project you will need to change a couple of files and wait for the second round until everything is reconnected. Let's look at an example when you change one image in the src / img / directory - in this case, running imagemin to optimize the image makes sense, but only for one image, and of course, in this case, restarting concat and uglify is just waste of precious CPU time.
Of course, you can always run
$ grunt imagemin from your console instead of the standard $ grunt . This will allow you to run only the task that is needed, but there is a more rational solution. It is called grunt-newer.Grunt-newer has a local cache in which it stores information about files that have been changed, and runs tasks for them only. Let's see how to connect it.
Remember our aliases.yaml? Let's change
default: - 'concat' - 'uglify' - 'imagemin' on this:
default: - 'newer:concat' - 'newer:uglify' - 'newer:imagemin' Simply put, we simply add the prefix “newer:” to any of our tasks, which must first be passed through the grunt-newer plugin, which, in turn, will determine for which files to run the task, and for which not.
Running tasks in parallel: grunt-concurrent
grunt-concurrent is a plugin that becomes really useful when you have a lot of tasks that are independent of each other and that take a lot of time. It uses the cores of your processor, parallelizing tasks on them.
Especially cool is that the configuration of this plugin is super simple. If you use load-grunt-config, create a sl. file:
grunt / concurrent.js
module.exports = { first: ['concat'], second: ['uglify', 'imagemin'] }; We simply install parallel execution of the first (first) and second (second) queues. In the first stage, we run only the task “concat”. In the second stage, we run uglify and imagemin, and since they are independent of each other, they will be executed in parallel, and, therefore, execution time will be common to both tasks.
We changed the alias of our default task so that it is processed through the grunt-concurrent plugin. The following is the modified aliases.yaml file:
default: - 'concurrent:first' - 'concurrent:second' If you now restart the Grunt build, the concurrent plugin will start the concat task first, and then create two threads on different processor cores so that imagemin and uglify work in parallel. Cool!
A word of advice : it is highly unlikely that in our simple example, grunt-concurrent will make our build much faster. The reason is the overhead (overhead) for running additional threads for Grunt instances. Judging by my calculations, it takes at least 300ms / stream.
How long did the build take? Time-grunt comes to the rescue
Well, now we have optimized all our tasks, and it would be very useful for us to know how long each task takes to complete. Fortunately, there is a plugin that does an excellent job with this task: time-grunt.
time-grunt is not a plug-in in the classic sense (it is not connected via loadNpmTask), it is rather related to plug-ins that you connect “directly,” such as load-grunt-config. We will add the connection of this plugin to our Gruntfile just as we have already done for load-grunt-config. Now our Gruntfile should look like this:
module.exports = function(grunt) { // measures the time each task takes require('time-grunt')(grunt); // load grunt config require('load-grunt-config')(grunt); }; I apologize for the disappointment, but that's all - try restarting Grunt from your console and for each task (and for the entire assembly) you should see nicely formatted information about the execution time:

Automatic alert system
Now that you have a well-optimized collector that quickly performs all its tasks and gives you the option of auto-assembling (that is, tracking changes in files through the grunt-contrib-watch plugin or using hooks after commits), it would be great to have another system who could notify you when your fresh build is ready to use, or when something went wrong? We meet , grunt-notify .
By default, grunt-notify provides automatic alerts for all errors and warnings that Grunt throws out. To do this, it can use any alert system installed in your OS: Growl for Mac OS X or Windows, Mountain Lion's and Mavericks' Notification Center, and Notify-send. It's amazing that all you need to get this functionality is to install the plugin from the npm repository and connect it to your Gruntfile (remember, if you use grunt-load-config, as described above, this step is automated!).
This is how the plugin works depending on your operating system:
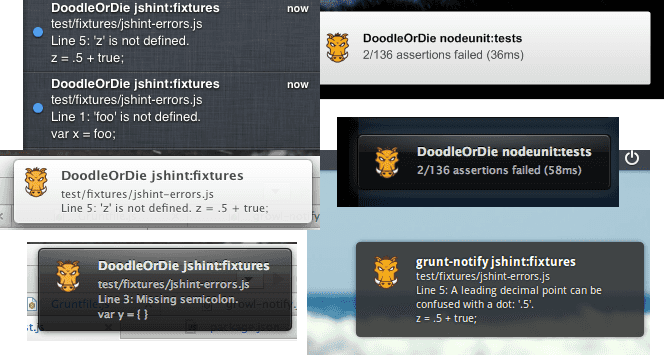
In addition to errors and warnings, let's configure it so that it runs after the completion of our last task.
It is assumed that you use grunt-contrib-config to separate the tasks into files. Here is the file we need:
grunt / notify.js
module.exports = { imagemin: { options: { title: 'Build complete', // optional message: '<%= pkg.name %> build finished successfully.' //required } } } } The key of our configuration hash determines the name of the task for which we want to connect grunt-notify. This example will create an alert immediately after the imagemin task (the last one in the list for execution) is completed.
And at the end
If you performed everything from the very beginning, as described in the course of the article, now you can consider yourself a proud owner of a super-clean and organized collector, incredibly fast due to parallelization and selective processing. And do not forget that with any result of the assembly, we will be carefully informed!
If you discover other interesting solutions that will help improve Grunt or, say, useful plugins, please let us know! In the meantime, successful builds!
From translator
I tried to translate this article as close as possible to the original, but in some places I still allowed a couple of frivolities, so that it “sounded in Russian,” because not all the momentum and methods of constructing English sentences fit well into Russian. I really hope that you will treat this with understanding.
I hope you enjoy the article. I am pleased to hear constructive criticism and suggestions for improvement. Comments are also welcome!
Source: https://habr.com/ru/post/215267/
All Articles