Boat for DirectX-arcade. Part number 1: make contact
Introduction
 Everyone, playing, at least once thought: “I wish I could write a program that would play for me!”. But usually this thought, and the thought remains so ... Constantly something interferes with: ignorance of where to start, fear of the task being too heavy, whispering from the left shoulder “and why is that? who needs it to make the program play with the program? ”etc.
In this series of articles I am going to show that, firstly: “the devil is not so terrible as he is painted,” and secondly: I am going to answer the question later: “why is this necessary?”.
Now we start with a simple one. Since establishing the relationship between the game and the player program (bot). The widely known game Zuma is taken as an experimental rabbit.
')
Any interaction consists of two processes: sending data to “them” and receiving data from “them”. In Zuma, all control is done with a mouse, and the game gives out feedback using an image. Accordingly, the first thing you need to learn how to programmatically emulate the behavior of the mouse and get the image from the game.
The main purpose of this article is to get a program that automatically enters the gameplay over and over again, does something there, and when the game over-e starts it all over again. Further, this framework will evolve in the direction that the bot farther and lasts longer in the game before the game over.
Solved auxiliary subtasks: mouse emulation, mouse redirection to a virtual machine, image capture.
Retreat
When developing the code for this cycle of articles, an approach is used: to get results as quickly as possible in a minimum of effort. This approach allows you to maintain motivation at a high level, and does not give up at the sight of the impossibility of the task. Because of this:- first, many irrelevant (from the point of view of the current result) moments will quickly go over, leaving “crutches and supports” in the code. And only at the next iterations these moments will be dealt with separately, and the “crutches” will be replaced with a full code.
- secondly, the code style is more “hacker” than the classic C #. In the code there will be a lot of lambd, anonymous data, tricks, copyright arbitrariness and the complete absence of comments.
Mouse emulation
Windows supports 2 standard methods for mouse emulation using 4 different WinApi functions.The first way is to send your window messages ( WM_MOUSEMOVE , WM_LBUTTONDOWN , etc.) to the program using the SendMessage or PostMessage functions.
For DirectX-games (as in our case) this method is not suitable, because such mouse polling programs use DirectInput, which polls the mouse directly, ignoring windows messages.
The second way : direct emulation of the behavior of the mouse using the mouse_event or SendInput functions . This method is suitable for any program, including full-screen DirectX-games. The mouse_event function is simpler, but it is considered obsolete, SendInput is more modern, but more cumbersome. Let's stop on mouse_event.
WinApi functions from C # are called using PInvoke technology. The PInvoke description for most common WinApi functions can be found at PInvoke.net . The mouse_event function is no exception .
[DllImport("user32.dll")] public static extern void mouse_event(uint dwFlags, int dx, int dy, uint dwData, UIntPtr dwExtraInfo); Mouse coordinates
The mouse_event function has a specific feature: the mouse coordinates are set in mickey, and not in pixels. The recalculation of mickey to pixels (and vice versa) depends on the resolution of the main monitor used. (0,0) corresponds to the upper left corner of the monitor, and (65535, 65535) to the lower right, which gives the formula for converting mickey to pixels and back:mickey_point = pixel_point * (65536, 65536) / screen_size and pixel_point = mickey_point * screen_size / (65536, 65536) .Basic operations
Summarizing all of the above, we get the following operations to control the mouse.Move the mouse to a point (x, y):
mouse_event(MouseEventFlags.MOVE | MouseEventFlags.ABSOLUTE, x * 65536 / screen_width, y * 65536 / screen_height); Left click:
mouse_event((MouseEventFlags.LEFTDOWN), 0, 0); System.Threading.Thread.Sleep(100); mouse_event((MouseEventFlags.LEFTUP), 0, 0); Right-click:
mouse_event((MouseEventFlags.RIGHTDOWN), 0, 0); System.Threading.Thread.Sleep(100); mouse_event((MouseEventFlags.RIGHTUP), 0, 0); Problem: input exclusivity
When emulating a mouse through the mouse_event function, there is a serious inconvenience: the mouse_event simulates a mouse for the entire OS at once, and not for an individual application. From this it follows that while the bot is running and playing, then other work behind the computer is impossible: debugging the bot, actively viewing the state of the bot, reading the Internet, etc. But there is a way: a virtual machine!Transferring the game to a virtual machine
Moving the game to the virtual machine solves the following problems:- first, it simplifies interaction with games that do not support windowed mode and work only in full-screen mode,
- secondly, mouse input is replaced only on the virtual machine, and on the main machine continues to work in normal mode, allowing the computer user to go about their business.
Bot, in contrast to the game itself, more convenient to run on the main machine. This allows you to restart the bot directly from Visual Studio, debug it in the same place, there is where to display the internal state of the bot, etc.
Deploying a virtual machine (in this case, Oracle VirtualBox was used ), installing the guest OS and transferring the game is done on a regular basis with the exception of one thing: the bot needs to be able to establish a network connection between the host OS and the guest OS. This is done in a variety of ways. One way to get a specific port from the guest OS to the host using VirtualBox. Another way is to configure the Bridged Adapter mode, then the virtual machine for the entire network will look like a normal computer, and the guest OS will receive its ip-address via dhcp from the router. Access from the host OS to the guest OS will occur at this address. (the author, in this case, used the variant with bridged adapter)
Proxy
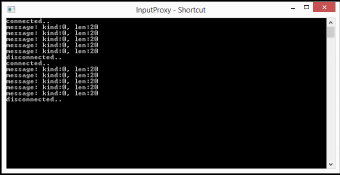 To control the mouse on the guest OS, we will write a proxy, which is a simple console tcp-server. Its full code is small and presented under the cat. To simplify the code and reduce dependencies, the proxy is written on a bare socket without using remoting, wcf, etc.
Proxy code
using System; using System.Collections.Generic; using System.Linq; using System.Net.Sockets; using System.Runtime.InteropServices; using System.Text; namespace InputProxy { class Program { static void Main(string[] args) { var socket = new Socket(AddressFamily.InterNetwork, SocketType.Stream, ProtocolType.Tcp); socket.Bind(new System.Net.IPEndPoint(System.Net.IPAddress.Any, 7001)); socket.Listen(10); for (; ; ) { var client = socket.Accept(); Console.WriteLine("connected.."); var thread = new System.Threading.Thread(() => { try { var clientReader = new System.IO.BinaryReader(new NetworkStream(client)); for (; ; ) { if (client.Poll(1, SelectMode.SelectRead) && client.Available == 0) { Console.WriteLine("disconnected.."); break; } if (client.Available > 0) { var msgSize = clientReader.ReadInt32(); var message = clientReader.ReadBytes(msgSize); var messageReader = new System.IO.BinaryReader(new System.IO.MemoryStream(message)); var msgKind = messageReader.ReadInt32(); Console.WriteLine("message: kind:{0}, len:{1}", msgKind, message.Length); switch (msgKind) { case 0: { var flags = messageReader.ReadUInt32(); var x = messageReader.ReadInt32(); var y = messageReader.ReadInt32(); var data = messageReader.ReadUInt32(); mouse_event(flags, x, y, data, UIntPtr.Zero); } break; } } else System.Threading.Thread.Sleep(10); } } catch (Exception exc) { Console.WriteLine(exc); } }) { IsBackground = true }; thread.Start(); } } [DllImport("user32.dll")] public static extern void mouse_event(uint dwFlags, int dx, int dy, uint dwData, UIntPtr dwExtraInfo); } } For a proxy to work, it’s enough to copy it to a virtual machine and launch it. The proxy waits for messages on port 7001 and displays a log of its work on the console. To shut down the proxy, just close the console window.
Customer
Connecting to a proxy is even easier than the code of the proxy itself. var client = new System.Net.Sockets.TcpClient(vm_host, 7001); var clientStream = client.GetStream(); var clientWriter = new System.IO.BinaryWriter(clientStream); Action<MouseEventFlags, int, int> mouse_event = (flags, x, y) => { var messageStream = new System.IO.MemoryStream(); var messageWriter = new System.IO.BinaryWriter(messageStream); messageWriter.Write(0); messageWriter.Write((uint)flags); messageWriter.Write(x); messageWriter.Write(y); messageWriter.Write(0); var message = messageStream.ToArray(); clientWriter.Write(message.Length); clientWriter.Write(message); clientStream.Flush(); }; Image capture
The image is most easily captured directly from the screen. In the .net there is a ready-made function Graphics.CopyFromScreen for this. On this method and dwell.First, I want to get a Bitmap at the output, not Graphics - this is solved with the help of an auxiliary function:
public static Bitmap GetScreenImage(Rectangle rect) { var bmp = new Bitmap(rect.Width, rect.Height, PixelFormat.Format32bppArgb); using (Graphics graphics = Graphics.FromImage(bmp)) { graphics.CopyFromScreen(rect.Left, rect.Top, 0, 0, rect.Size, CopyPixelOperation.SourceCopy); } return bmp; } Secondly, you need to know what part of the screen you need to capture. You can, of course, always capture the same part of the screen, and place the game with your hands in this part of the screen, but this is
Pinvoke-description of both functions is on pinvoke.net site: FindWindow and GetWindowRect .
[DllImport("user32.dll", SetLastError = true)] public static extern IntPtr FindWindow(string lpClassName, string lpWindowName); [DllImport("user32.dll")] [return: MarshalAs(UnmanagedType.Bool)] public static extern bool GetWindowRect(IntPtr hwnd, out RECT lpRect); [StructLayout(LayoutKind.Sequential)] public struct RECT { public int Left; public int Top; public int Right; public int Bottom; } And the image capture code of the virtual machine window is obtained as follows:
var vm_left = 8; var vm_right = 8; var vm_top = 50; var vm_bottom = 30; var vm_title = "Windows81 [Running] - Oracle VM VirtualBox"; var handle = FindWindow(null, vm_title); if (handle == IntPtr.Zero) throw new Exception(" "); RECT rect; GetWindowRect(handle, out rect); var gameScreenRect = new System.Drawing.Rectangle(rect.Left + vm_left, rect.Top + vm_top, rect.Right - rect.Left - vm_right - vm_left, rect.Bottom - rect.Top - vm_bottom - vm_top); var gameBmp = GetScreenImage(gameScreenRect); Weakness
A significant disadvantage of this approach is that the window being captured is, firstly: it must be located entirely on the screen, and secondly, it must be placed on top of all other windows. This inconvenience is leveled with the help of two (or more) monitors :), then the virtual machine window is located on the auxiliary monitor, without disturbing anyone, remaining on top of the other windows. Also, this problem is completely solved with the help of the previously reviewed method: transfer of a function (screen capture) inside a virtual machine. To do this, simply add the corresponding function to InputProxy.Looping gameplay
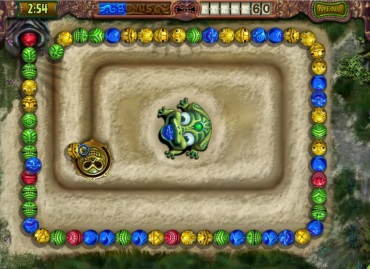
Finally, we proceed directly to solving the task set for today: looping the gameplay - all the necessary subtasks have been solved. Zuma gameplay revolves around three windows: main, mission, and action. The main window contains the main menu, allowing you to select the type of game, the mission window offers you to select a mission, and the game process itself takes place in the action window.The bot determines the current window in the easiest way: by the color value at several key points. Points are selected manually: by the method of "scrutinizing".
var screenChecks = new[] { new { Name = "main", Points = new[] { new CheckPoint(200, 190, 0xff554a22), new CheckPoint(65, 400, 0xfff44c41) } }, new { Name = "mission", Points = new[] { new CheckPoint(200, 190, 0xffb5d0c7), new CheckPoint(65, 400, 0xffad7630) } }, new { Name = "action", Points = new[] { new CheckPoint(950, 10, 0xff72554b), new CheckPoint(10, 10, 0xff462b1d), } }, }; Func<Bitmap, string> check = image => screenChecks.Where(_check => image.Check(_check.Points)).Select(_check => _check.Name).FirstOrDefault(); The main bot cycle:
var startButtonPoint = new Point(950, 430); var startMissionPoint = new Point(600, 750); for (; ; ) { try { var bmp = GetScreenImage(gameScreenRect); var screenName = check(bmp); Console.Write(screenName + new string(' ', 20) + new string('\x8', 40)); switch (screenName) { case "main": mouse_event(MouseEventFlags.MOVE | MouseEventFlags.ABSOLUTE, startButtonPoint.X * 65536 / game_width, startButtonPoint.Y * 65536 / game_height); System.Threading.Thread.Sleep(400); mouse_event(MouseEventFlags.LEFTDOWN, 0, 0); System.Threading.Thread.Sleep(150); mouse_event(MouseEventFlags.LEFTUP, 0, 0); System.Threading.Thread.Sleep(50); System.Threading.Thread.Sleep(400); break; case "mission": mouse_event(MouseEventFlags.MOVE | MouseEventFlags.ABSOLUTE, startMissionPoint.X * 65536 / game_width, startMissionPoint.Y * 65536 / game_height); System.Threading.Thread.Sleep(10); mouse_event(MouseEventFlags.LEFTDOWN, 0, 0); System.Threading.Thread.Sleep(150); mouse_event(MouseEventFlags.LEFTUP, 0, 0); System.Threading.Thread.Sleep(50); break; case "action": mouse_event(MouseEventFlags.LEFTDOWN, 0, 0); System.Threading.Thread.Sleep(150); mouse_event(MouseEventFlags.LEFTUP, 0, 0); System.Threading.Thread.Sleep(50); break; case null: bmp.Save("unknown.bmp"); break; } } catch (Exception exc) { Console.WriteLine(exc); } } In the game phase, the bot constantly clicks, releasing the balls at one point. On such a simple (or rather stupid) tactic, a bot in the first mission gains 1000-2000 points, and sometimes it even fully picks up a Zuma strip.

Summary
The goal has been accomplished: the bot frame has been written - the game process is fixated.The following goals: connect OpenCV, recognize the position and color of the balls.
Ps
Image to attract attention. (Orange shows areas that the next version of the bot recognized as balls)
Boat for DirectX-arcade. Part number 1: make contact
Boat for the arcade. Part number 2: connect OpenCv
Source: https://habr.com/ru/post/214955/
All Articles