Using SPI from Python on Raspberry Pi
The information given in this article was obtained in the process of connecting the nRF24L01 + transceiver to RPi. Naturally, all this can be used to work with other SPI devices.
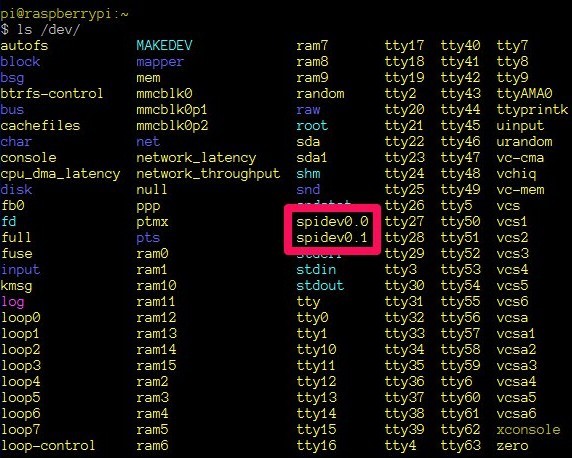
To enable the SPI hardware interface, you need to comment out the " blacklist spi-bcm2708 " line in the /etc/modprobe.d/raspi-blacklist.conf file and restart Pi. In order to make sure that SPI is enabled, you can run the listing of the / dev directory :
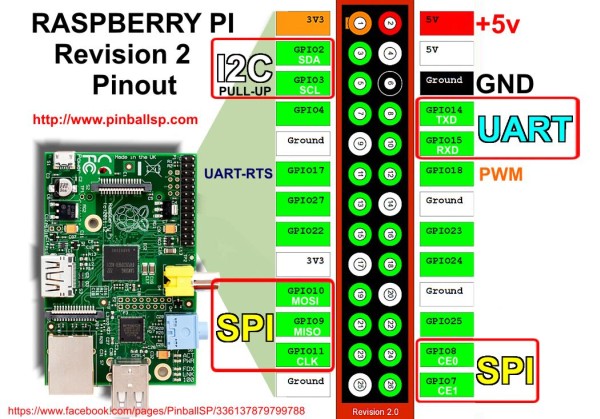
The location of the SPI signals on the GPIO connector:
')
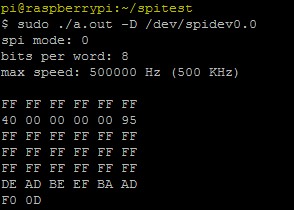
To verify the correctness of SPI, you need to close between each other MOSI and MISO and execute the following commands:
The correct output should be:
Python module for working with SPI can be found here . Module installation is performed as follows:
The main functions of the py-spidev module .
An example of working with SPI from Python:
To enable the SPI hardware interface, you need to comment out the " blacklist spi-bcm2708 " line in the /etc/modprobe.d/raspi-blacklist.conf file and restart Pi. In order to make sure that SPI is enabled, you can run the listing of the / dev directory :
The location of the SPI signals on the GPIO connector:
')
To verify the correctness of SPI, you need to close between each other MOSI and MISO and execute the following commands:
$ wget https://raw2.github.com/torvalds/linux/master/Documentation/spi/spidev_test.c $ gcc spidev_test.c $ sudo ./a.out -D /dev/spidev0.0 The correct output should be:
Python module for working with SPI can be found here . Module installation is performed as follows:
$ git clone https://github.com/doceme/py-spidev $ cd py-spidev/ $ sudo python setup.py install The main functions of the py-spidev module .
- SpiDev ([bus], [client]) . Return a new SPI device that is connected to the specified SPI device interface.
- open (bus, device) . Connects the SPI device. open (X, Y) will open / dev / spidev-XY
- xfer2 ([values]) . Perform SPI transaction. CS will be held active between blocks.
- close () . Disconnects the object from the interface.
An example of working with SPI from Python:
nrf = spidev.SpiDev(0, 0) nrf.xfer2([0x1, 0x8]) nrf.close() Source: https://habr.com/ru/post/214901/
All Articles