Configure the Site-to-Site IPsec tunnel between the Windows Azure cloud and the D-Link DFL-210
Greetings
In this article, I will describe in stages the entire process of configuring the Site-to-Site tunnel between the Windows Azure cloud and the D-Link DFL-210 firewall (relevant for the DFL line of devices: 210 \ 260E \ 800 \ 860E)
Attention! All configuration steps are accompanied by a large number of pictures!
')
First, create a new Windows Azure virtual network using the wizard
Name: Habratest
New Territorial Group: Habragroup
Region: Western Europe
Then we enter the name and address of the local DNS (if necessary). Otherwise, we use DNS from Windows Azure, or any public
Put the checkbox "Configure a network-to-network VPN connection "
In the next step, enter the settings of our DFL:
Name: Mydfl
The IP address of the VPN device: 78.153.146.110 is the dedicated static IPv4 address of our DFL ( This is important. If DFL is over NAT, then we will fail )
Address space: 192.168.22.0/24 - local subnet, which we will connect to Windows Azure
In the last step, enter the settings of the subnet to which we will connect (will be used for services created in Windows Azure)
In our case, the settings will be as follows:
The total address space of the virtual network: 172.16.80.0/24
Subnet:
AzureSubnet 172.16.80.0/27
Gateway 172.16.80.32/29
Virtual subnet is created!
Go to the " Settings " of the newly created virtual network and check that we did everything correctly
On the " Dashboard " tab we see the following picture.
Click the " Create Gateway " button at the bottom of the page and select the " Static Routing " mode. Confirm your intentions by clicking " OK "
We are waiting for 10-15 minutes until Windows Azure creates a gateway for us
So, the gateway is created. We look, that Windows Azure gave us:
Gateway IP Address: 23.97.132.122
Next, click the " Key Management " button at the bottom of the page and get our personal pre-shared key:
R9GrgLgZPosdZ7isMdt8MkrDQnfBwUbO
General requirements for the gateway can be found here:
http://msdn.microsoft.com/ru-ru/library/windowsazure/jj156075.aspx#BKMK_VPNGateway
Now let's add all the IP addresses of the cloud to the directory (“ Objects-> Address book-> InterfaceAddresses ):
Name: Habratest_cloud_gateway
Value: 23.97.132.122
Name: Habratest_cloud_subnet
Value: 172.16.80.0/24
Then go to " Objects-> Authentication Objects " and add a new object of the type " Pre-shared key ":
Name: Habratest_cloud_key
Passphrase: R9GrgLgZPosdZ7isMdt8MkrDQnfBwUbO
Next, go to the " Objects-> VPN Objects-> IKE Algorithms " item and create a new IKE algorithm:
Name: Habratest_cloud_stage1
We put the daws: 3DES and AES (128,128,256), as well as the SHA1 checkbox
After creating the IKE algorithm, proceed to the creation of the IPsec algorithm ( "Objects-> VPN Objects-> IPsec Algorithms" ):
Name: Habratest_cloud_stage2
Galki: same as IKE
Now let's proceed directly to creating a rule for an IPsec tunnel ( "Interfaces-> IPsec" ):
General tab
Name: Habratest_cloud_IPsec
Local Network: lannet
Remote Network: Habratest_cloud_subnet
Remote Endpoint: Habratest_cloud_gateway
Encapsulation mode: Tunnel ( important setting! )
IKE Config Mode Pool: None
IKE Algorithms: Habratest_cloud_stage1
IKE Lifetime: 28800
IPsec Algorithms: Habratest_cloud_stage2
IPsec Lifetime: 3600 sec
IPsec Lifetime: 102400000 Kb
“Authentication” tab
Put the point “ Pre-shared key ” and choose our “ Habratest_cloud_key >”
Tab " IKE Settings "
IKE:
Main - DH Group 2
PFS - None
Security Association: Per Net
NAT Traversal: On if supported and NATed
Dead Peer Detection: Use
Then we create two IP Rules (“ Rules-> IP Rules ”):
Rule 1 :
Name: lan_to_cloud
Action: Allow
Service: All_service
Schedule: None
Source interface: lan
Source Network: lannet
Destination Interface: Habratest_cloud_IPsec
Destination Network: Habratest_cloud_subnet
Rule 2 :
Name: cloud_to_lan
Action: Allow
Service: All_service
Schedule: None
Source interface: Habratest_cloud_IPsec
Source Network: Habratest_cloud_subnet
Destination Interface: lan
Destination Network: lannet
So we created the basic settings for the tunnel. Now save and apply the changes to the DFL
That's all! We observe beautiful pictures of the raised tunnel
Then you can create the necessary services in Windows Azure (virtual machines, databases, etc)
A little about possible errors in the DFL logs:
1. statusmsg = “No request" - incorrect encryption methods are selected
2. reason = “Invalid proposal” - the same as item 1
3. reason = "IKE_INVALID_COOKIE" - the tunnel was already raised, but after that changes were made to its settings. Go to the DFL "Status-> IPsec-> Habratest_cloud_IPsec-> on the top right of the List all active IKE SAs page" and delete the outdated IKE SA. Reboot DFL
That's all. Do not forget to change the test data from the article (IP addresses, subnets, regions, pre-shared key keys) to your
Thanks for attention!
PS I ask you to pay attention to the comment of the habrauser DikSoft , which reports that such a scenario is officially unsupported and there may be problems
In this article, I will describe in stages the entire process of configuring the Site-to-Site tunnel between the Windows Azure cloud and the D-Link DFL-210 firewall (relevant for the DFL line of devices: 210 \ 260E \ 800 \ 860E)
Attention! All configuration steps are accompanied by a large number of pictures!
')
Step 1: Configure Windows Azure
First, create a new Windows Azure virtual network using the wizard
Picture
Name: Habratest
New Territorial Group: Habragroup
Region: Western Europe
Picture
Then we enter the name and address of the local DNS (if necessary). Otherwise, we use DNS from Windows Azure, or any public
Put the checkbox "Configure a network-to-network VPN connection "
Picture
In the next step, enter the settings of our DFL:
Name: Mydfl
The IP address of the VPN device: 78.153.146.110 is the dedicated static IPv4 address of our DFL ( This is important. If DFL is over NAT, then we will fail )
Address space: 192.168.22.0/24 - local subnet, which we will connect to Windows Azure
Picture
In the last step, enter the settings of the subnet to which we will connect (will be used for services created in Windows Azure)
In our case, the settings will be as follows:
The total address space of the virtual network: 172.16.80.0/24
Subnet:
AzureSubnet 172.16.80.0/27
Gateway 172.16.80.32/29
Picture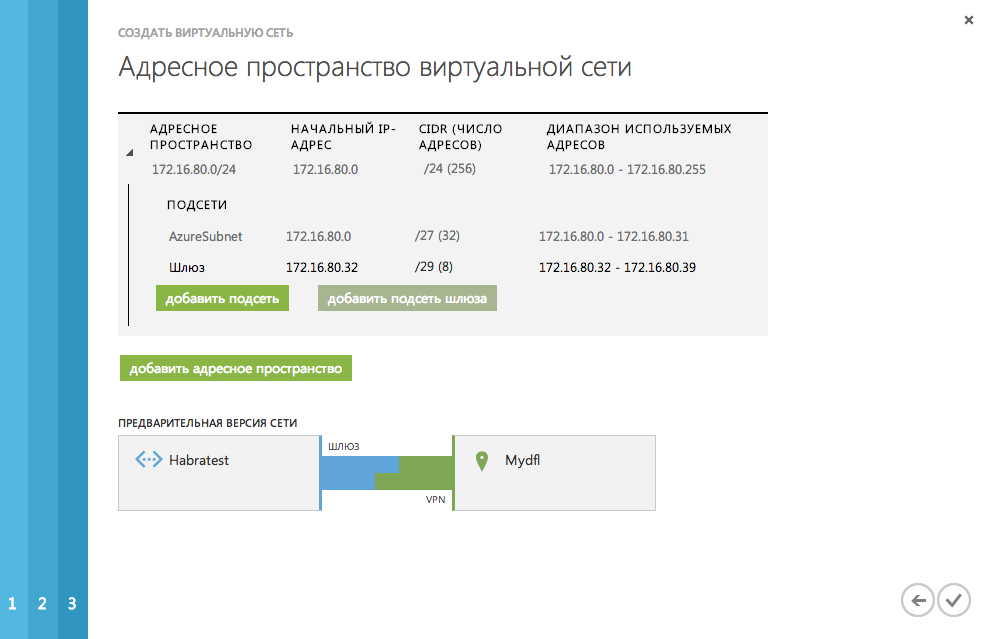
Virtual subnet is created!
Go to the " Settings " of the newly created virtual network and check that we did everything correctly
Picture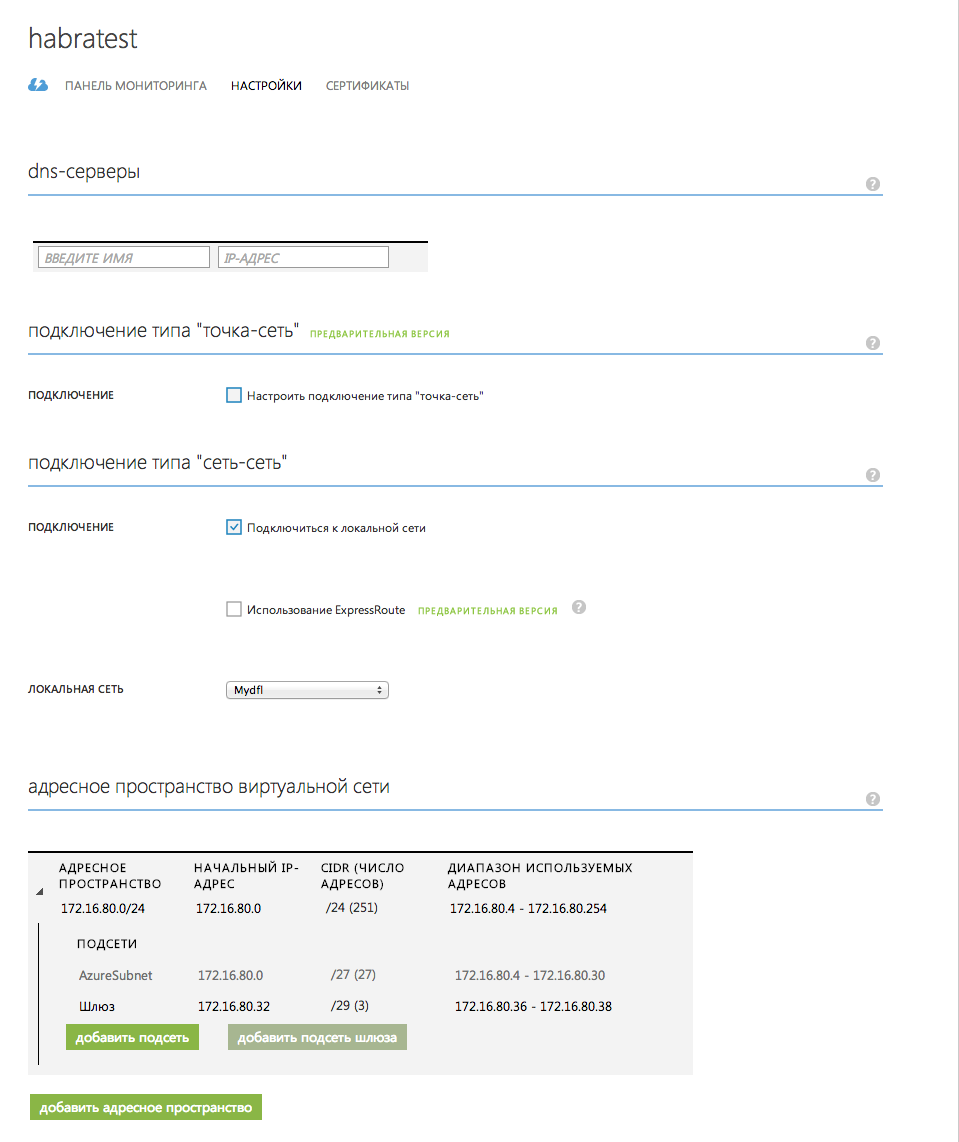
On the " Dashboard " tab we see the following picture.
Picture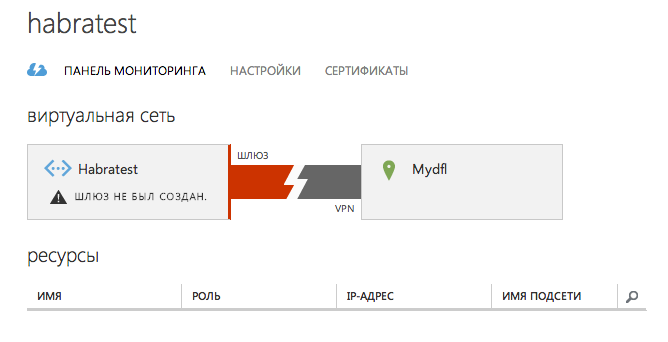
Click the " Create Gateway " button at the bottom of the page and select the " Static Routing " mode. Confirm your intentions by clicking " OK "
Picture
We are waiting for 10-15 minutes until Windows Azure creates a gateway for us
... It took 10 to 15 minutes ...
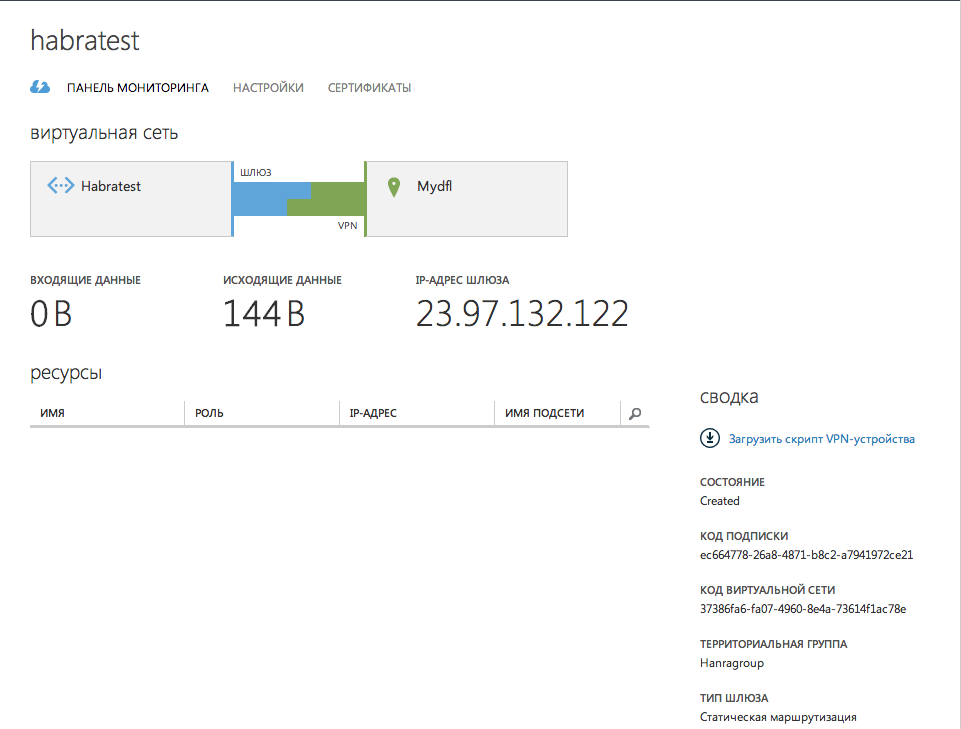
So, the gateway is created. We look, that Windows Azure gave us:
Gateway IP Address: 23.97.132.122
Picture
Next, click the " Key Management " button at the bottom of the page and get our personal pre-shared key:
R9GrgLgZPosdZ7isMdt8MkrDQnfBwUbO
Picture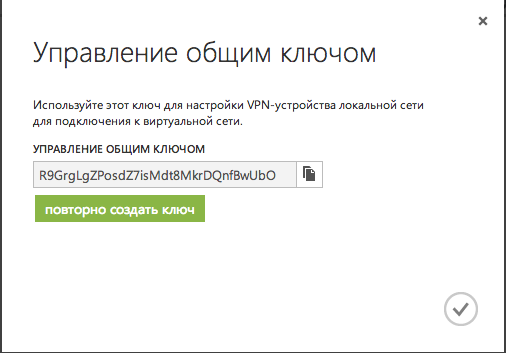
Step 2: Configure DFL
General requirements for the gateway can be found here:
http://msdn.microsoft.com/ru-ru/library/windowsazure/jj156075.aspx#BKMK_VPNGateway
Here you have to make one very important note.
In the Russian DFL firmware (installed by default), such wonderful encryption methods as AES, which Windows Azure uses (and not only) for its work, are not available. We will leave discussions on this topic outside of this article and use the following trick:
We follow the link http://tsd.dlink.com.tw/
Choose your DFL model from the list and download the latest WorldWide firmware for our device (denoted “For WW”)
Download the firmware in our DFL and wait for the completion of the operation
Firmware uploaded and we can continue
Now let's add all the IP addresses of the cloud to the directory (“ Objects-> Address book-> InterfaceAddresses ):
Name: Habratest_cloud_gateway
Value: 23.97.132.122
Name: Habratest_cloud_subnet
Value: 172.16.80.0/24
Picture
Then go to " Objects-> Authentication Objects " and add a new object of the type " Pre-shared key ":
Name: Habratest_cloud_key
Passphrase: R9GrgLgZPosdZ7isMdt8MkrDQnfBwUbO
Picture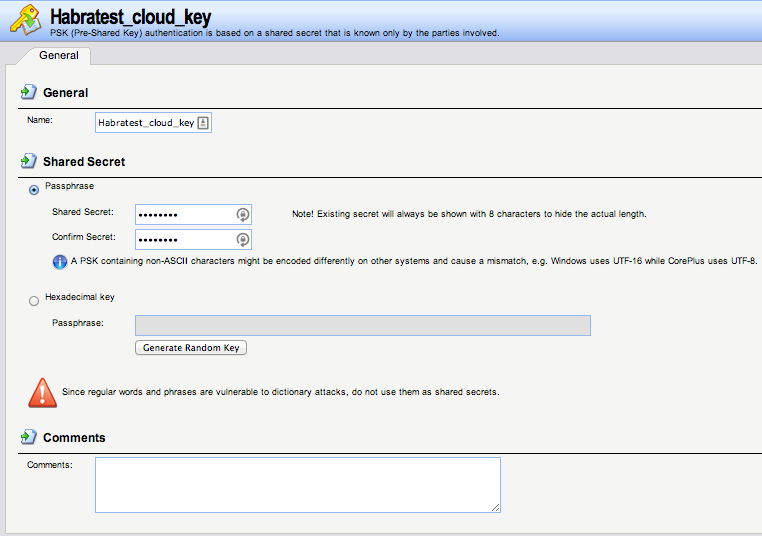
Next, go to the " Objects-> VPN Objects-> IKE Algorithms " item and create a new IKE algorithm:
Name: Habratest_cloud_stage1
We put the daws: 3DES and AES (128,128,256), as well as the SHA1 checkbox
Picture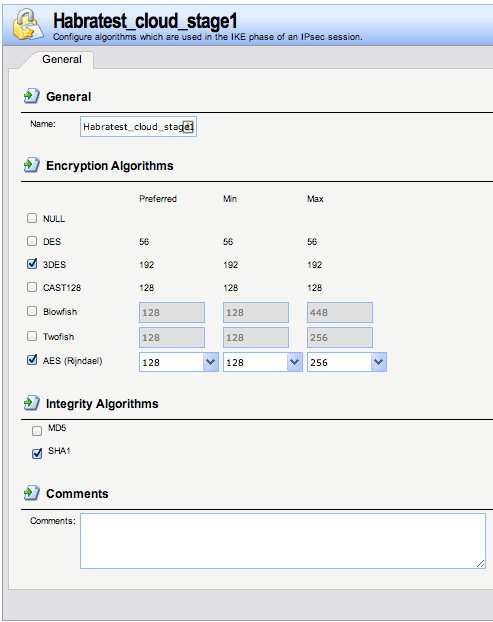
After creating the IKE algorithm, proceed to the creation of the IPsec algorithm ( "Objects-> VPN Objects-> IPsec Algorithms" ):
Name: Habratest_cloud_stage2
Galki: same as IKE
Picture
Now let's proceed directly to creating a rule for an IPsec tunnel ( "Interfaces-> IPsec" ):
General tab
Name: Habratest_cloud_IPsec
Local Network: lannet
Remote Network: Habratest_cloud_subnet
Remote Endpoint: Habratest_cloud_gateway
Encapsulation mode: Tunnel ( important setting! )
IKE Config Mode Pool: None
IKE Algorithms: Habratest_cloud_stage1
IKE Lifetime: 28800
IPsec Algorithms: Habratest_cloud_stage2
IPsec Lifetime: 3600 sec
IPsec Lifetime: 102400000 Kb
Picture
“Authentication” tab
Put the point “ Pre-shared key ” and choose our “ Habratest_cloud_key >”
Picture
Tab " IKE Settings "
IKE:
Main - DH Group 2
PFS - None
Security Association: Per Net
NAT Traversal: On if supported and NATed
Dead Peer Detection: Use
Picture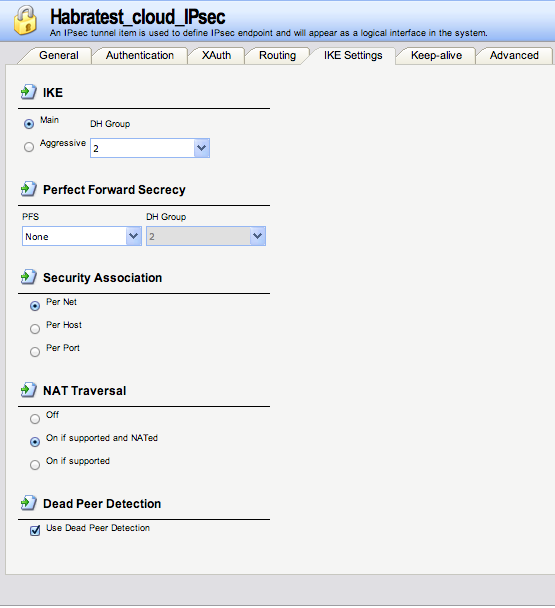
Then we create two IP Rules (“ Rules-> IP Rules ”):
Rule 1 :
Name: lan_to_cloud
Action: Allow
Service: All_service
Schedule: None
Source interface: lan
Source Network: lannet
Destination Interface: Habratest_cloud_IPsec
Destination Network: Habratest_cloud_subnet
Picture
Rule 2 :
Name: cloud_to_lan
Action: Allow
Service: All_service
Schedule: None
Source interface: Habratest_cloud_IPsec
Source Network: Habratest_cloud_subnet
Destination Interface: lan
Destination Network: lannet
Picture
So we created the basic settings for the tunnel. Now save and apply the changes to the DFL
That's all! We observe beautiful pictures of the raised tunnel
Picture
Then you can create the necessary services in Windows Azure (virtual machines, databases, etc)
A little about possible errors in the DFL logs:
1. statusmsg = “No request" - incorrect encryption methods are selected
2. reason = “Invalid proposal” - the same as item 1
3. reason = "IKE_INVALID_COOKIE" - the tunnel was already raised, but after that changes were made to its settings. Go to the DFL "Status-> IPsec-> Habratest_cloud_IPsec-> on the top right of the List all active IKE SAs page" and delete the outdated IKE SA. Reboot DFL
Picture
That's all. Do not forget to change the test data from the article (IP addresses, subnets, regions, pre-shared key keys) to your
Thanks for attention!
PS I ask you to pay attention to the comment of the habrauser DikSoft , which reports that such a scenario is officially unsupported and there may be problems
Source: https://habr.com/ru/post/214789/
All Articles