Weather Station on Ethernet (HTTP + Modbus) powered by POE
Good day to the habr-community.
Much time has passed since my last post about the smart home . I decided to do it starting from the weather station.
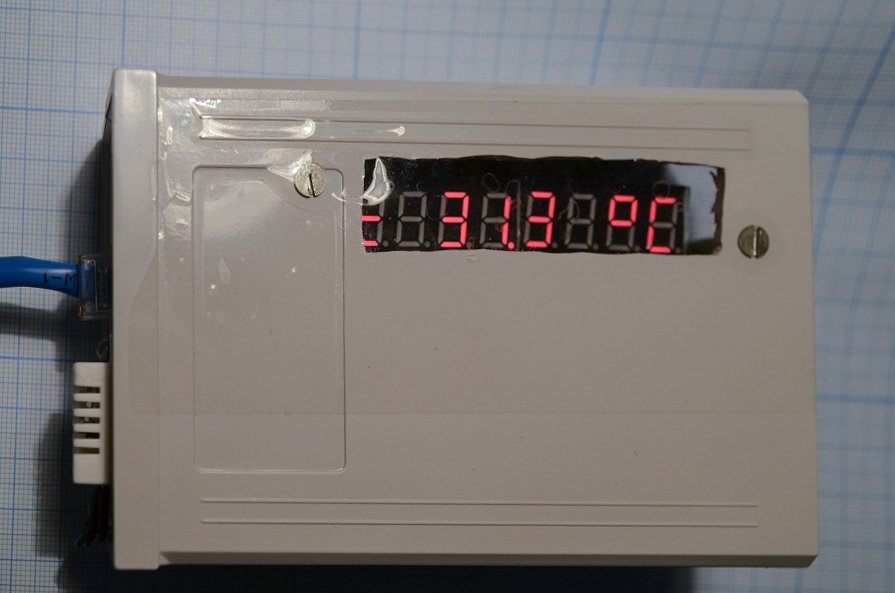
Figure 1 - Photo of the prototype
Despite the abundance of articles about weather stations on the arduino (http://habrahabr.ru/post/165747/, habrahabr.ru/post/171525 , habrahabr.ru/post/213405 ) I still decided to publish my decision.
')
Functions that it performs:
Functions that could not be implemented, but I wanted:
The cost of ~ 1700 rubles (at the rate at the time of purchase), it included:
The device was completely assembled from commercially available Arduino-based components. All sensors were wired and located inside the purchased housing of the ale of electrical equipment. Transparent windows in a prototype are made of transparent adhesive tape.
The device has an LED-display that will work well at low temperatures, and allows you to use the device for its intended purpose without a computer. For convenience of use at night - the feedback on illumination is organized in the software.
The Iboard w5100 board was chosen as the brain, due to the fact that it already has all the arduino + Ethernet shield + sensor board for power and ground multiplication, when a large number of devices are connected. Such a highly integrated fee saves money and space. This board also supports Passiv POE.
I decided to make the data transfer wired (unlike most smart home solutions) for the following reasons:
In order not to produce interfaces, and to do everything in a uniform way - I decided to use Ethernet for data transfer. Power is transmitted over the same wire using Passiv POE technology. Advantages of this method - if all devices are connected to a common Ethernet network - then there will be no issue with protocol convectors / gateways.

Figure 2 - Block diagram of the device
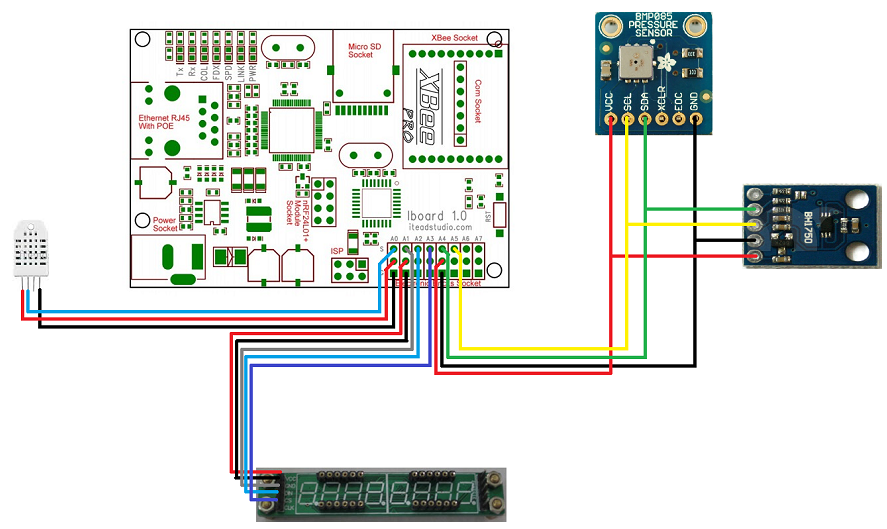
Figure 3 - Connection Diagram
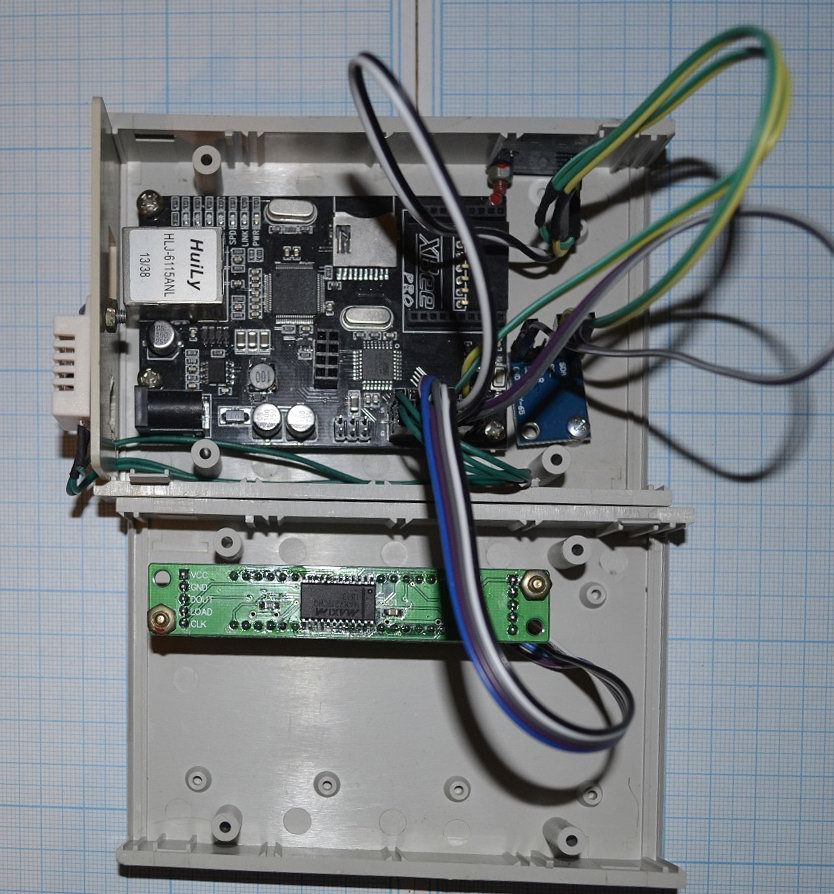
Figure 4 - Inside view
Passive POE - This is a special implementation of the POE modules. In the original POE, a protocol implementation is required, while the injector determines the power of the remote equipment when the connection is established, and if it can power it, then write it down. Passive POE was invented by cunning Chinese who did not want to make such a cunning implementation, but wanted to enter the market of POE equipment, and as a result they came up with stupidly applying voltage to unused twisted pairs of category 5E cable. Some even write that they allegedly adhere to the IEEE 802.3af standard in terms of electrical characteristics, but even this is not always the case.
The IBOARD W5100 works if a voltage of 6-20V is applied to pins 4.5 and 7.8 of the Ethernet connector. I am serving 20 V.
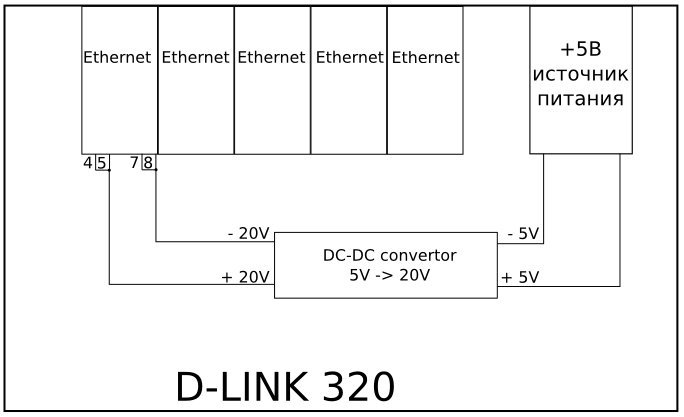
Figure 5 - Connection Diagram for POE Injection
I built the injector into the D-LINK 320, installing a Chinese boost DC-DC converter into it.

Figure 6 - Photo modification
After installation - it all worked.
Attention! Before turning on, check that the power source is configured to issue 20V.
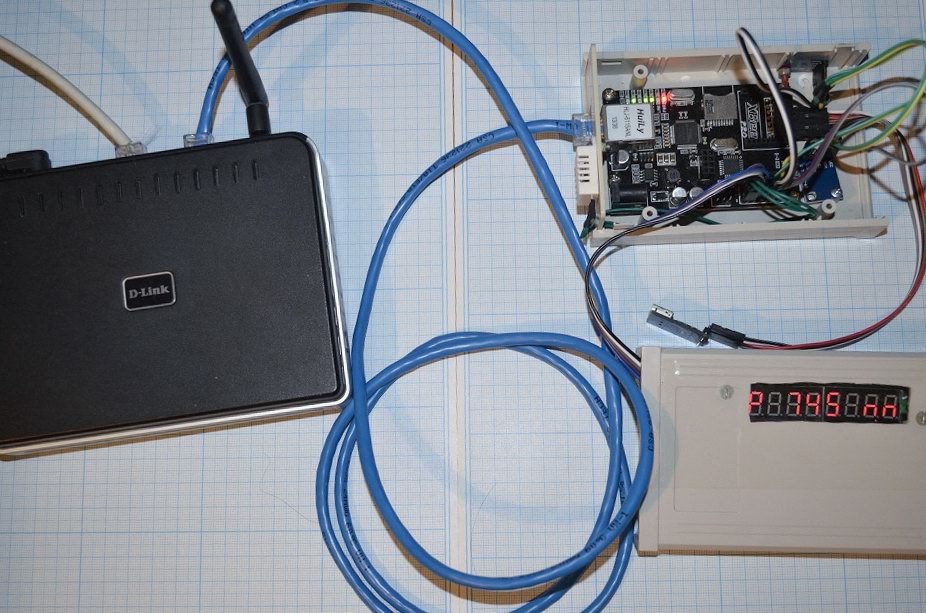
Figure 7 - Works of the whole structure
The web-interface was made for the most convenient interaction with the device from the network without additional software on the client side. For the possibility of automated data access, it would be convenient to provide information in the form of an XML file. In this project, these two ways of accessing data were combined through the use of an XSLT processor.
The web browser sends a request for 192.168.0.20 ; Arduino responds with an XML document:
To display this information in a beautiful way, the browser loads the XSLT processor and generates an HTML document using it.
As a result of all these activities, this XML document in a Web browser looks like this:

Figure 8 - The appearance of the web interface in Firefox
In software, I tried to use ready-made libraries to the maximum to speed up the process.
The program logic is quite simple - we initialize all the devices by calling the corresponding functions from the libraries.
In the cycle, we read all the sensor readings, if necessary - update the data on the 8-bit LED indicator and process the request via the Ethernet network.
The following libraries were used in the project:
It is worth noting that in order to display letters - I had to upgrade the symbol table in the LedControl library. By default, this library can only display the letters af.
Git-repository with Arduino controller software: github.com/krotos139/sh1_arduino_weather_station_v1
Smart weather station with an Ethernet interface can be easily implemented on arduino.
The cost of the device in pilot production - ~ 1700 rubles
Assembly time - ~ 1 day
The functionality is fantastic - it can work as an independent device with power from POE and from a standard arduino-vsky power source, as well as a smart device - allowing you to receive all the necessary information from the browser. For automated information processing, the device provides information in the form of an XML document and the modbus protocol.
Much time has passed since my last post about the smart home . I decided to do it starting from the weather station.
Figure 1 - Photo of the prototype
Despite the abundance of articles about weather stations on the arduino (http://habrahabr.ru/post/165747/, habrahabr.ru/post/171525 , habrahabr.ru/post/213405 ) I still decided to publish my decision.
')
Functional
Functions that it performs:
- Temperature measurement
- Moisture measurement
- Pressure measurement
- Light measurement
- Indication of measured parameters
- Delivery of measured parameters via the HTTP interface as an XML document
- HTTP XSLT processor output for XML styling when displayed by the browser
- Issuance of information on Modbus (I intend to use it as a smart home control protocol)
- Power through Passive POE
Functions that could not be implemented, but I wanted:
- Measurement of precipitation
- Direction of the wind
- Wind speed
- DHCP client
The cost of ~ 1700 rubles (at the rate at the time of purchase), it included:
- DHT22 Digital Temperature And Humidity Sensor $ 5.13
- GY-65 BMP085 Atmospheric Pressure Altimeter Module $ 4.09
- GY-302 BH1750 Chip Light Intensity Light Module $ 2.85
- IBOARD W5100 Ethernet Module for Arduino Development Board with POE / Xbee and SD Card Slot Expansion $ 18.46
- MAX7219 Digital Tube Display Module $ 4.74
- 40pcs 20cm 2.54mm 1p-1p pin Dupont wire cable Line connector $ 2.42
- FT232RL USB To Serial Line Download Line Downloader USB TO 232 $ 4.47
- Plastic case ~ 100 rubles
Device implementation
The device was completely assembled from commercially available Arduino-based components. All sensors were wired and located inside the purchased housing of the ale of electrical equipment. Transparent windows in a prototype are made of transparent adhesive tape.
The device has an LED-display that will work well at low temperatures, and allows you to use the device for its intended purpose without a computer. For convenience of use at night - the feedback on illumination is organized in the software.
The Iboard w5100 board was chosen as the brain, due to the fact that it already has all the arduino + Ethernet shield + sensor board for power and ground multiplication, when a large number of devices are connected. Such a highly integrated fee saves money and space. This board also supports Passiv POE.
I decided to make the data transfer wired (unlike most smart home solutions) for the following reasons:
- Wire anyway pull - whether it be power or data transfer
- If it is decided to power the device from chemical power sources, then the question of their replacement will arise
- Wired communications seem more reliable:
- They will have no complaints from Roskomnadzor, since they do not emit anything
- There will be no problems with the mutual influence of other transceivers in the same frequency
- There will not be a huge number of problems associated with the implementation of radio communications (temporary separation of the ether, signal attenuation, the influence of other such systems when overlapping reception areas, etc.)
- There will be calm people with whom Wifi warms the brain.
In order not to produce interfaces, and to do everything in a uniform way - I decided to use Ethernet for data transfer. Power is transmitted over the same wire using Passiv POE technology. Advantages of this method - if all devices are connected to a common Ethernet network - then there will be no issue with protocol convectors / gateways.
Figure 2 - Block diagram of the device
Figure 3 - Connection Diagram
Figure 4 - Inside view
Implementing Passiv POE
Passive POE - This is a special implementation of the POE modules. In the original POE, a protocol implementation is required, while the injector determines the power of the remote equipment when the connection is established, and if it can power it, then write it down. Passive POE was invented by cunning Chinese who did not want to make such a cunning implementation, but wanted to enter the market of POE equipment, and as a result they came up with stupidly applying voltage to unused twisted pairs of category 5E cable. Some even write that they allegedly adhere to the IEEE 802.3af standard in terms of electrical characteristics, but even this is not always the case.
The IBOARD W5100 works if a voltage of 6-20V is applied to pins 4.5 and 7.8 of the Ethernet connector. I am serving 20 V.
Figure 5 - Connection Diagram for POE Injection
I built the injector into the D-LINK 320, installing a Chinese boost DC-DC converter into it.
Figure 6 - Photo modification
After installation - it all worked.
Attention! Before turning on, check that the power source is configured to issue 20V.
Figure 7 - Works of the whole structure
WEB-interface implementation
The web-interface was made for the most convenient interaction with the device from the network without additional software on the client side. For the possibility of automated data access, it would be convenient to provide information in the form of an XML file. In this project, these two ways of accessing data were combined through the use of an XSLT processor.
The web browser sends a request for 192.168.0.20 ; Arduino responds with an XML document:
<?xml version="1.0" encoding="UTF-8"?> <?xml-stylesheet type="text/xsl" href="http://192.168.0.20/z1.xsl"?> <response> <temperature> <celsius>30.70</celsius> <sensors> <sensor name='BMP' unit='C'>32.62</sensor> <sensor name='DHT' unit='C'>30.70</sensor> </sensors> </temperature> <humidity> <percentage>21.60</percentage> </humidity> <pressure> <pa>99309</pa> <mmHg>745</mmHg> </pressure> <illuminance> <lx>11</lx> </illuminance> </response> To display this information in a beautiful way, the browser loads the XSLT processor and generates an HTML document using it.
Source code
<?xml version='1.0' encoding='UTF-8'?> <xsl:stylesheet version='1.0' xmlns:xsl='http://www.w3.org/1999/XSL/Transform'> <xsl:template match='/'> <html> <head> <title>Weather station</title> <meta http-equiv='refresh' content='5'/> <style> .z1 { font-family:Arial, Helvetica, sans-serif; color:#666; font-size:12px; text-shadow: 1px 1px 0px #fff; background:#eaebec; margin:20px; border:#ccc 1px solid; border-collapse:separate; border-radius:3px; box-shadow: 0 1px 2px #d1d1d1; } .z1 th { font-weight:bold; padding:15px; border-bottom:1px solid #e0e0e0; background: #ededed; background: linear-gradient(to top, #ededed, #ebebeb); } .z1 td { padding:10px; background: #f2f2f2; background: linear-gradient(to top, #f2f2f2, #f0f0f0); } .z1 tr:hover td{ background: #aaaaaa; background: linear-gradient(to top, #f2f2f2, #e0e0e0); } </style> </head> <body> <h2>Weather station</h2> <table class='z1'> <tr> <th>Property</th> <th>Value</th> </tr> <tr> <td> Temperature </td> <td><xsl:value-of select='response/temperature/celsius'/> C</td> </tr> <tr> <td> Humidity </td> <td><xsl:value-of select='response/humidity/percentage'/> %</td> </tr> <tr> <td> Pressure </td> <td><xsl:value-of select='response/pressure/mmHg'/> mm.Hg</td> </tr> <tr> <td> Illuminance </td> <td><xsl:value-of select='response/illuminance/lx'/> lx</td> </tr> </table> <h2>Termosensor</h2> <table class='z1'> <tr> <th>Sensor</th> <th>Value</th> </tr> <xsl:for-each select='response/temperature/sensors/sensor'> <tr> <td> <xsl:value-of select='@name'/> </td> <td><xsl:value-of select='.'/> <xsl:value-of select='@unit'/></td> </tr> </xsl:for-each> </table> </body> </html> </xsl:template> </xsl:stylesheet> As a result of all these activities, this XML document in a Web browser looks like this:
Figure 8 - The appearance of the web interface in Firefox
Software
In software, I tried to use ready-made libraries to the maximum to speed up the process.
The program logic is quite simple - we initialize all the devices by calling the corresponding functions from the libraries.
In the cycle, we read all the sensor readings, if necessary - update the data on the 8-bit LED indicator and process the request via the Ethernet network.
The following libraries were used in the project:
- DHTLib - Temperature / Humidity Sensor Access Library
- Adafruit-BMP085-Library - Pressure / Temperature Sensor Access Library
- BH1750 - Library of access to the light sensor
- LedControl - Library of work with LED indicator for SPI control panel
- Webduino - HTTP protocol implementation library
- Mudbus - Modbus Protocol Implementation Library
It is worth noting that in order to display letters - I had to upgrade the symbol table in the LedControl library. By default, this library can only display the letters af.
Source code
#include <Ethernet.h> #include <SPI.h> #include <Wire.h> #include "DHT.h" #include "BH1750.h" #include "Adafruit_BMP085.h" #include "LedControl.h" #include "Mudbus.h" #include "WebServer.h" #define WEATHER_STATION_Z1 0x20 // =============================================================== #define DHT_S1_PIN A0 // DHT22 // =============================================================== // assign a MAC address for the ethernet controller. // fill in your address here: byte mac[] = { 0xDE, 0xAD, 0xBE, 0xEF, 0xFE, 0xED}; // assign an IP address for the controller: IPAddress ip(192,168,0,20); IPAddress gateway(192,168,0,1); IPAddress subnet(255, 255, 255, 0); // =============================================================== float humidity = 0, temp_dht = 0, temp_bmp = 0, temp = 0; uint16_t light = 0; int32_t pressure_pa = 0, pressure_mm = 0; int mode = 0; dht dht_s1; BH1750 lightMeter; Adafruit_BMP085 bmp; /* This creates an instance of the webserver. By specifying a prefix * of "", all pages will be at the root of the server. */ #define PREFIX "" WebServer webserver(PREFIX, 80); //EthernetServer webserver(80); #define DEV_ID Mb.R[0] #define TEMPERATURE Mb.R[1] #define TEMPERATURE_DHT Mb.R[2] #define TEMPERATURE_BMP Mb.R[3] #define HUMIDITY Mb.R[4] #define PRESSURE_MM Mb.R[5] #define LIGHT Mb.R[6] Mudbus Mb; // pin A5 is connected to the DataIn // pin A6 is connected to the CLK // pin A7 is connected to LOAD LedControl lc=LedControl(A1,A2,A3,1); // ======================== Web pages ========================== void web_index(WebServer &server, WebServer::ConnectionType type, char *, bool) { /* this line sends the standard "we're all OK" headers back to the browser */ server.httpSuccess("application/xml; charset=utf-8"); /* if we're handling a GET or POST, we can output our data here. For a HEAD request, we just stop after outputting headers. */ if (type != WebServer::HEAD) { /* this defines some HTML text in read-only memory aka PROGMEM. * This is needed to avoid having the string copied to our limited * amount of RAM. */ P(index_p1) = "<?xml version=\"1.0\" encoding=\"UTF-8\"?>" "<?xml-stylesheet type=\"text/xsl\" href=\"http://192.168.0.20/z1.xsl\"?>" "<response>" " <temperature>" " <celsius>"; P(index_p2) = "</celsius>" " <sensors>" " <sensor name='BMP' unit='C'>"; P(index_p3) = "</sensor>" " <sensor name='DHT' unit='C'>"; P(index_p4) = "</sensor>" " </sensors>" " </temperature>" " <humidity>" " <percentage>"; P(index_p5) = "</percentage>" " </humidity>" " <pressure>" " <pa>"; P(index_p6) = "</pa>" " <mmHg>"; P(index_p7) = "</mmHg>" " </pressure>" " <illuminance>" " <lx>"; P(index_p8) = "</lx>" " </illuminance>" "</response>"; /* this is a special form of print that outputs from PROGMEM */ server.printP(index_p1); server.print(temp); server.printP(index_p2); server.print(temp_bmp); server.printP(index_p3); server.print(temp_dht); server.printP(index_p4); server.print(humidity); server.printP(index_p5); server.print(pressure_pa); server.printP(index_p6); server.print(pressure_mm); server.printP(index_p7); server.print(light); server.printP(index_p8); } } void web_z1_xsl(WebServer &server, WebServer::ConnectionType type, char *, bool) { server.httpSuccess("text/xsl; charset=utf-8"); if (type != WebServer::HEAD) { P(z1_xsl) = "<?xml version='1.0' encoding='UTF-8'?>" "<xsl:stylesheet version='1.0' xmlns:xsl='http://www.w3.org/1999/XSL/Transform'>" "<xsl:template match='/'>" " <html>" " <head>" " <title>Weather station</title>" " <meta http-equiv='refresh' content='5'/>" " <style>" " .z1 {" " font-family:Arial, Helvetica, sans-serif;" " color:#666;" " font-size:12px;" " text-shadow: 1px 1px 0px #fff;" " background:#eaebec;" " margin:20px;" " border:#ccc 1px solid;" " border-collapse:separate; " " border-radius:3px;" " box-shadow: 0 1px 2px #d1d1d1;" " }" " .z1 th {" " font-weight:bold;" " padding:15px;" " border-bottom:1px solid #e0e0e0;" " background: #ededed;" " background: linear-gradient(to top, #ededed, #ebebeb);" " }" " .z1 td {" " padding:10px;" " background: #f2f2f2;" " background: linear-gradient(to top, #f2f2f2, #f0f0f0); " " }" " .z1 tr:hover td{" " background: #aaaaaa;" " background: linear-gradient(to top, #f2f2f2, #e0e0e0); " " }" " </style>" " </head>" " <body>" " <h2>Weather station</h2>" " <table class='z1'>" " <tr>" " <th>Property</th>" " <th>Value</th>" " </tr>" " <tr>" " <td> Temperature </td>" " <td><xsl:value-of select='response/temperature/celsius'/> C</td>" " </tr>" " <tr>" " <td> Humidity </td>" " <td><xsl:value-of select='response/humidity/percentage'/> %</td>" " </tr>" " <tr>" " <td> Pressure </td>" " <td><xsl:value-of select='response/pressure/mmHg'/> mm.Hg</td>" " </tr>" " <tr>" " <td> Illuminance </td>" " <td><xsl:value-of select='response/illuminance/lx'/> lx</td>" " </tr>" " </table>" " <h2>Termosensor</h2>" " <table class='z1'>" " <tr>" " <th>Sensor</th>" " <th>Value</th>" " </tr>" " <xsl:for-each select='response/temperature/sensors/sensor'>" " <tr>" " <td> <xsl:value-of select='@name'/> </td>" " <td><xsl:value-of select='.'/> <xsl:value-of select='@unit'/></td>" " </tr>" " </xsl:for-each>" " </table>" " </body>" " </html>" "</xsl:template>" "</xsl:stylesheet>"; /* this is a special form of print that outputs from PROGMEM */ server.printP(z1_xsl); } } // ===================================================== void setup(){ // Init LED display lc.shutdown(0,false); lc.setIntensity(0,2); lc.clearDisplay(0); lc.setChar(0,7,'L',false); lc.setChar(0,6,'O',false); lc.setChar(0,5,'A',false); lc.setChar(0,4,'d',false); // Ethernet SPI.begin(); Ethernet.begin(mac, ip); // Init Light sensor lightMeter.begin(); // Init pressure sensor if (!bmp.begin()) { Serial.println("ERROR: BMP085 sensor failed"); } //enable serial datada print Serial.begin(9600); Serial.println("Weather Z1 v 0.1"); // webserver.setDefaultCommand(&web_index); webserver.addCommand("index.html", &web_index); webserver.addCommand("z1.xsl", &web_z1_xsl); webserver.begin(); } void loop(){ char buff[64]; int len = 64; mode = (mode + 1) % 100; Z1_sensors_update(); Z1_SerialOutput(); Z1_ledDisplay(); Z1_modbus_tcp_slave(); // Z1_http_server(); webserver.processConnection(buff, &len); } void Z1_sensors_update() { if (mode%30==0) { // BH1750 (light) light = lightMeter.readLightLevel(); // BMP085 (Temp and Pressure) temp_bmp = bmp.readTemperature(); pressure_pa = bmp.readPressure(); pressure_mm = pressure_pa/133.3; // DHT22 (Temp) if (dht_s1.read22(DHT_S1_PIN) == DHTLIB_OK) { humidity = dht_s1.humidity; temp_dht = dht_s1.temperature; temp = temp_dht; } else { temp = temp_bmp; } } } void Z1_SerialOutput() { Serial.print("T1= "); Serial.print(temp_dht); Serial.print(" *C \t"); Serial.print("T2= "); Serial.print(temp_bmp); Serial.print(" *C \t"); Serial.print("Pressure= "); Serial.print(pressure_mm); Serial.print(" mm \t"); Serial.print("Humidity= "); Serial.print(humidity); Serial.print(" %\t"); Serial.print("Light= "); Serial.print(light); Serial.print(" lx \t"); Serial.print("\n"); } void Z1_ledDisplay() { int v; if (light<50) { lc.setIntensity(0,0); } else if (light>80 && light<200) { lc.setIntensity(0,2); } else if (light>250 && light<1000) { lc.setIntensity(0,5); } else if (light>1100) { lc.setIntensity(0,15); } if (mode<=25) { // lc.clearDisplay(0); lc.setChar(0,7,'t',false); if (temp>=0) { lc.setChar(0,6,' ',false); } else { lc.setChar(0,6,'-',false); } v = (int)( temp / 10 ) % 10; lc.setDigit(0,5,(byte)v,false); v = (int)( temp ) % 10; lc.setDigit(0,4,(byte)v,true); v = (int)( temp * 10 ) % 10; lc.setDigit(0,3,(byte)v,false); lc.setChar(0,2,' ',false); lc.setChar(0,1,'*',false); lc.setChar(0,0,'C',false); delay(1); } else if (mode<=50) { // lc.clearDisplay(0); lc.setChar(0,7,'H',false); lc.setChar(0,6,' ',false); v = (int)( humidity / 10 ) % 10; lc.setDigit(0,5,(byte)v,false); v = (int)( humidity ) % 10; lc.setDigit(0,4,(byte)v,true); v = (int)( humidity * 10 ) % 10; lc.setDigit(0,3,(byte)v,false); lc.setChar(0,2,' ',false); lc.setChar(0,1,'*',false); lc.setChar(0,0,'o',false); delay(1); } else if (mode<=75) { // lc.clearDisplay(0); lc.setChar(0,7,'P',false); lc.setChar(0,6,' ',false); v = (int)( pressure_mm / 100 ) % 10; lc.setDigit(0,5,(byte)v,false); v = (int)( pressure_mm/10 ) % 10; lc.setDigit(0,4,(byte)v,false); v = (int)( pressure_mm ) % 10; lc.setDigit(0,3,(byte)v,false); lc.setChar(0,2,' ',false); lc.setChar(0,1,'n',false); lc.setChar(0,0,'n',false); delay(1); } else { // lc.clearDisplay(0); lc.setChar(0,7,'L',false); lc.setChar(0,6,' ',false); v = (int)( light / 1000 ) % 10; lc.setDigit(0,5,(byte)v,false); v = (int)( light / 100 ) % 10; lc.setDigit(0,4,(byte)v,false); v = (int)( light / 10 ) % 10; lc.setDigit(0,3,(byte)v,false); v = (int)( light ) % 10; lc.setDigit(0,2,(byte)v,false); lc.setChar(0,1,' ',false); lc.setChar(0,0,' ',false); delay(1); } } void Z1_modbus_tcp_slave() { Mb.Run(); DEV_ID = WEATHER_STATION_Z1; TEMPERATURE = temp*10; TEMPERATURE_DHT = temp_dht*10; TEMPERATURE_BMP = temp_bmp*10; HUMIDITY = humidity*10; PRESSURE_MM = pressure_mm; LIGHT = light; } Git-repository with Arduino controller software: github.com/krotos139/sh1_arduino_weather_station_v1
Conclusion
Smart weather station with an Ethernet interface can be easily implemented on arduino.
The cost of the device in pilot production - ~ 1700 rubles
Assembly time - ~ 1 day
The functionality is fantastic - it can work as an independent device with power from POE and from a standard arduino-vsky power source, as well as a smart device - allowing you to receive all the necessary information from the browser. For automated information processing, the device provides information in the form of an XML document and the modbus protocol.
Source: https://habr.com/ru/post/214011/
All Articles