Development of cross-platform mobile applications in Delphi # 6
Part 1
Part 2
Part # 3
Part # 4
Part # 5
After a slightly prolonged pause, we continue the story of creating a mobile application in Delphi using the FM Platform. Let me remind you that as a task we chose the implementation of a cookbook, equipped with a “calculator of product proportions” and a timer. We started the development with the creation of a “desktop application”. The mobile counterpart for the Android platform has also been gradually implemented. SQLite was chosen as the DBMS.
Before continuing the development process, I would like to make two small digressions. First, in early January, the results of the competition announced by Embarcadero were summed up. Among the competitive works there are many quite interesting, and most importantly, really working solutions. Descriptions of some works from the list of winners have already been published .
')
And the second point to which attention should be paid before proceeding directly to the description of the process for the further development of our applications. In the middle of December, Update 2 for Delphi and RAD Studio was released. If you have experimented with third-party components in a project, you should use new versions that are compatible with Update 2. You may also have to re-recreate individual forms.
Now, let's start building a mobile application. In my opinion, the term "construction" is most appropriate here. After all, all business logic, in fact, has already been created in the desktop application, and we can only transfer it to the mobile application.
In the previous stages, we have already created a mobile application project, a data module and the preparation of the main form of the application. Let's make an active tab “Ingredients” and place the necessary components on it. In principle, in a mobile application, we could use a component of a tabular data display (Grid). The concept of the interface for the Android platform, although it suggests the possibility of using the Grid. However, as noted earlier, the Grid for Android is somewhat different from the usual Grid for desktop applications. Therefore, it is better to use the TListBox component to display data. Naturally, the data displayed in it will not be edited.
In the row of the list it is necessary to show the product, its quantity and unit of measurement. This data is contained in three different fields.
The list displays information from the dataset through LiveBindings automatically. Formation of the same presentation is advisable to do at the level of the data set, leaving the role of decoration to the TListBox component. Therefore, thinking about displaying information in the list on the interface, we will nevertheless begin working with the data set.
In the FDTIngredientes data set, we will create a calculated field IngridientInfo. To do this, open the field editor (double click on the FDTIngredientes component) and select the context menu item New Field. Using the dialog that opens, set the properties of the new field, as shown in the figure.

The values of the calculated fields are calculated based on the values of the already existing fields of the current record of the data set. To get them, use the OnCalcFields event handler. In the handler code, enter the following line:
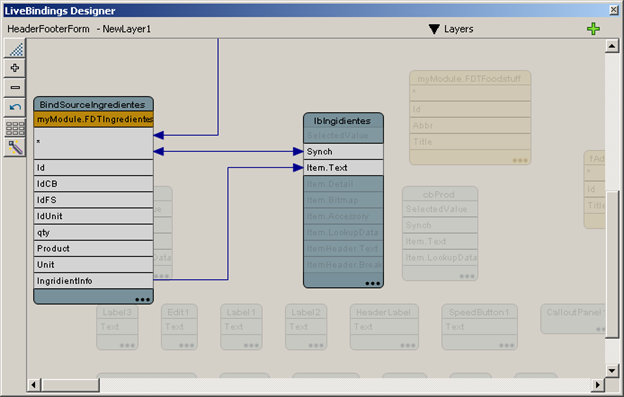
Place the ListBox component (lbIngridients) on the main form. With the help of LiveBinding designer connect it to the data source. Similarly, we included a list of recipes on the left side of the form.
The remaining controls (two drop-down lists, the navigator and the input field for the number of ingredients) are placed on the form and connected to the data source in the same way as in the desktop application. Basically, you can try to transfer them from the main form of the desktop application using the clipboard.
The figure shows the appearance of the form designer.

LiveBinding links are as follows:
Now you can try to start the application. Obviously, you will get a functionally working analogue of a desktop application. However, its appearance leaves much to be desired. Values do not fit in the fields, controls are not quite as in the form designer. We will talk about how to bring the appearance of the application in order in the next part of the cycle.
In the meantime, let's summarize some preliminary results. The process of transferring functionality from a “desktop” application to a mobile one is quite simple. Although you have to take into account certain features of the interface, it is quite reasonable to create and debug an application for Windows, and then build an Android or iOS application based on it. The application can be transferred to a mobile platform step by step. At the same time, you can significantly save time due to the speed of debugging the code containing the business logic.
In the next part we will continue to create a mobile application.
Part 2
Part # 3
Part # 4
Part # 5
After a slightly prolonged pause, we continue the story of creating a mobile application in Delphi using the FM Platform. Let me remind you that as a task we chose the implementation of a cookbook, equipped with a “calculator of product proportions” and a timer. We started the development with the creation of a “desktop application”. The mobile counterpart for the Android platform has also been gradually implemented. SQLite was chosen as the DBMS.
Before continuing the development process, I would like to make two small digressions. First, in early January, the results of the competition announced by Embarcadero were summed up. Among the competitive works there are many quite interesting, and most importantly, really working solutions. Descriptions of some works from the list of winners have already been published .
')
And the second point to which attention should be paid before proceeding directly to the description of the process for the further development of our applications. In the middle of December, Update 2 for Delphi and RAD Studio was released. If you have experimented with third-party components in a project, you should use new versions that are compatible with Update 2. You may also have to re-recreate individual forms.
Now, let's start building a mobile application. In my opinion, the term "construction" is most appropriate here. After all, all business logic, in fact, has already been created in the desktop application, and we can only transfer it to the mobile application.
In the previous stages, we have already created a mobile application project, a data module and the preparation of the main form of the application. Let's make an active tab “Ingredients” and place the necessary components on it. In principle, in a mobile application, we could use a component of a tabular data display (Grid). The concept of the interface for the Android platform, although it suggests the possibility of using the Grid. However, as noted earlier, the Grid for Android is somewhat different from the usual Grid for desktop applications. Therefore, it is better to use the TListBox component to display data. Naturally, the data displayed in it will not be edited.
In the row of the list it is necessary to show the product, its quantity and unit of measurement. This data is contained in three different fields.
The list displays information from the dataset through LiveBindings automatically. Formation of the same presentation is advisable to do at the level of the data set, leaving the role of decoration to the TListBox component. Therefore, thinking about displaying information in the list on the interface, we will nevertheless begin working with the data set.
In the FDTIngredientes data set, we will create a calculated field IngridientInfo. To do this, open the field editor (double click on the FDTIngredientes component) and select the context menu item New Field. Using the dialog that opens, set the properties of the new field, as shown in the figure.
The values of the calculated fields are calculated based on the values of the already existing fields of the current record of the data set. To get them, use the OnCalcFields event handler. In the handler code, enter the following line:
FDTIngredientesIngridientInfo.AsString:= FDTIngredientesProduct.AsString+' '+ FDTIngredientesUnit.AsString+' '+IntToStr(FDTIngredientesqty.AsInteger); Place the ListBox component (lbIngridients) on the main form. With the help of LiveBinding designer connect it to the data source. Similarly, we included a list of recipes on the left side of the form.
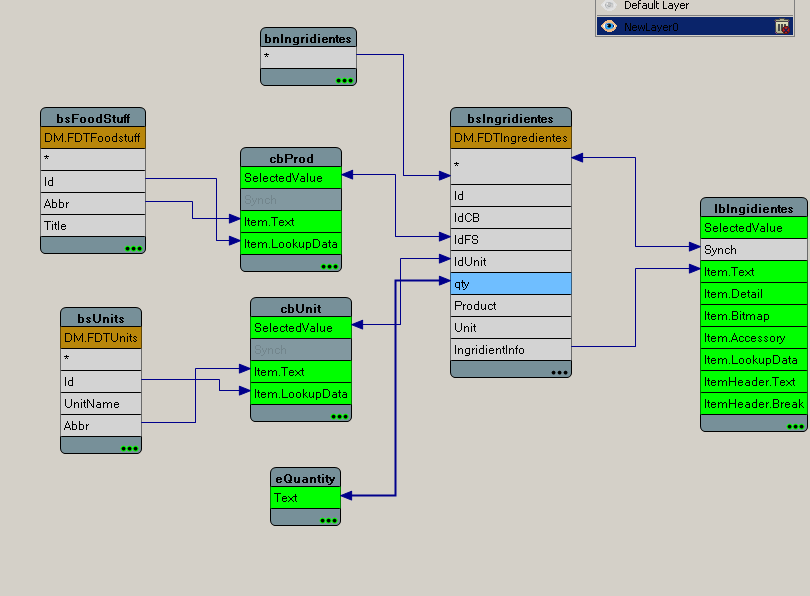
The remaining controls (two drop-down lists, the navigator and the input field for the number of ingredients) are placed on the form and connected to the data source in the same way as in the desktop application. Basically, you can try to transfer them from the main form of the desktop application using the clipboard.
The figure shows the appearance of the form designer.
LiveBinding links are as follows:
Now you can try to start the application. Obviously, you will get a functionally working analogue of a desktop application. However, its appearance leaves much to be desired. Values do not fit in the fields, controls are not quite as in the form designer. We will talk about how to bring the appearance of the application in order in the next part of the cycle.
In the meantime, let's summarize some preliminary results. The process of transferring functionality from a “desktop” application to a mobile one is quite simple. Although you have to take into account certain features of the interface, it is quite reasonable to create and debug an application for Windows, and then build an Android or iOS application based on it. The application can be transferred to a mobile platform step by step. At the same time, you can significantly save time due to the speed of debugging the code containing the business logic.
In the next part we will continue to create a mobile application.
Source: https://habr.com/ru/post/213953/
All Articles