Computer control without hands (a gyro in my head!)
In the previous article, I described how you can control a computer with your eyes. Despite the fact that in some cases tracking the position of the pupils (eye gaze tracking) is the only way to provide a sick person with the opportunity to communicate with the outside world, the system described earlier is not without flaws. First of all, it is the need to use components that are difficult to purchase in Russia. In addition, a person with glasses has to severely limit the position of the head in order to minimize the parasitic glare on the surface of the glasses and to achieve a stable system operation.
Is it possible to use something simpler and more reliable if a person is able to move his head, but has difficulty working with his hands?
- = Update January 2019 = -
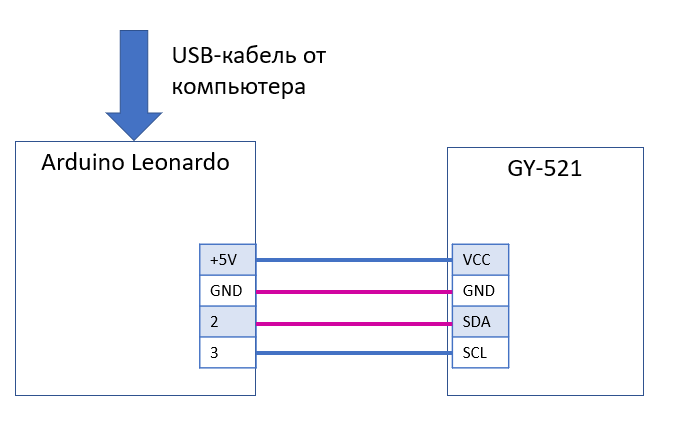
The Upvel UM-510KB remote control described in the article is no longer possible to buy, but instead you can use this scheme assembled from the Arduino Leonardo and the GY-521 module with the MPU-6050 gyroscope / accelerometer to track the head rotation.
')
Arduino Leonardo and GY-521 are connected by four wires. If possible, solder them.
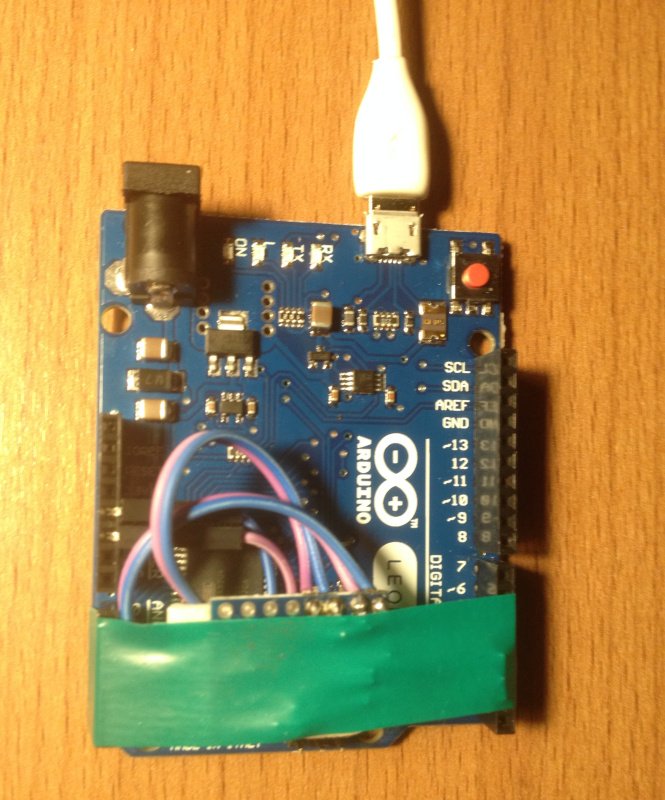
I got this prototype. Naturally, in an amicable way, all this should be ennobled / placed in the body.
 |  |
The program (sketch) that needs to be loaded into the Arduino looks like this:
#include "I2Cdev.h" #include "MPU6050_6Axis_MotionApps20.h" #include "Wire.h" #include <Mouse.h> MPU6050 mpu; uint16_t packetSize; // expected DMP packet size (default is 42 bytes) uint16_t fifoCount; // count of all bytes currently in FIFO uint8_t fifoBuffer[64]; // FIFO storage buffer // orientation/motion vars Quaternion q; // [w, x, y, z] quaternion container VectorFloat gravity; // [x, y, z] gravity vector float ypr[3]; // [yaw, pitch, roll] yaw/pitch/roll container and gravity vector // float old_mx=-200; float old_my=-200; float dx,dy,mx,my; // ================================================================ // === INITIAL SETUP === // ================================================================ void setup() { Wire.begin(); Wire.setClock(400000); // 400kHz I2C clock. Comment this line if having compilation difficulties mpu.initialize(); mpu.dmpInitialize(); mpu.setDMPEnabled(true); packetSize = mpu.dmpGetFIFOPacketSize(); } // ================================================================ // === MAIN PROGRAM LOOP === // ================================================================ void loop() { // wait for MPU interrupt or extra packet(s) available while (fifoCount < packetSize) { fifoCount = mpu.getFIFOCount(); } // check for overflow (this should never happen unless our code is too inefficient) if ( fifoCount >= 1024) { // reset so we can continue cleanly mpu.resetFIFO(); fifoCount = mpu.getFIFOCount(); // otherwise, check for DMP data ready interrupt (this should happen frequently) } else { // wait for correct available data length, should be a VERY short wait while (fifoCount < packetSize) fifoCount = mpu.getFIFOCount(); // read a packet from FIFO mpu.getFIFOBytes(fifoBuffer, packetSize); // track FIFO count here in case there is > 1 packet available // (this lets us immediately read more without waiting for an interrupt) fifoCount -= packetSize; // mpu.dmpGetQuaternion(&q, fifoBuffer); mpu.dmpGetGravity(&gravity, &q); mpu.dmpGetYawPitchRoll(ypr, &q, &gravity); // ypr[0] - X, ypr[1] - Y, Y - mx=ypr[0] * 180/M_PI; my=ypr[1] * 180/M_PI; if(old_mx>-200) // { if((old_mx<-100)&&(mx>100)) { dx=(-180-old_mx)+(mx-180); } else if((old_mx>100)&&(mx<-100)) { dx=(180-old_mx)+(180+mx); } else { dx=mx-old_mx; } dy=my-old_my; Mouse.move(2000/60*dx, -1000/30*dy); } old_mx=mx; old_my=my; } } To compile the sketch you also need to download the libraries I2Cdev and MPU6050. You can get them from here: github.com/jrowberg/i2cdevlib/tree/master/Arduino
After downloading the sketch, the assembled device acts in the same way as the console from the article. That is, you change the orientation of the device in space, and the mouse cursor on the screen moves.
- = next - the original article = -
Is it possible to use something simpler and more reliable if a person is able to move his head, but has difficulty working with his hands?
Of course, such funds exist. First of all, these are programs that use a regular webcam to monitor head rotation and some other actions, such as blinking eyes and lip movements (read about them below, in the section " Is the game worth the candle? ").

In addition, specialized devices are also being produced, which are also cameras that monitor markers that glow brightly in the infrared range . Markers are attached somewhere in the head area, for example, on the rim of glasses, cap, headset. Sometimes they even recommend sticking a marker on the forehead.
Various firms that previously manufactured this type of device gradually gathered under the wing of NaturalPoint . And now they have on the site you can find devices that previously competed, and now they just divide different market segments. For example, the simpler version ( TrackIR ) they offer for gamers, and more expensive ( SmartNav ) - for working at the computer.
And without that, an expensive SmartNav ($ 500) becomes just gold when you try to buy it in Russia. Therefore, an idea arose to create something that could position the cursor on a computer screen just as well, but it would be more accessible.
At first, I wanted to use the same principle of work: markers, lights, image processing. But thoughts came about direct measurements. Up to attaching an electronic caliper to the head (almost a joke).
As it turned out later, such devices really exist!
Look here at this engineering marvel - a lever that you need to keep your mouth, and control his head movements!
Suddenly, the idea was to use a [electronic] gyroscope. They have recently become available and very accurate. Finished devices such as "air mouse", however, did not receive much distribution. For example, the Logitech MX Air mouse is already out of production, apparently due to a lack of demand.
There are programs for smartphones (both iPhone and Android) that allow you to use them as aerial masks, using the gyros built into them. But I didn’t explore this question deeply, because, above all, I was interested in a cheap solution.
Finally, multimedia consoles for TVs that also use the built-in gyroscope came into view. Some of them work with a regular computer; you just need to insert the adapter into the USB-socket. Data transmission occurs over the air, that is, the direct view of the console is not required, as is the case with infrared transceivers.
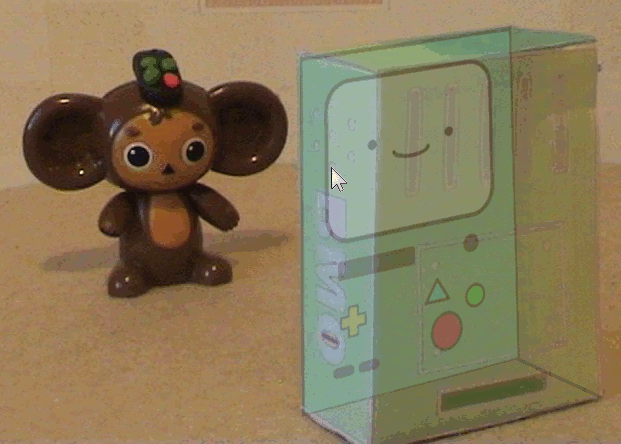
The console is fixed on the head, and when it is turned, the mouse cursor on the screen moves (as in Cheburashka in the title of the article). It remains only to deal with mouse clicks and a virtual keyboard. For these purposes, I wrote my program .
The difficulty is the following: the consoles “fall asleep” after a certain period of inactivity, and they need to be awakened by pressing a button, which can be difficult for the person using them.

I had to put on a series of experiments - to clamp one of the buttons on the keyboard and leave the remote control idle, hoping that the pressed button would not allow the remote to fall asleep. Moreover, the button had to be clamped with a clothespin, and not with a hand, since the hand could transmit small movements to the console. Buttons could be pressed only those that are not used in Windows.
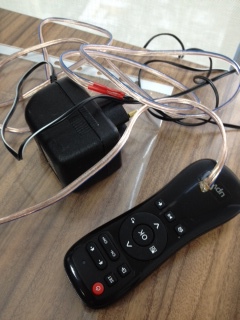
Some consoles could not be defeated, but in the end the Upvel UM-510KB was found, which is guaranteed not to fall asleep while holding a pair of buttons.

If you open this remote, you can find the STM8L-151 microcontroller from STMicroelectronics (1), the Invensense MPU-3050c three-axis gyroscope (2), and some other nameless chip (3) for communicating with a 2.4 GHz USB adapter inside. An infrared LED is also visible. You need it if you want to use the remote control to switch programs and adjust the volume on the TV. When communicating with a computer, the LED is not used, so you can safely block it.
Of course, a beautiful solution would be to read, disassemble and modify the microcontroller's program, and then reflash it so that the console does not fall asleep and not short the buttons. But I am not familiar with this area, I leave this opportunity to enthusiasts.
The remote control with constantly pressed buttons consumes electricity voraciously. Therefore it was necessary to solder the power supply unit to it in order not to change the batteries every day.
Rework step by step
First of all, I note that the fact that everything has worked for me does not mean that it will work for you. If the manufacturer, for example, changes the firmware, the closure of two buttons may be useless. However, I hope that no one will change the firmware as superfluous.
So, open the remote. We pick with a screwdriver until it opens, slightly damaging the case. Then, take out the board and close it with two buttons (see photo). You can use a soldering iron to clean the board, but I just glued the pieces of foil with candy to tape with reinforced scotch tape.
Solder power from a three-volt stabilized power source.
We pour glue to taste so that the wire stays firmly in the case.
 |  |  |
| Close the TWO (!) Buttons in the indicated places. Attention! Initially, the photo contained erroneously labeled buttons! It is necessary to close the "Set" button and the button with four squares, located to the left of "OK" | Strengthen wire | Assembly |

How to hold the remote on your head? You can simply put the remote on the head and put on a wool hat on top. So I initially did. But for long-term use, you can sew a pocket to some kind of headgear.
The exact position of the console relative to the head is not required. If the mouse cursor is not where you would like, just turn your head so that the cursor starts to rest on the edge of the screen. This will move the cursor in the direction opposite to the rotation of the head. In short, try and everything will become clear without explanation.
Is it worth it?
After everything was done, I decided to try programs that use a regular webcam to control the mouse without hands for comparison. What was my surprise when they all earned great! If there is nothing else at hand, I recommend using them.
I tried such programs (all free):
Personally, I liked the eViaCam program most of all, but this is a purely subjective, superficial opinion based on short use with default settings and with the webcam I have. You might like a completely different program.

To appreciate the advantages of using a gyroscope over purely software solutions, I wrote a program in which you need to move the cursor after the squares appearing on the screen. At the same time, the mouse cursor should stop (lock) above the square for at least 0.2 seconds.
Two small squares are shown: red - where you need to lead the mouse, and green - the place where red moves to the next step.
The program and its source code are available at https://github.com/MastaLomaster/CStest
As a result, the following times for moving the cursor across 25 squares of 40x40 pixels were obtained (indirectly, a higher speed also indicates greater positioning accuracy):
| ordinary mouse in hand | 28.3 seconds |
| remote with a gyroscope on the head | 36.7 seconds |
| eViaCam | 58.3 seconds |
| Head mouse | 66.3 seconds |
| Camera mouse | 48.4 seconds |
The typing speed on the virtual keyboard is less revealing. The fact is that the keyboard requires the mouse cursor to “hover” above the key for a long time (about a second). Otherwise, false clicks are possible. Nevertheless, I cite data for typing. I typed the text "Computer Management without hands" and it took me:
| ordinary mouse in hand | 1 minute 15 seconds |
| remote with a gyroscope on the head | 1 minute 23 seconds |
| eViaCam | 1 minute 31 seconds |
| Head mouse | 1 minute 44 seconds |
| Camera mouse | 1 minute 28 seconds |
Camera Mouse - I liked the least, due to the fact that the cursor does not stand still, but twitches. But the typing speed in it turned out to be quite good.
I used a program that I wrote to work with the Tobii REX eye tracking device, and later modified it to support any device that moves the cursor around the screen, including aerial mice.
The program itself and its source code are available here: https://github.com/MastaLomaster/bkb
An illustration of how the program works with the eye tracking device is here: http://www.youtube.com/watch?v=O68C4d2SNC8
With other devices, the program works in the same way, only the cursor moves not from eye movement, but, for example, from turning the head with a gyroscope.
Is it worth it to throw out about a thousand rubles for the console, power supply, wires, and even lose time, if there are free programs that you can work with, and you don’t need to cling to your head?
In my opinion, the use of the console gives the following advantages:
- Quick cursor response . to the point that you can play dynamic games
- Predictability . That is, turning your head to the usual angle, you will see that the cursor has moved to the usual place
- Independence from the lighting conditions and in general from the fact that new faces / objects appeared in the frame.
Well, it's up to you to decide.
Source: https://habr.com/ru/post/213715/
All Articles