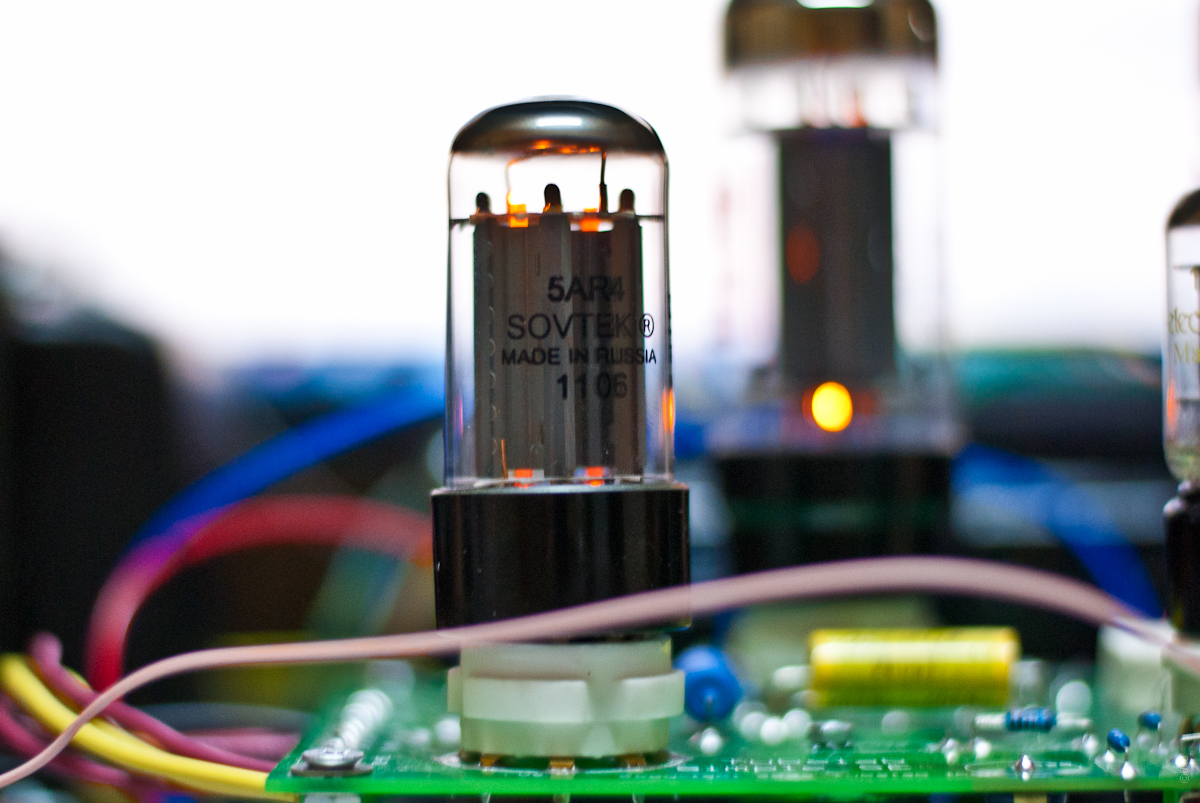
Warm tube sound
Somehow accidentally noticed that 90% of articles on Habré with the tag "warm lamp" talk about anything, but not about lamp technology. At the same time, few publications about tube devices collect many likes of delighted comments.
I do not remember how or when this strange idea settled in my head - to assemble a tube amplifier. Why is it also not entirely clear - I am not a music lover, I have not been home to home theaters for a long time and quickly got ill, as a memory of this time there are floor speakers Wharfedale Diamond 8.4, used in recent years exclusively as a decorative stand for flowers. Anyway, the thought settled so deeply in my head that a slow study of specialized resources began, reading forums, searching for dummies' tube amplifier circuits, etc. etc. The absence of any experience in communicating with lamp technology (the most up-to-date gadget I remember is a black and white TV set in a student hostel in the early 90s of the last century) scaring and attracting at the same time.
A sluggish search could go on indefinitely, if one day a remarkable resource was not found - http://tubelab.com/ . He chose his choice on a single-ended Tube Lab Simple Single End (SSE) amplifier, ideally suited to my interests, namely: a simple amplifier for beginners with a minimum of components, without any adjustments, while being quite versatile and, judging by the reviews, proved to be excellent. The order of the payment was made on the site (sent anywhere except Russia and Italy), payment via Paypal, short correspondence with the developer, fast delivery of two boards (In addition to SSE, a payment was also ordered for an advanced version of Tublab SE - so to speak, “for growth”) . It was decided to order components via e-bay, not quickly, but reliably and inexpensively - delivery times were compensated by convenience (receiving by mail, leisurely search while sitting at the computer). The process took quite a long time, but I was not particularly in a hurry (almost 2 years had passed since the order of the boards to the time of successful switching on).
')
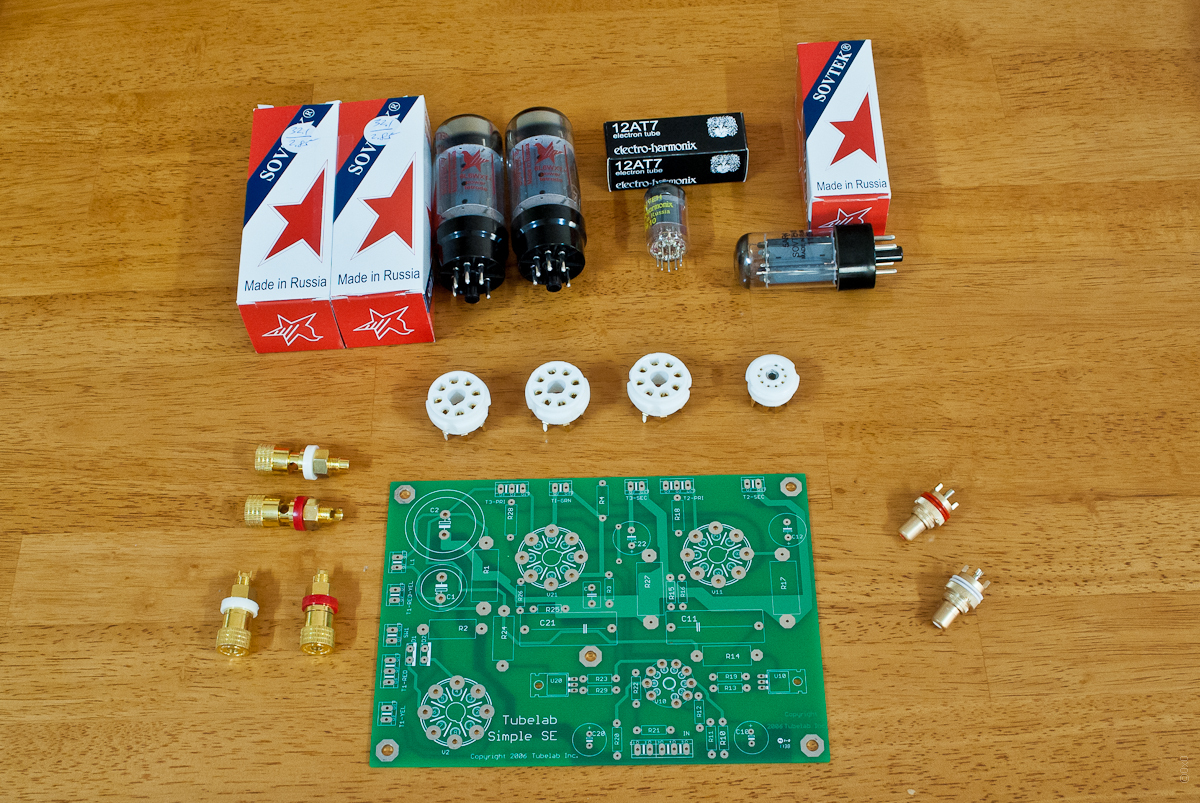
The first parts received
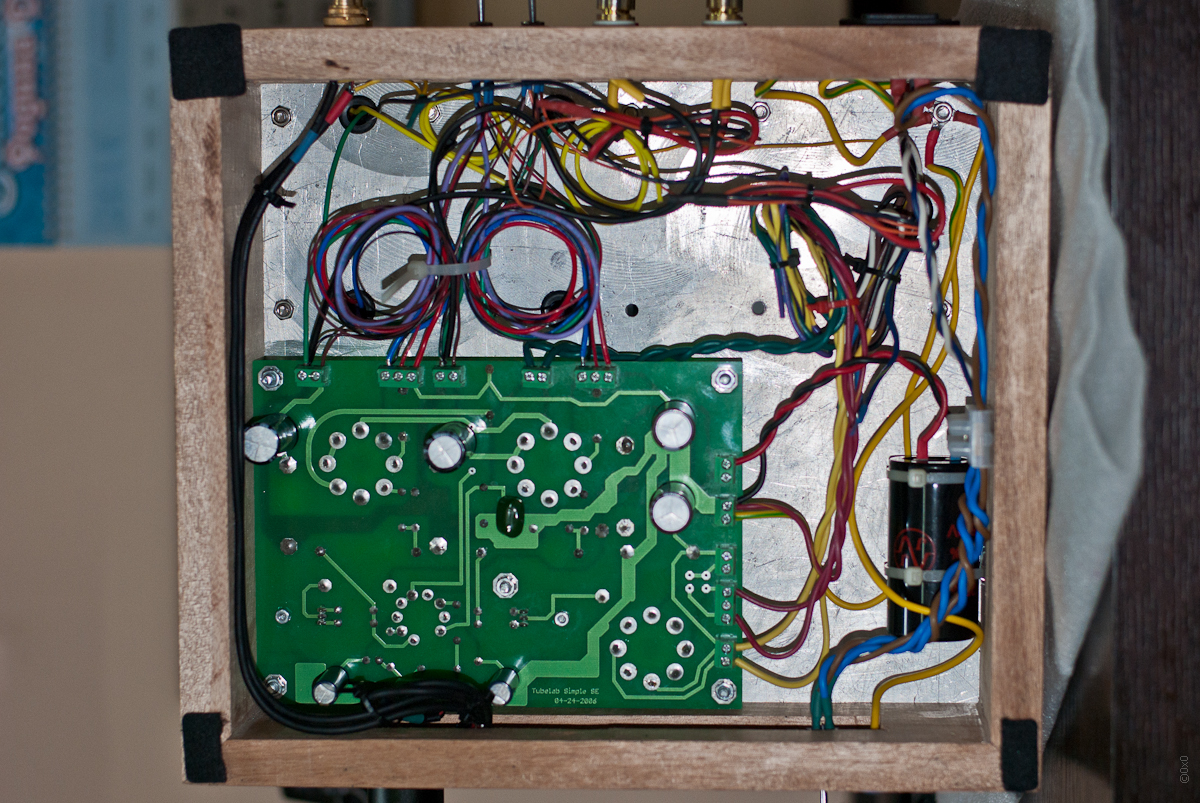
It makes no sense to describe the process of assembling the amplifier board, detailed instructions with pictures are on the project website . Particularly pleasedwith disclaimer disclaimer
Some recommendations received in the process of studying materials.
One of the problems faced was the choice of transformers (power and output) - it is quite difficult to buy a transformer with the required voltages, if the 110-volt version is usually available from American retailers, then a 220V transformer must be ordered from the manufacturer and wait 45-60 days. In addition, they are quite heavy and the cost of shipping from the US almost doubles the cost of the order. Fortunately, the right version (Hammond 374BX) was found in Germany , which made it possible to save a lot on delivery and order a choke (inductance) for use in the output filter of the power supply unit. The first mistake - ordering inductance, I picked up the resistance, completely forgetting about the current, as a result I got a coil with a current limit of 100ma instead of the minimum required 170ma, I had to go back to a simpler and lower quality version with an RC filter and buy the corresponding wire resistor, change the same resistor on the coil, if the desire arises, you can at any time. With output transformers it was simpler, only Transcendar had adequate delivery times, in all respects the model TT-119 approached.
Finally, the moment came when all the components were received, free time became apparent, and nothing prevented us from seeing how all this would work. In violation of all safety regulations, all connections were made right on the table in front of the monitor.
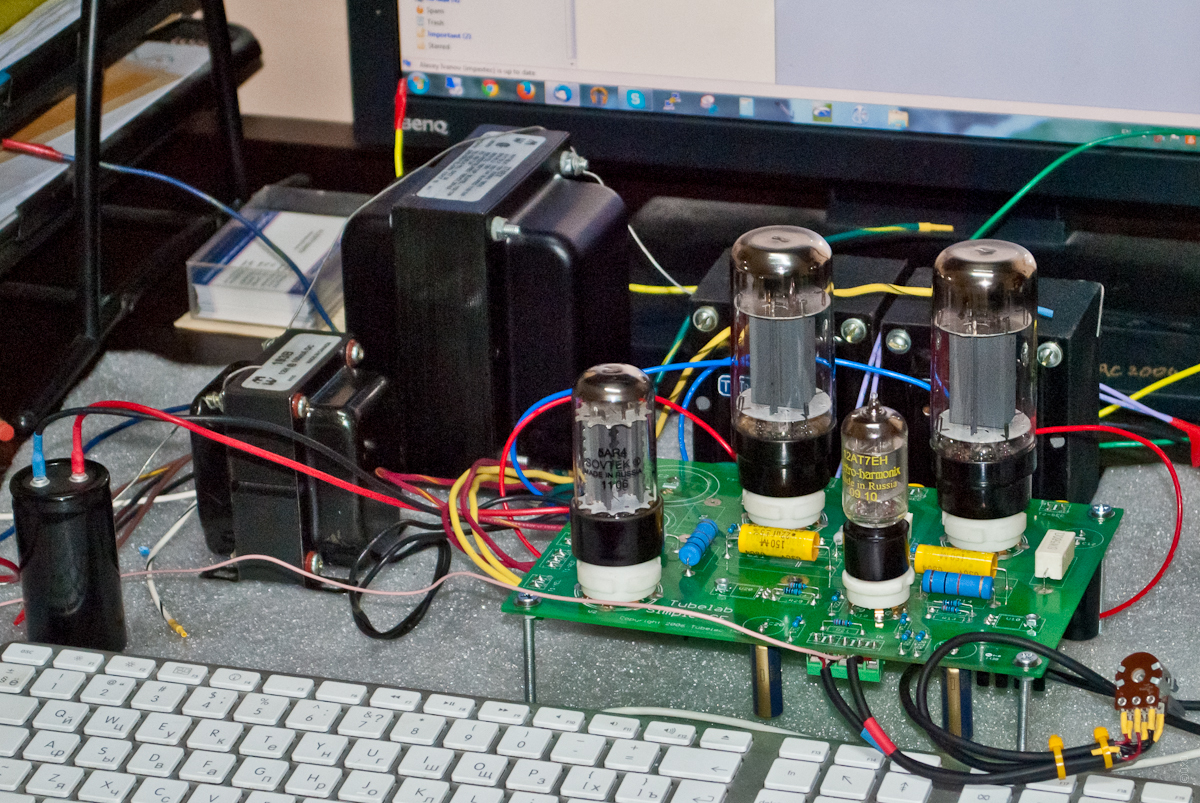
An old LG-P500 was invited to the role of a signal source, and speakers from a music center as speakers, some red tape and a little courage were needed. Taadaaaaam - the switch-on took place, nothing exploded, the lamps lit up with a beautiful orange light ... and silence, or rather, if you put your ear to the speaker, you could even hear music against the background noise, but it was not at all the "warm tube" sound that I was hoping hear.
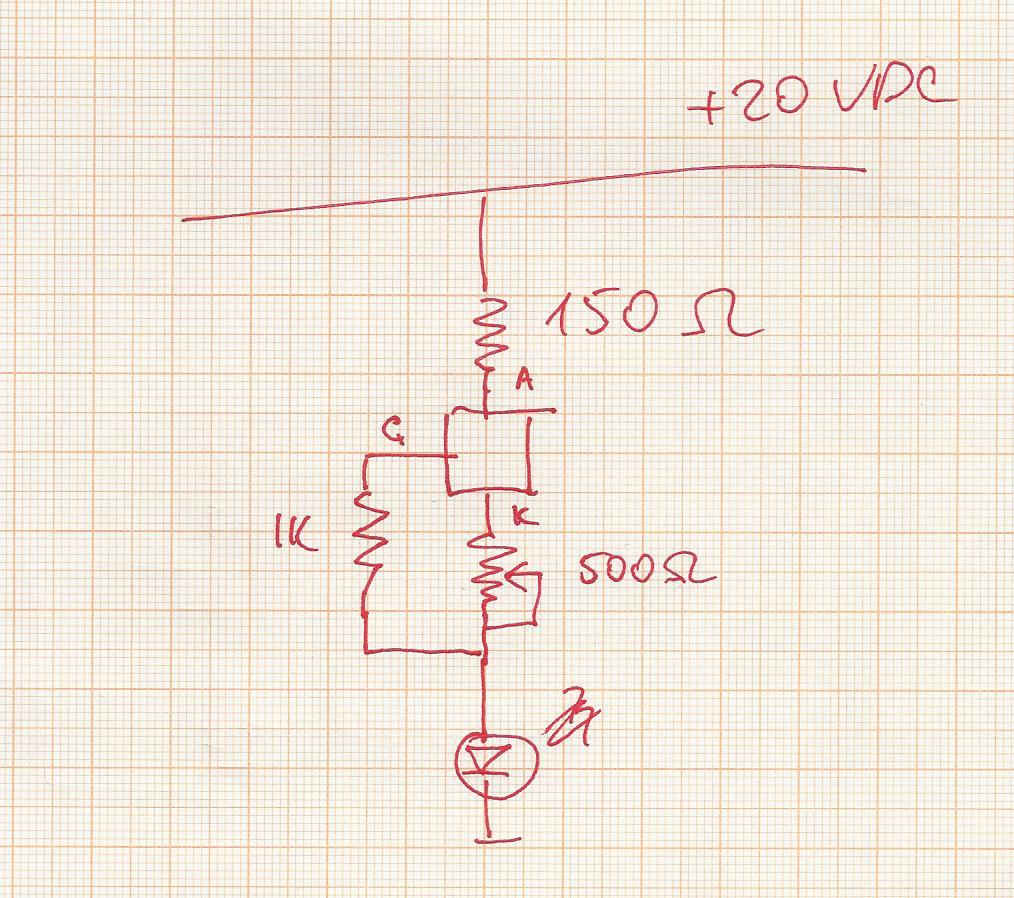
The first thing I decided to check is the voltage at the rectifier output, and was immediately unpleasantly surprised, instead of 375V x √2-27V = 503.33V expected by me (the voltage on the secondary winding multiplied by the root of 2 minus the drop on the lamp) I saw almost 550V at the output of the rectifier and, accordingly, 525V B + (anode voltage). There was no desire to test electrolytes for endurance (they are designed for 500V), I had to turn off the power. After checking the voltage of the network, I was once again surprised - it turned out to be more than 240V (a further survey of the neighbors confirmed that this is all true). Fortunately, the transformer can be switched over to this voltage. When the voltage was turned on again, they returned to normal, but the speakers were still silent, a further check revealed that there was no anode voltage on the input triode, which, in my opinion, indicated a malfunction of a single semiconductor device - an adjustable current source IXIS10M45.
Having decided that the problem arose due to overvoltage and / or Chinese ebay-seller, I ordered a new pair of IXIS10M45 from England, it seemed safer and faster. I must say that the next inclusion was completed in exactly the same way as the first and second, although the new parts looked completely different, but they refused to work in the same way. Here I began to worry, since both channels behaved completely identical, and the voltage on the 12AT7 anodes was completely absent. Since in this circuit, apart from the lamp itself, the current regulator and a priori working small things, there was nothing else, the suspicion fell on the lamp. The ebay auction made it quite inexpensive to buy the ECC81 (the European equivalent of the American 12AT7), and at the same time another batch of IXYS 10M45 (again, a Chinese seller, he took it with a reserve just in case). The third batch of 10M45 looked (and called) in the same way as the second, for the purity of the experiment, immediately replaced the lamp and IXYS, disconnected all unnecessary (second stage) and for the fourth time did not find anything on the anode of the first triode.
Complete failure, the mind refused to understand how this could be. On a prototyping board, I assembled a simple circuit with a LED and an adjustable power source (used untouched from the third installment), powered from the laptop's power supply - and IT DIDN'T EARN !!!
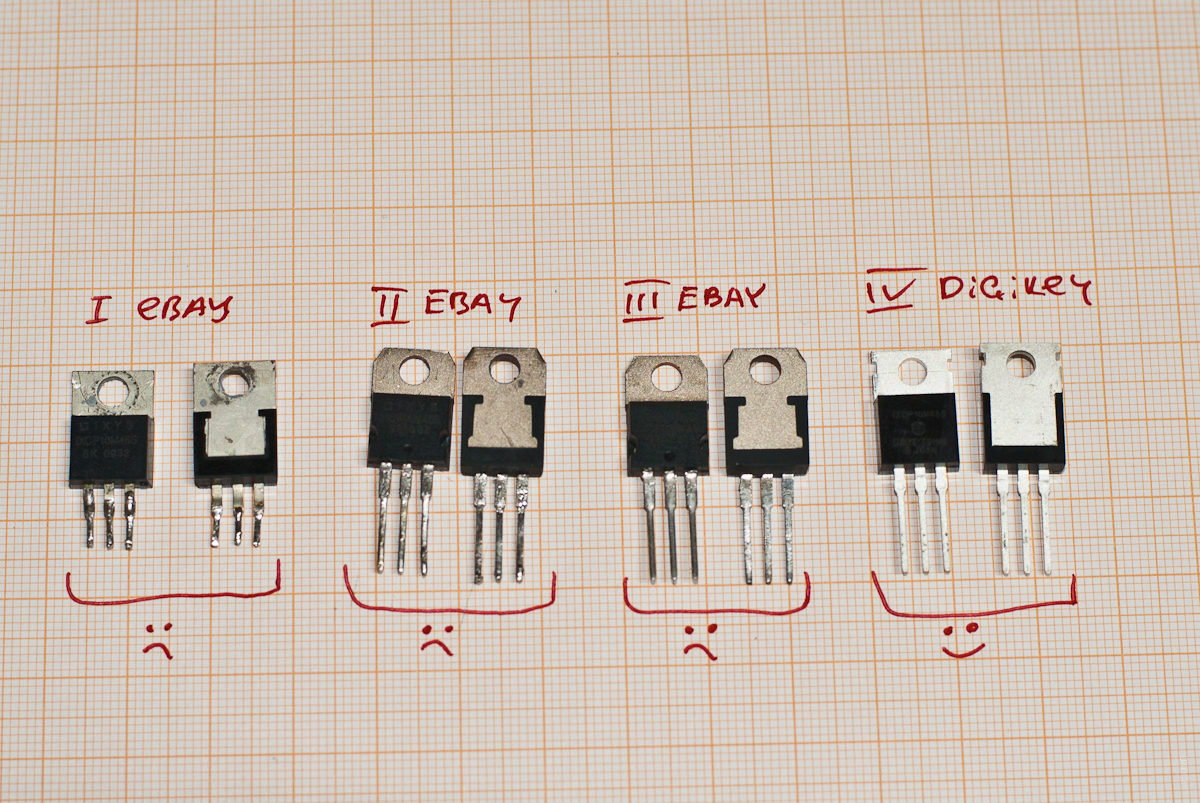
At that moment, the idea of a universal conspiracy began to haunt me, even the things that had to work did not work ... and I again decided to order problem chips, only through a verified vendor (Digikey). And once again there were difficulties even where they should not have been. The first problem that arose (in Digikey, the minimum shipping cost to my region was $ 75, even for a $ 5 order). This problem was solved with the help of an American intermediary, but the second one came out after placing an order - a letter came to my email asking toconfirm that I was not a terrorist to fill out a BIS711 form (who cares about goo.gl/VAkDYB ). I ordered the usual radio parts to the US address, why I still need to fill out this form when I buy the usual radio parts. Having entered my name and my home address in all fields, namely: I am the end user, I am the official representative of the end user, I am the buyer, I am the exporter and indicated that with all this I am an individual, sent the completed form to Digikey, and the next day I received an order confirmation and a tracking on the parcel.
The next batch of appearance was different from all previous ones, which inspired a certain optimism (picture below)
Check on the mock-up board pleased, the LED happily changed the brightness depending on the resistance of the control resistor. Five minutes to replace parts on the board ...
... the next inclusion and from the speakers sounded MUSIC.
As it turned out in the process of communication on specialized forums - fake radio components on ebay become a big problem. That's what they write moderators Diyaudio
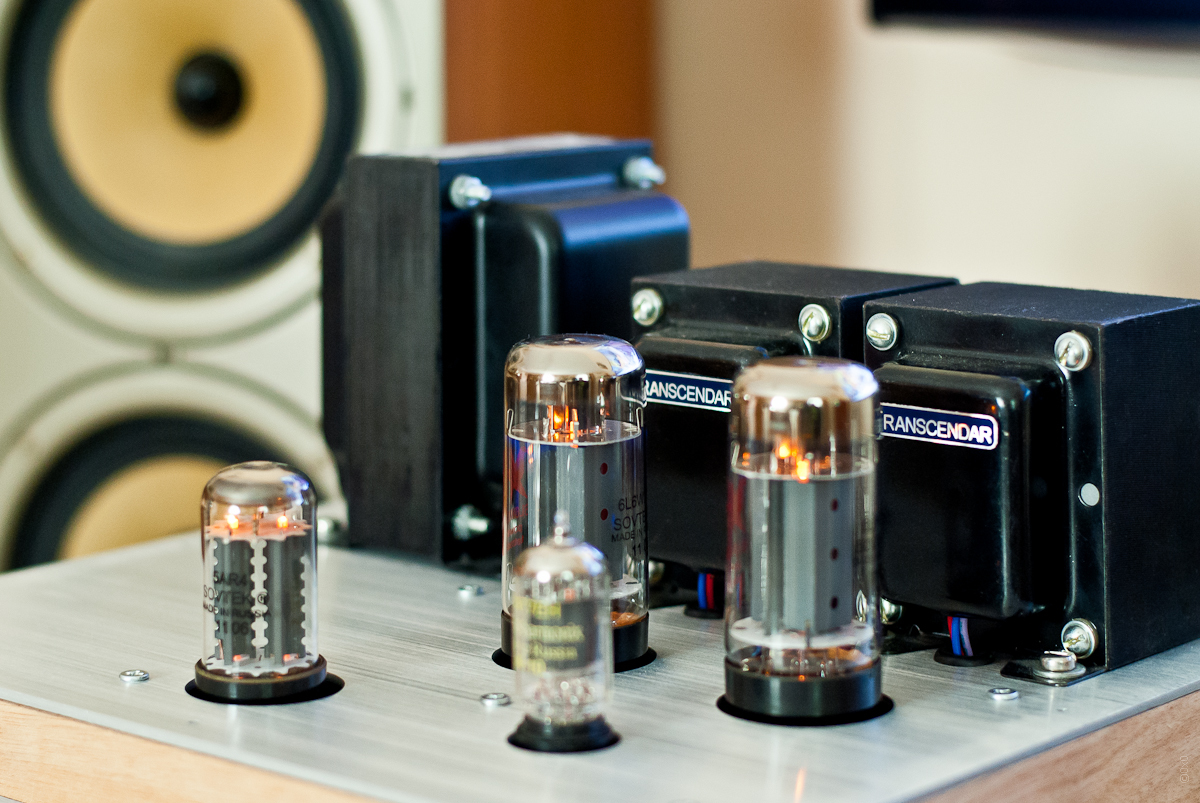
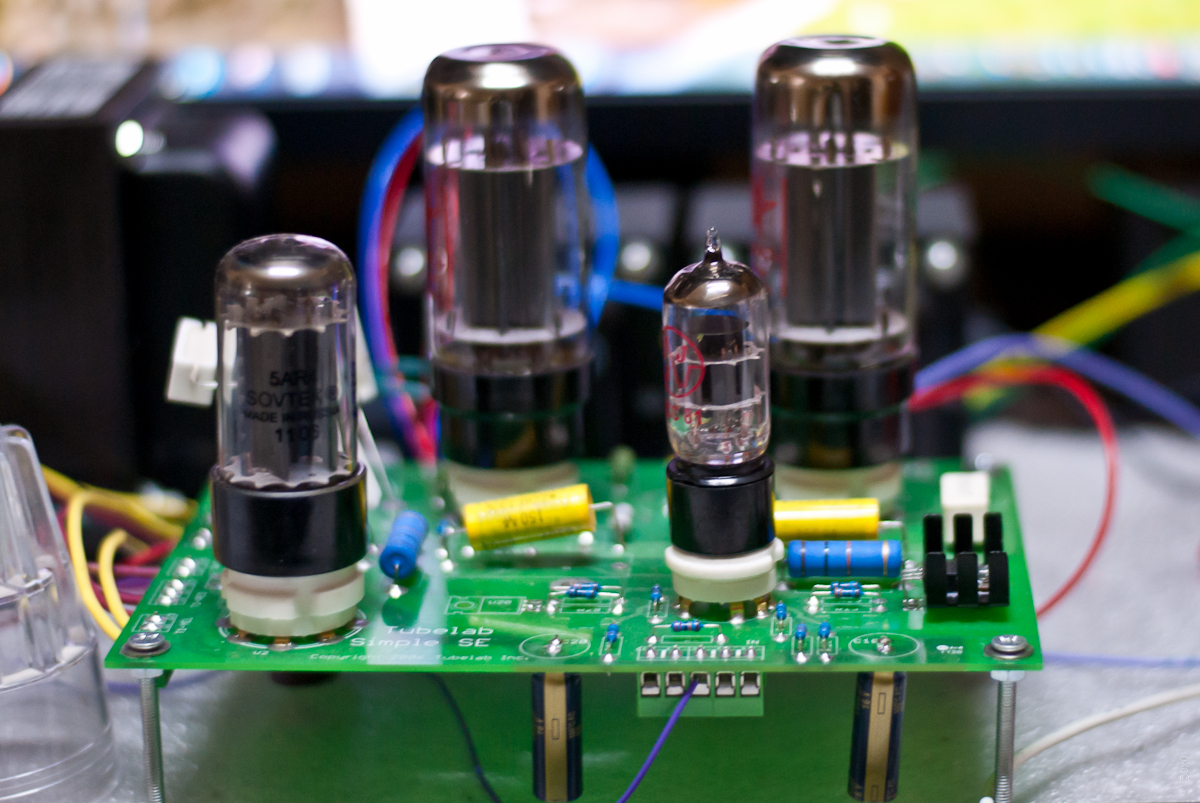
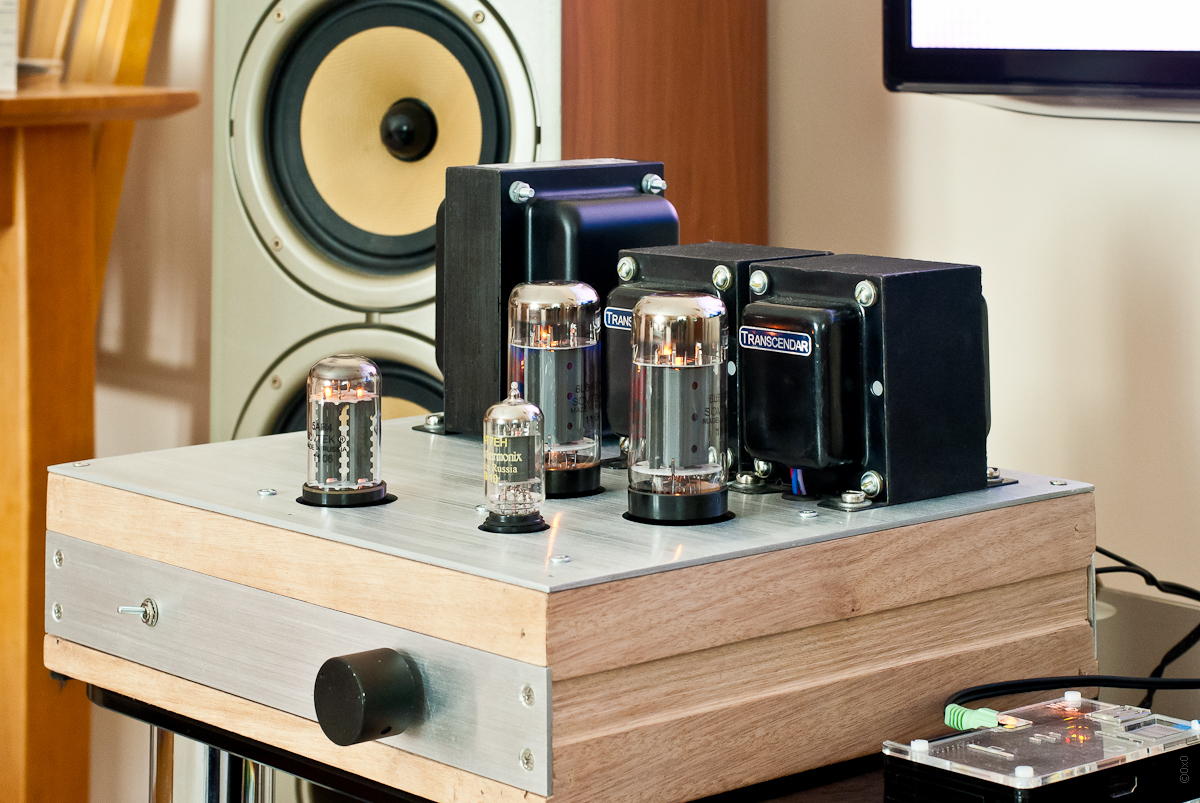
As a result, I received a working fee, restored my own self-esteem, became disillusioned with Ebay. The body was made in haste, as intended as a layout for testing layouts, but unexpectedly liked.

At the moment, the amplifier works in conjunction with the Raspberry Pi & Volumio (as a source), the sound is really very pleasant and really warm (+ 65C). There are plans to improve the body, overcome a slightly interfering hum, embed USB DAC (there will be a tube sound card), it is possible to add a remote control. If there is interest, I will describe the process of manufacturing the case, as well as talk about the problems identified and ways to eliminate them.
UPDATE
Scheme Jpeg , PDF and the location of elements (it is difficult to find on the site, used for marking holes on the body).
I do not remember how or when this strange idea settled in my head - to assemble a tube amplifier. Why is it also not entirely clear - I am not a music lover, I have not been home to home theaters for a long time and quickly got ill, as a memory of this time there are floor speakers Wharfedale Diamond 8.4, used in recent years exclusively as a decorative stand for flowers. Anyway, the thought settled so deeply in my head that a slow study of specialized resources began, reading forums, searching for dummies' tube amplifier circuits, etc. etc. The absence of any experience in communicating with lamp technology (the most up-to-date gadget I remember is a black and white TV set in a student hostel in the early 90s of the last century) scaring and attracting at the same time.
A sluggish search could go on indefinitely, if one day a remarkable resource was not found - http://tubelab.com/ . He chose his choice on a single-ended Tube Lab Simple Single End (SSE) amplifier, ideally suited to my interests, namely: a simple amplifier for beginners with a minimum of components, without any adjustments, while being quite versatile and, judging by the reviews, proved to be excellent. The order of the payment was made on the site (sent anywhere except Russia and Italy), payment via Paypal, short correspondence with the developer, fast delivery of two boards (In addition to SSE, a payment was also ordered for an advanced version of Tublab SE - so to speak, “for growth”) . It was decided to order components via e-bay, not quickly, but reliably and inexpensively - delivery times were compensated by convenience (receiving by mail, leisurely search while sitting at the computer). The process took quite a long time, but I was not particularly in a hurry (almost 2 years had passed since the order of the boards to the time of successful switching on).
')
The first parts received
It makes no sense to describe the process of assembling the amplifier board, detailed instructions with pictures are on the project website . Particularly pleased
Accidents, stupidity of your child’s life,
Transfer
We are not responsible for injuries, incidents, acts of accidental insanity, burned houses, exploded components and other undesirable consequences (all of which are possible) as a result of using the information contained on the site.
Some recommendations received in the process of studying materials.
- Never install electrolytes “all the way”; there should be a small gap between them and the board. The fact is that when soldering the leg heats up and lengthens, while cooling down it shortens, and, with a tight fit, it can simply fall off the lining. Considering that the heating-cooling process takes place regularly in a tube amplifier, at this point you should pay attention.
- Position the chassis of the output and power transformers perpendicularly to reduce mutual influence.
- Input audio connectors to isolate from the chassis, in order to exclude the possibility of the appearance of "ground loops" in the signal lines. If the wire is shielded, the shield should be grounded only on one side.
- Order spare parts to avoid logistics delays and save on delivery.
- And most importantly - be more careful with purchases of components on ebay (more on that later).
One of the problems faced was the choice of transformers (power and output) - it is quite difficult to buy a transformer with the required voltages, if the 110-volt version is usually available from American retailers, then a 220V transformer must be ordered from the manufacturer and wait 45-60 days. In addition, they are quite heavy and the cost of shipping from the US almost doubles the cost of the order. Fortunately, the right version (Hammond 374BX) was found in Germany , which made it possible to save a lot on delivery and order a choke (inductance) for use in the output filter of the power supply unit. The first mistake - ordering inductance, I picked up the resistance, completely forgetting about the current, as a result I got a coil with a current limit of 100ma instead of the minimum required 170ma, I had to go back to a simpler and lower quality version with an RC filter and buy the corresponding wire resistor, change the same resistor on the coil, if the desire arises, you can at any time. With output transformers it was simpler, only Transcendar had adequate delivery times, in all respects the model TT-119 approached.
Finally, the moment came when all the components were received, free time became apparent, and nothing prevented us from seeing how all this would work. In violation of all safety regulations, all connections were made right on the table in front of the monitor.
An old LG-P500 was invited to the role of a signal source, and speakers from a music center as speakers, some red tape and a little courage were needed. Taadaaaaam - the switch-on took place, nothing exploded, the lamps lit up with a beautiful orange light ... and silence, or rather, if you put your ear to the speaker, you could even hear music against the background noise, but it was not at all the "warm tube" sound that I was hoping hear.
The first thing I decided to check is the voltage at the rectifier output, and was immediately unpleasantly surprised, instead of 375V x √2-27V = 503.33V expected by me (the voltage on the secondary winding multiplied by the root of 2 minus the drop on the lamp) I saw almost 550V at the output of the rectifier and, accordingly, 525V B + (anode voltage). There was no desire to test electrolytes for endurance (they are designed for 500V), I had to turn off the power. After checking the voltage of the network, I was once again surprised - it turned out to be more than 240V (a further survey of the neighbors confirmed that this is all true). Fortunately, the transformer can be switched over to this voltage. When the voltage was turned on again, they returned to normal, but the speakers were still silent, a further check revealed that there was no anode voltage on the input triode, which, in my opinion, indicated a malfunction of a single semiconductor device - an adjustable current source IXIS10M45.
Having decided that the problem arose due to overvoltage and / or Chinese ebay-seller, I ordered a new pair of IXIS10M45 from England, it seemed safer and faster. I must say that the next inclusion was completed in exactly the same way as the first and second, although the new parts looked completely different, but they refused to work in the same way. Here I began to worry, since both channels behaved completely identical, and the voltage on the 12AT7 anodes was completely absent. Since in this circuit, apart from the lamp itself, the current regulator and a priori working small things, there was nothing else, the suspicion fell on the lamp. The ebay auction made it quite inexpensive to buy the ECC81 (the European equivalent of the American 12AT7), and at the same time another batch of IXYS 10M45 (again, a Chinese seller, he took it with a reserve just in case). The third batch of 10M45 looked (and called) in the same way as the second, for the purity of the experiment, immediately replaced the lamp and IXYS, disconnected all unnecessary (second stage) and for the fourth time did not find anything on the anode of the first triode.
Complete failure, the mind refused to understand how this could be. On a prototyping board, I assembled a simple circuit with a LED and an adjustable power source (used untouched from the third installment), powered from the laptop's power supply - and IT DIDN'T EARN !!!
At that moment, the idea of a universal conspiracy began to haunt me, even the things that had to work did not work ... and I again decided to order problem chips, only through a verified vendor (Digikey). And once again there were difficulties even where they should not have been. The first problem that arose (in Digikey, the minimum shipping cost to my region was $ 75, even for a $ 5 order). This problem was solved with the help of an American intermediary, but the second one came out after placing an order - a letter came to my email asking to
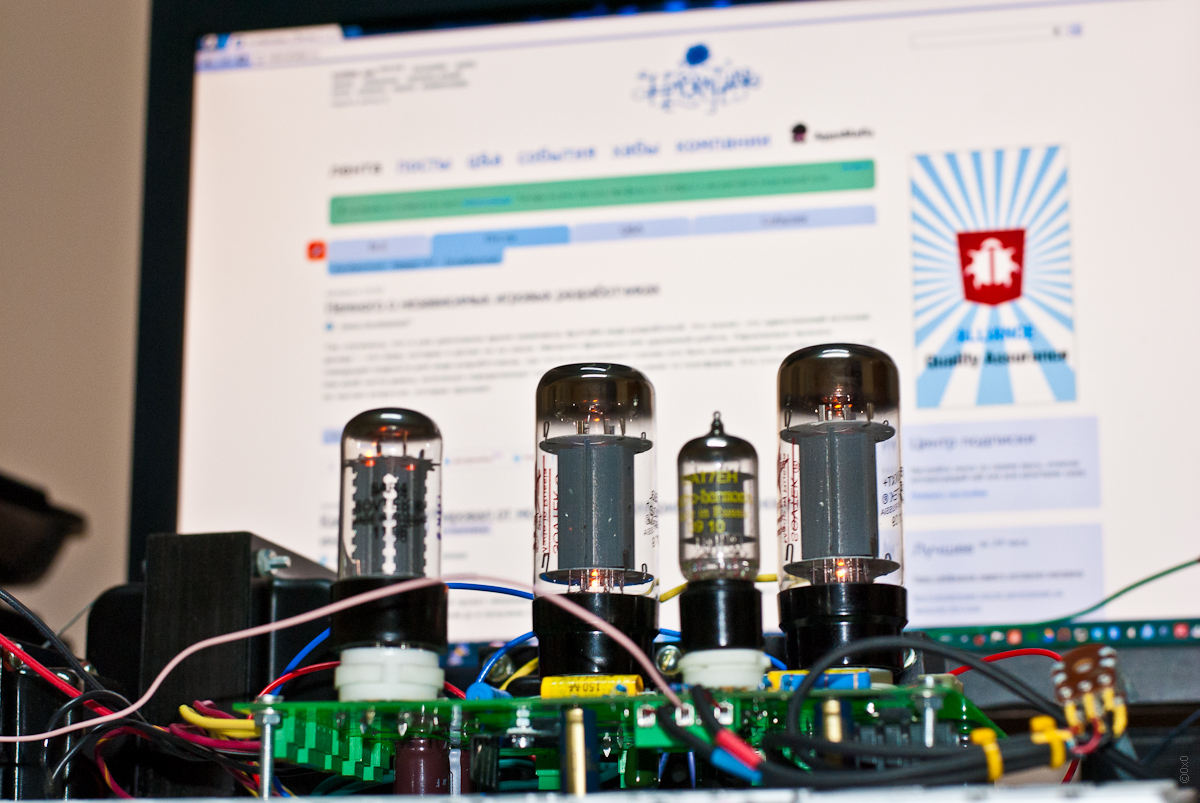
The next batch of appearance was different from all previous ones, which inspired a certain optimism (picture below)
Check on the mock-up board pleased, the LED happily changed the brightness depending on the resistance of the control resistor. Five minutes to replace parts on the board ...
... the next inclusion and from the speakers sounded MUSIC.
As it turned out in the process of communication on specialized forums - fake radio components on ebay become a big problem. That's what they write moderators Diyaudio
- Fake parts are a real plague by now. No small chance to get a quick small purchase.
- I never buy semi conductors or electrolytic capacitors on eBay for this reason.
Transfer
- fake parts - the trouble of our time and the chances of running into them with small urgent purchases are quite large
- so (...) I never buy semiconductors or electrolytic capacitors on ebay
As a result, I received a working fee, restored my own self-esteem, became disillusioned with Ebay. The body was made in haste, as intended as a layout for testing layouts, but unexpectedly liked.
At the moment, the amplifier works in conjunction with the Raspberry Pi & Volumio (as a source), the sound is really very pleasant and really warm (+ 65C). There are plans to improve the body, overcome a slightly interfering hum, embed USB DAC (there will be a tube sound card), it is possible to add a remote control. If there is interest, I will describe the process of manufacturing the case, as well as talk about the problems identified and ways to eliminate them.
UPDATE
Scheme Jpeg , PDF and the location of elements (it is difficult to find on the site, used for marking holes on the body).
Source: https://habr.com/ru/post/213215/
All Articles