Prototype. From idea to trial lot
In this article I want to talk about my experience of creating an experimental batch of a sufficiently simple product - a handle for an action camera.
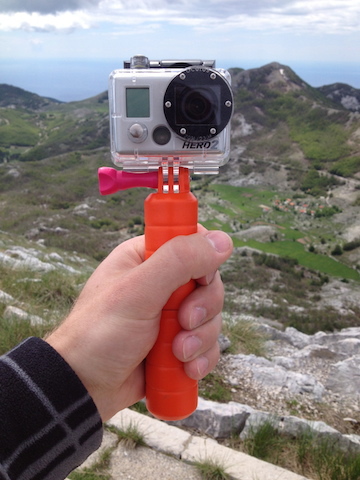
The idea was born after visiting the beautiful ski resort of Breuil-Cervinha, in Italy. Riding there, the camera was fixed to a broken ski stick, a stick with a large lever absorbs vibrations very well and it is convenient to shoot yourself. But for shooting in non-“combat” conditions, I wanted the usual convenient holder (these functions were later added with a float function). The Internet, of course, produced a bunch of ready-made and commercially available solutions, but it was decided upon returning to make one's own.
Let's start. Upon return, I certainly got sick, and this was an additional incentive to start designing, as there was really nothing to do at home. It was decided to move on the following algorithm:
')
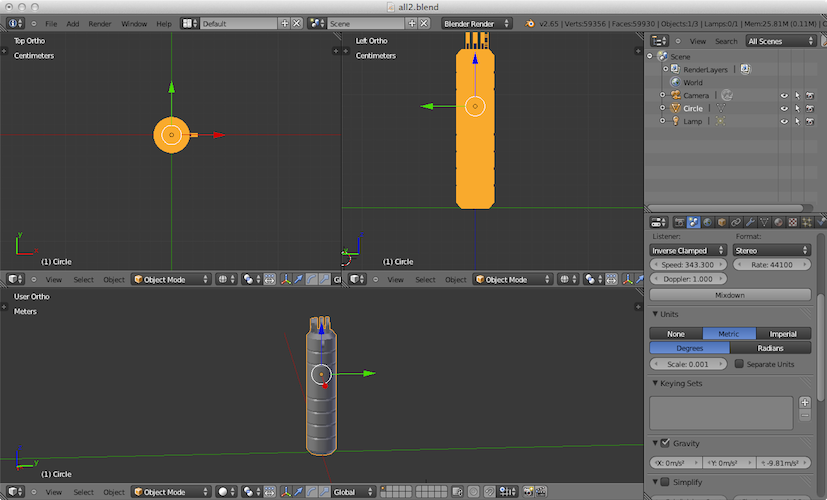
1. 3D model.
2. Master model printed on a 3D printer.
3. Creating a silicone mold on the model.
4. Casting an experimental batch in silicone molds.
The expected result of this stage: a model ready for 3D printing in STL format.
Up to this point, I drew something only at the Moscow Aviation Institute, at first with my hands then at Compass. Now, from the variety of CAD and 3D editors, I chose Blender, the main criterion for choosing the editor was ease of development (plus free and openness, cross-platform (did everything on the Mac)). Oddly enough, Blender can be turned into bearable CAD.
After a couple of days of tutorials, something began to turn out. For people who want to repeat my path, I will say three things that would save me a lot of time:
1. For real sizes of objects in the Scene-> Unit settings, select Metric \ Degrees and Scale to specify 0.001, thus all dimensions and coordinates will be metric.
2. Do not do anything “by hand”, that is, for example, when stretching or transferring an object, do not do it with a mouse (even if you hit the grid there will be fractional numbers), for each tool you can numerically hammer in its parameters, for example, transfer the object 5 cm by Y axis
3. Think over the item itself, taking into account the possibility of its further manufacturing, any additional cavity or recess may increase the cost of production several times.
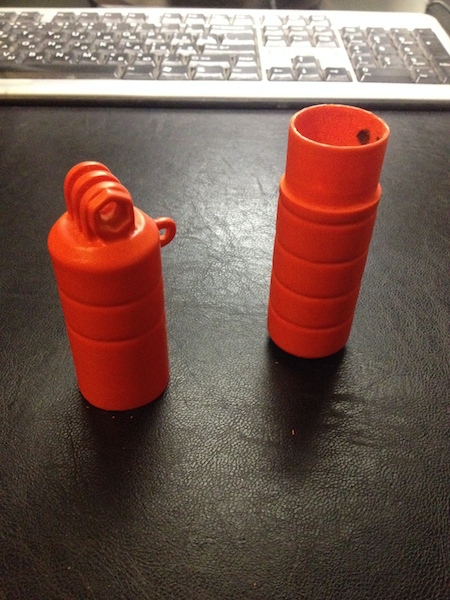
A printer can print just about anything. But when casting plastic into silicone, it is necessary to take into account the nuances, in my case there is a cavity inside (after all, it is a float), so It is necessary to make two component parts, in the upper fastening a through hole - it will be necessary to drill a ready-made part. And yet - you need as little as possible to make small parts, they greatly reduce the life of the silicone form.
Next, it was necessary to create a model in the STL format, the blender can do export to this format, but to be sure that everything went well, the file will need to be checked in a special program, it will check if all the normals are correct, if there are any holes in object and so on. I used Netfabb Studio.
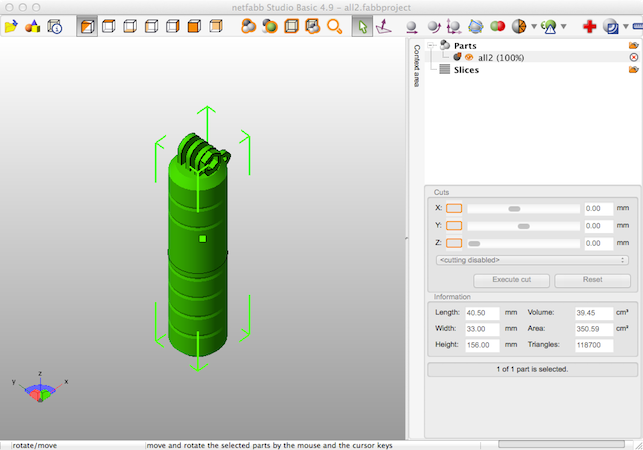
She will also be able to show the final dimensions and the volume to be filled in with the part (to be needed, since usually the price for printing the prototype is calculated by the volume of the product).
So, netfabb doesn't swear at anything - we give it to the press.
The expected result of this stage: the processed master model
To begin with, I took from my friend the well-known “Russian” 3D printer based on RepRap. After a week of trying, I realized that this product is not suitable for my tasks. Accuracy, surface quality and fine details are too low. The compounds are very bad. It was decided to order a print on the photo / gypsum polymer on the side. The office was looking for a long time, because through it I wanted to make molds and castings. Found adequate in price only in St. Petersburg (even with delivery to the white-stone, it turned out much cheaper). The master model decided to order from a gypsum polymer (almost 7-10 times cheaper than a photopolymer, I did not need a glossy surface and a little greater accuracy of photopolymer). The office also undertook the processing of the finished master model (grinding sharp corners, filling holes, painted for some reason, etc.). And that's what happened:
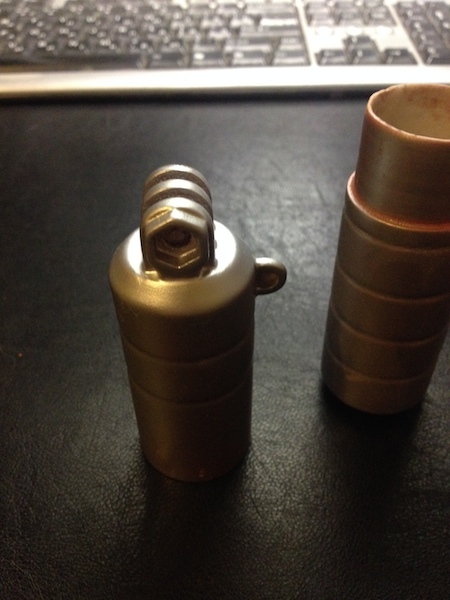
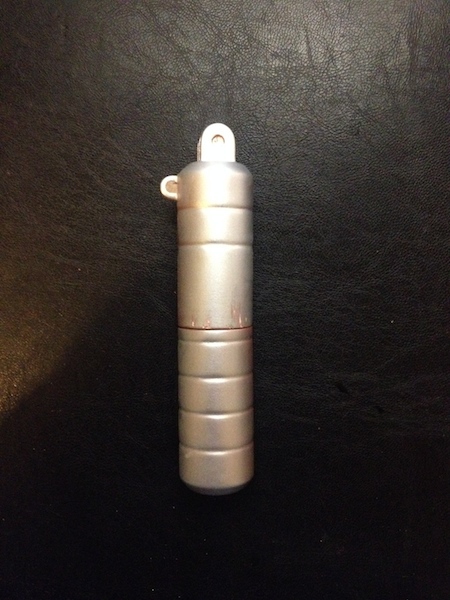
Mostly rude, but still 100,500 times better than my experiments with RepRap.
The expected result of this stage: an experimental batch of products (20 pieces)
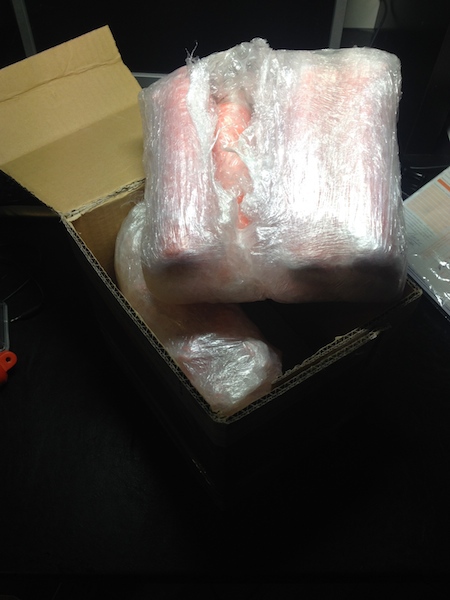
According to this master model, the forms were made, and the details were cast in vacuum. And finally, the cherished package came to me, with carefully packed products (the substances that were banned were packed in films).
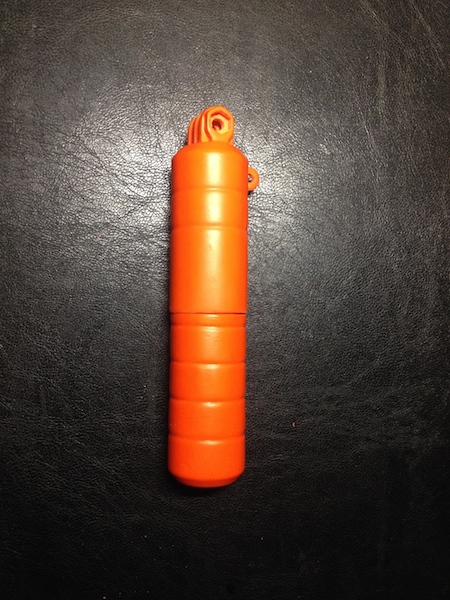
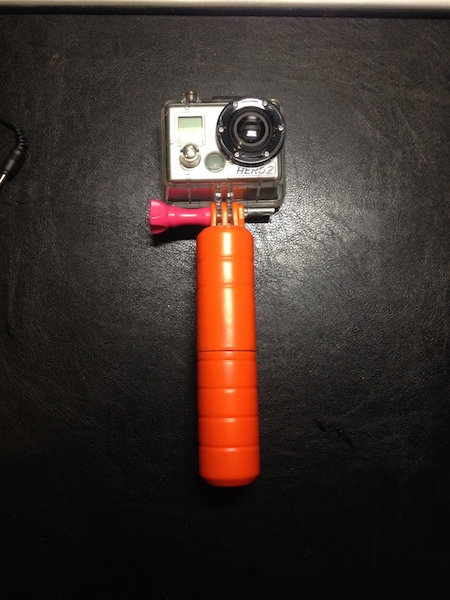
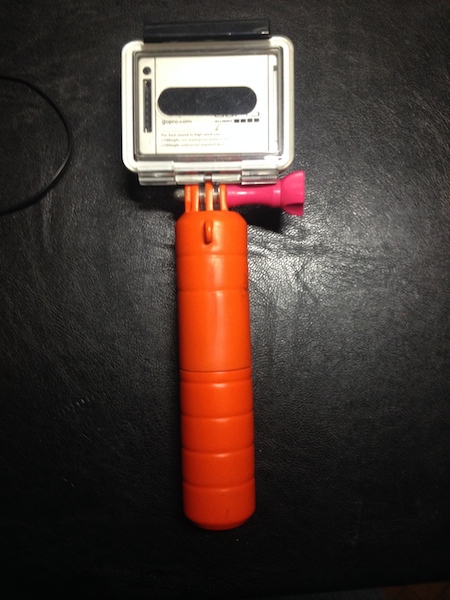
It turned out almost what I expected. A little overshot with the dimensions of the top mount - in order for the camera to be well fixed it is necessary to tighten the bolt a lot. And the connection of the top and bottom is also a bit loose, but there will be a rubber seal. If made with photopolymer, it would look less rude.
If you want to do something - do it. Modern technologies allow you to create prototypes and pilot batches of your products without the use of expensive industrial means of production. If you have a startup (for example, a device, there is a fee, you need to make a case), just for the sake of interest or something else - do it.
While waiting for the parcel I studied and tried out the technology of casting in silicone, I’ll gather my strength, too, I will write a post, this time I’ve been going for a long time - all of the above happened last February-March.
The idea was born after visiting the beautiful ski resort of Breuil-Cervinha, in Italy. Riding there, the camera was fixed to a broken ski stick, a stick with a large lever absorbs vibrations very well and it is convenient to shoot yourself. But for shooting in non-“combat” conditions, I wanted the usual convenient holder (these functions were later added with a float function). The Internet, of course, produced a bunch of ready-made and commercially available solutions, but it was decided upon returning to make one's own.
Let's start. Upon return, I certainly got sick, and this was an additional incentive to start designing, as there was really nothing to do at home. It was decided to move on the following algorithm:
')
1. 3D model.
2. Master model printed on a 3D printer.
3. Creating a silicone mold on the model.
4. Casting an experimental batch in silicone molds.
Design
The expected result of this stage: a model ready for 3D printing in STL format.
Up to this point, I drew something only at the Moscow Aviation Institute, at first with my hands then at Compass. Now, from the variety of CAD and 3D editors, I chose Blender, the main criterion for choosing the editor was ease of development (plus free and openness, cross-platform (did everything on the Mac)). Oddly enough, Blender can be turned into bearable CAD.
After a couple of days of tutorials, something began to turn out. For people who want to repeat my path, I will say three things that would save me a lot of time:
1. For real sizes of objects in the Scene-> Unit settings, select Metric \ Degrees and Scale to specify 0.001, thus all dimensions and coordinates will be metric.
2. Do not do anything “by hand”, that is, for example, when stretching or transferring an object, do not do it with a mouse (even if you hit the grid there will be fractional numbers), for each tool you can numerically hammer in its parameters, for example, transfer the object 5 cm by Y axis
3. Think over the item itself, taking into account the possibility of its further manufacturing, any additional cavity or recess may increase the cost of production several times.
A printer can print just about anything. But when casting plastic into silicone, it is necessary to take into account the nuances, in my case there is a cavity inside (after all, it is a float), so It is necessary to make two component parts, in the upper fastening a through hole - it will be necessary to drill a ready-made part. And yet - you need as little as possible to make small parts, they greatly reduce the life of the silicone form.
Next, it was necessary to create a model in the STL format, the blender can do export to this format, but to be sure that everything went well, the file will need to be checked in a special program, it will check if all the normals are correct, if there are any holes in object and so on. I used Netfabb Studio.
She will also be able to show the final dimensions and the volume to be filled in with the part (to be needed, since usually the price for printing the prototype is calculated by the volume of the product).
So, netfabb doesn't swear at anything - we give it to the press.
Master model
The expected result of this stage: the processed master model
To begin with, I took from my friend the well-known “Russian” 3D printer based on RepRap. After a week of trying, I realized that this product is not suitable for my tasks. Accuracy, surface quality and fine details are too low. The compounds are very bad. It was decided to order a print on the photo / gypsum polymer on the side. The office was looking for a long time, because through it I wanted to make molds and castings. Found adequate in price only in St. Petersburg (even with delivery to the white-stone, it turned out much cheaper). The master model decided to order from a gypsum polymer (almost 7-10 times cheaper than a photopolymer, I did not need a glossy surface and a little greater accuracy of photopolymer). The office also undertook the processing of the finished master model (grinding sharp corners, filling holes, painted for some reason, etc.). And that's what happened:
Mostly rude, but still 100,500 times better than my experiments with RepRap.
Forms and castings in them
The expected result of this stage: an experimental batch of products (20 pieces)
According to this master model, the forms were made, and the details were cast in vacuum. And finally, the cherished package came to me, with carefully packed products (the substances that were banned were packed in films).
Test
It turned out almost what I expected. A little overshot with the dimensions of the top mount - in order for the camera to be well fixed it is necessary to tighten the bolt a lot. And the connection of the top and bottom is also a bit loose, but there will be a rubber seal. If made with photopolymer, it would look less rude.
Total
If you want to do something - do it. Modern technologies allow you to create prototypes and pilot batches of your products without the use of expensive industrial means of production. If you have a startup (for example, a device, there is a fee, you need to make a case), just for the sake of interest or something else - do it.
PS
While waiting for the parcel I studied and tried out the technology of casting in silicone, I’ll gather my strength, too, I will write a post, this time I’ve been going for a long time - all of the above happened last February-March.
Source: https://habr.com/ru/post/213061/
All Articles