Integration with the hub "Photos" on Windows Phone
Today I would like to touch on one topic that relates to the sphere of maximizing the possibilities of the mobile platform. In particular, the discussion will focus on how to integrate an image-handling application into the Photos hub. As you probably know, this opportunity appeared in Windows Phone 7 and successfully migrated to the eighth version of the OS.
Below I will show with successive examples what gives the developer this opportunity, how to work with it, and at the same time I will share information about a small bug of this platform.
This article is written for those who have just begun to study the WP platform, so there will be many details that I often get asked about. All the necessary information in a compressed form can be found in the MSDN article , and this post is simply a more detailed, step-by-step instruction for beginners.
1. Registration of the application "receiver"
')
First of all, it is necessary to prescribe in the application manifest that we support the possibility of sharing photos, using a small extension:
To demonstrate, create an application (in my case it will be WPShareDemo) and open the WMAppManifest.xml file through the xml editor. To do this, select the XML (Text) editor item in the context menu:

Next you need a little trick. First of all, it is necessary to register the extension inside the Deployment \ App tag, and since the sequence of tags is strictly prescribed in the manifest, this extension should be added only after the <Tokens /> tag.
This extension, like any other, must be written inside the tag.
Next we have a little difference between WP7 and WP8.
In the Capabilities section, you must register the following tag for WP7:
And for WP8:
They can also be ticked off in the graphical interface that opens by double clicking on the manifest file.
As a result, you should get something like this manifest code:
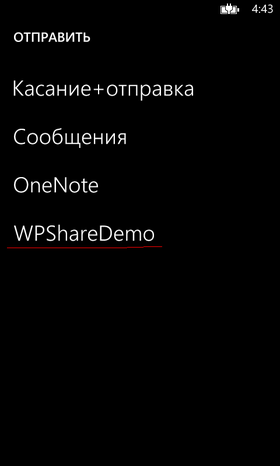
Now, if we open the photo and select the Send / Share item, we can see our application in the list of those who can “accept” the sent photo.
2. Reception photos
Now our application will be started as usual, from the specified start page in the manifest (by default MainPage.xaml), but with additional parameters of the form:
If you wish, you can process the photo directly on the main page, but, most likely, it will be rather inconvenient to integrate the excess logic into the main page. It is often easier to process photos on a separate page with its own separate logic. To implement this idea, we will use the opportunity to redirect to other pages (URI mapper).
To do this, we will add a new page, PhotoShare.xaml, to the project, which will “accept” the launch of the application with a shared photo. Next, add a class named CustomUriMapper and write the following code for it:
As it is easy to understand, if Uri contains the keywords ShareContent and FileId, then the address bar MainPage will be replaced with PhotoShare. To register a mapper, you need to register the following line in the InitializePhoneApplication method in app.xaml.cs:
The complete code for the InitializePhoneApplication method is:
3. Reading photos
Once we have decided on which page we will take a photo (in our case, PhotoShare.xaml), we can already read the resulting image in our code. In this case, we'll just display the photo.
To do this, add an Image element to our XAML page:
And in the page code, add the OnNavigateTo method:
In this code section, the key methods are:
library.GetPictureFromToken
and
photoFromLibrary.GetPreviewImage ()
The GetPreviewImage () method returns a picture optimized for full-screen display on the Windows Phone screen. In case we want to get a picture in its original size, we need to use the GetImage () method:
However, in this case, remember that the amount of memory consumed can increase significantly, and if you have previously “eaten” most of the memory with your application, then your application can simply crash when you share a large image.
In the end, if everything was done correctly, then, “sharing” any photo in our application, we should see something like this:

4. Platform bug
As I said, the possibility of sharing photos appeared in Windows Phone 7. And in WP8 there was such a great feature, like Fast app resume .
Unfortunately, these two great opportunities are not good friends with each other. The reason is that the minimized application runs in the same place where we minimized it, so when you try to send a photo to a minimized and minimized application, exactly the same thing happens - the application is restored on the same page where it was minimized, and no parameters it does not come!
Unfortunately, at the moment I do not have a solution to this problem. The only way to circumvent this obstacle that I found is to abandon the Fast app resume, if you need to use the ability to send photos in the application.
Updated
If the user's phone has received the latest updates of the platform (namely WP8 Update 3), then this user bug will not be observed.
Below I will show with successive examples what gives the developer this opportunity, how to work with it, and at the same time I will share information about a small bug of this platform.
This article is written for those who have just begun to study the WP platform, so there will be many details that I often get asked about. All the necessary information in a compressed form can be found in the MSDN article , and this post is simply a more detailed, step-by-step instruction for beginners.
1. Registration of the application "receiver"
')
First of all, it is necessary to prescribe in the application manifest that we support the possibility of sharing photos, using a small extension:
<Extension ExtensionName="Photos_Extra_Hub" ConsumerID="{5B04B775-356B-4AA0-AAF8-6491FFEA5632}" TaskID="_default" /> To demonstrate, create an application (in my case it will be WPShareDemo) and open the WMAppManifest.xml file through the xml editor. To do this, select the XML (Text) editor item in the context menu:
Next you need a little trick. First of all, it is necessary to register the extension inside the Deployment \ App tag, and since the sequence of tags is strictly prescribed in the manifest, this extension should be added only after the <Tokens /> tag.
This extension, like any other, must be written inside the tag.
<Extensions> <Extension ExtensionName="Photos_Extra_Share" ConsumerID="{5B04B775-356B-4AA0-AAF8-6491FFEA5632}" TaskID="_default" /> </Extensions> Next we have a little difference between WP7 and WP8.
In the Capabilities section, you must register the following tag for WP7:
/>And for WP8:
/>They can also be ticked off in the graphical interface that opens by double clicking on the manifest file.
As a result, you should get something like this manifest code:
spoiler
<?xml version="1.0" encoding="utf-8"?> <Deployment xmlns="http://schemas.microsoft.com/windowsphone/2012/deployment" AppPlatformVersion="8.0"> <DefaultLanguage xmlns="" code="en-US" /> <App xmlns="" ProductID="{dcef4a48-7464-43cf-a4f7-157debfe6447}" Title="WPShareDemo" RuntimeType="Silverlight" Version="1.0.0.0" Genre="apps.normal" Author="WPShareDemo author" Description="Sample description" Publisher="WPShareDemo" PublisherID="{7f1b10ab-ad1e-4d51-9c30-5b893453ace7}"> <IconPath IsRelative="true" IsResource="false">Assets\ApplicationIcon.png</IconPath> <Capabilities> <Capability Name="ID_CAP_NETWORKING" /> <Capability Name="ID_CAP_MEDIALIB_AUDIO" /> <Capability Name="ID_CAP_MEDIALIB_PLAYBACK" /> <Capability Name="ID_CAP_SENSORS" /> <Capability Name="ID_CAP_WEBBROWSERCOMPONENT" /> <Capability Name="ID_CAP_MEDIALIB_PHOTO" /> </Capabilities> <Tasks> <DefaultTask Name="_default" NavigationPage="MainPage.xaml" /> </Tasks> <Tokens> <PrimaryToken TokenID="WPShareDemoToken" TaskName="_default"> <TemplateFlip> <SmallImageURI IsRelative="true" IsResource="false">Assets\Tiles\FlipCycleTileSmall.png</SmallImageURI> <Count>0</Count> <BackgroundImageURI IsRelative="true" IsResource="false">Assets\Tiles\FlipCycleTileMedium.png</BackgroundImageURI> <Title>WPShareDemo</Title> <BackContent> </BackContent> <BackBackgroundImageURI> </BackBackgroundImageURI> <BackTitle> </BackTitle> <DeviceLockImageURI> </DeviceLockImageURI> <HasLarge> </HasLarge> </TemplateFlip> </PrimaryToken> </Tokens> <Extensions> <Extension ExtensionName="Photos_Extra_Share" ConsumerID="{5B04B775-356B-4AA0-AAF8-6491FFEA5632}" TaskID="_default" /> </Extensions> <ScreenResolutions> <ScreenResolution Name="ID_RESOLUTION_WVGA" /> <ScreenResolution Name="ID_RESOLUTION_WXGA" /> <ScreenResolution Name="ID_RESOLUTION_HD720P" /> </ScreenResolutions> </App> </Deployment> Now, if we open the photo and select the Send / Share item, we can see our application in the list of those who can “accept” the sent photo.
spoiler
2. Reception photos
Now our application will be started as usual, from the specified start page in the manifest (by default MainPage.xaml), but with additional parameters of the form:
/MainPage.xaml?Action=ShareContent&FileId=%7B5870C5AE-FF18-4ABC-996F-D6CE3F773F56%7DIf you wish, you can process the photo directly on the main page, but, most likely, it will be rather inconvenient to integrate the excess logic into the main page. It is often easier to process photos on a separate page with its own separate logic. To implement this idea, we will use the opportunity to redirect to other pages (URI mapper).
To do this, we will add a new page, PhotoShare.xaml, to the project, which will “accept” the launch of the application with a shared photo. Next, add a class named CustomUriMapper and write the following code for it:
using System; using System.Windows.Navigation; namespace WPShareDemo { class CustomUriMapper : UriMapperBase { public override Uri MapUri(Uri uri) { string tempUri = uri.ToString(); string mappedUri; // Launch from the photo share picker. // Incoming URI example: /MainPage.xaml?Action=ShareContent&FileId=%7BA3D54E2D-7977-4E2B-B92D-3EB126E5D168%7D if ((tempUri.Contains("ShareContent")) && (tempUri.Contains("FileId"))) { // Redirect to PhotoShare.xaml. mappedUri = tempUri.Replace("MainPage", "PhotoShare"); return new Uri(mappedUri, UriKind.Relative); } // Otherwise perform normal launch. return uri; } } } As it is easy to understand, if Uri contains the keywords ShareContent and FileId, then the address bar MainPage will be replaced with PhotoShare. To register a mapper, you need to register the following line in the InitializePhoneApplication method in app.xaml.cs:
RootFrame.UriMapper = new CustomUriMapper();The complete code for the InitializePhoneApplication method is:
spoiler
private void InitializePhoneApplication() { if (phoneApplicationInitialized) return; // Create the frame but don't set it as RootVisual yet; this allows the splash // screen to remain active until the application is ready to render. RootFrame = new PhoneApplicationFrame(); RootFrame.Navigated += CompleteInitializePhoneApplication; // Handle navigation failures RootFrame.NavigationFailed += RootFrame_NavigationFailed; // Handle reset requests for clearing the backstack RootFrame.Navigated += CheckForResetNavigation; RootFrame.UriMapper = new CustomUriMapper(); // Ensure we don't initialize again phoneApplicationInitialized = true; } 3. Reading photos
Once we have decided on which page we will take a photo (in our case, PhotoShare.xaml), we can already read the resulting image in our code. In this case, we'll just display the photo.
To do this, add an Image element to our XAML page:
<Image x:Name="ShareImage">And in the page code, add the OnNavigateTo method:
protected override void OnNavigatedTo(NavigationEventArgs e) { if (NavigationContext.QueryString.ContainsKey("FileId")) { var library = new MediaLibrary(); var photoFromLibrary = library.GetPictureFromToken(NavigationContext.QueryString["FileId"]); var bitmapFromPhoto = new BitmapImage(); bitmapFromPhoto.SetSource(photoFromLibrary.GetPreviewImage()); ShareImage.Source = bitmapFromPhoto; } } In this code section, the key methods are:
library.GetPictureFromToken
and
photoFromLibrary.GetPreviewImage ()
The GetPreviewImage () method returns a picture optimized for full-screen display on the Windows Phone screen. In case we want to get a picture in its original size, we need to use the GetImage () method:
protected override void OnNavigatedTo(NavigationEventArgs e) { if (NavigationContext.QueryString.ContainsKey("FileId")) { var library = new MediaLibrary(); var photoFromLibrary = library.GetPictureFromToken(NavigationContext.QueryString["FileId"]); var bitmapFromPhoto = new BitmapImage(); bitmapFromPhoto.SetSource(photoFromLibrary.GetImage()); ShareImage.Source = bitmapFromPhoto; } } However, in this case, remember that the amount of memory consumed can increase significantly, and if you have previously “eaten” most of the memory with your application, then your application can simply crash when you share a large image.
In the end, if everything was done correctly, then, “sharing” any photo in our application, we should see something like this:
4. Platform bug
As I said, the possibility of sharing photos appeared in Windows Phone 7. And in WP8 there was such a great feature, like Fast app resume .
Unfortunately, these two great opportunities are not good friends with each other. The reason is that the minimized application runs in the same place where we minimized it, so when you try to send a photo to a minimized and minimized application, exactly the same thing happens - the application is restored on the same page where it was minimized, and no parameters it does not come!
Unfortunately, at the moment I do not have a solution to this problem. The only way to circumvent this obstacle that I found is to abandon the Fast app resume, if you need to use the ability to send photos in the application.
Updated
If the user's phone has received the latest updates of the platform (namely WP8 Update 3), then this user bug will not be observed.
Source: https://habr.com/ru/post/213017/
All Articles