Install Windows Server 2008 over a network with a Linux PXE server. WinPE Customization
Friends! Good day to all!
We want not only to promote ourselves and our services here, but also to share the experience and knowledge gained during the administration of a huge number of projects, and ultimately make a worthy and useful blog. To do this, we asked our engineers to participate in this. And for the future we want to understand: will it be interesting for the habrovans? And if so, in what form?
Under the cat this time we will talk about installing Windows Server 2008 over a network from a Linux PXE server .
')
Menu loaded WinPE.
Everylazy good system administrator seeks to automate as much uninteresting manual work as possible in order to devote more time to meditation and Zen.
Scripts, response files for various wizards are written, monitoring and alert systems, configuration management systems are configured ...
Nothing should be a distraction on the path to enlightenment.
In this article I will describe how to prepare an image of Windows PE WinPE to boot from a Linux PXE server.
We have to solve the following tasks:
I will omit the PXE server side setup, since The topic is fairly well described on the Internet (for example, here ).
In the course of the narration I will dwell only on those points that are necessary in the framework of this article.
To prepare a WinPE image, you need a computer with Windows 7 or Windows Server 2008, as well as an installed Windows AIK package .
When the required OS is installed and the package is installed.
We mount the image of winpe.wim to make changes, as well as prepare the bootloader.
In the console that opens, sequentially enter the commands:
The WinPE shell
Since the menu is in Russian, we need an editor that allows us to change the text encoding (CP866 in our case).
I use Notepad ++
File path:
Edit it to add a menu, as in the screenshot above.
Save the changes to
Unmount winpe.wim with the changes and copy the resulting image to the rest of the files.
Now let's set up the Download Configuration Data ( BCD )
Create a new script createbcd.cmd. It will generate the desired BCD.
Open the text editor again and paste the following code there:
Run the script.
Prepare an autounattend.xml answer file for unattended installation of Windows Server 2008
On the first server disk, a single partition is created that occupies the entire disk space. The OS is placed in this section, the password for the Administrator account is set, the key is entered, but Windows is not activated.
The file must be copied to the smb root balls, which is mounted by the
The preparatory stage in Windows is nearing completion, it remains to copy the
Tftp configuration files.
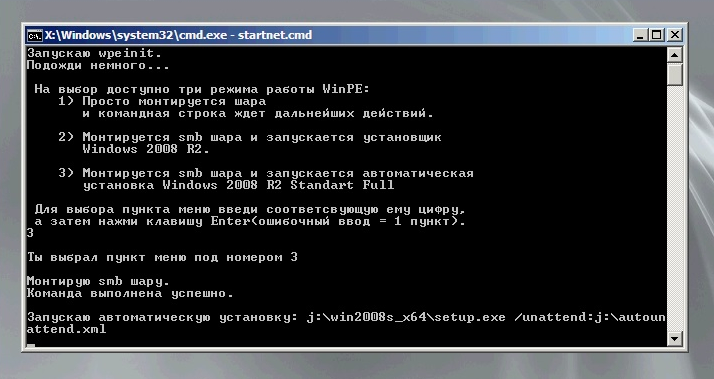
Fragment start installation
That's all.
Thank you for attention!
1. http://gnu.su/news.php?extend.1683
2. http://dice.neko-san.net/2011/02/automated-windows-server-2008r2-installation-from-a-linux-server-without-machine-imaging
3. http://technet.microsoft.com/ru-ru/library/cc749415 ( v=ws.10 ) .aspx
The author of the article and part-time engineer ServerClub - FessAectan
We want not only to promote ourselves and our services here, but also to share the experience and knowledge gained during the administration of a huge number of projects, and ultimately make a worthy and useful blog. To do this, we asked our engineers to participate in this. And for the future we want to understand: will it be interesting for the habrovans? And if so, in what form?
Under the cat this time we will talk about installing Windows Server 2008 over a network from a Linux PXE server .
')
Menu loaded WinPE.
Every
Scripts, response files for various wizards are written, monitoring and alert systems, configuration management systems are configured ...
Nothing should be a distraction on the path to enlightenment.
In this article I will describe how to prepare an image of Windows PE WinPE to boot from a Linux PXE server.
We have to solve the following tasks:
- Perform any administrative actions (updating the RAID controller firmware for example)
- Install Windows Server 2008 in "manual" mode.
- Fully unattended installation of Windows Server 2008
I will omit the PXE server side setup, since The topic is fairly well described on the Internet (for example, here ).
In the course of the narration I will dwell only on those points that are necessary in the framework of this article.
Stage # 1. Windows
To prepare a WinPE image, you need a computer with Windows 7 or Windows Server 2008, as well as an installed Windows AIK package .
When the required OS is installed and the package is installed.
run Windows PE Tools Command Prompt on behalf of the Administrator
We mount the image of winpe.wim to make changes, as well as prepare the bootloader.
In the console that opens, sequentially enter the commands:
mkdir c:\winpe mkdir c:\winpe\mount cd c:\winpe copype.cmd amd64 c:\winpe mkdir c:\netboot\win\boot imagex /mountrw winpe.wim 1 mount xcopy c:\winpe\mount\windows\boot\pxe\pxeboot.n12 c:\netboot\win xcopy c:\winpe\mount\windows\boot\pxe\bootmgr.exe c:\netboot\win xcopy c:\winpe\iso\boot\boot.sdi c:\netboot\win\boot The WinPE shell
startnet.cmd file startnet.cmdSince the menu is in Russian, we need an editor that allows us to change the text encoding (CP866 in our case).
I use Notepad ++
File path:
C:\winpe\mount\Windows\System32\startnet.cmdEdit it to add a menu, as in the screenshot above.
startnet.cmd script code
@echo off echo. echo wpeinit. echo ... echo. wpeinit echo WinPE: echo 1) echo . echo. echo 2) smb echo Windows 2008 R2. echo. echo 3) smb echo Windows 2008 R2 Standart Full echo. echo , echo Enter( = 1 ). set /p ID= echo. if %ID%==1 goto :first if %ID%==2 goto :second if %ID%==3 goto :third if %ID% GTR 3 goto :failure if %ID% LSS 3 goto :failure exit /b :second echo 2 echo. echo smb . net use j: \\1.2.3.4\public echo j:\win2008s_x64\setup.exe j:\win2008s_x64\setup.exe exit /b :third echo 3 echo. echo smb . net use j: \\1.2.3.4\public echo : j:\win2008s_x64\setup.exe /unattend:j:\autounattend.xml j:\win2008s_x64\setup.exe /unattend:j:\autounattend.xml exit /b :first echo 1 echo. :failure echo. echo smb . net use j: \\1.2.3.4\public exit /b Save the changes to
startnet.cmd .Unmount winpe.wim with the changes and copy the resulting image to the rest of the files.
imagex.exe /unmount /commit mount xcopy c:\winpe\winpe.wim c:\netboot\win\boot Now let's set up the Download Configuration Data ( BCD )
What is the boot configuration data store?
The boot configuration data store contains boot configuration parameters and controls the launch of the Microsoft Windows Vista and Microsoft Windows Server 2008 operating systems. These parameters were previously stored in the Boot.ini file (for BIOS-based operating systems) or in NVRAM (for EFI-based operating systems (Extensible Firmware Interface)). To change the Windows code that runs before loading the operating system, you can use the command line utility Bcdedit.exe, with which you can add, delete, modify, and supplement entries in the boot configuration data store.
Create a new script createbcd.cmd. It will generate the desired BCD.
Open the text editor again and paste the following code there:
bcdedit -createstore %1\BCD bcdedit -store %1\BCD -create {ramdiskoptions} /d "Ramdisk options" bcdedit -store %1\BCD -set {ramdiskoptions} ramdisksdidevice boot bcdedit -store %1\BCD -set {ramdiskoptions} ramdisksdipath \boot\boot.sdi for /F "tokens=2 delims={}" %%i in ('bcdedit -store %1\BCD -create /d "MyWinPE Boot Image" /application osloader') do set guid={%%i} bcdedit -store %1\BCD -set %guid% systemroot \Windows bcdedit -store %1\BCD -set %guid% detecthal Yes bcdedit -store %1\BCD -set %guid% winpe Yes bcdedit -store %1\BCD -set %guid% osdevice ramdisk=[boot]\Boot\winpe.wim,{ramdiskoptions} bcdedit -store %1\BCD -set %guid% device ramdisk=[boot]\Boot\winpe.wim,{ramdiskoptions} bcdedit -store %1\BCD -create {bootmgr} /d "Windows BootManager" bcdedit -store %1\BCD -set {bootmgr} timeout 30 bcdedit -store %1\BCD -set {bootmgr} displayorder %guid% Run the script.
createbcd.cmd c:\netboot\win\boot Prepare an autounattend.xml answer file for unattended installation of Windows Server 2008
On the first server disk, a single partition is created that occupies the entire disk space. The OS is placed in this section, the password for the Administrator account is set, the key is entered, but Windows is not activated.
autounattend.xml
<?xml version="1.0" encoding="utf-8"?> <unattend xmlns="urn:schemas-microsoft-com:unattend"> <settings pass="windowsPE"> <component name="Microsoft-Windows-Setup" processorArchitecture="amd64" publicKeyToken="31bf3856ad364e35" language="neutral" versionScope="nonSxS" xmlns:wcm="http://schemas.microsoft.com/WMIConfig/2002/State" xmlns:xsi="http://www.w3.org/2001/XMLSchema-instance"> <ComplianceCheck> <DisplayReport>Never</DisplayReport> </ComplianceCheck> <DiskConfiguration> <WillShowUI>OnError</WillShowUI> <Disk> <DiskID>0</DiskID> <WillWipeDisk>true</WillWipeDisk> <CreatePartitions> <CreatePartition> <Order>1</Order> <Type>Primary</Type> <Extend>true</Extend> </CreatePartition> </CreatePartitions> <ModifyPartitions> <!-- Modify the system partition--> <ModifyPartition> <Order>1</Order> <PartitionID>1</PartitionID> <Format>NTFS</Format> <Label>System</Label> </ModifyPartition> </ModifyPartitions> </Disk> </DiskConfiguration> <ImageInstall> <OSImage> <InstallFrom> <MetaData wcm:action="add"> <Key>/IMAGE/NAME</Key> <Value>Windows Server 2008 R2 SERVERSTANDARD</Value> </MetaData> </InstallFrom> <InstallToAvailablePartition>false</InstallToAvailablePartition> <WillShowUI>OnError</WillShowUI> <InstallTo> <DiskID>0</DiskID> <PartitionID>1</PartitionID> </InstallTo> </OSImage> </ImageInstall> <UpgradeData> <WillShowUI>OnError</WillShowUI> <Upgrade>false</Upgrade> </UpgradeData> <UserData> <ProductKey> <Key></Key> <WillShowUI>OnError</WillShowUI> </ProductKey> <AcceptEula>true</AcceptEula> <FullName>serverclub</FullName> <Organization>serverclub</Organization> </UserData> </component> <component name="Microsoft-Windows-International-Core-WinPE" processorArchitecture="amd64" publicKeyToken="31bf3856ad364e35" language="neutral" versionScope="nonSxS" xmlns:wcm="http://schemas.microsoft.com/WMIConfig/2002/State" xmlns:xsi="http://www.w3.org/2001/XMLSchema-instance"> <SetupUILanguage> <UILanguage>en-US</UILanguage> <WillShowUI>OnError</WillShowUI> </SetupUILanguage> <UserLocale>en-US</UserLocale> <SystemLocale>en-US</SystemLocale> <UILanguage>en-US</UILanguage> <UILanguageFallback>en-US</UILanguageFallback> <InputLocale>en-US</InputLocale> </component> </settings> <settings pass="specialize"> <component name="Microsoft-Windows-International-Core" processorArchitecture="amd64" publicKeyToken="31bf3856ad364e35" language="neutral" versionScope="nonSxS" xmlns:wcm="http://schemas.microsoft.com/WMIConfig/2002/State" xmlns:xsi="http://www.w3.org/2001/XMLSchema-instance"> <InputLocale>en-US</InputLocale> <UILanguage>en-US</UILanguage> <UILanguageFallback>en-US</UILanguageFallback> </component> <component name="Microsoft-Windows-Shell-Setup" processorArchitecture="amd64" publicKeyToken="31bf3856ad364e35" language="neutral" versionScope="nonSxS" xmlns:wcm="http://schemas.microsoft.com/WMIConfig/2002/State" xmlns:xsi="http://www.w3.org/2001/XMLSchema-instance"> <ComputerName>CHANGE-ME</ComputerName> <ProductKey>XXX-ZZZ-YYY-RRR-QQQ</ProductKey> <RegisteredOrganization>serverclub</RegisteredOrganization> <RegisteredOwner>serverclub</RegisteredOwner> <DoNotCleanTaskBar>true</DoNotCleanTaskBar> <TimeZone>UTC</TimeZone> <DisableAutoDaylightTimeSet>false</DisableAutoDaylightTimeSet> </component> </settings> <settings pass="oobeSystem"> <component name="Microsoft-Windows-Shell-Setup" processorArchitecture="amd64" publicKeyToken="31bf3856ad364e35" language="neutral" versionScope="nonSxS" xmlns:wcm="http://schemas.microsoft.com/WMIConfig/2002/State" xmlns:xsi="http://www.w3.org/2001/XMLSchema-instance"> <UserAccounts> <AdministratorPassword> <Value>ServerMegaSecurePassword111</Value> <PlainText>true</PlainText> </AdministratorPassword> </UserAccounts> </component> </settings> <settings pass="offlineServicing"> <component name="Microsoft-Windows-PnpCustomizationsNonWinPE" processorArchitecture="x86" publicKeyToken="31bf3856ad364e35" language="neutral" versionScope="nonSxS" xmlns:wcm="http://schemas.microsoft.com/WMIConfig/2002/State" xmlns:xsi="http://www.w3.org/2001/XMLSchema-instance"> <DriverPaths> <PathAndCredentials wcm:keyValue="1" wcm:action="add"> <Path>j:\</Path> </PathAndCredentials> </DriverPaths> </component> </settings> <cpi:offlineImage cpi:source="wim:j:/win2008s_x64/sources/install.wim#Windows Server 2008 R2 SERVERSTANDARD" xmlns:cpi="urn:schemas-microsoft-com:cpi" /> </unattend> The file must be copied to the smb root balls, which is mounted by the
startnet.cmd script.The preparatory stage in Windows is nearing completion, it remains to copy the
c:\netboot\win folder to the server tftp root, and also place the files from the Windows Server 2008 installation disk / image in the folder accessible for mounting via sbm protocol.Stage # 2. Linux
The structure of our menu.

Tftp configuration files.
/tftpboot/pxelinux.cfg/default
PROMPT 0
UI vesamenu.c32
MENU BACKGROUND pxelinux.cfg / logo.jpg
MENU TITLE ServerClub PXE Boot Menu
MENU TIMEOUT 50
MENU COLOR TITLE 0 #ffffffff # 00000000
MENU COLOR SEL 7 #ffffffff # ff000000
LABEL CentOS ->
KERNEL vesamenu.c32
APPEND pxelinux.cfg / centos
LABEL Debian ->
KERNEL vesamenu.c32
APPEND pxelinux.cfg / debian
LABEL Ubuntu ->
KERNEL vesamenu.c32
APPEND pxelinux.cfg / ubuntu
LABEL BSD ->
KERNEL vesamenu.c32
APPEND pxelinux.cfg / bsd
LABEL ArchLinux ->
KERNEL vesamenu.c32
APPEND pxelinux.cfg / arch
LABEL Windows ->
KERNEL vesamenu.c32
APPEND pxelinux.cfg / windows
LABEL VmWare ->
KERNEL vesamenu.c32
APPEND pxelinux.cfg / vmware
LABEL LiveCD`s ->
KERNEL vesamenu.c32
APPEND pxelinux.cfg / live
LABEL Utilities ->
KERNEL vesamenu.c32
APPEND pxelinux.cfg / utils
/tftpboot/pxelinux.cfg/windows
PROMPT 0
UI vesavesamenu.c32
MENU BACKGROUND pxelinux.cfg / logo.jpg
MENU TITLE Windows
MENU TIMEOUT 50
MENU COLOR TITLE 0 #ffffffff # 00000000
MENU COLOR SEL 7 #ffffffff # ff000000
LABEL <- Main Menu
KERNEL vesamenu.c32
APPEND pxelinux.cfg / default
LABEL Windows2003_x64
kernel w2k3.0
LABEL Windows2008_x64_R2 (menu inside)
kernel boot / pxeboot.n12
LABEL <- Main Menu
KERNEL vesamenu.c32
APPEND pxelinux.cfg / default
A small demonstration =)
Fragment start installation
That's all.
Thank you for attention!
The following sources were used to prepare the article:
1. http://gnu.su/news.php?extend.1683
2. http://dice.neko-san.net/2011/02/automated-windows-server-2008r2-installation-from-a-linux-server-without-machine-imaging
3. http://technet.microsoft.com/ru-ru/library/cc749415 ( v=ws.10 ) .aspx
The author of the article and part-time engineer ServerClub - FessAectan
Source: https://habr.com/ru/post/213007/
All Articles