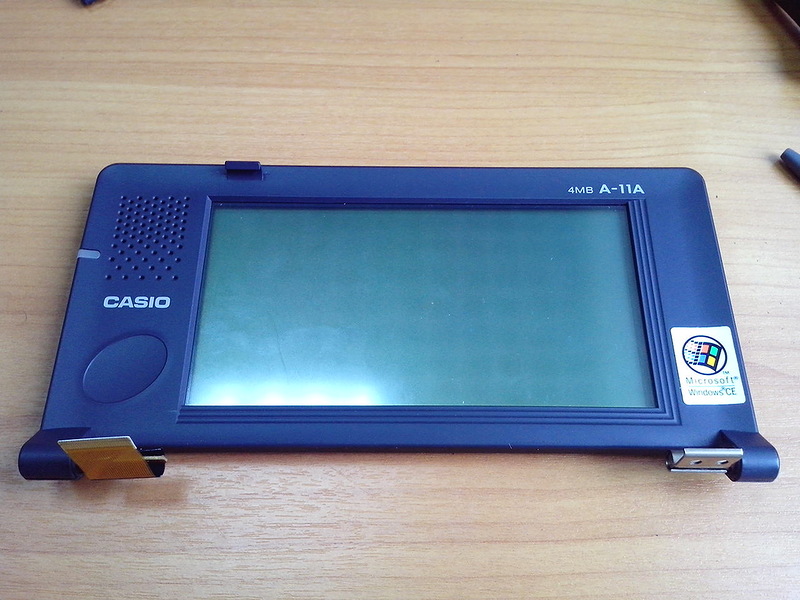
Rare PDA Casio Cassiopeia A-11A
I got into my hands for the purely symbolic price of the Casio Cassiopeia A-11A PDA - one of the first Casio handheld computers released in late 1996.
Unfortunately, little Cassiopeia ruffled life pretty hard. Firstly, the previous owner shamelessly lost the wire for connecting this PDA to a computer. And secondly, the Cassiopeia A-11A screen began to live its own life and began to turn off at the most unpredictable moment. And then it stopped working altogether, as it should be according to the law of meanness.
')
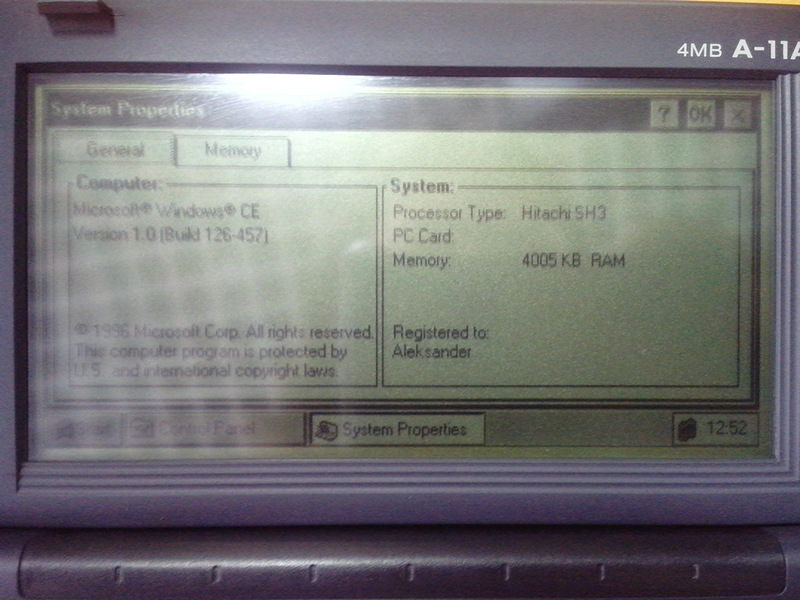
This machine is remarkable - there are as many as 4 MB of RAM onboard, a Hitachi SH3 processor with a frequency of 40 MHz, Windows CE 1.0, and all this joy of two finger batteries works.
I felt sorry for the poor thing, and I decided to fix it. The repair process and detailed information about the Cassiopeia A-11A, as always, under habrakatom.
Technical characteristics of Casio Cassiopeia A-11A
The device is running the operating system Microsoft Windows CE 1.0 Handheld PC edition.
Appearance
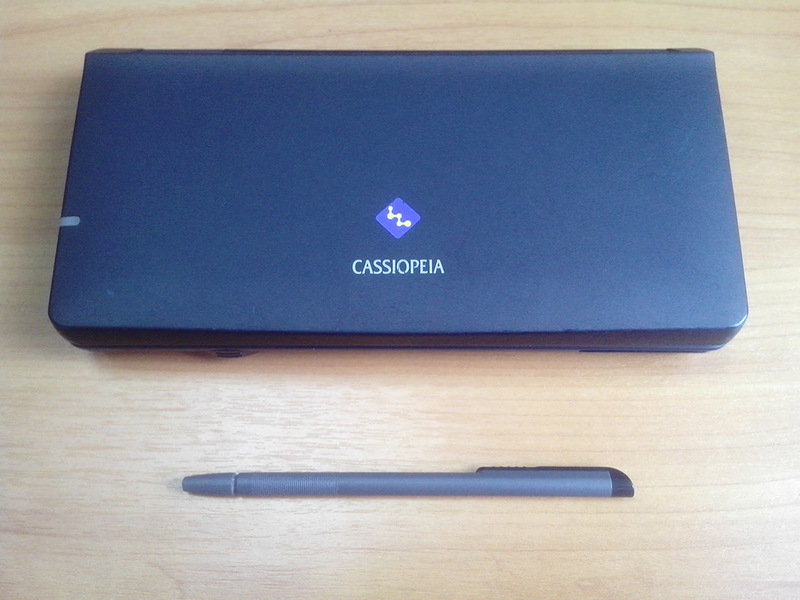
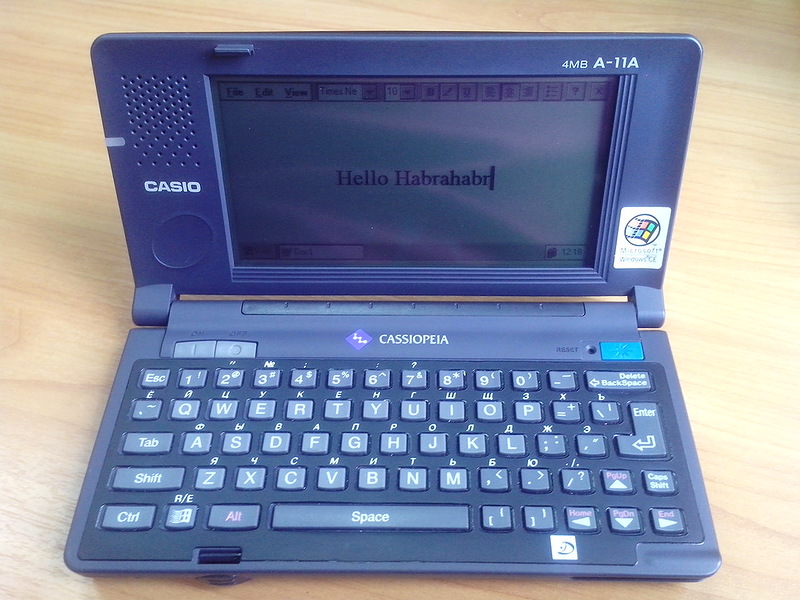
Casio Cassiopeia A-11A is really a very tiny device. The length of the stylus is 11.5 cm.
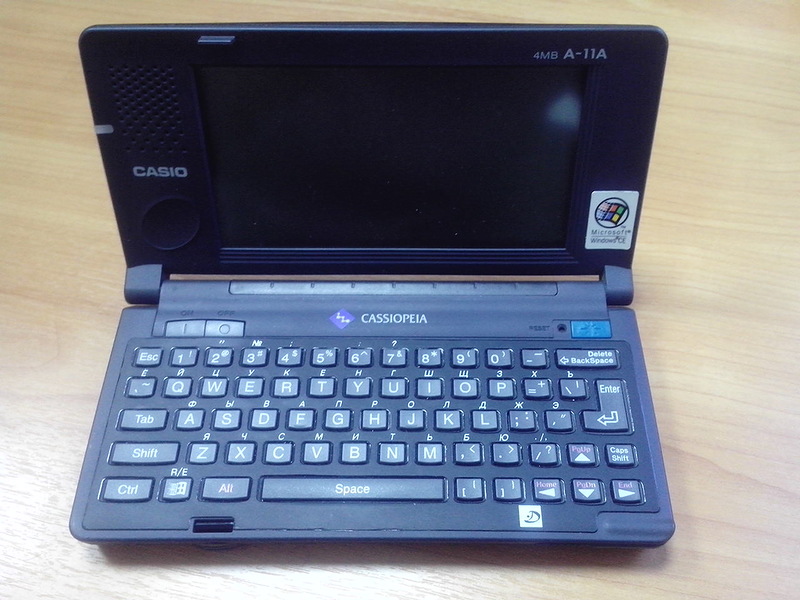
The keyboard of Cassiopeia is Russified. The green key in the upper right corner turns on the backlight.

On the right side there is a PCMCIA card slot and a connector for connecting external devices, such as a CASIO QV digital camera. The latter is closed with a rubber stopper.

On the left side of the case there are: a connector for connecting a data cable, an IR transceiver window and a contrast control.
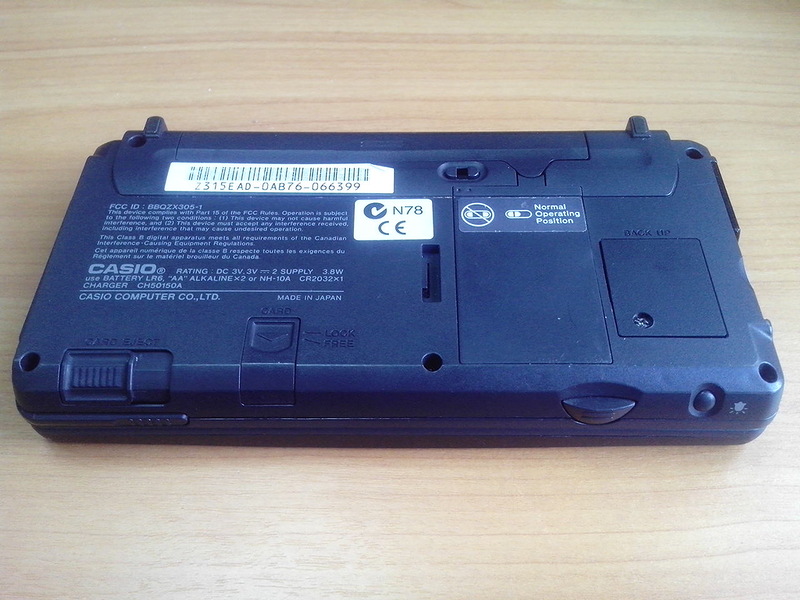
The battery compartment is fixed using the slide switch. Its normal position is shown in the picture. The latch and eject button of the PCMCIA card are located in the lower left corner. The stylus retracts into the intended technological hole under the eject button of the PCMCIA card.
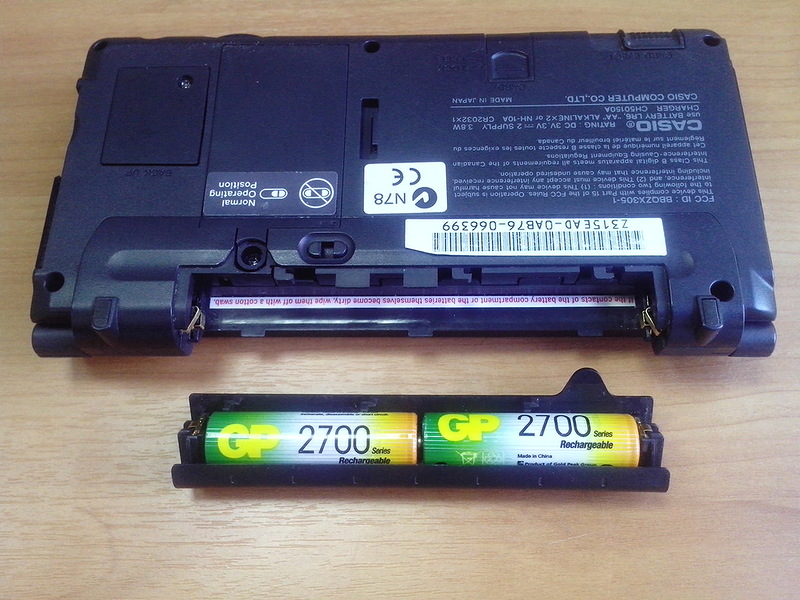
Baby Cassiopeia eats from two finger-type batteries or AA-size batteries.
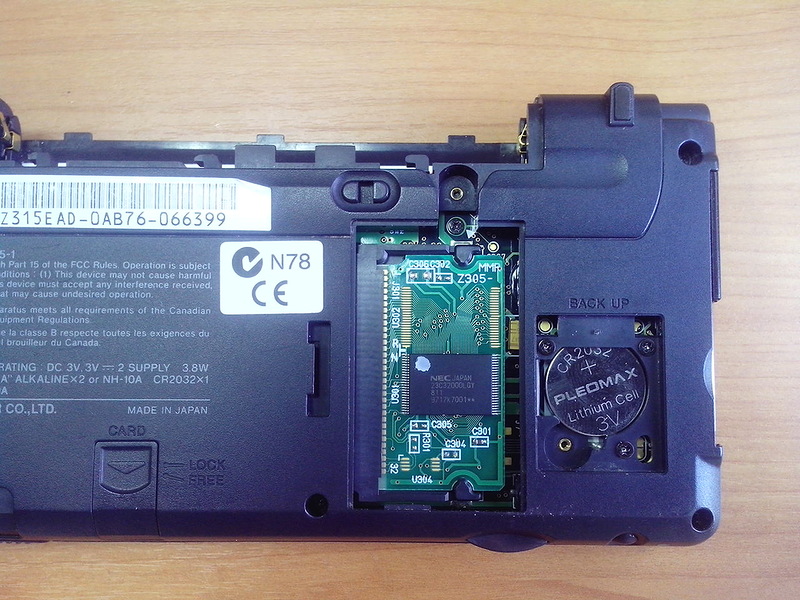
Under the covers, tightened with screws, is a CR2032 battery (it is necessary to save data in the event of removing the battery pack) and a ROM card. ROM card (ROM), contains firmware with Microsoft Windows CE 1.0 OS.
You can upgrade the version of the operating system only by replacing this card with the Windows CE 2.0 upgrade ROM card, which I, of course, did not have.
Repairing Cassiopea And at the same time, we photograph the entrails
As I have already said, the Casio Cassiopeia A-11A malfunction consisted in an inactive LCD display, and the touchscreen sensor worked fine - the tap on the screen was accompanied by a beep.
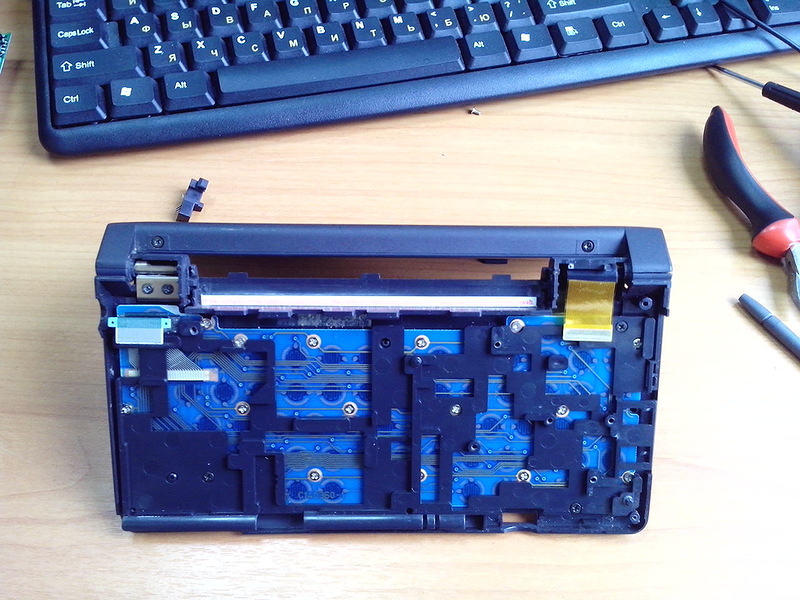
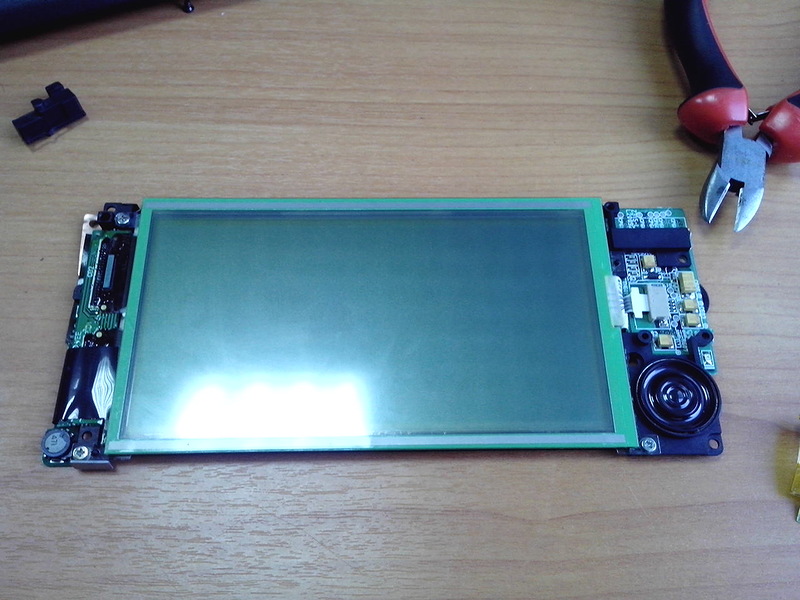
Naturally, first of all it was necessary to check the integrity of the flexible loop connecting the display with the main board. For this, I had to completely disassemble the PDA.
First of all, remove the lower part of the housing Casio Cassiopeia A-11A.

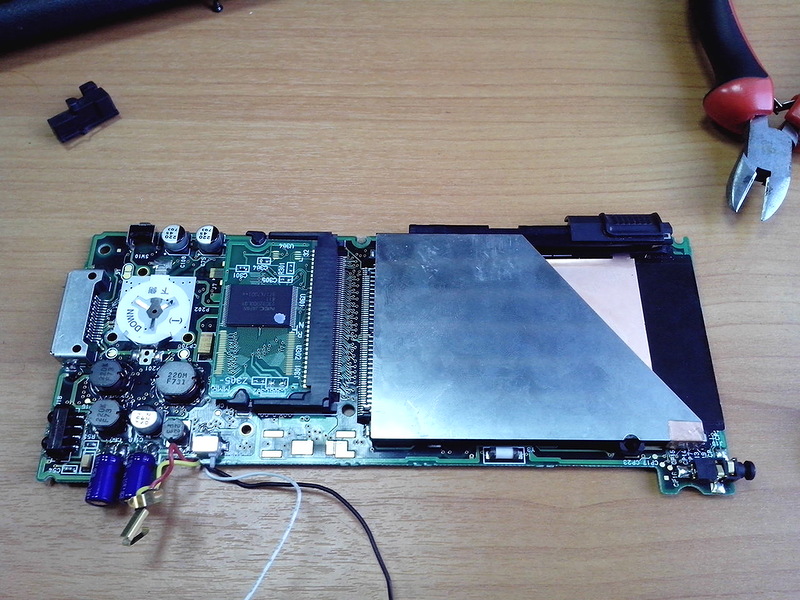
A fairly large part of the space on the main board is occupied by a PCMCIA slot and a slot for connecting a ROM card.
We unscrew all the screws that secure the main board to the body, and gently lift it from the side opposite to the battery compartment. We take out the plastic switch and the latch of the PCMCIA slot. We try not to lose or crush them.
Gently open the screwdriver with the latch of the connectors into which the keyboard and display cables are inserted. We hook the contacts of the battery compartment with a screwdriver (there are four of them, but only the top two are used) and remove them from the seats.
Now the main board can be removed. In the upper left corner is a plastic switch. Do not lose it.
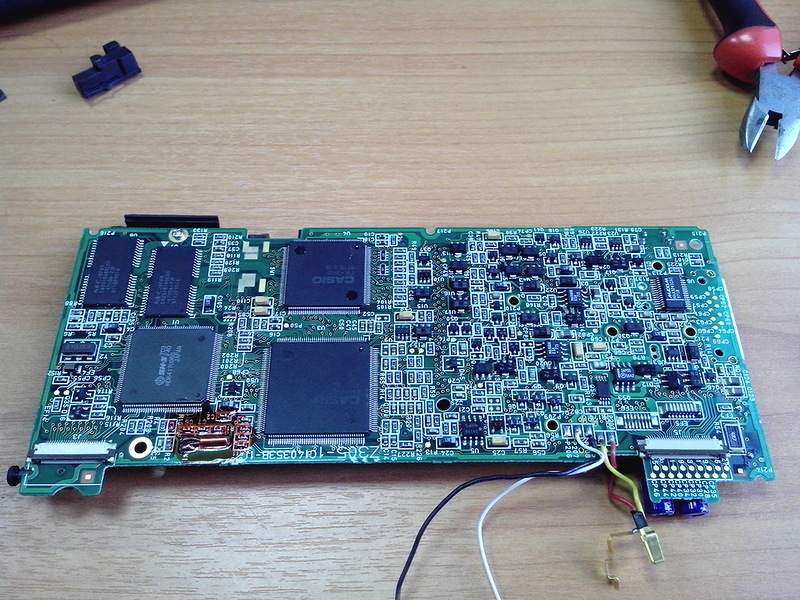
Most of the components, including the processor, are located on the back of the main board.
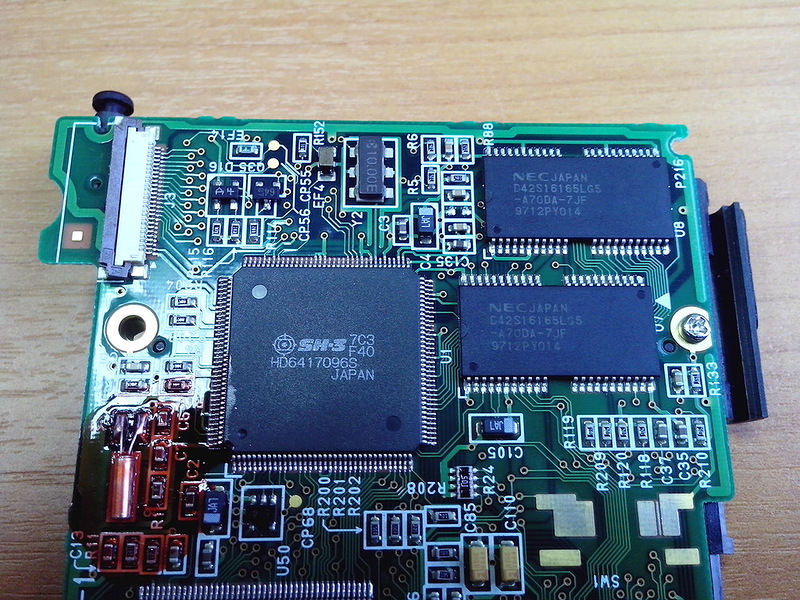
In the upper right corner are two NEC D42S16165LG5 memory chips of 2MB each.
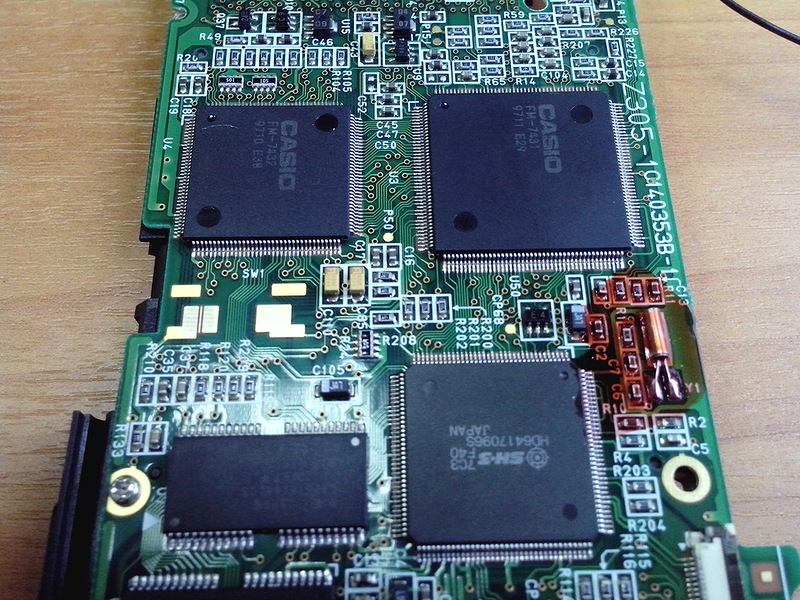
Almost in the center of the main board there are two proprietary chips CASIO FM-7431 and FM-7432. Datashit on them could not be found.
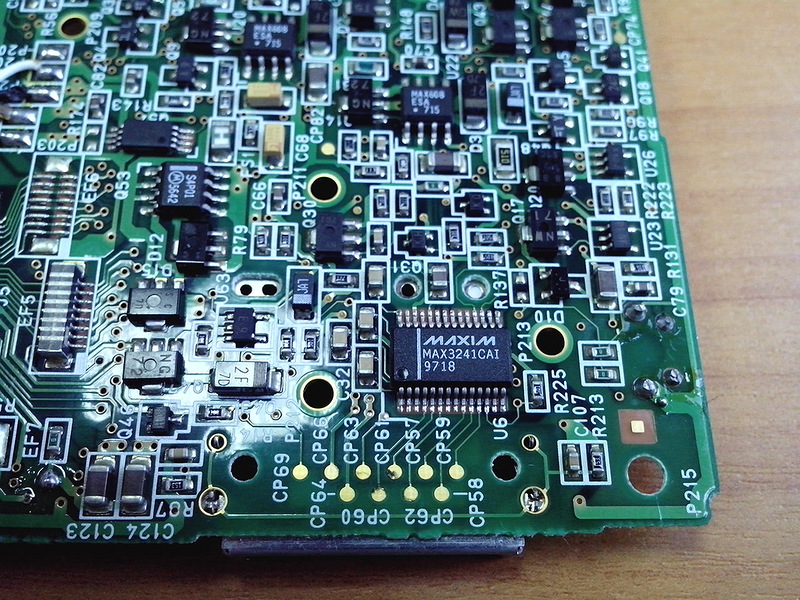
The RS-232 communication interface is made on the MAX3241CAI microcircuit.
Carefully inspect the main board for the presence of obvious defects. No such ones were found. Brush connectors for connecting cables.
Armed with alcohol and eraser, wipe the contacts of the keyboard and display loops.
Now you can try to assemble Casio Cassiopeia A-11A and test it for performance. Or you may not collect it, since these manipulations did not help the display to work.
Well, we continue to mock half-dead. The main task is to extract and ring the display loop.
Carefully unscrew the screws securing the hinge of the display and remove it.
We unscrew the two screws that connect the halves of the display case and carefully open it, trying not to damage the plastic latches.

Release the display board from the screws holding it, and pull it out of the case.
The cable connecting the display board with the main board is just opposite the speaker. Open the connector latch and try to pull the cable, but it was not there! The cable is glued to the printed circuit board, which is extremely not logical, but it is quite possible.
A little effort and skill, and the train is finally freed from glue bonds.
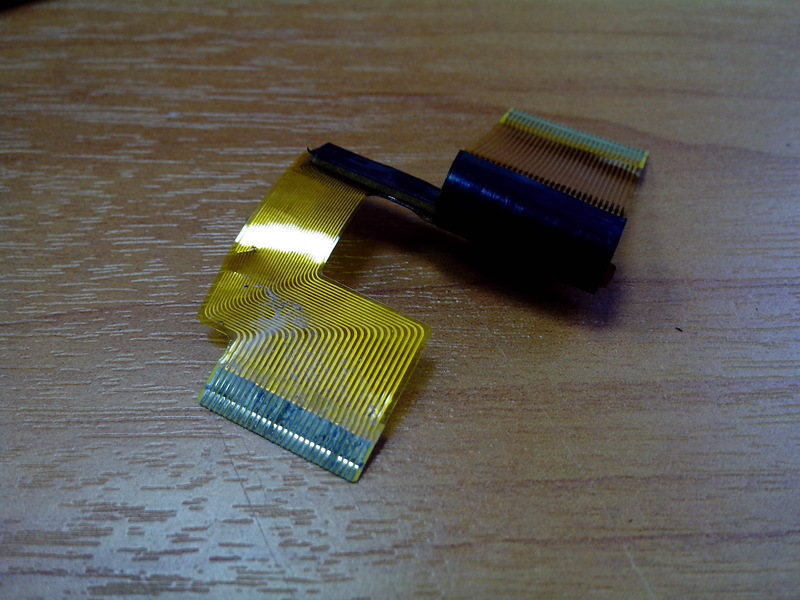
Immediately it becomes clear why the display did not want to work. Just look at the state of the contacts - there is no need to do without alcohol.
We take an eraser and get rid of dirt in the gaps between the pads, clean the contacts to shine. Also, a dent appeared on the cable (as if it was being pushed through with a screwdriver), but thank God it did not affect the integrity of the internal conductors.
Now you can collect the PDA. Repair is over.
First start
After assembling Cassiopaea, you must carefully make sure that there are no extra parts left. For example, I forgot to put in place a slide switch that commutes the power supply when the battery pack is inserted and serves as a kind of latch that secures the battery pack in the working position.
Turn on the Cassiopeia A-11A PDA.
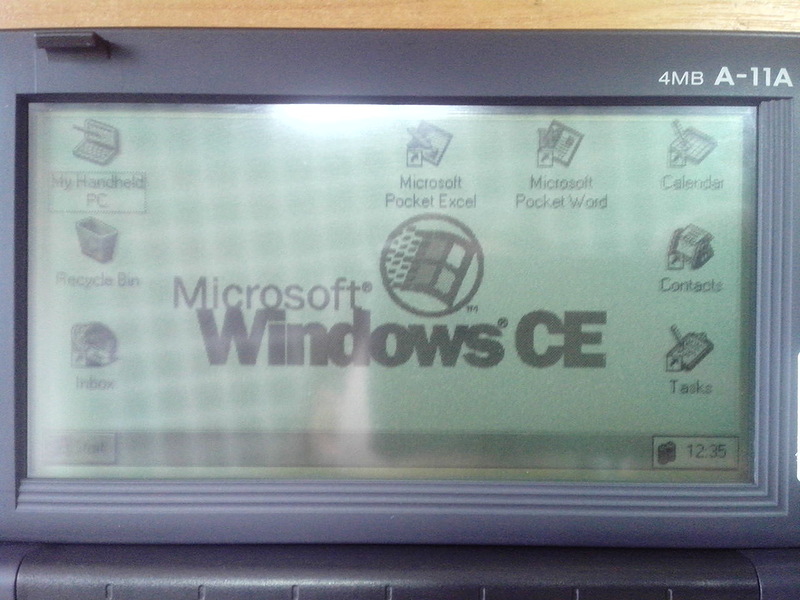
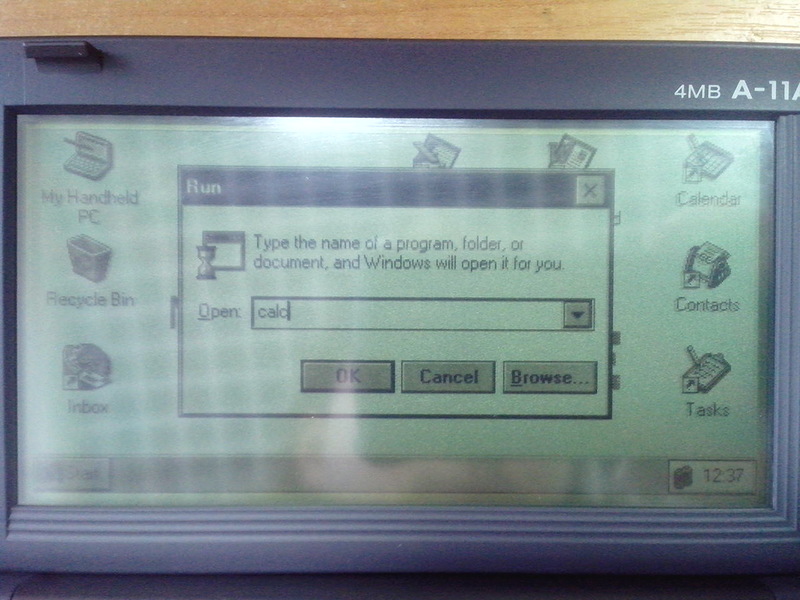
After the initial setup of all parameters, we are waited by the familiar “Windows” interface.
Have you already noticed that the interface of the operating system, as well as the keyboard layout, unfortunately, is in English? Despite the fact that the qwerty-keyboard of this device is Russified, the support of the Russian language in the applications must be installed separately, for example, using RusCE / LE .
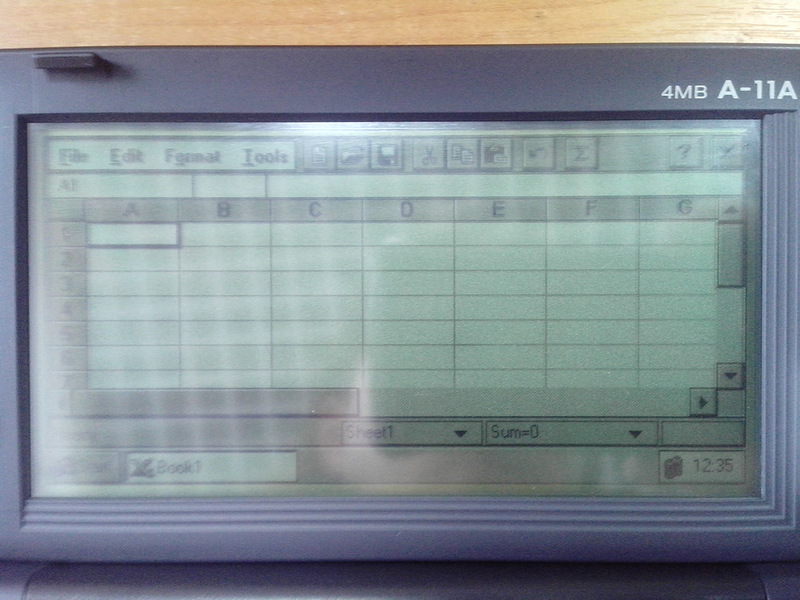
As you can see, office software Microsoft Word and Excel are already pre-installed on the PDA.
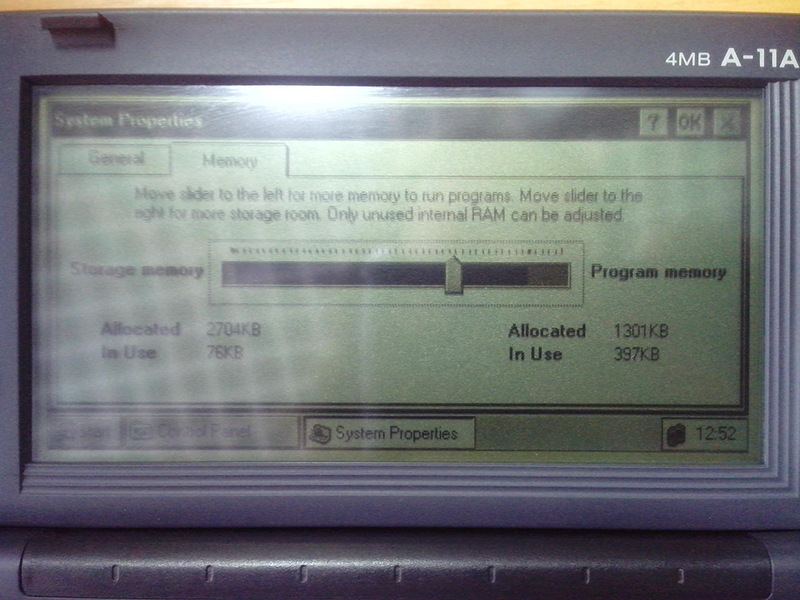
The size of the RAM allocated for the programs and for the data can be changed in the control panel.
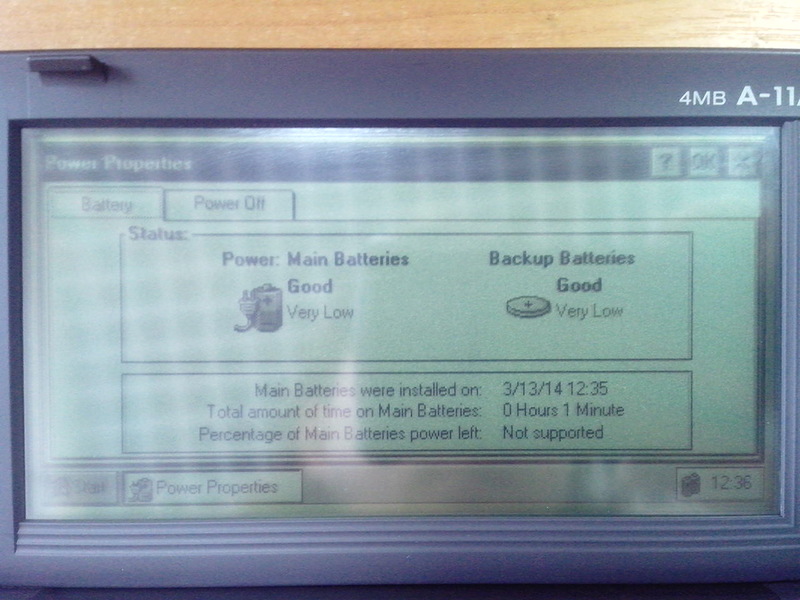
It should be noted that all data is stored in the RAM of the device and disappears in the case of simultaneous removal of the battery pack and the CR2032 disk element.
Since Cassiopeia A-11A has a PCMCIA expansion slot, you could try connecting a CompactFlash flash card to a PDA via an appropriate adapter, but I didn’t have an adapter or a small memory card (I strongly doubt that Cassiopeia can digest modern CFs of more than 1GB), so this experiment was postponed until better times.
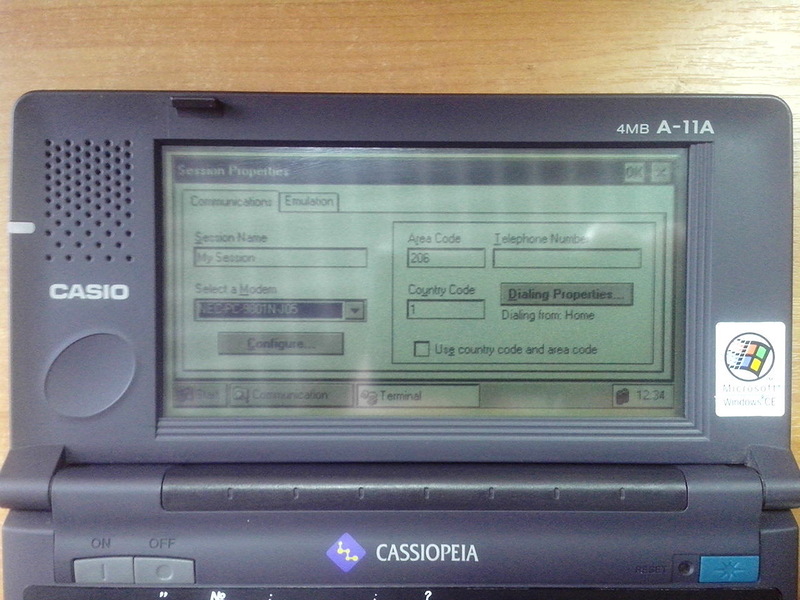
However, you can try to connect a PCMCIA card to the Cassiopeia A-11A, for example, the NEC PC 9801N-J05 modem I have lost.
As you can see, it is successfully determined by the system, and with it you can try to connect to the Internet via dial-up. Unfortunately, Cassiopeia A-11A does not have any pre-installed web browser, and there is no ftp client either, so nothing can be downloaded to the PDA via the network connection.
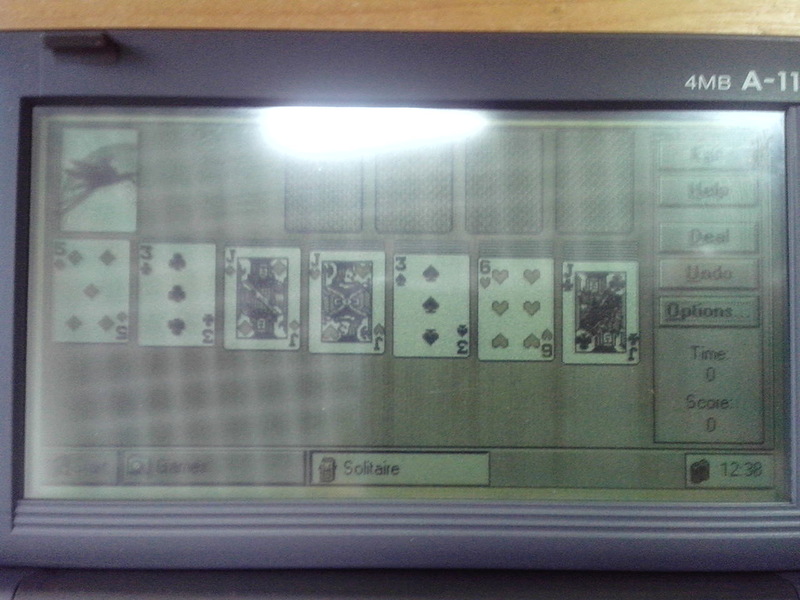
By tradition, I would like to launch a toy on Cassiopeia A-11A (except for built-in solitaire, of course), but alas, without the wires for connecting a PDA to a personal computer, I cannot even install a Windows CE interface.
An observant reader will say: “Comrade, why do you need a wire? Cassiopeia has IRDA, throw files with it. ” I hasten to upset you, the infrared port on my Cassiopaea, as it turned out later, does not work. Attempting to send or receive a file ends in nothing.
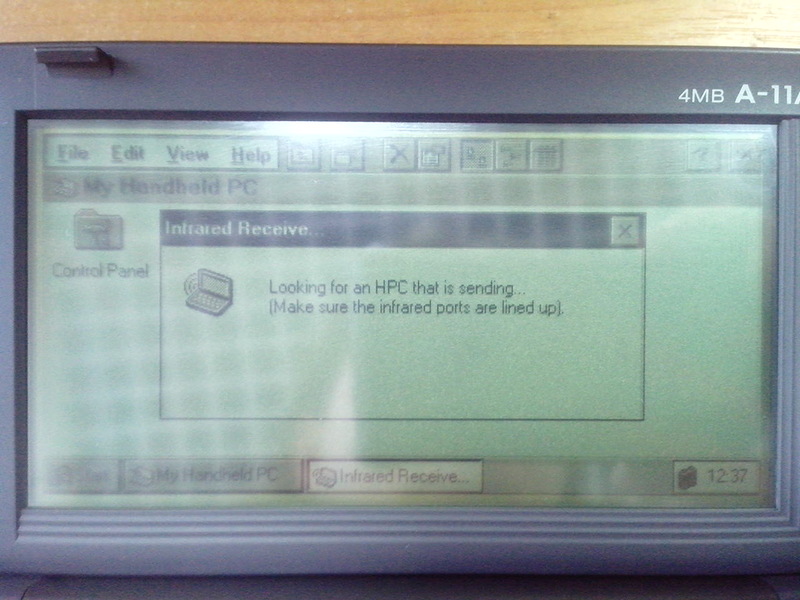
You can look at such a window for a long time, without waiting for the result.
For the purity of the experiment, I tried to pair Cassiopeia A-11A with several devices: Fujitsu Siemens Pocket LOOX 410 PDA, Toshiba Satellite Pro 430CDT laptop and with a regular computer via USB-IRDA Kingsun KS 959. No device has ever been able to receive or receive the file with Cassiopaea, although they successfully determined it in sight.
This is where my little review of baby Cassiopeia came to a logical end.
Thank you for your attention and have a nice day!
Unfortunately, little Cassiopeia ruffled life pretty hard. Firstly, the previous owner shamelessly lost the wire for connecting this PDA to a computer. And secondly, the Cassiopeia A-11A screen began to live its own life and began to turn off at the most unpredictable moment. And then it stopped working altogether, as it should be according to the law of meanness.
')
This machine is remarkable - there are as many as 4 MB of RAM onboard, a Hitachi SH3 processor with a frequency of 40 MHz, Windows CE 1.0, and all this joy of two finger batteries works.
I felt sorry for the poor thing, and I decided to fix it. The repair process and detailed information about the Cassiopeia A-11A, as always, under habrakatom.
Technical characteristics of Casio Cassiopeia A-11A
- Processor: Hitachi SH3 40 MHz
- Memory: 4 MB ROM and 4 MB RAM
- Display: 5.1-inch (130 mm) monochrome backlit LCD display
- Screen resolution: 480 x 240 pixels
- Number of colors displayed: 4 grayscale
- Communication Interfaces: Serial Port (Proprietary Connector) and Infrared Port
- Expansion Interfaces: PCMCIA (Type I, II)
- Input devices: QWERTY-keyboard (61 key) and touch screen
- Sound: speaker
- Power Source: 2xAA; CR2032 to save CMOS data
- Dimensions: 175 mm x 92 mm x 26.5 mm
- Weight: 380 gr.
The device is running the operating system Microsoft Windows CE 1.0 Handheld PC edition.
Appearance
Casio Cassiopeia A-11A is really a very tiny device. The length of the stylus is 11.5 cm.
The keyboard of Cassiopeia is Russified. The green key in the upper right corner turns on the backlight.
On the right side there is a PCMCIA card slot and a connector for connecting external devices, such as a CASIO QV digital camera. The latter is closed with a rubber stopper.
On the left side of the case there are: a connector for connecting a data cable, an IR transceiver window and a contrast control.
The battery compartment is fixed using the slide switch. Its normal position is shown in the picture. The latch and eject button of the PCMCIA card are located in the lower left corner. The stylus retracts into the intended technological hole under the eject button of the PCMCIA card.
Baby Cassiopeia eats from two finger-type batteries or AA-size batteries.
Under the covers, tightened with screws, is a CR2032 battery (it is necessary to save data in the event of removing the battery pack) and a ROM card. ROM card (ROM), contains firmware with Microsoft Windows CE 1.0 OS.
You can upgrade the version of the operating system only by replacing this card with the Windows CE 2.0 upgrade ROM card, which I, of course, did not have.
Repairing Cassiopea And at the same time, we photograph the entrails
As I have already said, the Casio Cassiopeia A-11A malfunction consisted in an inactive LCD display, and the touchscreen sensor worked fine - the tap on the screen was accompanied by a beep.
Naturally, first of all it was necessary to check the integrity of the flexible loop connecting the display with the main board. For this, I had to completely disassemble the PDA.
First of all, remove the lower part of the housing Casio Cassiopeia A-11A.
A fairly large part of the space on the main board is occupied by a PCMCIA slot and a slot for connecting a ROM card.
We unscrew all the screws that secure the main board to the body, and gently lift it from the side opposite to the battery compartment. We take out the plastic switch and the latch of the PCMCIA slot. We try not to lose or crush them.
Gently open the screwdriver with the latch of the connectors into which the keyboard and display cables are inserted. We hook the contacts of the battery compartment with a screwdriver (there are four of them, but only the top two are used) and remove them from the seats.
Now the main board can be removed. In the upper left corner is a plastic switch. Do not lose it.
Most of the components, including the processor, are located on the back of the main board.
In the upper right corner are two NEC D42S16165LG5 memory chips of 2MB each.
Almost in the center of the main board there are two proprietary chips CASIO FM-7431 and FM-7432. Datashit on them could not be found.
The RS-232 communication interface is made on the MAX3241CAI microcircuit.
Carefully inspect the main board for the presence of obvious defects. No such ones were found. Brush connectors for connecting cables.
Armed with alcohol and eraser, wipe the contacts of the keyboard and display loops.
Now you can try to assemble Casio Cassiopeia A-11A and test it for performance. Or you may not collect it, since these manipulations did not help the display to work.
Well, we continue to mock half-dead. The main task is to extract and ring the display loop.
Carefully unscrew the screws securing the hinge of the display and remove it.
We unscrew the two screws that connect the halves of the display case and carefully open it, trying not to damage the plastic latches.
Release the display board from the screws holding it, and pull it out of the case.
The cable connecting the display board with the main board is just opposite the speaker. Open the connector latch and try to pull the cable, but it was not there! The cable is glued to the printed circuit board, which is extremely not logical, but it is quite possible.
A little effort and skill, and the train is finally freed from glue bonds.
Immediately it becomes clear why the display did not want to work. Just look at the state of the contacts - there is no need to do without alcohol.
We take an eraser and get rid of dirt in the gaps between the pads, clean the contacts to shine. Also, a dent appeared on the cable (as if it was being pushed through with a screwdriver), but thank God it did not affect the integrity of the internal conductors.
Now you can collect the PDA. Repair is over.
First start
After assembling Cassiopaea, you must carefully make sure that there are no extra parts left. For example, I forgot to put in place a slide switch that commutes the power supply when the battery pack is inserted and serves as a kind of latch that secures the battery pack in the working position.
Turn on the Cassiopeia A-11A PDA.
After the initial setup of all parameters, we are waited by the familiar “Windows” interface.
Have you already noticed that the interface of the operating system, as well as the keyboard layout, unfortunately, is in English? Despite the fact that the qwerty-keyboard of this device is Russified, the support of the Russian language in the applications must be installed separately, for example, using RusCE / LE .
As you can see, office software Microsoft Word and Excel are already pre-installed on the PDA.
The size of the RAM allocated for the programs and for the data can be changed in the control panel.
It should be noted that all data is stored in the RAM of the device and disappears in the case of simultaneous removal of the battery pack and the CR2032 disk element.
Since Cassiopeia A-11A has a PCMCIA expansion slot, you could try connecting a CompactFlash flash card to a PDA via an appropriate adapter, but I didn’t have an adapter or a small memory card (I strongly doubt that Cassiopeia can digest modern CFs of more than 1GB), so this experiment was postponed until better times.
However, you can try to connect a PCMCIA card to the Cassiopeia A-11A, for example, the NEC PC 9801N-J05 modem I have lost.
As you can see, it is successfully determined by the system, and with it you can try to connect to the Internet via dial-up. Unfortunately, Cassiopeia A-11A does not have any pre-installed web browser, and there is no ftp client either, so nothing can be downloaded to the PDA via the network connection.
By tradition, I would like to launch a toy on Cassiopeia A-11A (except for built-in solitaire, of course), but alas, without the wires for connecting a PDA to a personal computer, I cannot even install a Windows CE interface.
An observant reader will say: “Comrade, why do you need a wire? Cassiopeia has IRDA, throw files with it. ” I hasten to upset you, the infrared port on my Cassiopaea, as it turned out later, does not work. Attempting to send or receive a file ends in nothing.
You can look at such a window for a long time, without waiting for the result.
For the purity of the experiment, I tried to pair Cassiopeia A-11A with several devices: Fujitsu Siemens Pocket LOOX 410 PDA, Toshiba Satellite Pro 430CDT laptop and with a regular computer via USB-IRDA Kingsun KS 959. No device has ever been able to receive or receive the file with Cassiopaea, although they successfully determined it in sight.
This is where my little review of baby Cassiopeia came to a logical end.
Thank you for your attention and have a nice day!
Source: https://habr.com/ru/post/212849/
All Articles