IP PBX in the cloud do it yourself in 10 minutes
 Many of Habr's readers are familiar with modern IP PBXs in the cloud, such as Mango, Oktell, Octoline and others. All of them offer various functions and tariff plans to satisfy the most different customers and meet their requirements, but there are always a number of those who choose Asterisk anyway, because they want to have opportunities for customization and integration, which only Asterisk can offer a few. In addition to Asterisk itself, it will still require a person who will be able to configure everything and support it, a separate connection to the telecom operator via SIP or via a VoIP gateway and so on. When we started to create our own cloud platform for developing VoxImplant communication applications, we, of course, knew that one of the most popular scenarios for its use would be an IP PBX, so we implemented all the necessary functionality for this. Unlike the case of Asterisk, a person who decides to make his IP PBX based on VoxImplant will need only Javascript knowledge, familiarization with this article and free 10-15 minutes to get the first working version of PBX at the output, which can later be integrated with their services and customize in accordance with their requirements. More on this under the cut.
First, we will define the architecture and functionality of the PBX, I will immediately note that in this article we will look at the basic version that is suitable for organizing telephony in the office in some cases, and if you wish, you can customize the scripts according to your requirements, but more on that later. We will build a PBX in accordance with the following scheme:

PBX users can make calls to each other and to real phone numbers, a separate group of users (Operators) can also receive incoming calls that come to the PBX from ordinary phones (more on this later) or via SIP, respectively, they can transfer calls to regular users and each friend if necessary. SIP phone - softphone or iron phone, with support for SIP, Web SDK / Mobile SDK - client application for a browser or smartphone, made using the appropriate SDK from VoxImplant.
So, to create an IP PBX, we need a free VoxImplant developer account, which can be obtained here https://voximplant.com/sign-up
After creating and activating an account, you can go to the control panel https://manage.voximplant.com/ , where most of our future work will take place. To begin, we will need to create users (Users) that will correspond to users and operators of the PBX, when creating a user, you can choose whether he has a separate VoxImplant account (Separate account balance) or if he calls, the amount will be debited from the general account of the account (by default) - while we change nothing, we do by default. IMPORTANT: Use 3-digit numeric codes (101, 102, 103, etc.) for login / username - in our scripts we will proceed from this format. Now you can proceed directly to the creation of PBX functionality, VoxImplant server applications are a set of scenarios that process calls passing through the platform. These scripts are written in standard Javascript, in which several namespaces and classes are available for working with VoxImplant functions (for more details, see the link ). Scripts are created and edited in the Scenarios section. In total, we will have 3 types of call processing scenarios: for incoming, for outgoing and for calls between users, let's call them PBX in, PBX out and PBX local, respectively. Let's start with the simplest PBX local:
VoxEngine.forwardCallToUser(); “And this is all?” - you ask :) Yes, this is all, since forwardCallToUser is one of the helper-functions that we wrote to speed up and facilitate the creation of applications. In fact, behind this function is a piece of Javascript code, a la:
')
VoxEngine.addEventListener(AppEvents.CallAlerting, function(e) { var newCall = this.callUser(e.destination, e.callerid, e.displayName); VoxEngine.easyProcess(e.call, newCall); }); Where easyProcess is another one of the helper-functions, in more detail all the functions can be found in the documentation for VoxEngine , since we do not have the task to study VoxImplant thoroughly now, we will continue without going into the details. The following script (PBX out) is responsible for sending outgoing calls to regular phone numbers:
VoxEngine.addEventListener(AppEvents.CallAlerting, function (e) { var call2 = VoxEngine.callPSTN(e.destination.substring(1), "74957893798"); VoxEngine.easyProcess(e.call, call2); }); In this code, we use the callPSTN function to redirect the call to the telephone network with Caller ID - 74957893798, which must be preauthorized in the Settings -> Caller IDs section, so that the caller ID when calling shows that we are calling. For the first parameter, it simply discards the prefix from 1 digit (later we will adjust this digit during the binding of scripts to the application), which signals that the call should be skipped in the PSTN, that is, the number is entered in the form 974952200022 after 94952200022 remain - the usual Moscow number. Here, too, everything is quite simple, now let's move on to the most interesting scenario - handling incoming calls (PBX in), I will add the “meat” in parts to make it clearer:
// var callerid, displayName; // AppEvents.CallAlerting VoxEngine.addEventListener(AppEvents.CallAlerting, function(e) { // Caller ID callerid = e.callerid; // displayName - SIP displayName = e.displayName; // ( ) e.call.handleTones(true); // , e.call.answer(); }); We have allowed the connection to the platform, now we need to handle the call, inside the previous listener we add handling of the call connection event:
// , var GMT_offset = 4, workingHours = [ [0, 0], // Sun [10, 19], // Mon [10, 19], // Tue [10, 19], // Wed [10, 19], // Thu [10, 19], // Fri [0, 0] // Sat ], nonWorkingHours = false, workingHoursGreetingURL = 'http://yourdomain.com/ivr.mp3', //<=== URL MP3- ( ) nonWorkingHoursGreetingURL = 'http://yourdomain.com/ivr_nwh.mp3'; //<=== URL MP3- ( ) e.call.addEventListener(CallEvents.Connected, function(e) { // . / , GMT_offset (GMT+4 ) var d = new Date(new Date().getTime() + GMT_offset * 3600 * 1000), day = d.getUTCDay(), hour = d.getUTCHours(); Logger.write("Day: " + day + " Hour: " + hour); if (hour >= workingHours[day][0] && hour < workingHours[day][1]) { /** * * */ e.call.startPlayback(workingHoursGreetingURL, false); e.call.record(); } else { /** * * */ nonWorkingHours = true; e.call.startPlayback(nonWorkingHoursGreetingURL, false); } }); Handler on the call connection hung, now you need to hang the handler on the disconnect:
e.call.addEventListener(CallEvents.Disconnected, function(e) { // VoxEngine.terminate(); }); And the handler completes playing our greeting:
// var TIMEOUT = 3000, operatorTimer; e.call.addEventListener(CallEvents.PlaybackFinished, function(e) { // , - , if (!nonWorkingHours) { operatorTimer = setTimeout(function() { forwardCallToOperator(e.call); }, TIMEOUT); } else VoxEngine.terminate(); // - }); You, probably, noticed the forwardCallToOperator function, we will return to it right away as we enable the handling of button presses on the phone to enter the extension number. Earlier we already included the handler by calling e.call.handleTones (true), now we need to declare it:
// var input = ''; e.call.addEventListener(CallEvents.ToneReceived, function(e) { // e.call.stopPlayback(); // input += e.tone; if (input.length == 3) { // 3 forwardCallToExtension(e.call, input); } }); Well, now it's time for the most interesting functions - forwardCallToExtension and forwardCallToOperator:
var operators = ['101', '102', '103'], // <== , - operatorCalls = {}, nOperatorCalls = 0, activeOperatorCall; function forwardCallToExtension(call, ext) { clearTimeout(operatorTimer); // call.handleTones(false); // ( ) call.playProgressTone("RU"); // , var call2 = VoxEngine.callUser(ext, callerid, displayName); // call2.addEventListener(CallEvents.Failed, VoxEngine.terminate); call2.addEventListener(CallEvents.Connected, function(e) { // - VoxEngine.sendMediaBetween(call, call2); }); call2.addEventListener(CallEvents.Disconnected, VoxEngine.terminate); } function forwardCallToOperator(call) { // call.handleTones(false); nOperatorCalls = 0; // ( ) call.playProgressTone("RU"); // , , . for (var i in operators) { var j = operators[i]; nOperatorCalls++; operatorCalls[j] = VoxEngine.callUser(j, callerid, displayName); operatorCalls[j].addEventListener(CallEvents.Failed, function(e) { if (typeof activeOperatorCall == "undefined") { delete operatorCalls[e.call.number()]; nOperatorCalls--; if (nOperatorCalls == 0) { call.hangup(); } } }); operatorCalls[j].addEventListener(CallEvents.Connected, function(e) { delete operatorCalls[e.call.number()]; activeOperatorCall = e.call; VoxEngine.sendMediaBetween(call, e.call); activeOperatorCall.addEventListener(CallEvents.Disconnected, VoxEngine.terminate); for (var i in operatorCalls) { operatorCalls[i].hangup(); } operatorCalls = {}; }); } } Everything is ready, we combine our parts and get a complete script . The case remains for the small - to create a VoxImplant application and connect users and our scripts to it. This is done in the following simple way:
1. In the Applications section, we create an application, name it and specify users who can use it.
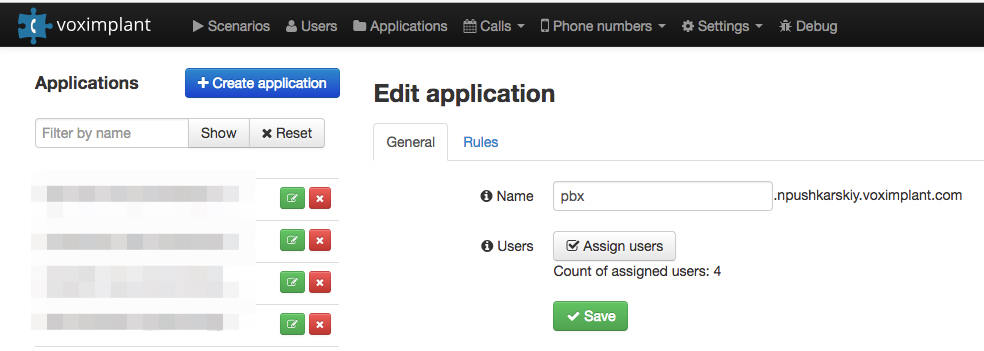
2. After creating the application, select editing immediately.
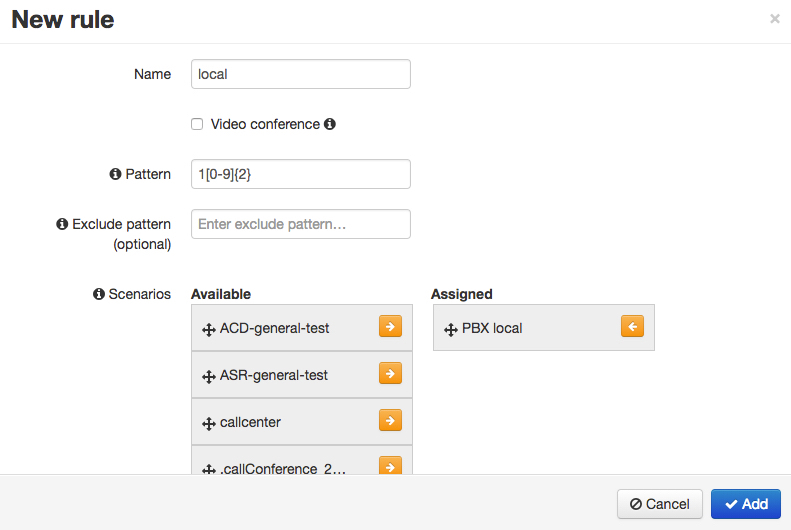
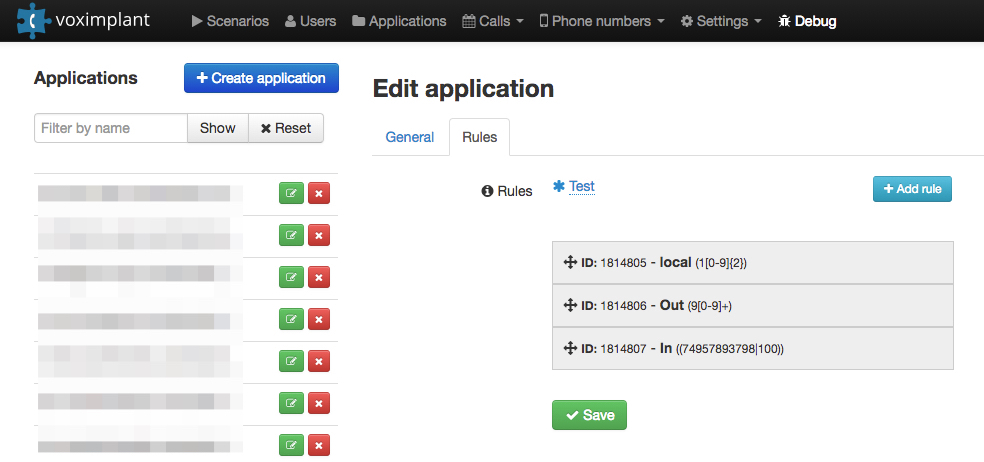
3. In the Rules tab, use the Add Rule button to create 3 new rules: local, out, in
When creating a local rule, given that you specified the names of users as 101, 102, 103, etc. in the Pattern field, specify 1 [0-9] {2} and, using drag'n'drop, drag the PBX local script from Available to Assigned, in order to assign which script should be called if users connected to our PBX decide to call their internal number Colleagues. We save.
And the last rule in: in the Pattern, we indicate something in the spirit (74957893798 | 100) and drag the PBX in in the direction of Assigned. We save. 74957893798 is just an example, there should be a phone number here that you can connect to your application in the Phone numbers section. And 100 allows you to call our PBX via SIP using a URL of the form sip: 100@appname.accountname.voximplant.com, where appname is the name of your application you specified during its creation, and accountname is the name of the account VoxImplant you specified During registration. If you already have a purchased number that supports forwarding via SIP, then you can connect it to the PBX, for example, by sending calls to that SIP URI (sip: 100@appname.accountname.voximplant.com), which we made for incoming calls SIP.
4. Save the application.
Now our PBX is ready to connect SIP phones (or client applications based on VoxImplant SDK), receive and process calls, local calls between PBX users and outgoing calls to real numbers.
PS Ready scripts from the article are posted on GitHub https://github.com/voximplant/pbx . The ready-made web phone based on the VoxImplant Web SDK can be found at http://webphone.voximplant.com/?account=accountname&app=appname , remember to replace the accountname and appname with your own names. Well, X-lite / Bria has not been canceled, if you need a more or less sane SIP softphone.
Source: https://habr.com/ru/post/212713/
All Articles