Xcode and Travis: running tests on a variety of configurations
 The basic idea of this note, in principle, can fit in one sentence: “since you write tests, it would be nice to run them on all possible configurations, and not on a single one”. But since the format of single-line articles in Habré is not accepted, and the information is assimilated in proportion to the logarithm of the number of words in the explanation, I will cut out the idea in more detail.
Introduction
Do you like bugs? I adore some here: fat juicy fatal bugs are sheer pleasure, they cannot be overlooked and released with them. However, there are also improbable little bugs, which are not visible to the naked eye, but which strive to manifest themselves in some specific conditions, for example, only on a specific version of the OS , or only when the compiler optimization is enabled. These little scoundrels, being not caught, are able to drink a lot of the developer’s blood and ruin their sleep at night. Paradoxically, the rarer the bug appears, the more effort it sometimes takes to capture and eliminate it. If you understand what I mean, then probably the idea that tests should be run on all the many potentially used combinations of OS versions, devices, and compilation settings seems obvious to you.
However, as a quick inspection of a couple of dozens of popular libraries on GitHub showed, most developers, even using automatic running of tests for each commit (via Travis-CI ), still test only one configuration for the latest version of iOS. Units in addition run tests on OS X, but that’s the case. Let's see how you can do it differently.
In principle, the Continuous Integration module built into XCode 5 allows you to run tests on several simulators, but does not provide sufficient flexibility, and in general, many did not like it. Therefore, we will not consider it in detail in this article, and we have already written about it.
')
xcodebuild
For testing, we will use the xcodebuild utility, which comes as part of the Xcode Command Line Tools . Previously, most preferred xctool from Facebook, since Firstly, xcodebuild would not start without tambourines and dances, and secondly, xctool produces a more pleasing to the eye. However, with the release of Xcode 5, the situation has changed in favor of the native xcodebuild : tambourines are no longer needed, and xctool currently does not allow us to specify the type of simulator, which is the key moment for us.
A typical test command looks like this:
xcodebuild test -project {project}.xcodeproj -scheme {scheme} -sdk iphonesimulator -destination OS=6.0,name=iPhone -configuration Release Everything is pretty obvious: we specify the project (or workspace), scheme, SDK, OS version, simulator name and Debug / Release configuration.
With a small script, we can easily iterate and test all possible configurations (assuming that the Deployment Target is 5.0, and we are testing the universal library for iOS and OS X):
for configuration in Release Debug do for device in "iPhone" "iPad" do for iosversion in 6.0 6.1 5.0 5.1 do test_ios iOSTests "$iosversion" "$device" "$configuration" done done for device in "iPhone Retina (3.5-inch)" "iPhone Retina (4-inch)" "iPad Retina" do for iosversion in 6.0 6.1 7.0 do test_ios iOSTests "$iosversion" "$device" "$configuration" done done for device in "iPhone Retina (4-inch 64-bit)" "iPad Retina (64-bit)" do test_ios iOSTests-64bit 7.0 "$device" "$configuration" done test_osx OSXTests "$configuration" done (test_ios and test_osx - functions for testing, the full version of the script is available in the test project on GitHub)This will give us 40 possible configurations, which probably already looks redundant. After all, there is no point in testing logic at different resolutions or UI with different optimization settings. And if you managed to upgrade the system to OS X Mavericks, then you managed to notice that iOS 5 simulators do not work on it.
So, later in the article we will test the following configurations:
| Logic tests | iOS 6.0 | iOS 6.1 | iOS 7.0 | iOS 7.0 64-bit | OS X |
| Release | ✓ | ✓ | ✓ | ✓ | ✓ |
| Debug | ✓ | ✓ | ✓ | ✓ | ✓ |
| UI Tests | iphone | iPad | iPhone Retina (3.5-inch) | iPhone Retina (4-inch) | iPad Retina |
| iOS 6.0 | ✓ | ✓ | ✓ | ✓ | ✓ |
| iOS 7.0 | ✓ | ✓ | ✓ | ✓ |
Adding a binding to count successfully tested configurations and exit at the first failure, we get
final version of the script:
test-main-configurations.sh
#!/bin/sh # Global settings project=XCode/TravisCI.xcodeproj Formatting output
function red() { eval "$1=\"$(tput setaf 1)$2$(tput sgr 0)\"" } function green() { eval "$1=\"$(tput setaf 2)$2$(tput sgr 0)\"" } function yellow() { eval "$1=\"$(tput setaf 3)$2$(tput sgr 0)\"" } function bold() { eval "$1=\"$(tput bold)$2$(tput sgr 0)\"" } function echo_fmt() { local str=$1 local color=$2 local bold=$3 if [ "$color" != '' ]; then $color str "$str" fi if [ "$bold" != '' ]; then $bold str "$str" fi echo $str } Testing
succeeded_count=0 function test() { local options="$@" echo_fmt "xcodebuild test -project $project $options" yellow xcodebuild test -project $project "$@" local exitcode=$? if [[ $exitcode != 0 ]] ; then echo_fmt "xcodebuild exited with code $exitcode" red echo_fmt "=== TESTS FAILED ===" red bold exit 1 else ((succeeded_count++)) fi } function test_ios() { local scheme=$1 local iosversion=$2 local device="$3" local configuration=$4 shift 4 echo_fmt "=== TEST SCHEME $scheme IOS $iosversion DEVICE $device CONFIGURATION $configuration ===" yellow bold test -scheme "$scheme" \ -sdk iphonesimulator \ -destination OS="$iosversion",name="$device" \ -configuration "$configuration" \ "$@" } function test_osx() { local scheme=$1 local configuration=$2 shift 2 echo_fmt "=== TEST SCHEME $scheme OSX CONFIGURATION $configuration ===" yellow bold test -scheme "$scheme" -configuration "$configuration" "$@" } # Logic tests for configuration in Release Debug do for iosversion in 6.0 6.1 7.0 #5.0 5.1 # Mavericks does not support iOS 5 Simulator do test_ios "iOSLogicTests" "$iosversion" "iPad Retina" "$configuration" done test_ios "iOSLogicTests-64bit" 7.0 "iPad Retina (64-bit)" "$configuration" ONLY_ACTIVE_ARCH=YES test_osx "OSXTests" "$configuration" done # UI tests test_ios "iOSUITests" 6.0 "iPhone" Debug for device in "iPad" "iPhone Retina (3.5-inch)" "iPhone Retina (4-inch)" "iPad Retina" do for iosversion in 6.0 7.0 do test_ios "iOSUITests" "$iosversion" "$device" Debug done done # Result echo_fmt "=== SUCCEEDED $succeeded_count CONFIGURATIONS. ===" green bold Running which:
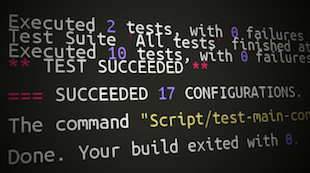
./Script/test-main-configurations.sh will give us a message about successfully passed tests:=== SUCCEEDED 19 CONFIGURATIONS ===or error message:
=== TESTS FAILED ===
About testing on the iOS 64-bit simulator
Because of some bug, Xcode often does not allow running tests on a 64-bit simulator and swears with a strange message:
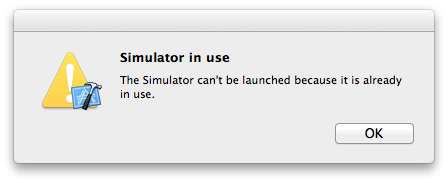
This outrage is fixed by setting “Build Active Architecture Only” = “YES” for the tested configuration (Debug / Release). Therefore, in the script for 64-bit tests there is an additional option
This outrage is fixed by setting “Build Active Architecture Only” = “YES” for the tested configuration (Debug / Release). Therefore, in the script for 64-bit tests there is an additional option
ONLY_ACTIVE_ARCH=YES .Xcode
Someone may not like to run the script manually, so you can create a separate target that will launch it. To do this, in Xcode, we perform the Add Target ... -> Other -> Aggregate manipulations, then the Editor -> Add Build Phase -> Add Run Script Build Phase , and add the following script:
cd ${SRCROOT}/.. # scriptname="test-main-configurations" script="Script/${scriptname}.sh" log="Script/${scriptname}.log" $script > $log # , if [[ $? != 0 ]] ; then # , ... echo "error: TESTS FAILED" # ... , ... exit 1 else rm $log # ... fi 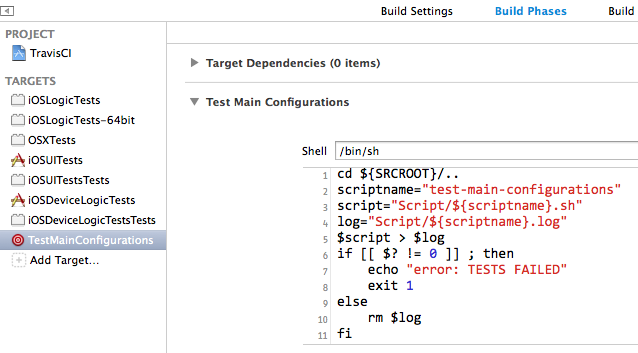
Now, if the build of this target ( ⌘ + B ) has been successfully completed, then the tests have passed successfully, if not, go to the Scripts / test-main-configurations.log log and see what the reason is.
Of course, to manually launch such testing before each commit no willpower is enough, but it is quite possible to make this a mandatory step when releasing a new release, for example, by adding a similar Build Phase in the release branch of DVS .
Travis-ci
But of course, it’s more efficient when the tests are regularly run automatically, for this we set up the Travis-CI integration system, which will automatically run all our tests on every GitHub. I will not describe the details in detail, the benefit has already been the corresponding article , I’ll dwell only on the necessary points.
All we need is to add the .travis.yml file to the repository root, which will indicate that we should run our script:
language: objective-c script: Script/test-main-configurations.sh Well, log in to Travis-CI and enable the checkbox for the desired repository. In principle, everything. Now commits will be thoroughly tested, and pull requests will be accompanied by messages from Travis:


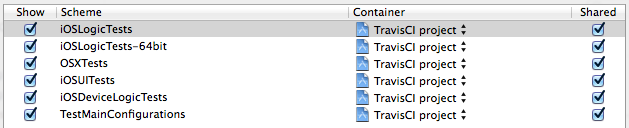
Do not forget to check that the test schemes are present in the repository, i.e. they have the Shared checkbox selected :
By the way, Travis uses Xcode 5.0.2 on OS X 10.8.5, so it can run tests on iOS 5.0 and iOS 5.1.
Testing on the device.
If you have a device on iOS 5, then the tests can be run on it by writing a similar script for several configurations. Logical tests are run only on the simulator, and on the device you can run only application tests. Therefore, if you are testing a library, you will have to create an empty container application with your library, and test it.
The xcodebuild command for testing on a device looks like this:
xcodebuild test -project XCode/TravisCI.xcodeproj -scheme iOSDeviceLogicTests -sdk iphoneos -destination name='iPad Yan' -configuration Release If something does not start, then look spoiler
- There may be problems with the provisioning profile . Check if the app is running on the device from Xcode.
- Verify that there is a container application for the Build Phases test target in Target Dependencies .
- The Bundle Loader parameter in Build Settings must be set to:
$(BUILT_PRODUCTS_DIR)/MyExistingApp.app/MyExistingApp - And the Test Host parameter is set to:
$(BUNDLE_LOADER) - In addition, in the build settings of the container application, the Symbols Hidden by Default parameter should be NO .
That's all. Have a good test!
Links
Source: https://habr.com/ru/post/212615/
All Articles