The basics of creating a 2D character in Godot. Part 1: compiling the game engine, creating a project and rest animation hero
A couple of days ago I saw an article about publishing source code under the free MIT license of the Godot game engine and immediately decided to dig into it.
It turned out not so difficult, rather funny. In my first publication I would like to talk about the first steps towards the creation of a gaming platform, and all the pitfalls that I almost broke my fingers over these days.

If it is interesting to someone, welcome under Habrakat!
')
Immediately determine that there is no misunderstanding:
1) Writing an article encouraged me Charoplet with his series of articles "2D character in Unity 3D" . Thank him for this, creative success and new publications.
2) Again, for clarity, I took (without asking) textures (character) from his lessons. I hope they forgive me for it.
3) On board, I only have GNU / Linux, x86 and amd64 respectively. For other OS, it is enough to download binary files from the creators site. Since under amd64 everything is already there, and under x86 it is expected in the near future (the author promised to compile binary files as soon as possible), I decided that the article would be more relevant and interesting for 32-bit systems.
Installing dependencies, if not yet in the system (If something does not work, the information is outdated, look at the developers site ):
GCC or LLVM
Python 2.7+ (3.0 has not yet been tested).
SCons build system.
X11 and MESA development Libraries
ALSA development libraries
Freetype
pkg-config
Ubuntu users:
Source cloning:
Self compiling:
scons supports parallel compilation. Just add the -j option with an argument indicating the number of threads, for example
You can go and make a cup of tea. Compiling is not a quick process.
Tea prepared, still a compilation? Then you can go to the publisher's site and read the documentation , download demo and examples , as well as templates for exporting projects for the necessary operating systems.
The godot binary appeared in the / bin directory. Just run it.
We immediately see a dialogue with the projects. Since we launched for the first time, it will be empty.

Let's create your first project.
New Project -> Project Path - respectively the directory in which it will be; Project Name - its name.
Without hesitation, choose a destination, call test, click the Edit button, and the created project crashes with the segmentation fault.
At first, I thought my hands were crooked. I rebuilt from git, I launch it - again twenty five. I collected it on another machine - it all worked! On its own - no. And here to me dopperlo! Comrades! The program does not understand Cyrillic! In general, I moved everything to another directory, and it all worked on my machine. Well, we will continue to be careful.
Well, that's the main window of the program.
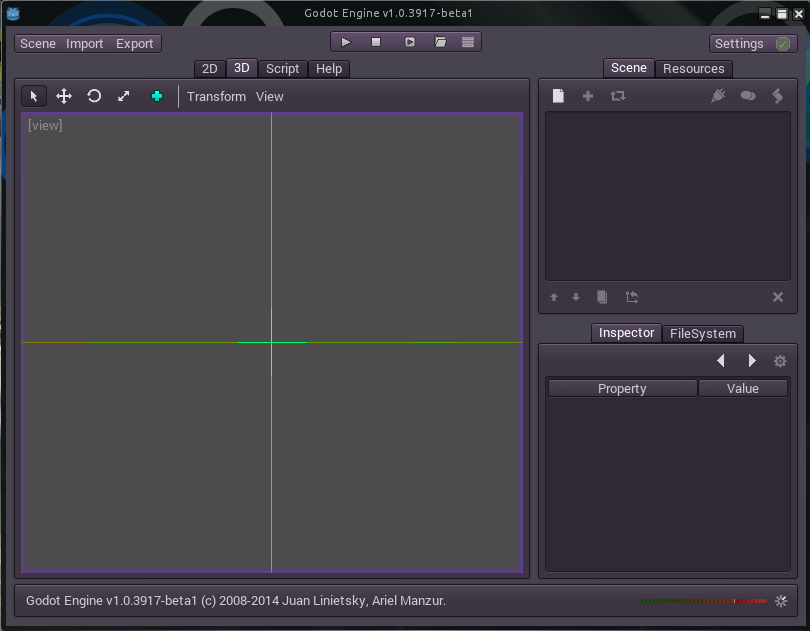
First, let's create a new scene. Scene is an episode of the game. It can be a whole level. Screensaver Character animation. Background. Godot is a scene editing program. Today we will not delve into the creation of a fully functional game scene, but simply create a character.
The first thing to do is to get the sprites. Draw / Download /Steal . I probably will take from a lesson about Unity3D. Sprites from Charoplet .
Swing Idle.png.
Import to Godot:

Specify which image (s) where to import
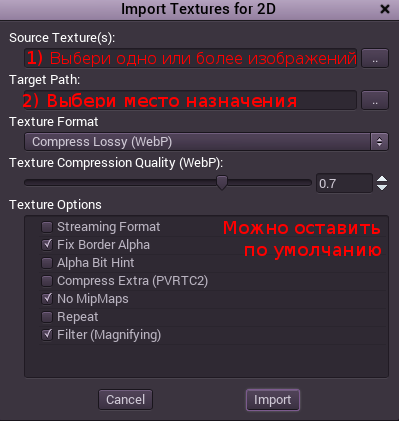
Specify the degree of compression

And click "Import". The Wiki has more detailed information about importing textures in English. I recommend reading .
Well, we are satisfied with the result of trying to create a character.
In the upper right corner in the Scene window, click on the only active button “Add / Create a new Node”, or use the keyboard shortcut Ctrl + A to create a “Node”. I think the closest translation is gear, but it doesn't sound beautiful. Let there be material? Document? Or so and leave, - "Noda"? I would welcome comments.
In the “Search” search, enter “Rigid”, and “Node” will be sorted by name. Choose RigidBody2D.
Configure the settings in the Inspector menu below:
So. Well we go! Now we stretch the sprite:
Again, Ctrl + A, Sprite -> Select Sprite. Not AnimatedSprite, but just Sprite.
Go to the "Settings" (Inspector - Control?), Click on the texture at the top, -> Load. Select the already imported Idle.tex texture.
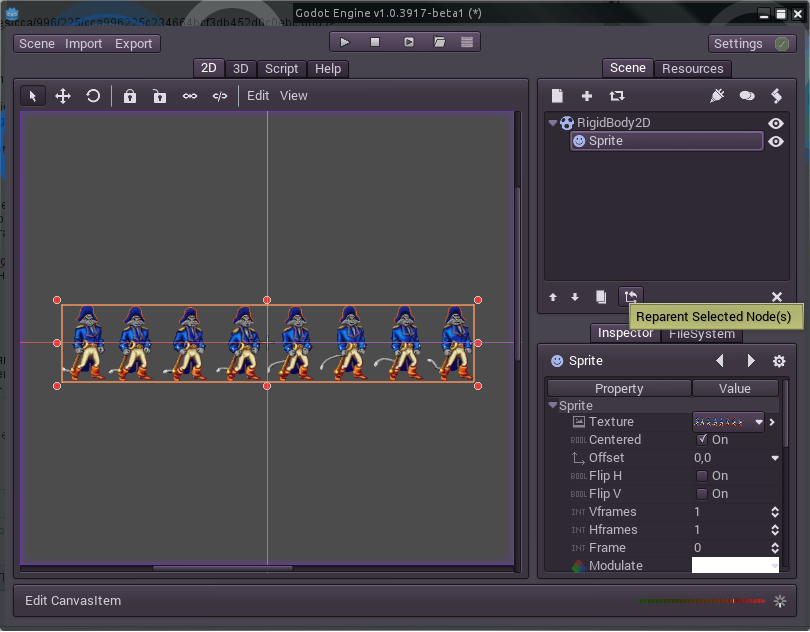
Yes, she appeared! Now we need to point out that we have as many as 8 frames here (True, the frames themselves are counted from zero, we count their number from one, get used to it). The parameter Hframes, - Horizontal frames, set equal to 8. And what do we see?
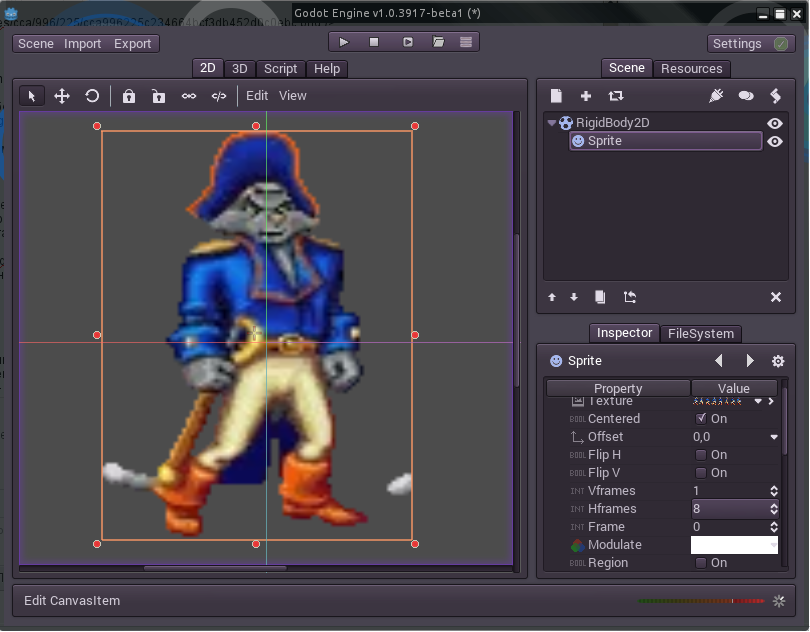
On the very first (which is zero) frame, the captain's tail is visible from the following! It's outrageous! What do these OKAM Studio think about themselves? Even the number of frames in the storyboard can not normally count! How can they write such programs ?!
Yes? Flashed the thought? No, the developers are not to blame. We are to blame. Were too lazy to draw your sprites. They took someone else's - that's payback.
The character on the sprite is crooked. We will rule.
... 10 minutes later ...
In GIMP, it turns out to be very difficult to do / change / edit sprites. We set the grid of the desired size (120 by 120 pixels). And shove the frames in places. Is done. Download the source files here . The finished texture looks like this:
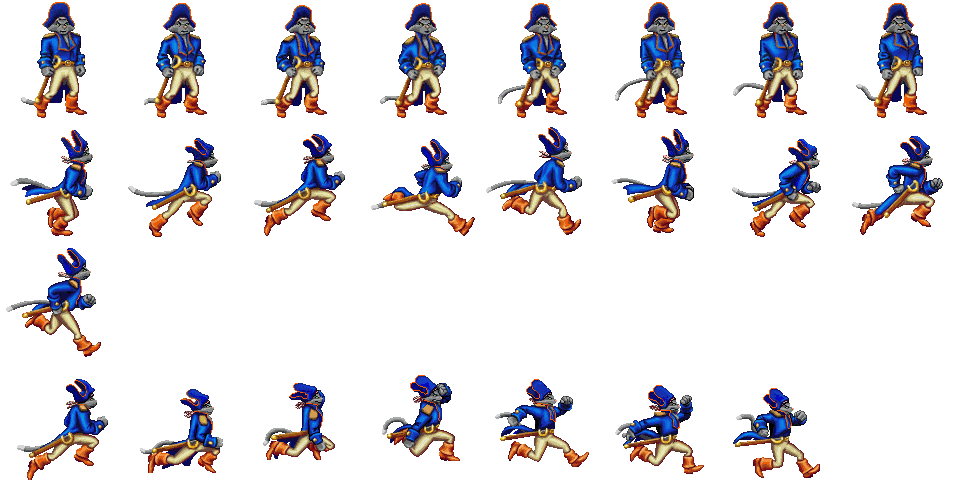
Yes, I glued all the animations in one picture. To make it easier to work on. When we will do jumps and run / walk.
Ok, reload. Specify Vframes = 4; Hframes = 8
Direct to RigidBody2D and rename it to the player. So it will be clearer, is not it?
Ctrl + A - create “Node” “AnimationPlayer” and immediately “Camera2D” in order not to return. Rename the AnimationPlayer to anim, and Camera2D simply to camera. So it will be easier further. With the camera, I think immediately guessed what to do. More while we will not touch it.
It's time to create an animation! Make it easier nowhere! Select anim, the animation menu appears at the bottom left.
Create an animation. At the bottom left there is a “Create new animation in player” button. Zhmyakayem. Call idle.
Click on the pencil to the right, and here it is, the menu of the animation editor.
We set Len (s) - animation length 1.1 (seconds), and Step (s) - animation step, 0.15.
Select again on the Sprite in the Scene window at the top right.
We look at the Inspector - we are looking for the Frame variable. It should be zero. Right drawn key. Click on it. We propose to create a new line of animation "frame" for this sprite. Agree (Create).
Now everything is simple. Press Ctrl + Right, select the next animation - click on the key. And so on. In total there should be 8 blue dots, 8 frames of animation. After that, you can click on the player to play, and see what we have. Yes, do not forget to loop animation. (Enable / Disable looping in animation button).
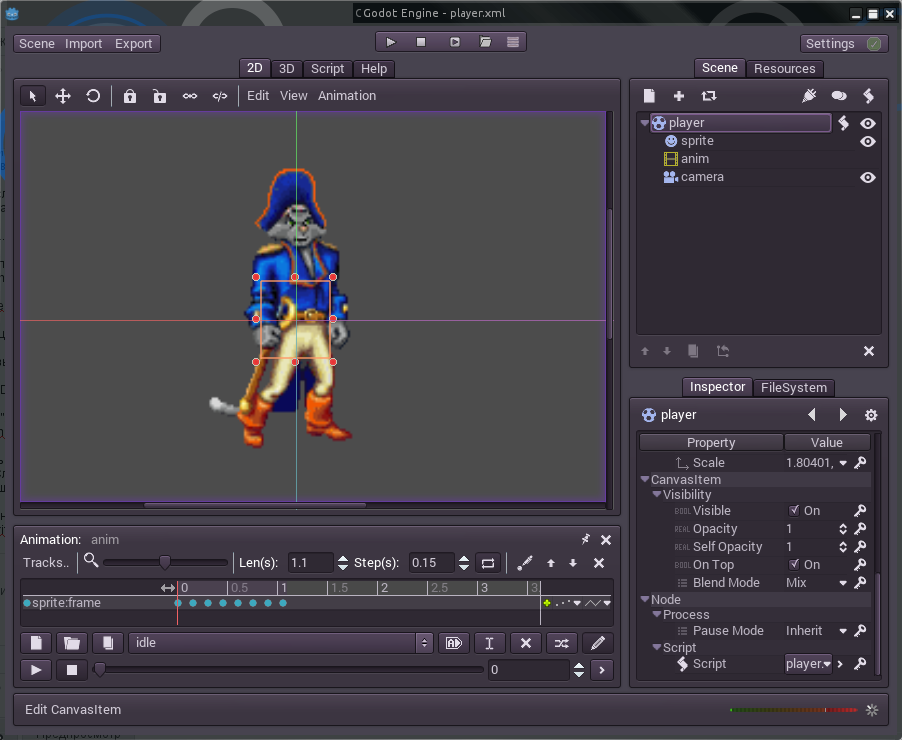
Save the scene (Scene -> Save, calling player.xml).
So, 30% did. Now the fun part.
We willcook! cod!
Scene -> player -> Inspector -> Script. Are you following me? The screenshot above shows where to go. We select there New GDScript.
Switch to the scripts tab.
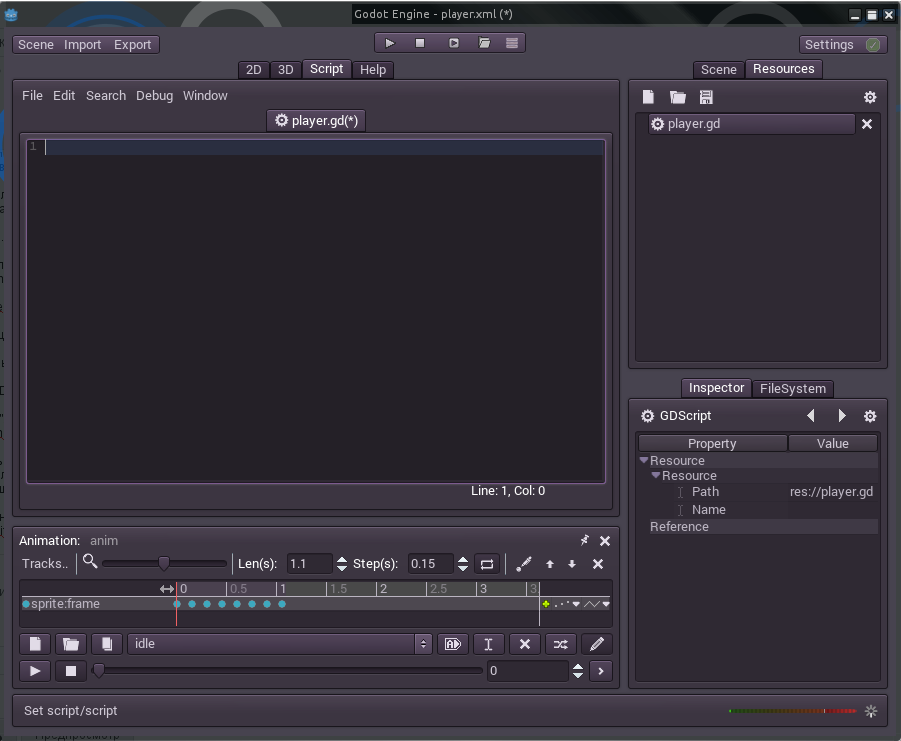
Well, let's go. I remind you that the program does not understand the Cyrillic alphabet. Therefore, comments on the code are for educational purposes only. Do not try to insert them into the code. Below is the complete code without them.
Well, and you were afraid.
Do not forget to save as player.gd.
So. In principle, almost everything is ready. It remains the most important thing:
Do not forget to save the scene with the character. And create a new one. The benefit is already able.
First, create an empty “Node” - let's call it Scene.
Now we will tie our player to it. Click on the "plus" and select our newly created player.xml.
So. Well, the launch.

Oops!
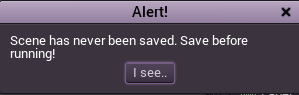
Save our scene as scene.xml. And run again. If everything is done correctly, you will see an amazing animation of our Captain!
A small video of the result with bonus backs and the ground under your feet:
Well, in conclusion. As I wrote above, in the GNU / linux x86 OS at the moment the project cannot be exported. The authors of the program are notified. In the near future they promised to solve this problem and compile not only binaries for x86, but also export templates. You can also test export to other OS.
Well, if I succeed, I hope to continue the cycle of articles on the creation of 2D, and in the future it is possible to have 3D games on this wonderful engine. Have a nice Friday, with the Day of Geek, see you soon!
It turned out not so difficult, rather funny. In my first publication I would like to talk about the first steps towards the creation of a gaming platform, and all the pitfalls that I almost broke my fingers over these days.
If it is interesting to someone, welcome under Habrakat!
We meet: compiling and installing godot on GNU / Linux x86, creating a simple scene and an animated character
')
Immediately determine that there is no misunderstanding:
1) Writing an article encouraged me
Charoplet with his series of articles "2D character in Unity 3D" . Thank him for this, creative success and new publications.2) Again, for clarity, I took (without asking) textures (character) from his lessons. I hope they forgive me for it.
3) On board, I only have GNU / Linux, x86 and amd64 respectively. For other OS, it is enough to download binary files from the creators site. Since under amd64 everything is already there, and under x86 it is expected in the near future (the author promised to compile binary files as soon as possible), I decided that the article would be more relevant and interesting for 32-bit systems.
Compilation
Installing dependencies, if not yet in the system (If something does not work, the information is outdated, look at the developers site ):
GCC or LLVM
Python 2.7+ (3.0 has not yet been tested).
SCons build system.
X11 and MESA development Libraries
ALSA development libraries
Freetype
pkg-config
Ubuntu users:
apt-get install git scons pkg-config libx11-dev libxcursor-dev build-essential libasound2-dev libfreetype6-dev libglu-dev Source cloning:
git clone https://github.com/okamstudio/godot.git Self compiling:
cd ./godot scons bin/godot scons supports parallel compilation. Just add the -j option with an argument indicating the number of threads, for example
scons -j 4 bin/godot I got the fastest when the number of threads == the number of cores.You can go and make a cup of tea. Compiling is not a quick process.
Tea prepared, still a compilation? Then you can go to the publisher's site and read the documentation , download demo and examples , as well as templates for exporting projects for the necessary operating systems.
First run, project creation
The godot binary appeared in the / bin directory. Just run it.
We immediately see a dialogue with the projects. Since we launched for the first time, it will be empty.
Let's create your first project.
New Project -> Project Path - respectively the directory in which it will be; Project Name - its name.
Without hesitation, choose a destination, call test, click the Edit button, and the created project crashes with the segmentation fault.
At first, I thought my hands were crooked. I rebuilt from git, I launch it - again twenty five. I collected it on another machine - it all worked! On its own - no. And here to me dopperlo! Comrades! The program does not understand Cyrillic! In general, I moved everything to another directory, and it all worked on my machine. Well, we will continue to be careful.
Well, that's the main window of the program.
First, let's create a new scene. Scene is an episode of the game. It can be a whole level. Screensaver Character animation. Background. Godot is a scene editing program. Today we will not delve into the creation of a fully functional game scene, but simply create a character.
Create game character
The first thing to do is to get the sprites. Draw / Download /
Charoplet .Swing Idle.png.
Import to Godot:
Specify which image (s) where to import
Specify the degree of compression
And click "Import". The Wiki has more detailed information about importing textures in English. I recommend reading .
Well, we are satisfied with the result of trying to create a character.
Character scene
In the upper right corner in the Scene window, click on the only active button “Add / Create a new Node”, or use the keyboard shortcut Ctrl + A to create a “Node”. I think the closest translation is gear, but it doesn't sound beautiful. Let there be material? Document? Or so and leave, - "Noda"? I would welcome comments.
In the “Search” search, enter “Rigid”, and “Node” will be sorted by name. Choose RigidBody2D.
Configure the settings in the Inspector menu below:
Mode: Character
Mass: 3
Friction: 0
Custom Integrato:
So. Well we go! Now we stretch the sprite:
Again, Ctrl + A, Sprite -> Select Sprite. Not AnimatedSprite, but just Sprite.
Go to the "Settings" (Inspector - Control?), Click on the texture at the top, -> Load. Select the already imported Idle.tex texture.
Yes, she appeared! Now we need to point out that we have as many as 8 frames here (True, the frames themselves are counted from zero, we count their number from one, get used to it). The parameter Hframes, - Horizontal frames, set equal to 8. And what do we see?
On the very first (which is zero) frame, the captain's tail is visible from the following! It's outrageous! What do these OKAM Studio think about themselves? Even the number of frames in the storyboard can not normally count! How can they write such programs ?!
Yes? Flashed the thought? No, the developers are not to blame. We are to blame. Were too lazy to draw your sprites. They took someone else's - that's payback.
The character on the sprite is crooked. We will rule.
... 10 minutes later ...
In GIMP, it turns out to be very difficult to do / change / edit sprites. We set the grid of the desired size (120 by 120 pixels). And shove the frames in places. Is done. Download the source files here . The finished texture looks like this:
Yes, I glued all the animations in one picture. To make it easier to work on. When we will do jumps and run / walk.
Ok, reload. Specify Vframes = 4; Hframes = 8
Direct to RigidBody2D and rename it to the player. So it will be clearer, is not it?
Ctrl + A - create “Node” “AnimationPlayer” and immediately “Camera2D” in order not to return. Rename the AnimationPlayer to anim, and Camera2D simply to camera. So it will be easier further. With the camera, I think immediately guessed what to do. More while we will not touch it.
It's time to create an animation! Make it easier nowhere! Select anim, the animation menu appears at the bottom left.
Create an animation. At the bottom left there is a “Create new animation in player” button. Zhmyakayem. Call idle.
Click on the pencil to the right, and here it is, the menu of the animation editor.
We set Len (s) - animation length 1.1 (seconds), and Step (s) - animation step, 0.15.
Select again on the Sprite in the Scene window at the top right.
We look at the Inspector - we are looking for the Frame variable. It should be zero. Right drawn key. Click on it. We propose to create a new line of animation "frame" for this sprite. Agree (Create).
Now everything is simple. Press Ctrl + Right, select the next animation - click on the key. And so on. In total there should be 8 blue dots, 8 frames of animation. After that, you can click on the player to play, and see what we have. Yes, do not forget to loop animation. (Enable / Disable looping in animation button).
Save the scene (Scene -> Save, calling player.xml).
So, 30% did. Now the fun part.
We will
Scene -> player -> Inspector -> Script. Are you following me? The screenshot above shows where to go. We select there New GDScript.
Switch to the scripts tab.
Well, let's go. I remind you that the program does not understand the Cyrillic alphabet. Therefore, comments on the code are for educational purposes only. Do not try to insert them into the code. Below is the complete code without them.
extends RigidBody2D # var anim="" # func _integrate_forces(s): # var new_anim=anim # ( , ) new_anim="idle" # if (new_anim!=anim): ## anim=new_anim get_node("anim").play(anim) Well, and you were afraid.
As I have promised:
extends RigidBody2D
var anim = ""
func _integrate_forces (s):
var new_anim = anim
new_anim = "idle"
if (new_anim! = anim):
anim = new_anim
get_node ("anim"). play (anim)
var anim = ""
func _integrate_forces (s):
var new_anim = anim
new_anim = "idle"
if (new_anim! = anim):
anim = new_anim
get_node ("anim"). play (anim)
Do not forget to save as player.gd.
So. In principle, almost everything is ready. It remains the most important thing:
Scene creation
Do not forget to save the scene with the character. And create a new one. The benefit is already able.
First, create an empty “Node” - let's call it Scene.
Now we will tie our player to it. Click on the "plus" and select our newly created player.xml.
So. Well, the launch.
Oops!
Save our scene as scene.xml. And run again. If everything is done correctly, you will see an amazing animation of our Captain!
A small video of the result with bonus backs and the ground under your feet:
Well, in conclusion. As I wrote above, in the GNU / linux x86 OS at the moment the project cannot be exported. The authors of the program are notified. In the near future they promised to solve this problem and compile not only binaries for x86, but also export templates. You can also test export to other OS.
Well, if I succeed, I hope to continue the cycle of articles on the creation of 2D, and in the future it is possible to have 3D games on this wonderful engine. Have a nice Friday, with the Day of Geek, see you soon!
Source: https://habr.com/ru/post/212583/
All Articles