+ (AppStore *) Timera: application architecture and design features
It is time to tell the public about our application timera. From today you can download it in the appstore.
Heximal (Pavel) , our ios developer, will tell about the timera architecture, he has read only now, so I post his post.
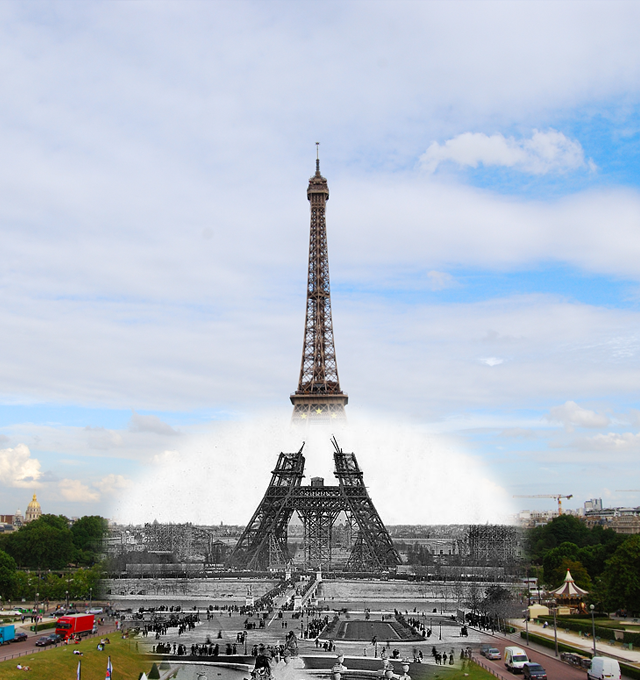
-> In this post I will write about my modest participation in an interesting and promising project with a very original name Timera (from the words time and era). By a lucky coincidence, I was in the active phase of searching for new development horizons at the very moment when the startup management was looking for a candidate for an iOS developer job. The essence of the project is quite simple - its visual presentation and description of the architecture can be seen in the main illustration of the post, under the cut.
')
The user is presented with a tool for creating a time tunnel, by combining a photograph from the past with a photograph taken by the camera of the smartphone. I really liked the idea, and I immediately began to integrate into the development process, during which I had to face and overcome many difficult and interesting tasks.
First of all, I would like to say a few words about the global architecture. The central link is a server that performs the functions of back-end, front-end, data storage, web-api. I will not describe the server stuffing in detail, since I have no relation to it. I can only say that the production-version works on cloud hosting from Microsoft, and for the implementation of the server-side, the classic currently used stack is used: IIS + MSSQL + ASP.NET
The front-end system (website www.timera.com ) provides the user the ability to view photos of other users, as well as is equipped with the social network functionality: there is an opportunity to put likes, leave comments, there is a function Share on other social networks. Also, the user of the website has the opportunity to upload an old photo. What does this mean, and what is it for? About this further.
In addition to the website, an integral part of the architecture is the mobile application. Today it is implemented for the two most popular platforms - this is of course Android and iOS. The functionality of the application almost completely reproduces the functionality of the website, except for the only feature that the website cannot have. It's about timeragraphy.
The term “timekeeping” is used to refer to the genre of historical collage. He is not new. After all, these works have long been walking on the Internet and many of them have become very viral. One has only to recall the project “Link of Times” by Sergei Larenkov or Sean Claver with his slideshow about the 1906 San Francisco earthquake. Actually, the name of the application was invented by David Webb, the founder of the project, simply by shortening the term “timeragraphy”. Now is the time to explain a little to the mechanics of timekeeping and how this process is implemented in the Timera mobile application.
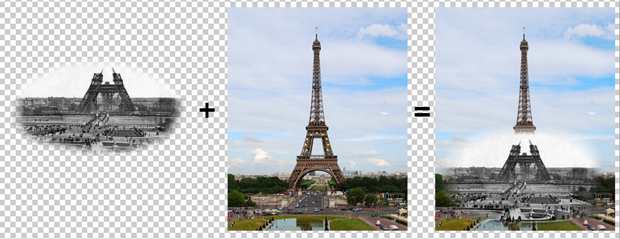
Suppose we have an old photograph of the Eiffel Tower. I personally like the picture of 1889, on which the tower was built only up to the first level. To create a timera-snapshot, you need to find the angle from which the old photograph was created, take a snapshot, “overtake” to the computer, and in some graphic editor to make a combination using various filters and gradients. The task, for example, is not for everyone. But on the other hand, she is capable of every Timera user. The whole process is as simple as possible and it may even seem quite funny (at least I personally consider it as such).
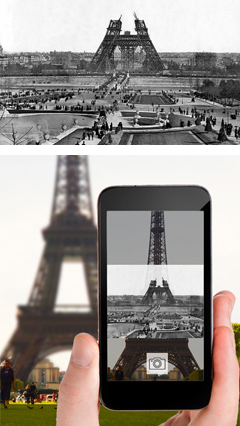
The user opens a screen with a map on which blue pins show old photos available in one place or another. Naturally, the application allows automatic location of the user and the display of objects around. After the user has decided that he will timer-graph, the screen with the camera starts. On this screen, there is simultaneously a live image from the camera and on top of it a translucent image of an old photograph (the degree of transparency can be changed). The user can move the old photo across the screen, resize it using the capabilities of the touch-screen technology, thus making the primary aim. After the snapshot is taken, a more accurate alignment screen opens.
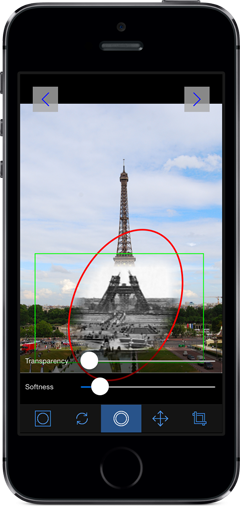
The most interesting begins on the third screen, where you configure the time-tunnel (time-tunnel). Here, a toolbar is available to the user with various tools, such as:
- transparency and sharpness sliders of the time-tunnel border (transparency and softness)
- turn of the time tunnel around the axis
- a function called swap (swap old and new photos, that is, the old one goes to the background, and the new one goes to the front one)
- change the shape of the time-tunnel: elliptical or rectangular
- crop
In all modes, it is possible to change the size and position of the time tunnel using on-screen gestures.
It would seem sparsely? Perhaps, but even with this set of tools very good compositions are created. And plus to everything, it is planned to expand this functionality, there are enough ideas in this regard.
After editing, the resulting image can be uploaded to the server and / or shared on the social network. When downloading to the server, you can set the privacy flag if you do not want to make your work public.
Here I would like to tell you a few nuances about the difficulties that have arisen in creating the main use-case (timer-graphing).
First, an unpleasant surprise was the presence of two values of type UIDeviceOrientation. In the past, I have worked with the iOS accelerometer and the device orientation concept, and then the number of possible device orientations was four: UIDeviceOrientationPortrait, UIDeviceOrientationPortraitUpsideDown, UIDeviceOrientationLandscapeLeft, UIDeviceOrientationLandscapeRight. On the screen of photographing, the orientation of the device is very critical, since the overlay image must be oriented accordingly, so that the old photo does not turn upside-down, or lying on its side. As it turned out, there are two more device positions: UIDeviceOrientationFaceUp and UIDeviceOrientationFaceDown. A lot of man-hours left to realize this fact and recognize in it the reason for the inappropriate behavior of the program.
Another interesting point related to the photography screen was a problem with the volume buttons on the side of the device: in the standard Camera application, pressing the volume buttons triggers the shutter, which is very convenient.
Next, the case of technology. For some reason, on our screen of photographing these buttons did not cause any reaction, no matter what tricks we had made, even compulsory “listening” of notifications from the media system did not help.
This is done something like this. The ViewController is subscribed to receive volume change notifications.
As it turned out later, this is due to the fact that we use overlayView, in which the user can change the transparency of the old photo, and generally see it. The same exact behavior has been found in other popular photo apps. At the same time, applications that use standard controls for photographing do not suffer from a lack of response to pressing the volume buttons.
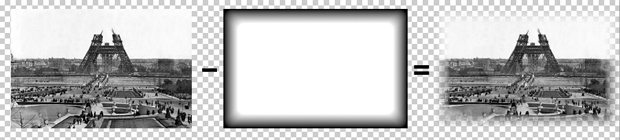
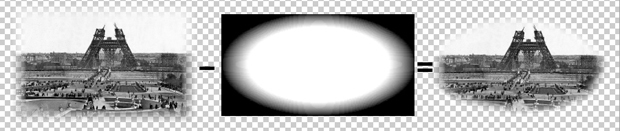
The greatest development time spent on the implementation of the screen with the effects of time-tunnel. The time-tunnel algorithm is based on the method of subtracting a gradient stencil from the original image: the darker the image pixel on the mask, the smaller the transparency value of the same-pixel of the masked image. All magic is implemented using the standard CoreGraphics framework and the CGImageCreateWithMask function, which receives the above two images as CGImageRef objects.
The formation of the timeragraphy occurs in three stages. We agree to use the designation “Image A” for the image in the background, and “Image B” for the image in the foreground.
1. A rectangular mask with gradient edges is drawn and applied to Image B. This was done so that the time tunnel did not abruptly break anywhere. It should be mentioned that the user has the ability to rotate the “Image B”, for example, if the horizon is littered. Thus, the mask is formed on the basis of the following parameters: the size of the “Image B”, the angle of rotation of the “Image B”, the amount of blurring of the border (adjusted by the slider). The resulting mask is subtracted from the "Image B", in the end it turns out "Image B" with blurred edges.
Pretty much had to tinker with the turn of the gradient, which was carried out with the help of the same CoreGraphics through the transformation of the coordinate matrix of the graphics context:
At the same time, there was an unexpected effect, as it turned out later, due to the fact that by default the reversal is performed around the upper left corner of the image.

I even asked a question on stackoverflow, after unsuccessful searches for hints. However, having received no answer, I found a solution empirically, and left an answer to my own question (http://stackoverflow.com/questions/19219855/uiimageview-get-transformed-uiimage)
Another surprise was the lack of a ready-made way to draw a rectangular gradient for the mask (such as in the illustration). CoreGraphics has a solution for an elliptical solution, but for rectangular, with rounded edges, it was necessary to invent it (http://stackoverflow.com/questions/18918382/coregraphics-rectangle-gradient - one more answer).
2. A gradient mask is drawn and applied to the “Image B” obtained as a result of processing in the first stage. Unlike the first stage, the user can specify the type of mask: rectangular or elliptical, plus the same dimensions of the mask, the rotation angle, the degree of blurring of the border. The size of the mask and the position of the user changes the fingers on the screen. Thus, an image of the time tunnel is formed.
3. At the last stage, the resulting image of the time tunnel is drawn in the required coordinates on “Image A”
I must note that CoreGraphics is far from the most productive thing in the world, and this is especially noticeable on older devices, starting with the iPhone 4 and below. In this regard, a number of measures have been taken to optimize the time-memory functional. But about this and many other things in the second part.
I hope I interested you. Download the app , rate and write feedback.
If you like, do not give up the invite. I will respond to comments and publish from my account.
Waiting for questions and comments.
Heximal (Pavel) , our ios developer, will tell about the timera architecture, he has read only now, so I post his post.
-> In this post I will write about my modest participation in an interesting and promising project with a very original name Timera (from the words time and era). By a lucky coincidence, I was in the active phase of searching for new development horizons at the very moment when the startup management was looking for a candidate for an iOS developer job. The essence of the project is quite simple - its visual presentation and description of the architecture can be seen in the main illustration of the post, under the cut.
')
The user is presented with a tool for creating a time tunnel, by combining a photograph from the past with a photograph taken by the camera of the smartphone. I really liked the idea, and I immediately began to integrate into the development process, during which I had to face and overcome many difficult and interesting tasks.
First of all, I would like to say a few words about the global architecture. The central link is a server that performs the functions of back-end, front-end, data storage, web-api. I will not describe the server stuffing in detail, since I have no relation to it. I can only say that the production-version works on cloud hosting from Microsoft, and for the implementation of the server-side, the classic currently used stack is used: IIS + MSSQL + ASP.NET
The front-end system (website www.timera.com ) provides the user the ability to view photos of other users, as well as is equipped with the social network functionality: there is an opportunity to put likes, leave comments, there is a function Share on other social networks. Also, the user of the website has the opportunity to upload an old photo. What does this mean, and what is it for? About this further.
In addition to the website, an integral part of the architecture is the mobile application. Today it is implemented for the two most popular platforms - this is of course Android and iOS. The functionality of the application almost completely reproduces the functionality of the website, except for the only feature that the website cannot have. It's about timeragraphy.
The term “timekeeping” is used to refer to the genre of historical collage. He is not new. After all, these works have long been walking on the Internet and many of them have become very viral. One has only to recall the project “Link of Times” by Sergei Larenkov or Sean Claver with his slideshow about the 1906 San Francisco earthquake. Actually, the name of the application was invented by David Webb, the founder of the project, simply by shortening the term “timeragraphy”. Now is the time to explain a little to the mechanics of timekeeping and how this process is implemented in the Timera mobile application.
Suppose we have an old photograph of the Eiffel Tower. I personally like the picture of 1889, on which the tower was built only up to the first level. To create a timera-snapshot, you need to find the angle from which the old photograph was created, take a snapshot, “overtake” to the computer, and in some graphic editor to make a combination using various filters and gradients. The task, for example, is not for everyone. But on the other hand, she is capable of every Timera user. The whole process is as simple as possible and it may even seem quite funny (at least I personally consider it as such).
The user opens a screen with a map on which blue pins show old photos available in one place or another. Naturally, the application allows automatic location of the user and the display of objects around. After the user has decided that he will timer-graph, the screen with the camera starts. On this screen, there is simultaneously a live image from the camera and on top of it a translucent image of an old photograph (the degree of transparency can be changed). The user can move the old photo across the screen, resize it using the capabilities of the touch-screen technology, thus making the primary aim. After the snapshot is taken, a more accurate alignment screen opens.
The most interesting begins on the third screen, where you configure the time-tunnel (time-tunnel). Here, a toolbar is available to the user with various tools, such as:
- transparency and sharpness sliders of the time-tunnel border (transparency and softness)
- turn of the time tunnel around the axis
- a function called swap (swap old and new photos, that is, the old one goes to the background, and the new one goes to the front one)
- change the shape of the time-tunnel: elliptical or rectangular
- crop
In all modes, it is possible to change the size and position of the time tunnel using on-screen gestures.
It would seem sparsely? Perhaps, but even with this set of tools very good compositions are created. And plus to everything, it is planned to expand this functionality, there are enough ideas in this regard.
After editing, the resulting image can be uploaded to the server and / or shared on the social network. When downloading to the server, you can set the privacy flag if you do not want to make your work public.
Here I would like to tell you a few nuances about the difficulties that have arisen in creating the main use-case (timer-graphing).
First, an unpleasant surprise was the presence of two values of type UIDeviceOrientation. In the past, I have worked with the iOS accelerometer and the device orientation concept, and then the number of possible device orientations was four: UIDeviceOrientationPortrait, UIDeviceOrientationPortraitUpsideDown, UIDeviceOrientationLandscapeLeft, UIDeviceOrientationLandscapeRight. On the screen of photographing, the orientation of the device is very critical, since the overlay image must be oriented accordingly, so that the old photo does not turn upside-down, or lying on its side. As it turned out, there are two more device positions: UIDeviceOrientationFaceUp and UIDeviceOrientationFaceDown. A lot of man-hours left to realize this fact and recognize in it the reason for the inappropriate behavior of the program.
Another interesting point related to the photography screen was a problem with the volume buttons on the side of the device: in the standard Camera application, pressing the volume buttons triggers the shutter, which is very convenient.
Next, the case of technology. For some reason, on our screen of photographing these buttons did not cause any reaction, no matter what tricks we had made, even compulsory “listening” of notifications from the media system did not help.
This is done something like this. The ViewController is subscribed to receive volume change notifications.
[[NSNotificationCenter defaultCenter]
addObserver:self
selector:@selector(volumeChanged:)
name:@"AVSystemController_SystemVolumeDidChangeNotification"
object:nil];
As it turned out later, this is due to the fact that we use overlayView, in which the user can change the transparency of the old photo, and generally see it. The same exact behavior has been found in other popular photo apps. At the same time, applications that use standard controls for photographing do not suffer from a lack of response to pressing the volume buttons.
The greatest development time spent on the implementation of the screen with the effects of time-tunnel. The time-tunnel algorithm is based on the method of subtracting a gradient stencil from the original image: the darker the image pixel on the mask, the smaller the transparency value of the same-pixel of the masked image. All magic is implemented using the standard CoreGraphics framework and the CGImageCreateWithMask function, which receives the above two images as CGImageRef objects.
The formation of the timeragraphy occurs in three stages. We agree to use the designation “Image A” for the image in the background, and “Image B” for the image in the foreground.
1. A rectangular mask with gradient edges is drawn and applied to Image B. This was done so that the time tunnel did not abruptly break anywhere. It should be mentioned that the user has the ability to rotate the “Image B”, for example, if the horizon is littered. Thus, the mask is formed on the basis of the following parameters: the size of the “Image B”, the angle of rotation of the “Image B”, the amount of blurring of the border (adjusted by the slider). The resulting mask is subtracted from the "Image B", in the end it turns out "Image B" with blurred edges.
Pretty much had to tinker with the turn of the gradient, which was carried out with the help of the same CoreGraphics through the transformation of the coordinate matrix of the graphics context:
CGFloat angleInRadians = angle * (M_PI / 180);

CGContextRotateCTM(bmContext, angleInRadians);
At the same time, there was an unexpected effect, as it turned out later, due to the fact that by default the reversal is performed around the upper left corner of the image.
I even asked a question on stackoverflow, after unsuccessful searches for hints. However, having received no answer, I found a solution empirically, and left an answer to my own question (http://stackoverflow.com/questions/19219855/uiimageview-get-transformed-uiimage)
Another surprise was the lack of a ready-made way to draw a rectangular gradient for the mask (such as in the illustration). CoreGraphics has a solution for an elliptical solution, but for rectangular, with rounded edges, it was necessary to invent it (http://stackoverflow.com/questions/18918382/coregraphics-rectangle-gradient - one more answer).
2. A gradient mask is drawn and applied to the “Image B” obtained as a result of processing in the first stage. Unlike the first stage, the user can specify the type of mask: rectangular or elliptical, plus the same dimensions of the mask, the rotation angle, the degree of blurring of the border. The size of the mask and the position of the user changes the fingers on the screen. Thus, an image of the time tunnel is formed.
3. At the last stage, the resulting image of the time tunnel is drawn in the required coordinates on “Image A”
I must note that CoreGraphics is far from the most productive thing in the world, and this is especially noticeable on older devices, starting with the iPhone 4 and below. In this regard, a number of measures have been taken to optimize the time-memory functional. But about this and many other things in the second part.
I hope I interested you. Download the app , rate and write feedback.
If you like, do not give up the invite. I will respond to comments and publish from my account.
Waiting for questions and comments.
Source: https://habr.com/ru/post/212497/
All Articles