Email protection in organizations using mobile devices
 Today in Russia, an increasing number of employees use personal mobile devices in the workplace. This phenomenon, called BYOD (Bring Your Own Device), necessitates the protection of corporate data, which, above all, is important for organizations with high requirements for information security.
BYOD policy is very effective both in small companies and in large corporations. First of all, it allows you to significantly save on the purchase of office equipment and provides employees with the opportunity to always stay in touch with colleagues and get access to working documents and company resources from any place. In addition, in many companies, managers use BYOD as a way to attract and retain qualified professionals. Employees who are accustomed to their devices are not particularly happy when the employer tells them that it is prohibited to use a personal phone or tablet at the workplace and will have to work with the equipment provided by the company. It looks archaic and restrictive. Especially if the equipment provided by the employee is worse than the advanced gadgets belonging to him.
At the same time, the thoughtless and uncontrolled use of personal devices in the company can cause irreparable damage to it. Therefore, in order to achieve the desired effect, company executives are required to grope a rather thin line between potential risks and potential benefits.
')
Most employees use personal mobile devices to access corporate email. Therefore, in this article we will look at the email encryption setting algorithms on mobile devices running iOS (5+) and Android (4+), which can be useful in organizing the protection of corporate mail.
In both cases, to configure the encryption function, we need:
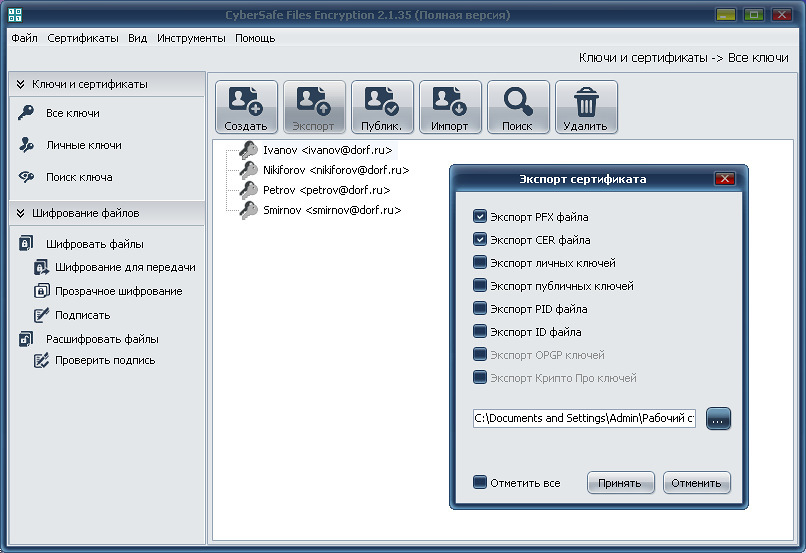
- Root Certification Authority certificate in X.509 format (file with * .cer extension). To create it, we will use CyberSafe encryption software , which can work as a Certification Authority . The CyberSafe root certificate is automatically created and installed in the trusted Windows certificate store when you first start the program. After that, we export the certificate to a separate file .
- personal certificate of the user in the PKCS # 12 format (file with the * .pfx extension), for the creation and export of which we also use CyberSafe. For more information about these certificates, as well as about exporting a pfx file, see the article Encryption of mail in Outlook 2010 .
Creation of certificates, as well as their subsequent distribution to employees of the company, may be entrusted to one person - the system administrator. The system administrator creates pfx certificates on his computer for all users who plan to use mail encryption on their mobile device, exports these certificates into separate files and then sends each of the users along with the certificate of the Certification Center and detailed instructions for setting up the encryption function. Also, he must tell each user his password to the pfx file.
Email Encryption on iOS Mobile Devices
1. We send the received certificates (the key file .pfx and the certificate file of the root Certification Center .cer) to the e-mail installed on the phone, or transfer them to any folder (including in the horse folder) via usb connection to the computer.
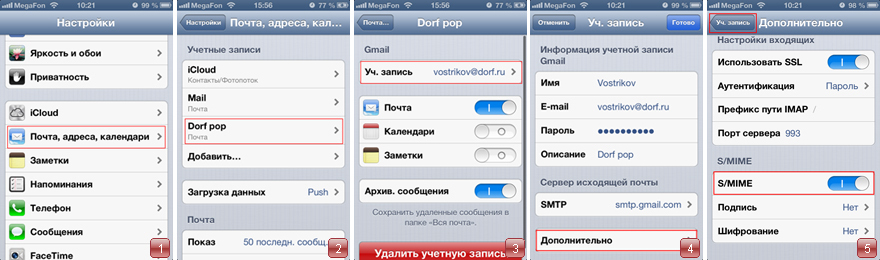
2. Create an email account on your phone. To add a new account, click Add . After creation, open Settings . Next Mail, addresses, calendars (Fig. 1) - The name of your account (in this example, it is Dorf pop (Fig. 2). - Account. (In this example, vostrikov@dorf.ru (Fig. 3). Assumed that your mail account is already configured.
3. Click on your account, mail settings open. Click Advanced (Figure 4). In advanced settings, use S / MIME . Next, click the button Uch. Record (Fig. 5). In the Account menu, click Finish to save the settings.
4. Select Account again - Advanced . If we go to the Encryption and Signature tabs, we will see that there are currently no suitable encryption certificates installed. (Fig. 6-7). The Certificates tab is now inactive, so we need to install the certificates created earlier.
5. Install the certificate of the Certification Center. Once we click on the file with the * .cer extension (Fig. 8). Select Install (Fig. 9). A warning page will open. Click Install (Fig. 10). Certificate Certification Center installed. Click Finish to return to the mail menu (Fig. 11).

6. Install a personal certificate. Once we click on the file with the extension * .pfx (Fig. 12). Click Install (Fig. 13). A warning page will open. Click Install (Fig. 14).
7. Enter the password for the certificate. It is identical to the password you set when creating your personal certificate in CyberSafe. Click Next (Fig. 15). Profile is installed. Click Finish .

8. Go to Settings - General Profiles tab (Fig. 16). Now the profiles of the Certification Authority and User Certificate are installed (Fig. 17). By clicking on them, you can get more information about certificates.
9. Go to Settings - Mail, addresses, calendars - Name of your account - Your account - Advanced. We see at the bottom of the option Signature and Encryption . Click on them one by one and install certificates for signing (Fig. 18) and encryption (Fig. 19). Click Advanced - Account . In the window, click Finish to save the settings.
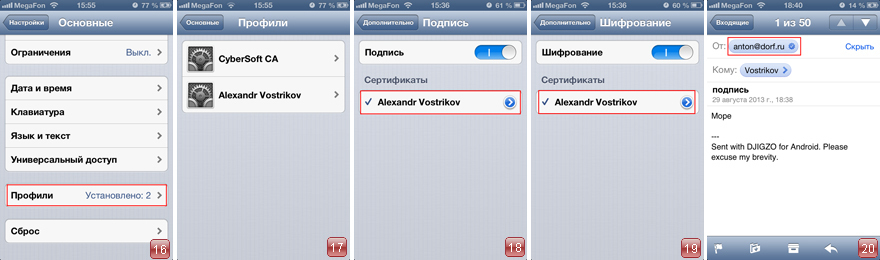
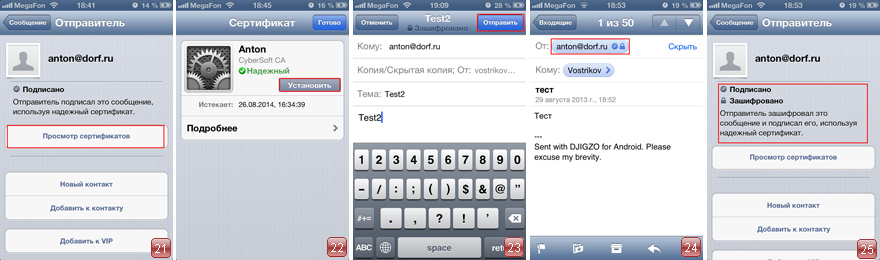
10. Similarly, the recipient creates and installs certificates on his phone, and then sends you a test letter. In the letter, he marks the option Sign . Having received the letter, we open it and see that it is signed (Fig. 20).
11. Click on the sender's email inscription (in this example, click on the email address anton@dorf.ru). We see that the certificate is trusted because a single Certificate Authority was used (Fig. 21). Click View Certificates . On the Certificate page, click Install (Fig. 22). Then click Finish .
12. Create a message to the recipient. Since we have already set the Encrypt and Sign options above, these options are enabled by default in the email. We send the recipient a letter (Fig. 23). The recipient, in turn, similarly installs your certificate. After that, the recipient can send you a test letter to verify encryption. In the letter, he notes Encrypt and Sign .
13. When viewing a test letter (Fig. 24), we see that the letter was decrypted, and the sender's certificate was correctly installed, and is in the list of trusted messages (Fig. 25). Email encryption is configured.
Email Encryption on Android Mobile Devices
1. We send the received certificates (the key file .pfx and the certificate file of the root Certification Center .cer) to the e-mail installed on the phone, or transfer them to any folder (including in the horse folder) via usb connection to the computer.
2. Since Android OS does not support encryption of mail through certificates, to configure encryption, we will use the djigzo program, which can be downloaded to the phone through the Play market .
3. After installing the program, go to the Main menu. To install certificates, go to Sertificattes & Keys (Figure 1). Use the Menu key to call the submenu for installing certificates and keys (Fig.2).
4. Select Import Sertificattes to import certificates (Figure 3). In the explorer, select the path to your certificate. Now we are installing the certificate of the Certification Center. This file has the extension * .cer. Here it is the file support@cybersafesoft.com.cer (Fig. 4). Select it from the list by clicking on the certificate, and add it to the list of certificates.
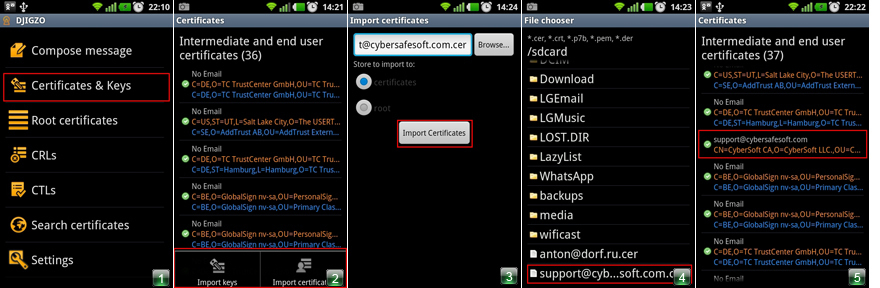
5. Next, in the list, select the root certificate support@cybersafesoft.com.cer. It is in the list of all certificates available on the phone (Fig. 5). Click on the certificate and in the context menu select the option Move to root store (Fig. 6). With this action, we add the certificate to the list of root certificates for the program.
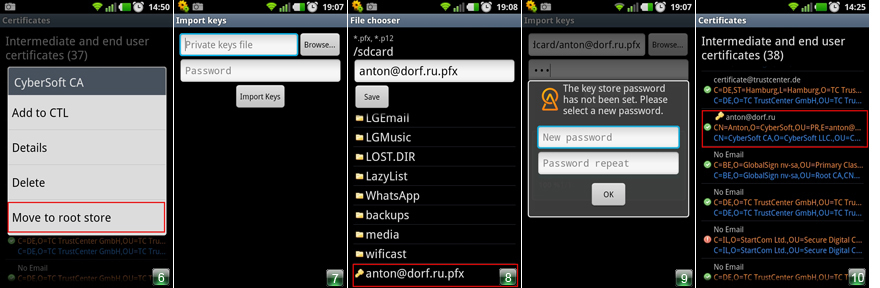
6. Select Import Keys (Figure 2). Enter password. This is the password you specified when creating your personal certificate in CyberSafe on your computer (Fig. 7). In Explorer, select the path to the * .pfx file. In this example, this file is anton@dorf.ru.pfx (Fig.8).
7. Set a new password to the keystore (Fig.9). Click OK . The certificate and private key are imported (Figure 10).
8. Settings - Account . Set the necessary account settings, tick the box Sign, Encrypt, Add Signature line (Fig. 11).
9. Settings - SMTP . Install the mail settings (Fig. 12-13).
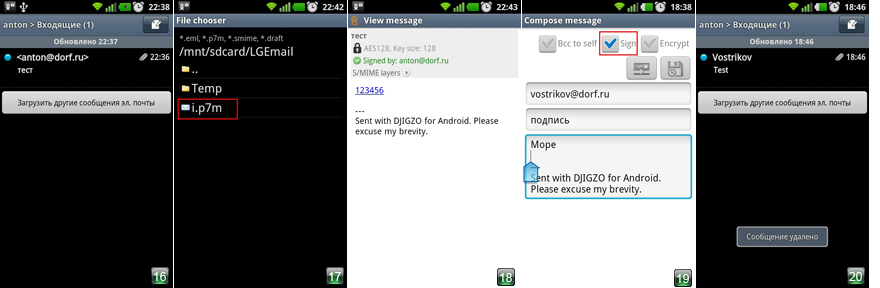
10. Check the installation of certificates and keys. Go to the option Compose message . Set the checkboxes on Sign and Encrypt and send any message to yourself. (Fig. 14-15).

11. Go to any email client on the phone. We see a message with a blue dot. This is our received message (Fig. 16). Open the letter, then use one of two options: Option 1. Click on the attachment in the .p7m format and select Open with the help of - djigzo in the context menu. Next - see p. 13. Option 2. Save the attachment in the .p7m format to the phone. Next - see p. 12.
12. Open the djigzo. Option Open message . In the explorer we find the saved file, click on it (Fig. 17).
13. Enter the password to the keystore. The message is decrypted (Fig. 18).
14. Messaging is controlled by the telephone's Menu button.
15. In order to exchange encrypted messages with partners, you need to send them a signed letter.
To do this, select the Compose message option in the program menu (Fig. 19). Set a tick on Sign , do not click the Encrypt button. We send the letter. The program will ask for the key store password. Enter the password, click OK .
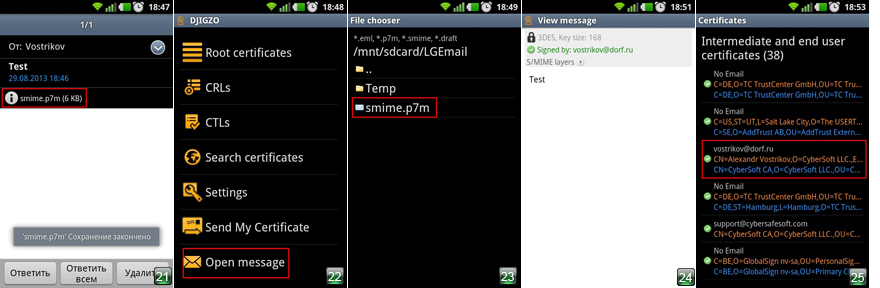
16. The recipient must install your certificate in their program. Now he sends the signed letter to you. We receive a message (Fig. 20), open it. We see the smime.p7m attachment (Fig. 21). Save it to your phone (Next - see p. 17), or click on the attachment, and in the context menu select Open with - djigzo . (Further - see p. 18).
17. Open the djigzo program. Option Open messag e (Fig. 22). In Explorer, select the path to the saved file (Fig. 23).
18. Enter the password keystore.
19. We see that the message is decrypted, (Fig. 24) and the sender's certificate is in the list of certificates (Figure 25).
Email encryption is configured.
Source: https://habr.com/ru/post/212391/
All Articles