Basics of creating a 2D character in Unity 3D 4.3. Part 3: jumping (and falling)
Part 1: character preparation and animation of rest
Part 2: Running Character
Part 3: jumping (and falling)
Hello. We continue a series of lessons on the creation of a 2D character. In the previous two parts, we made a character that can be in two states: peace and running left and right. Perhaps for a very simple game this will be enough. But we will not stop there and today we will teach our character to jump.
Our goal sounds simple, but in its implementation there will be some subtleties. First, we need to somehow determine that the character is in a jump state. It will be a little more difficult than determining the state of running. Secondly, you need to fasten the corresponding animation. Here we could act in the same way as animations of rest and running - play the corresponding animation frames cyclically while the character is in the jump state. But we are implementing a more flexible option. The jump state actually consists of two states: takeoff and free fall. In addition, there are special cases - only take-off and only fall. If we fasten one common animation for these two states (for example, the cloak pulled up and waving in the wind) - it may look normal, but not quite realistic. In reality, when a person jumps, the position of his body, arms, legs is different during takeoff and during a fall. We will create such an animation, which will take into account the speed of the rise / fall and, depending on it, switch the corresponding frame of the animation.
Download our project and scene. In the Assets - Sprites folder, we have the last unused Sprite Jump . Let's do with it the already familiar operation of cutting the sprite into a collection of images. Then in the Hierarchy window, select Character and go to the Animation window. To jump, we need several animation files, or rather, seven. This is equal to the number of frames in the Jump sprite. Let's create these animations, calling them Jump1 , Jump2 , etc.
')

Now add to each animation one image from the Jump sprite, in order: the Jump_0 sprite in the Jump1 animation, the Jump_1 sprite in the Jump2 animation ...
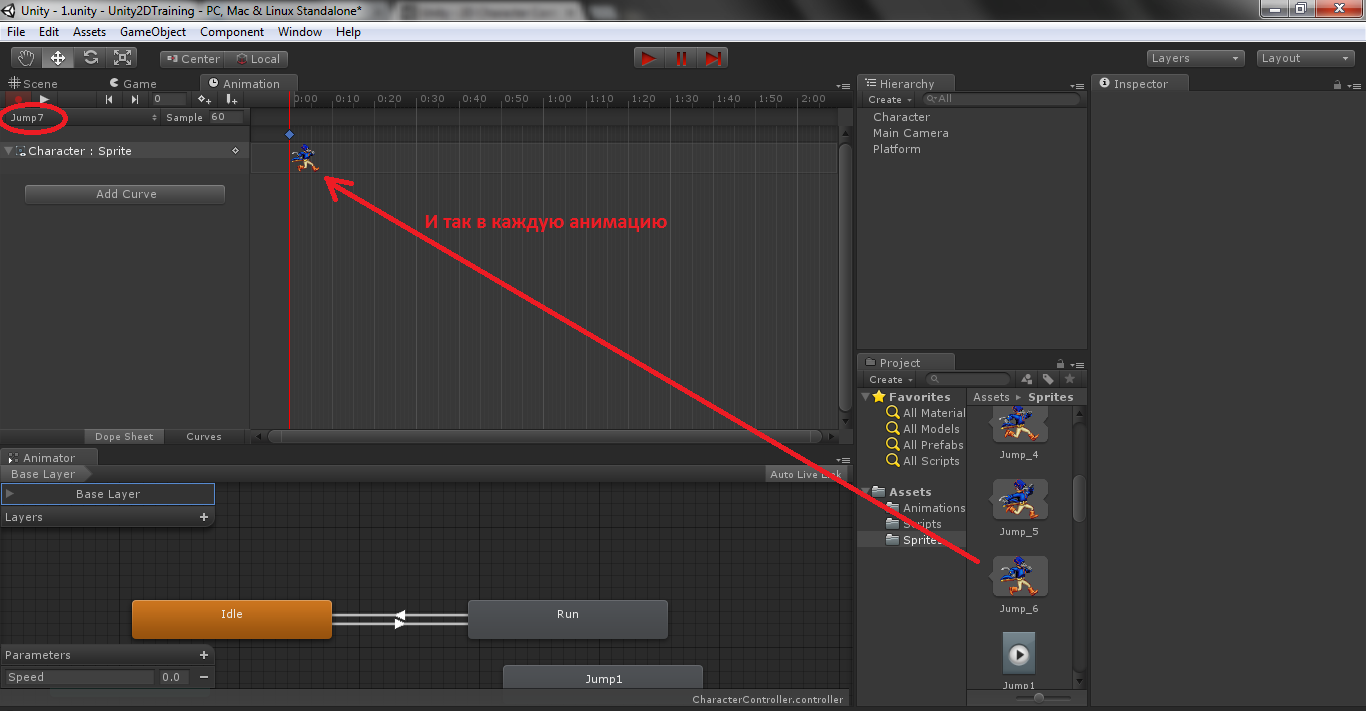
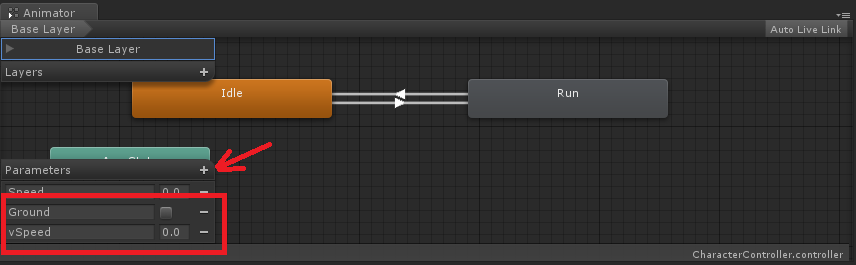
In the Animator window (not Animation !), We automatically created elements for new animations, but we will not need them anymore. Select them and delete them with the Delete key (the animations will also be removed from the corresponding list in the Animation window, but we will return them later). Create two new parameters in Animator : Ground with Bool type and vSpeed with Float type. The first will indicate whether the character is on the ground or in a jump, and the second will store the current value of the speed of the character along the Y axis, that is, the speed of take-off / fall. Depending on it, we will apply the appropriate animation from our seven jump animations.
Now right click on any free space in the Animator window and select Create State - From New Blend Tree . In the Inspector window, rename the created element as Jump .

Create two transitions between animations: Any State -> Jump and Jump -> Idle . That is, from any state we can go to the jump state, and from the jump state we can go to the rest state. I remind you how the transitions are made: right click on the first animation, Make Transition , left click on the second animation. For the first transition, set the Ground condition to false ; for the second Ground , set it to true .

Now double click on the Jump . The Blend Tree item opens. We will add our seven jump animations to it, and switching between them will occur depending on the value of the vSpeed parameter. By default, the Speed parameter is set in Blend Tree - change it to vSpeed in the Inspector window.
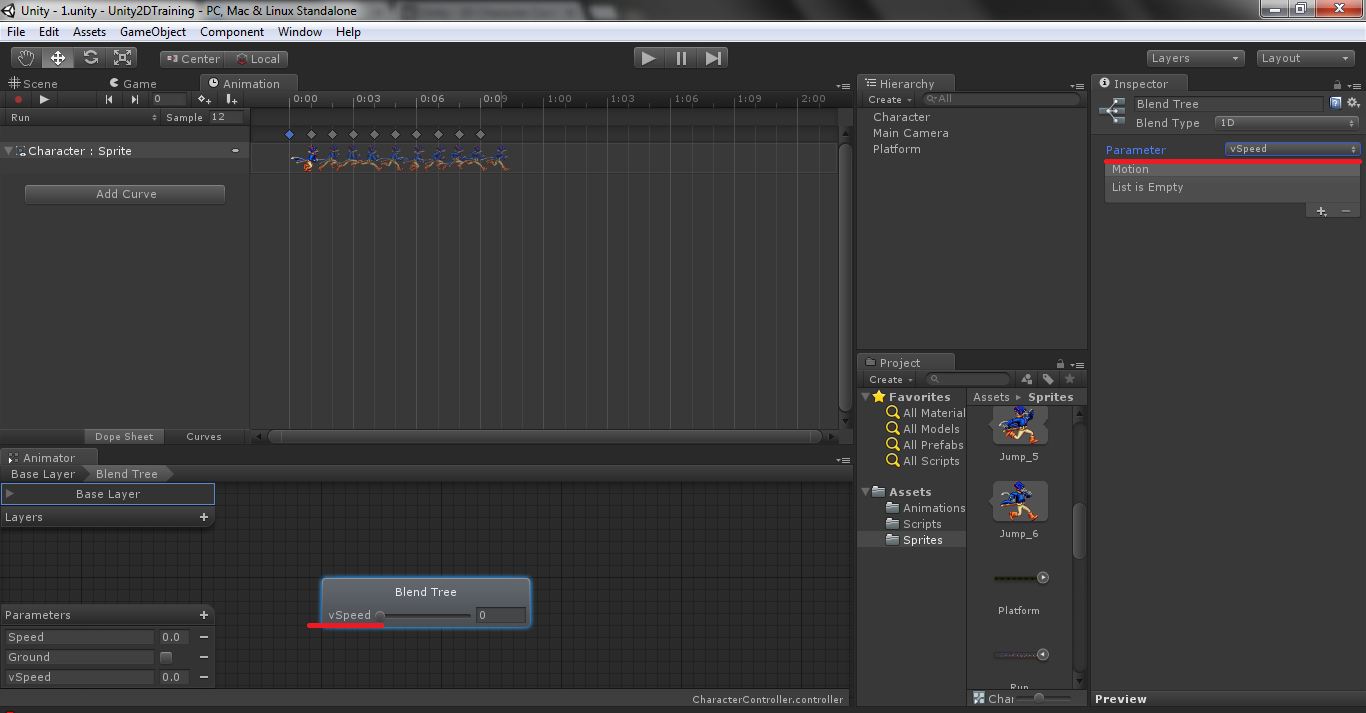
In the same window, click on the plus sign and select Add Motion Field . This needs to be done seven times. Seven fields will be created for our seven animations. Remove the Automate Thresholds flag so that you can manually set the values of the vSpeed parameter, upon reaching which the animation will be changed in the Blend Tree . Drag and drop animations into each field and set vSpeed values. This is what should happen (by the way, after these actions, those removed from the list in the Animation window of the animation Jump1 - Jump6 will appear again):

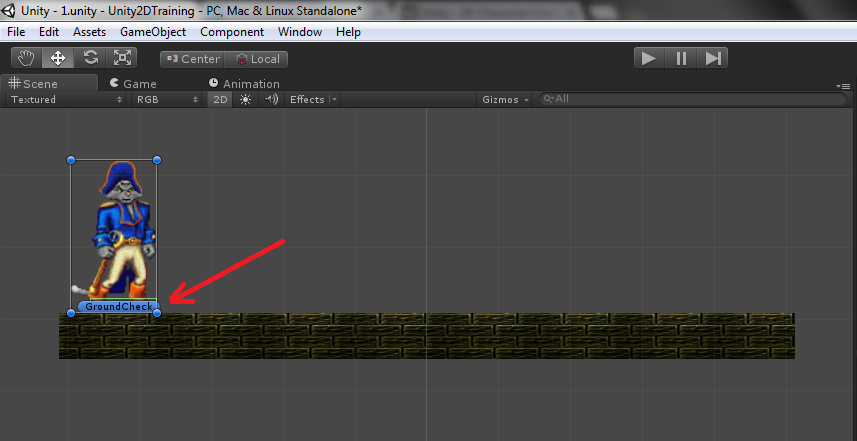
We'll finish with the animation for now. Now we need to learn how to determine when a character is on the ground, and when - in the air, that is, in a jump. Go to the Scene window. Create an empty game object, let's call it GroundCheck . Select it in the Hierarchy window and drag it to Character (all in the same Hierarchy window!). Now the GroundCheck object will be a child of the Character and will move with it, and the Character object will acquire the corresponding arrow hiding the child objects. Click on the arrow and again select the object GroundCheck . Assign him an icon to see the object on the scene. In the screenshot, I indicated how to do this:

In the Scene window, move GroundCheck to the character's legs. Thus, we have made an object that will be used to determine the character’s location on the ground.
Now we need to determine, and what is the earth? Obviously, this is our platform, but the game does not yet know about it. By the way, let's create a copy of the platform for testing the jump (the best way would be to create a prefab based on the platform, but for now let's just select Platform and press Ctrl + D ). Place the second platform to the right and above the first.

Select any of the platforms and pay attention to the upper part of the Inspector window. There is a Layer field with the value Default . It means that an object belongs to a particular layer. Click on Default , select Add Layer , set the name Ground in the User Layer 8 field. Select the platform again and set the Ground layer instead of the Default layer. For the second platform, also set the Ground layer.

Thus, we have determined that our platforms will be land. The GroundCheck object will be checked for intersection with objects in the Ground layer, i.e. with our platforms. If an intersection is found, the character is on the ground. This will be done in the CharacterControlleScript script created in the previous section. Let's open it for editing.
In the beginning of the script, add new variables in addition to the existing ones:
And at the beginning of the FixedUpdate method the following lines:
Now let's add the Update method to the script, in which we will handle the keystroke of the jump. We will do this in the Update method for greater control accuracy - this method is called every frame of the game, unlike FixedUpdate , which is called after the same specific time and usually, with a good FPS, calls occur less frequently than Update calls.
So the whole script will look like this:
Save the script, return to Unity. In the Hierarchy select Character . Drag the GroundCheck object into the Ground Check field of the CharacterControllerScript script, and in the What Is Ground field set the Ground .

So, in our script, in the FixedUpdate method, the intersection of a GroundCheck object with objects belonging to the Ground layer is checked. This is achieved using the Physics2D.OverlapCircle method. The arguments of this method also specify the radius of the intersection definition. Then, in the variable of the animator Ground , the result of determining the location on the ground is set, and in the variable vSpeed - the current speed of the character along the Y axis. Depending on this speed, one or another animation of the jump from seven animations in the Blend Tree is applied. The jump itself is set in the Update method when you press the spacebar, by giving vertical force to the Rigidbody2D component.
Before starting the game, let's change the value of gravity a bit, otherwise the speed of jumps will be slow, like on the Moon. Go to the menu Edit - Project Settings - Physics 2D . In the Inspector window set the value Gravity Y = -30. Run the game! If everything is done correctly, we will see something like the following:
Captain Kogot can run and jump. When jumping, depending on the state (rise / fall) and speed, the corresponding animation is applied. The video clearly shows that when jumping in the Animator window, switching between animations in the Blend Tree element occurs. At the same time, if the character just falls off the platform (i.e. there is no takeoff phase in the jump, no space was pressed) - only those animations work, for switching which negative speed values are set, which makes the character's behavior more realistic. Of course, for better effect, more animations and more fine-tuning of speed values are needed.
Well, that's all. The basis for the 2D character is created. What additional features to fasten to it depends on the particular game. Thanks for attention!
Part 2: Running Character
Part 3: jumping (and falling)
Hello. We continue a series of lessons on the creation of a 2D character. In the previous two parts, we made a character that can be in two states: peace and running left and right. Perhaps for a very simple game this will be enough. But we will not stop there and today we will teach our character to jump.
Our goal sounds simple, but in its implementation there will be some subtleties. First, we need to somehow determine that the character is in a jump state. It will be a little more difficult than determining the state of running. Secondly, you need to fasten the corresponding animation. Here we could act in the same way as animations of rest and running - play the corresponding animation frames cyclically while the character is in the jump state. But we are implementing a more flexible option. The jump state actually consists of two states: takeoff and free fall. In addition, there are special cases - only take-off and only fall. If we fasten one common animation for these two states (for example, the cloak pulled up and waving in the wind) - it may look normal, but not quite realistic. In reality, when a person jumps, the position of his body, arms, legs is different during takeoff and during a fall. We will create such an animation, which will take into account the speed of the rise / fall and, depending on it, switch the corresponding frame of the animation.
Download our project and scene. In the Assets - Sprites folder, we have the last unused Sprite Jump . Let's do with it the already familiar operation of cutting the sprite into a collection of images. Then in the Hierarchy window, select Character and go to the Animation window. To jump, we need several animation files, or rather, seven. This is equal to the number of frames in the Jump sprite. Let's create these animations, calling them Jump1 , Jump2 , etc.
')
Now add to each animation one image from the Jump sprite, in order: the Jump_0 sprite in the Jump1 animation, the Jump_1 sprite in the Jump2 animation ...
In the Animator window (not Animation !), We automatically created elements for new animations, but we will not need them anymore. Select them and delete them with the Delete key (the animations will also be removed from the corresponding list in the Animation window, but we will return them later). Create two new parameters in Animator : Ground with Bool type and vSpeed with Float type. The first will indicate whether the character is on the ground or in a jump, and the second will store the current value of the speed of the character along the Y axis, that is, the speed of take-off / fall. Depending on it, we will apply the appropriate animation from our seven jump animations.
Now right click on any free space in the Animator window and select Create State - From New Blend Tree . In the Inspector window, rename the created element as Jump .
Create two transitions between animations: Any State -> Jump and Jump -> Idle . That is, from any state we can go to the jump state, and from the jump state we can go to the rest state. I remind you how the transitions are made: right click on the first animation, Make Transition , left click on the second animation. For the first transition, set the Ground condition to false ; for the second Ground , set it to true .
Now double click on the Jump . The Blend Tree item opens. We will add our seven jump animations to it, and switching between them will occur depending on the value of the vSpeed parameter. By default, the Speed parameter is set in Blend Tree - change it to vSpeed in the Inspector window.
In the same window, click on the plus sign and select Add Motion Field . This needs to be done seven times. Seven fields will be created for our seven animations. Remove the Automate Thresholds flag so that you can manually set the values of the vSpeed parameter, upon reaching which the animation will be changed in the Blend Tree . Drag and drop animations into each field and set vSpeed values. This is what should happen (by the way, after these actions, those removed from the list in the Animation window of the animation Jump1 - Jump6 will appear again):
We'll finish with the animation for now. Now we need to learn how to determine when a character is on the ground, and when - in the air, that is, in a jump. Go to the Scene window. Create an empty game object, let's call it GroundCheck . Select it in the Hierarchy window and drag it to Character (all in the same Hierarchy window!). Now the GroundCheck object will be a child of the Character and will move with it, and the Character object will acquire the corresponding arrow hiding the child objects. Click on the arrow and again select the object GroundCheck . Assign him an icon to see the object on the scene. In the screenshot, I indicated how to do this:
In the Scene window, move GroundCheck to the character's legs. Thus, we have made an object that will be used to determine the character’s location on the ground.
Now we need to determine, and what is the earth? Obviously, this is our platform, but the game does not yet know about it. By the way, let's create a copy of the platform for testing the jump (the best way would be to create a prefab based on the platform, but for now let's just select Platform and press Ctrl + D ). Place the second platform to the right and above the first.
Select any of the platforms and pay attention to the upper part of the Inspector window. There is a Layer field with the value Default . It means that an object belongs to a particular layer. Click on Default , select Add Layer , set the name Ground in the User Layer 8 field. Select the platform again and set the Ground layer instead of the Default layer. For the second platform, also set the Ground layer.
Thus, we have determined that our platforms will be land. The GroundCheck object will be checked for intersection with objects in the Ground layer, i.e. with our platforms. If an intersection is found, the character is on the ground. This will be done in the CharacterControlleScript script created in the previous section. Let's open it for editing.
In the beginning of the script, add new variables in addition to the existing ones:
// ? private bool isGrounded = false; // Transform // public Transform groundCheck; // private float groundRadius = 0.2f; // , public LayerMask whatIsGround; And at the beginning of the FixedUpdate method the following lines:
//, isGrounded = Physics2D.OverlapCircle(groundCheck.position, groundRadius, whatIsGround); // anim.SetBool ("Ground", isGrounded); // / anim.SetFloat ("vSpeed", rigidbody2D.velocity.y); // - , , if (!isGrounded) return; Now let's add the Update method to the script, in which we will handle the keystroke of the jump. We will do this in the Update method for greater control accuracy - this method is called every frame of the game, unlike FixedUpdate , which is called after the same specific time and usually, with a good FPS, calls occur less frequently than Update calls.
private void Update() { // ... if (isGrounded && Input.GetKeyDown (KeyCode.Space)) { // false anim.SetBool("Ground", false); // , rigidbody2D.AddForce(new Vector2(0, 600)); } } So the whole script will look like this:
CharacterControllerScript
using UnityEngine; using System.Collections; public class CharacterControllerScript : MonoBehaviour { // . public float maxSpeed = 10f; // / private bool isFacingRight = true; // private Animator anim; // ? private bool isGrounded = false; // Transform // public Transform groundCheck; // private float groundRadius = 0.2f; // , public LayerMask whatIsGround; /// <summary> /// /// </summary> private void Start() { anim = GetComponent<Animator>(); } /// <summary> /// FixedUpdate, . . Animator /// Animate Physics = true /// </summary> private void FixedUpdate() { //, isGrounded = Physics2D.OverlapCircle(groundCheck.position, groundRadius, whatIsGround); // anim.SetBool ("Ground", isGrounded); // / anim.SetFloat ("vSpeed", rigidbody2D.velocity.y); // - , , if (!isGrounded) return; // Input.GetAxis . -1 1. // //-1 ( ), //1 ( D) float move = Input.GetAxis("Horizontal"); // Speed . // anim.SetFloat("Speed", Mathf.Abs(move)); // RigidBody2D. , // . rigidbody2D.velocity = new Vector2(move * maxSpeed, rigidbody2D.velocity.y); // , if(move > 0 && !isFacingRight) // Flip(); // . else if (move < 0 && isFacingRight) Flip(); } private void Update() { // ... if (isGrounded && Input.GetKeyDown (KeyCode.Space)) { // false anim.SetBool("Ground", false); // , rigidbody2D.AddForce(new Vector2(0, 600)); } } /// <summary> /// /// </summary> private void Flip() { // isFacingRight = !isFacingRight; // Vector3 theScale = transform.localScale; // theScale.x *= -1; // , , transform.localScale = theScale; } } Save the script, return to Unity. In the Hierarchy select Character . Drag the GroundCheck object into the Ground Check field of the CharacterControllerScript script, and in the What Is Ground field set the Ground .
So, in our script, in the FixedUpdate method, the intersection of a GroundCheck object with objects belonging to the Ground layer is checked. This is achieved using the Physics2D.OverlapCircle method. The arguments of this method also specify the radius of the intersection definition. Then, in the variable of the animator Ground , the result of determining the location on the ground is set, and in the variable vSpeed - the current speed of the character along the Y axis. Depending on this speed, one or another animation of the jump from seven animations in the Blend Tree is applied. The jump itself is set in the Update method when you press the spacebar, by giving vertical force to the Rigidbody2D component.
Before starting the game, let's change the value of gravity a bit, otherwise the speed of jumps will be slow, like on the Moon. Go to the menu Edit - Project Settings - Physics 2D . In the Inspector window set the value Gravity Y = -30. Run the game! If everything is done correctly, we will see something like the following:
Captain Kogot can run and jump. When jumping, depending on the state (rise / fall) and speed, the corresponding animation is applied. The video clearly shows that when jumping in the Animator window, switching between animations in the Blend Tree element occurs. At the same time, if the character just falls off the platform (i.e. there is no takeoff phase in the jump, no space was pressed) - only those animations work, for switching which negative speed values are set, which makes the character's behavior more realistic. Of course, for better effect, more animations and more fine-tuning of speed values are needed.
Well, that's all. The basis for the 2D character is created. What additional features to fasten to it depends on the particular game. Thanks for attention!
Source: https://habr.com/ru/post/212309/
All Articles