Creating a simple Chrome application
In the past topic, I tried to tell what the Chrome app is, and why write them. In this, as promised, I will describe the process of creating a simple Chrome application. The text editor will be used as an example. First, it can be written very shortly, so that almost all the code fits into the article. Second, the text editor will use several Chrome-specific (and other Chromium-based browsers) software interfaces. Third, yes, I already wrote a text editor for Chrome .
The full editor code is available on github . Ready editor can be installed from the Chrome app store .
')
To test the application you are developing, you will need to add it to your browser. To do this, on the
The code of any application for Chrome, as well as any extension, begins with the file manifest.json . It describes all the meta-information of the application. Let me give you the entire manifesto editor :
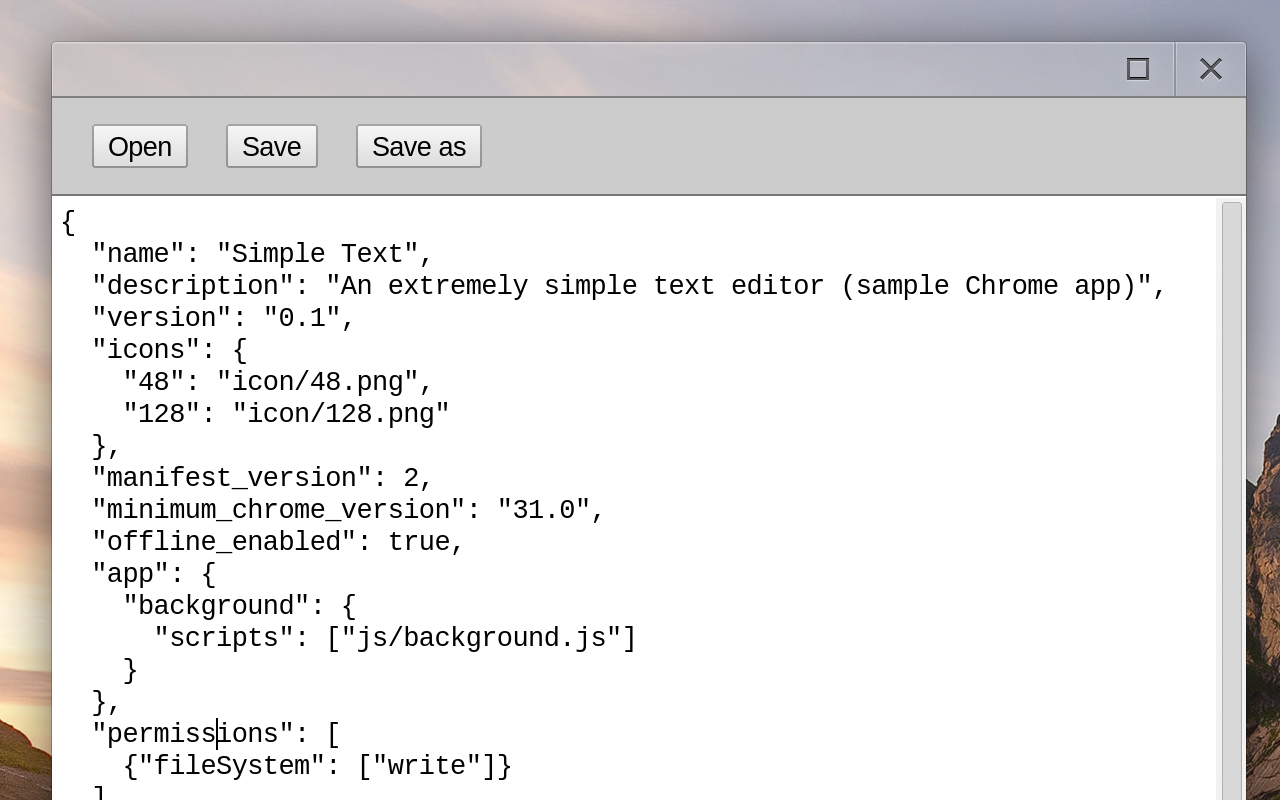
Let's sort out the fields that met here. With the name and description everything is clear. Version is a required field - Chrome Web Store will require it to change when you download an update for your app.
The standard sizes of the icons required for the application are 48 × 48 and 128 × 128 pixels. Also in some cases, a 16 × 16 icon is used. In addition, other icon sizes may be required in cases where it will be displayed on high-resolution displays, like on a Chromebook Pixel and the new MacbookPro.
The following construction is the main one in the file:
Here the browser is told how to run the application. Unlike extensions for which the background page is an optional attribute, it is always in the application. The logic of work is as follows: when you start the application, the background page code is first loaded. It can register handlers of certain events, in particular,
The
Finally, in the
The purpose of a Chrome application to open one type of file or another works so far only on Chrome OS.
All code implementing background page is in the js / background.js file. Here he is:
The background page runs in the background, independent of the application windows. Most of the time it is not loaded into memory. When you start the system, its code is executed and can install handlers for certain events, the most common of which is onLaunched. When handlers are set, the background page is usually unloaded from memory and is only started back if one of the events to which it is subscribed occurred.
When a user clicks on an application icon, or opens a file in it, the onLaunched event is fired on the background page. The call parameters, in particular, the file (s) that the application should open are transferred to it. The
The chrome.app.window.create method creates a new application window. The first parameter is the path to the html file opened in it (relative to the application directory). The second is the window settings. I will dwell on one of them.
There is nothing specific in the HTML and CSS files that make up Chrome apps. The only feature that can be noted is the absence of the need to take care of inter-browser compatibility.
We will use jQuery to simplify the code a bit. For editing, we will use the
For completeness, here is the CSS:
Since in our example, for simplicity, we limit ourselves to the minimum set of features, the main editor code will be devoted almost exclusively to working with files. Several APIs are used for this, some of which are already on the path to W3C standardization. The File API and related interfaces are a great topic that deserves a separate article. As a good introduction, I recommend this article on html5rocks.com .
So, let's sort the code in
The task of the initialization function is to add handlers to the buttons and get the file to open from the background page. The background page context is derived from the main window asynchronously using chrome.runtime.getBackgroundPage .
Button handlers:
We will store the current FileEntry in the global variable currentEntry.
The only specific feature in the above code is the chrome.fileSystem.chooseEntry method. Using this method, the file selection window opens (its own on each system). Like all other functions for working with the file system, this method is asynchronous and gets a callback to continue working (in our case, the loadEntry and saveToEntry functions described below).
Reading file:
In the
In the File API, there are two different objects that describe the file: FileEntry and File. Roughly speaking, FileEntry represents the path to the file, and File - the data contained in it. Therefore, in order to read the file, you need to get a File object from Entry. This is achieved using the asynchronous
FileReader is a separate object for reading files. It allows you to quite flexibly manage the reading process, but in this case we just need to read the entire contents of the file from it.
Writing a file, like reading, does not contain Chrome-specific code:
Before writing data, it is necessary to bring them to Blob . One additional step that we will need when writing is to cut the file in case it already exists and is long. If we were sure that this is a new file, the code of the record would be simplified to:
This completes the code of our application. Unfortunately, managing files in JavaScript is somewhat unintuitive, and is probably the most difficult part of the application. But, as I wrote above, these APIs are not specific to Chrome, but implemented in all modern browsers .
The code for this example is made as short as possible to fit into the format of the article. If you want to look at more detailed examples of how these or other features of the Chrome API are used, a large set of examples of Chrome apps has been published on GitHub. The official documentation for all software interfaces is on developer.chrome.com . The main place where you can get answers to specific questions about programming Chrome applications is the google-chrome-app tag on StackOverflow .
The full editor code is available on github . Ready editor can be installed from the Chrome app store .
')
Training
To test the application you are developing, you will need to add it to your browser. To do this, on the
chrome://extensions page, check the “Developer mode” checkbox. After this, it will be possible to add your extension or application.manifest.json
The code of any application for Chrome, as well as any extension, begins with the file manifest.json . It describes all the meta-information of the application. Let me give you the entire manifesto editor :
{ "name": "Simple Text", "description": "An extremely simple text editor (sample Chrome app)", "version": "0.1", "icons": { "48": "icon/48.png", "128": "icon/128.png" }, "manifest_version": 2, "minimum_chrome_version": "31.0", "offline_enabled": true, "app": { "background": { "scripts": ["js/background.js"] } }, "permissions": [ {"fileSystem": ["write"]} ], "file_handlers": { "text": { "title": "Simple Text", "types": ["application/javascript", "application/json", "application/xml", "text/*"], "extensions": ["c", "cc", "cpp", "css", "h", "hs", "html", "js", "json", "md", "py", "textile", "txt", "xml", "yaml"] } } } Let's sort out the fields that met here. With the name and description everything is clear. Version is a required field - Chrome Web Store will require it to change when you download an update for your app.
The standard sizes of the icons required for the application are 48 × 48 and 128 × 128 pixels. Also in some cases, a 16 × 16 icon is used. In addition, other icon sizes may be required in cases where it will be displayed on high-resolution displays, like on a Chromebook Pixel and the new MacbookPro.
"manifest_version" is the version of the manifest file format. At this point, you should use the value 2."offline_enabled" - as you might expect, this flag is set for applications that work regardless of the availability of Internet access.The following construction is the main one in the file:
"app": { "background": { "scripts": ["js/background.js"] } }, Here the browser is told how to run the application. Unlike extensions for which the background page is an optional attribute, it is always in the application. The logic of work is as follows: when you start the application, the background page code is first loaded. It can register handlers of certain events, in particular,
onLaunched events, which then starts when the user opens the application in one way or another.The
"permissions" section describes the access settings for the application. In our case, the ability to save files has been added.Finally, in the
"file_handlers" section "file_handlers" types opened by the application are described. For different types of files in the file manager, Chrome OS may show different lines in the menu. For example, for some files, an item in the menu may look like “Watch an image in the SuperProgram”, and for others - “Edit text in the SuperProgram”.The purpose of a Chrome application to open one type of file or another works so far only on Chrome OS.
Background page
All code implementing background page is in the js / background.js file. Here he is:
var entryToLoad = null; function init(launchData) { var fileEntry = null if (launchData && launchData['items'] && launchData['items'].length > 0) { entryToLoad = launchData['items'][0]['entry'] } var options = { frame: 'chrome', minWidth: 400, minHeight: 400, width: 700, height: 700 }; chrome.app.window.create('index.html', options); } chrome.app.runtime.onLaunched.addListener(init); The background page runs in the background, independent of the application windows. Most of the time it is not loaded into memory. When you start the system, its code is executed and can install handlers for certain events, the most common of which is onLaunched. When handlers are set, the background page is usually unloaded from memory and is only started back if one of the events to which it is subscribed occurred.
When a user clicks on an application icon, or opens a file in it, the onLaunched event is fired on the background page. The call parameters, in particular, the file (s) that the application should open are transferred to it. The
entryToLoad = launchData['items'][0]['entry'] code saves the file transferred to the application in a local variable, from which it will then be taken by the editor code. The onLaunched event can also come when the application is already open. In this case, the code in the background page can decide whether to open a new window, or perform some actions in an already open window.The chrome.app.window.create method creates a new application window. The first parameter is the path to the html file opened in it (relative to the application directory). The second is the window settings. I will dwell on one of them.
frame: 'chrome' creates a window with the usual design for the current operating system. Another option here is frame: 'none' . In this case, the application starts in the "bare" window, and the developer will have to take care of adding buttons to close, minimize and maximize the window, as well as the area for which the window can be dragged across the screen.index.html
There is nothing specific in the HTML and CSS files that make up Chrome apps. The only feature that can be noted is the absence of the need to take care of inter-browser compatibility.
<!DOCTYPE html> <html> <head> <title>Simple Text</title> <link href="main.css" rel="stylesheet"> <script src="js/jquery-2.1.0.min.js" type="text/javascript"></script> <script src="js/main.js" type="text/javascript"></script> </head> <body> <header> <button id="open">Open</button> <button id="save">Save</button> <button id="saveas">Save as</button> </header> <textarea></textarea> </body> </html> We will use jQuery to simplify the code a bit. For editing, we will use the
<textarea> field. In this editor, instead, it will be used more intelligent editing module. The most common options are CodeMirror and Ace .For completeness, here is the CSS:
body { margin: 0; } header { background-color: #CCC; border-bottom: 1px solid #777; -webkit-box-align: center; -webkit-box-orient: horizontal; -webkit-box-pack: left; display: -webkit-box; height: 48px; padding: 0px 12px 0px 12px; } button { margin: 8px; } textarea { border: none; -webkit-box-sizing: border-box; font-family: monospace; padding: 4px; position: absolute; top: 48px; bottom: 0px; left: 0px; right: 0px; width: 100%; } textarea:focus { outline: none !important; } Main code: work with files
Since in our example, for simplicity, we limit ourselves to the minimum set of features, the main editor code will be devoted almost exclusively to working with files. Several APIs are used for this, some of which are already on the path to W3C standardization. The File API and related interfaces are a great topic that deserves a separate article. As a good introduction, I recommend this article on html5rocks.com .
So, let's sort the code in
js/main.js I will give it fragments, the full code is on Github . function init(entry) { $('#open').click(open); $('#save').click(save); $('#saveas').click(saveAs); chrome.runtime.getBackgroundPage(function(bg) { if (bg.entryToLoad) loadEntry(bg.entryToLoad); }); } $(document).ready(init); The task of the initialization function is to add handlers to the buttons and get the file to open from the background page. The background page context is derived from the main window asynchronously using chrome.runtime.getBackgroundPage .
Button handlers:
var currentEntry = null; function open() { chrome.fileSystem.chooseEntry({'type': 'openWritableFile'}, loadEntry); } function save() { if (currentEntry) { saveToEntry(currentEntry); } else { saveAs(); } } function saveAs() { chrome.fileSystem.chooseEntry({'type': 'saveFile'}, saveToEntry); } We will store the current FileEntry in the global variable currentEntry.
The only specific feature in the above code is the chrome.fileSystem.chooseEntry method. Using this method, the file selection window opens (its own on each system). Like all other functions for working with the file system, this method is asynchronous and gets a callback to continue working (in our case, the loadEntry and saveToEntry functions described below).
Reading file:
function setTitle() { chrome.fileSystem.getDisplayPath( currentEntry, function(path) { document.title = path + ' - Simple Text'; }); } function loadEntry(entry) { currentEntry = entry; setTitle(); entry.file(readFile); } function readFile(file) { var reader = new FileReader(); reader.onloadend = function(e) { $('textarea').val(this.result); }; reader.readAsText(file); } In the
setTitle() function, we change the window title to show the path to the current file. How this header is displayed depends on the system. On Chrome OS, it is not shown at all. chrome.fileSystem.getDisplayPath is the most correct way to get the path of a file suitable to show it to the user. Another path representation is available through entry.fullPath .In the File API, there are two different objects that describe the file: FileEntry and File. Roughly speaking, FileEntry represents the path to the file, and File - the data contained in it. Therefore, in order to read the file, you need to get a File object from Entry. This is achieved using the asynchronous
entry.file() method.FileReader is a separate object for reading files. It allows you to quite flexibly manage the reading process, but in this case we just need to read the entire contents of the file from it.
Writing a file, like reading, does not contain Chrome-specific code:
function saveToEntry(entry) { currentEntry = entry; setTitle(); var blob = new Blob([$('textarea').val()], {type: 'text/plain'}); entry.createWriter(function(writer) { writer.onwrite = function() { writer.onwrite = null; writer.write(blob); } writer.truncate(blob.size); }); } Before writing data, it is necessary to bring them to Blob . One additional step that we will need when writing is to cut the file in case it already exists and is long. If we were sure that this is a new file, the code of the record would be simplified to:
entry.createWriter(function(writer) { writer.write(blob); }); Conclusion
This completes the code of our application. Unfortunately, managing files in JavaScript is somewhat unintuitive, and is probably the most difficult part of the application. But, as I wrote above, these APIs are not specific to Chrome, but implemented in all modern browsers .
The code for this example is made as short as possible to fit into the format of the article. If you want to look at more detailed examples of how these or other features of the Chrome API are used, a large set of examples of Chrome apps has been published on GitHub. The official documentation for all software interfaces is on developer.chrome.com . The main place where you can get answers to specific questions about programming Chrome applications is the google-chrome-app tag on StackOverflow .
Source: https://habr.com/ru/post/212107/
All Articles