Fighting familiarity with Leap Motion

Habr, hello!
Today I would like to tell you about a simple application for a small, but interesting gadget that I accidentally got into my hands (and even for free!).
We will consider and try a device called LeapMotion , which flaunts on the site for the "attractive" $ 79.99 ...
About him speech and will go on.
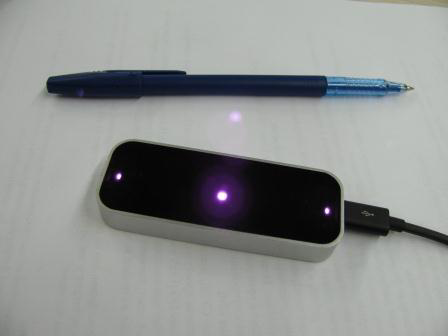
First, a few words about the device itself. This is a small, flash-like device that captures the movement of your hands. Moving on like a kind of killer kinect-a. Read more about it on the wiki .
He came to me, as I said, by chance, on the hackathon from Microsoft, where this gadget was one of the areas of development. It should also be said that articles about this miracle device already appeared in the open spaces of Habr , however, there was no intelligible Russian-speaking tutorial.
')
However, more to the point.
The action itself lasted only about 6 hours, so I and the team had to figure out a new technology for themselves on the fly. It was decided to develop an analogue of the Rubik's cube, and use Unity3d for these tools, which is perfectly suitable for this task. Documentation was found quickly and we started.
Next, everything in order.
1) Drivers
Drivers helpfully lie on the official site of the creators themselves. There can be no particular problems, the only annoying factor was the registration required to try this device and see the well-known picture with five fingers on the monitor.
2) SDK
The SDK itself contains a set of libraries needed for development and an example of work: UnitySandbox, which is essentially the same application that points to the structure of your hand. The only change is that they will give us a real cube! Which we can raise and lower, increase and do other all sorts of dirty tricks with a poor cube.
Interesting SDK ends here.
3) Application
Since it is not interesting to use examples from the SDK, I had to turn my own bike to work with this miracle.
Let's start. To begin with, we will create a project and add the following dlls to the folder with libraries, which we take from the downloaded SDK (for x86):
x86 / LeapCSharp.dll
x86 / Leap.dll
Next, add the LeapCSharp.NET.3.5.dll file to our Assets folder.
Then we create a script with the original name LeapBehavior, assign it to the main camera and add the following code to it:
LeapBehavior.cs
using UnityEngine; using System.Collections; using Leap; public class LeapBehavior : MonoBehaviour { Controller controller; void Start () { controller = new Controller(); } void Update () { Frame frame = controller.Frame(); // if(controller.IsConnected) //, { Frame frame = controller.Frame(); // ( ) Frame previous = controller.Frame(1); //... Debug.Log(frame.Fingers.Count); // } } } A few words about the Controller and Frame. The first is needed to control and monitor the device itself, and Frame contains everything that the gadget has managed to “see” our miracle at the moment. Frame can also return lists of the seen hands, hands, fingers and all other delights.
frame.Fingers.Count returns us the size of the list, which contains all the fingers seen by the device.
Check - works.
However, there are several subtleties. Firstly, Leap motion, very often, counts the fingers together for one, and secondly, it often cannot determine which hand belongs to the fingers (two hands put together, cross over - spread - brought together) and a poor sensor can show the unbelievable, but these are trifles .
The definition of the number of fingers is finished, now we will try to find their position. It’s still trivial, you just need to modify the Update function a bit. After the output, add the following lines to the logs:
int IDFinger = 0; Debug.Log(frame.Fingers[IDFinger].TipPosition.x); Using Fingers, we get a sheet of fingers on Fream, and take the 0th position.
Now let's try to visualize it somehow. We use the fastest and easiest way. Let's try to attach some object to our fingers. For example, the scope. To do this, add a sphere to the stage and add our script to it (do not forget to remove the same script from the main camera).
Now we change it so that the position of the sphere changes with the position of the finger. To do this, create a Vector3 (an object containing 3 components - X, Y and Z). Initialize it with the finger coordinates obtained from the sensor. Also, to visualize the fingers, create a new script called fingerController. As a result, a slightly corrected script will look like this:
<h6>fingerController.cs </h6> <source lang="cs"> using UnityEngine; using System.Collections; using Leap; using System; public class fingerController : MonoBehaviour { public int IDFinger = 0; Controller controller; void Start () { controller = new Controller(); } void Update () { if(controller.IsConnected) //controller is a Controller object { Frame frame = controller.Frame(); Frame previous = controller.Frame(1); this.transform.position = new Vector3(frame.Fingers[IDFinger].TipPosition.x, frame.Fingers[IDFinger].TipPosition.y, frame.Fingers[IDFinger].TipPosition.z); } } } Theoretically, our object is a sphere, should float after the finger, the number of which is indicated in the IDFinger field. Like this.

Let's change the color of the sphere to our favorite (so that it is different from the background), we launch the application and hurray - it works!
Add a sphere for the second finger on the form. After we start the project and twist our fingers in all directions. Spheres must follow the movement of the fingers.
Another problem is possible here - the coordinates of the fingers vary from, for example, -100 to 100 very sharply, for a person it is a centimeter, and for the device it is serious. Therefore, in order not to see the spheres flying beyond the horizon, you can move the main camera away to grasp a larger area.
Now add the Rubik's Cube itself (you can also use a regular cube) and try to turn it around.

To do this, we write a simple script.
We agree that moving a cube, you can at least two fingers and go.
We drag a cube onto the form, add a new script to the prefabs in the same place, and enter the name: “enterCube”. Add the Box Collider property and set a tick that our cube is a trigger. Copy the following code:
enterCube.cs
using UnityEngine; using System.Collections; using System.Collections.Generic; public class enterCube : MonoBehaviour { private int CountOfFingerInCube = 0; private List<Collider> ListFinger = new List<Collider>(); void Start () { } void FixedUpdate () { if(CountOfFingerInCube==2) { Vector3 vector = new Vector3(0,0,0); vector.x = (ListFinger[0].transform.position.x + ListFinger[1].transform.position.x)/2; vector.y = (ListFinger[0].transform.position.y + ListFinger[1].transform.position.y)/2; vector.z = (ListFinger[0].transform.position.z + ListFinger[1].transform.position.z)/2; this.transform.position = vector; } } void OnTriggerEnter(Collider other) { CountOfFingerInCube++; ListFinger.Add(other); } void OnTriggerExit(Collider other) { CountOfFingerInCube--; ListFinger.Remove(other); } } Briefly about ListFinger. He keeps in himself all the fingers that entered the trigger, when exiting, he deletes the one that leaves the list.
Check - the cube is really moving. However - not spinning. I think it will not be difficult, using Vector3.Angle, to find the angle of rotation.
Below is the result of the work at the moment (after which the rental time of the device has passed, and it had to be returned):
It can be seen that in the first part of the video, the cube sometimes throws in different directions when both fingers are too close. This is due to the imperfection of the sensors, which sometimes can not distinguish the real coordinates of the fingers.
With the accuracy of determining the coordinates of each finger separately, there are no problems. The device responds by a clear change of coordinates even on a slight movement of the hand, when trying to keep it in one place.
That is, in perspective, with Leap motion, you can create a nice notebook notebook simulator. It is configured with a special pen, which, however, could not be touched, as the setting was carried out long before us.
As soon as the project is completed, a link to its sources will appear here.
Thank.
PS I am also grateful to my friends who participated in this event and helped me master this amazing device!
Source: https://habr.com/ru/post/212069/
All Articles